You can find the code here: https://github.com/Mini256/tidb-snowflake-e-commerce-demo
And visit our live demo here: https://tidb-snowflake-e-commerce-demo.vercel.app

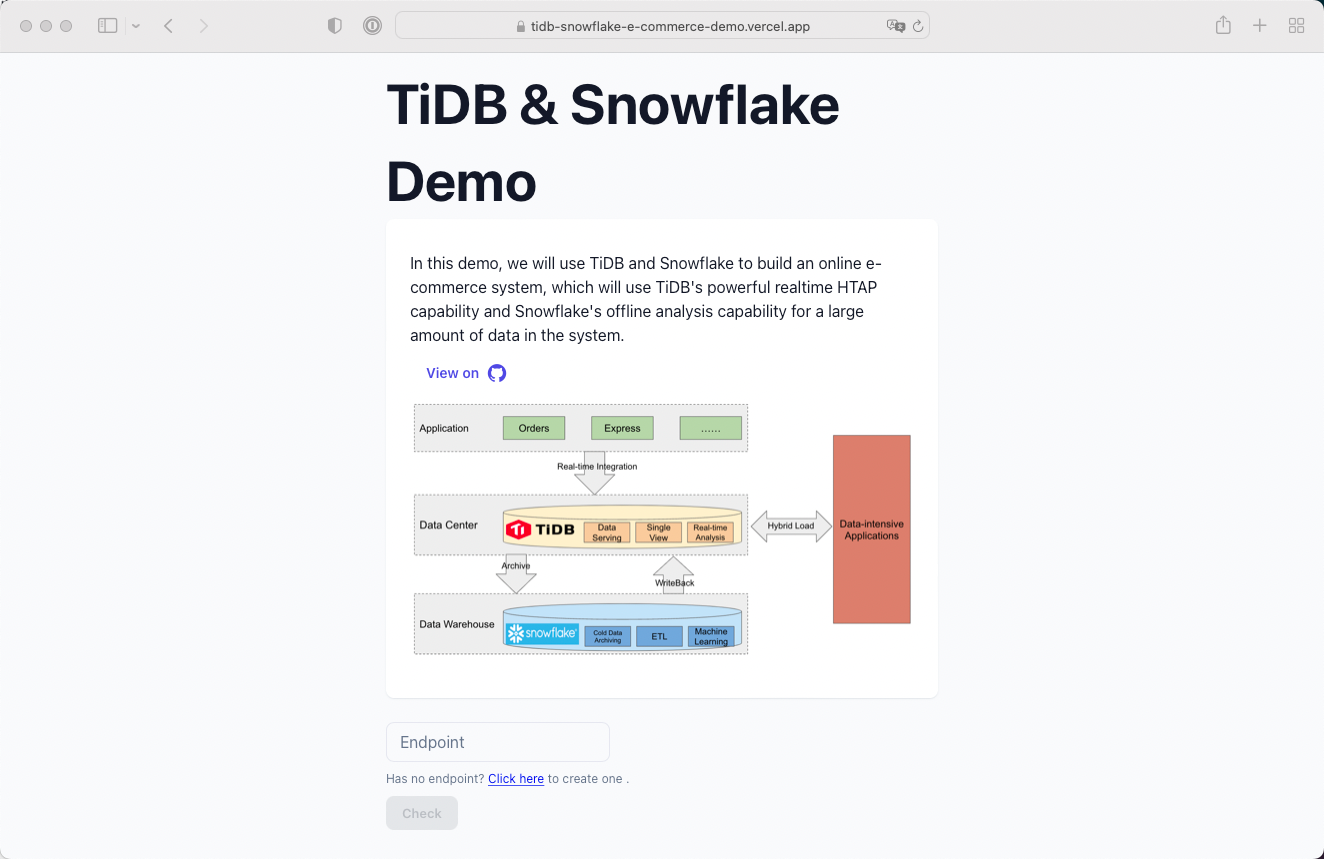
In this demo, we will use TiDB Cloud and Snowflake to build an online e-commerce system, which will use TiDB's powerful realtime HTAP capability and Snowflake's offline analysis capability for a large amount of data in the system. This demo uses TiDB to store business data such as orders, expresses, user data, etc. Use Snowflake as data warehouse to archive cold data and data warehouse modeling. This demo will build a simple real-time dashboard to monitor today's product sales situation, as well as will analyzes users' consumption ability and calculate users' labels according to users' purchasing behavior, and calculate popular items at different grade prices according to item sales, so as to build a simple item recommendation function.
In the traditional e-commerce scenario, especially data reporting part or real-time monitoring part. There was a third part data warehouse used to do pre-aggregation of data and then put it into MySQL to do queries. As the business grows and the report forms become more diversified, the scalability of MySQL becomes a bottleneck. Besides, the complexity of multi-node MySQL's library and table splitting scheme is high, and the operation and maintenance is very difficult.
Compared to MySQL, TiDB has lower latency and better scalability in TP under many scenarios, especially served as the underlying storage for e-commerce big sales promotion.
- TiDB supports high-speed access and provides good batch query capability.
- Row-based storage with index precise positioning providing millisecond response, and HTAP architecture can support future business development.
- TiDB support real-time analysis (such as the day of the data that can not be timely ETLing, like orders and expresses).
Generate business data.
- Order business: Generate orders table data.
- Express business: Generate express table data. The express table and the orders table are stored in different TiDB databases separately. These two tables can be related by order_id.
- Other businesses(Ignore at Demo stage): Use databases (such as MySQL or Oracle), and synchronize data to a unified TiDB cluster in real time through synchronization tools.
Collect business data and provide data services.
- Collect business data through data integration tools such as DM and Flink CDC and write to the unified TiDB cluster.
- Data service: Query user tags and recommend hot-selling products to users.
- Generate user tags based on user purchase behavior: whether high-net-worth customers or not.
- Generate two batches of weekly hot-selling products according to the sales data: hot-selling products with high unit price and hot-selling products with low unit price.
- Recommend high-net-worth hot-selling products to high-net-worth users, and low-unit-price hot-selling products to low-net-worth users.
- Unified view: Users can query their own orders and the express information associated with the orders in real time.
- Real-time analysis: Data analysts analyze the real-time transaction data of the day.
- The total amount, and number of transactions on the day.
- Group by commodity type to display the total amount, and number of transactions.
Use Snowflake to complete data warehouse modeling and cold data archiving.
- Cold data archiving: Store TiDB orders and express yesterday's data in Snowflake.
- Data warehouse modeling: Calculate the monthly bill data of each user, and get the monthly summary expenditure data.
- Machine Learning (Ignore at Demo stage): Mining transaction data through machine learning.
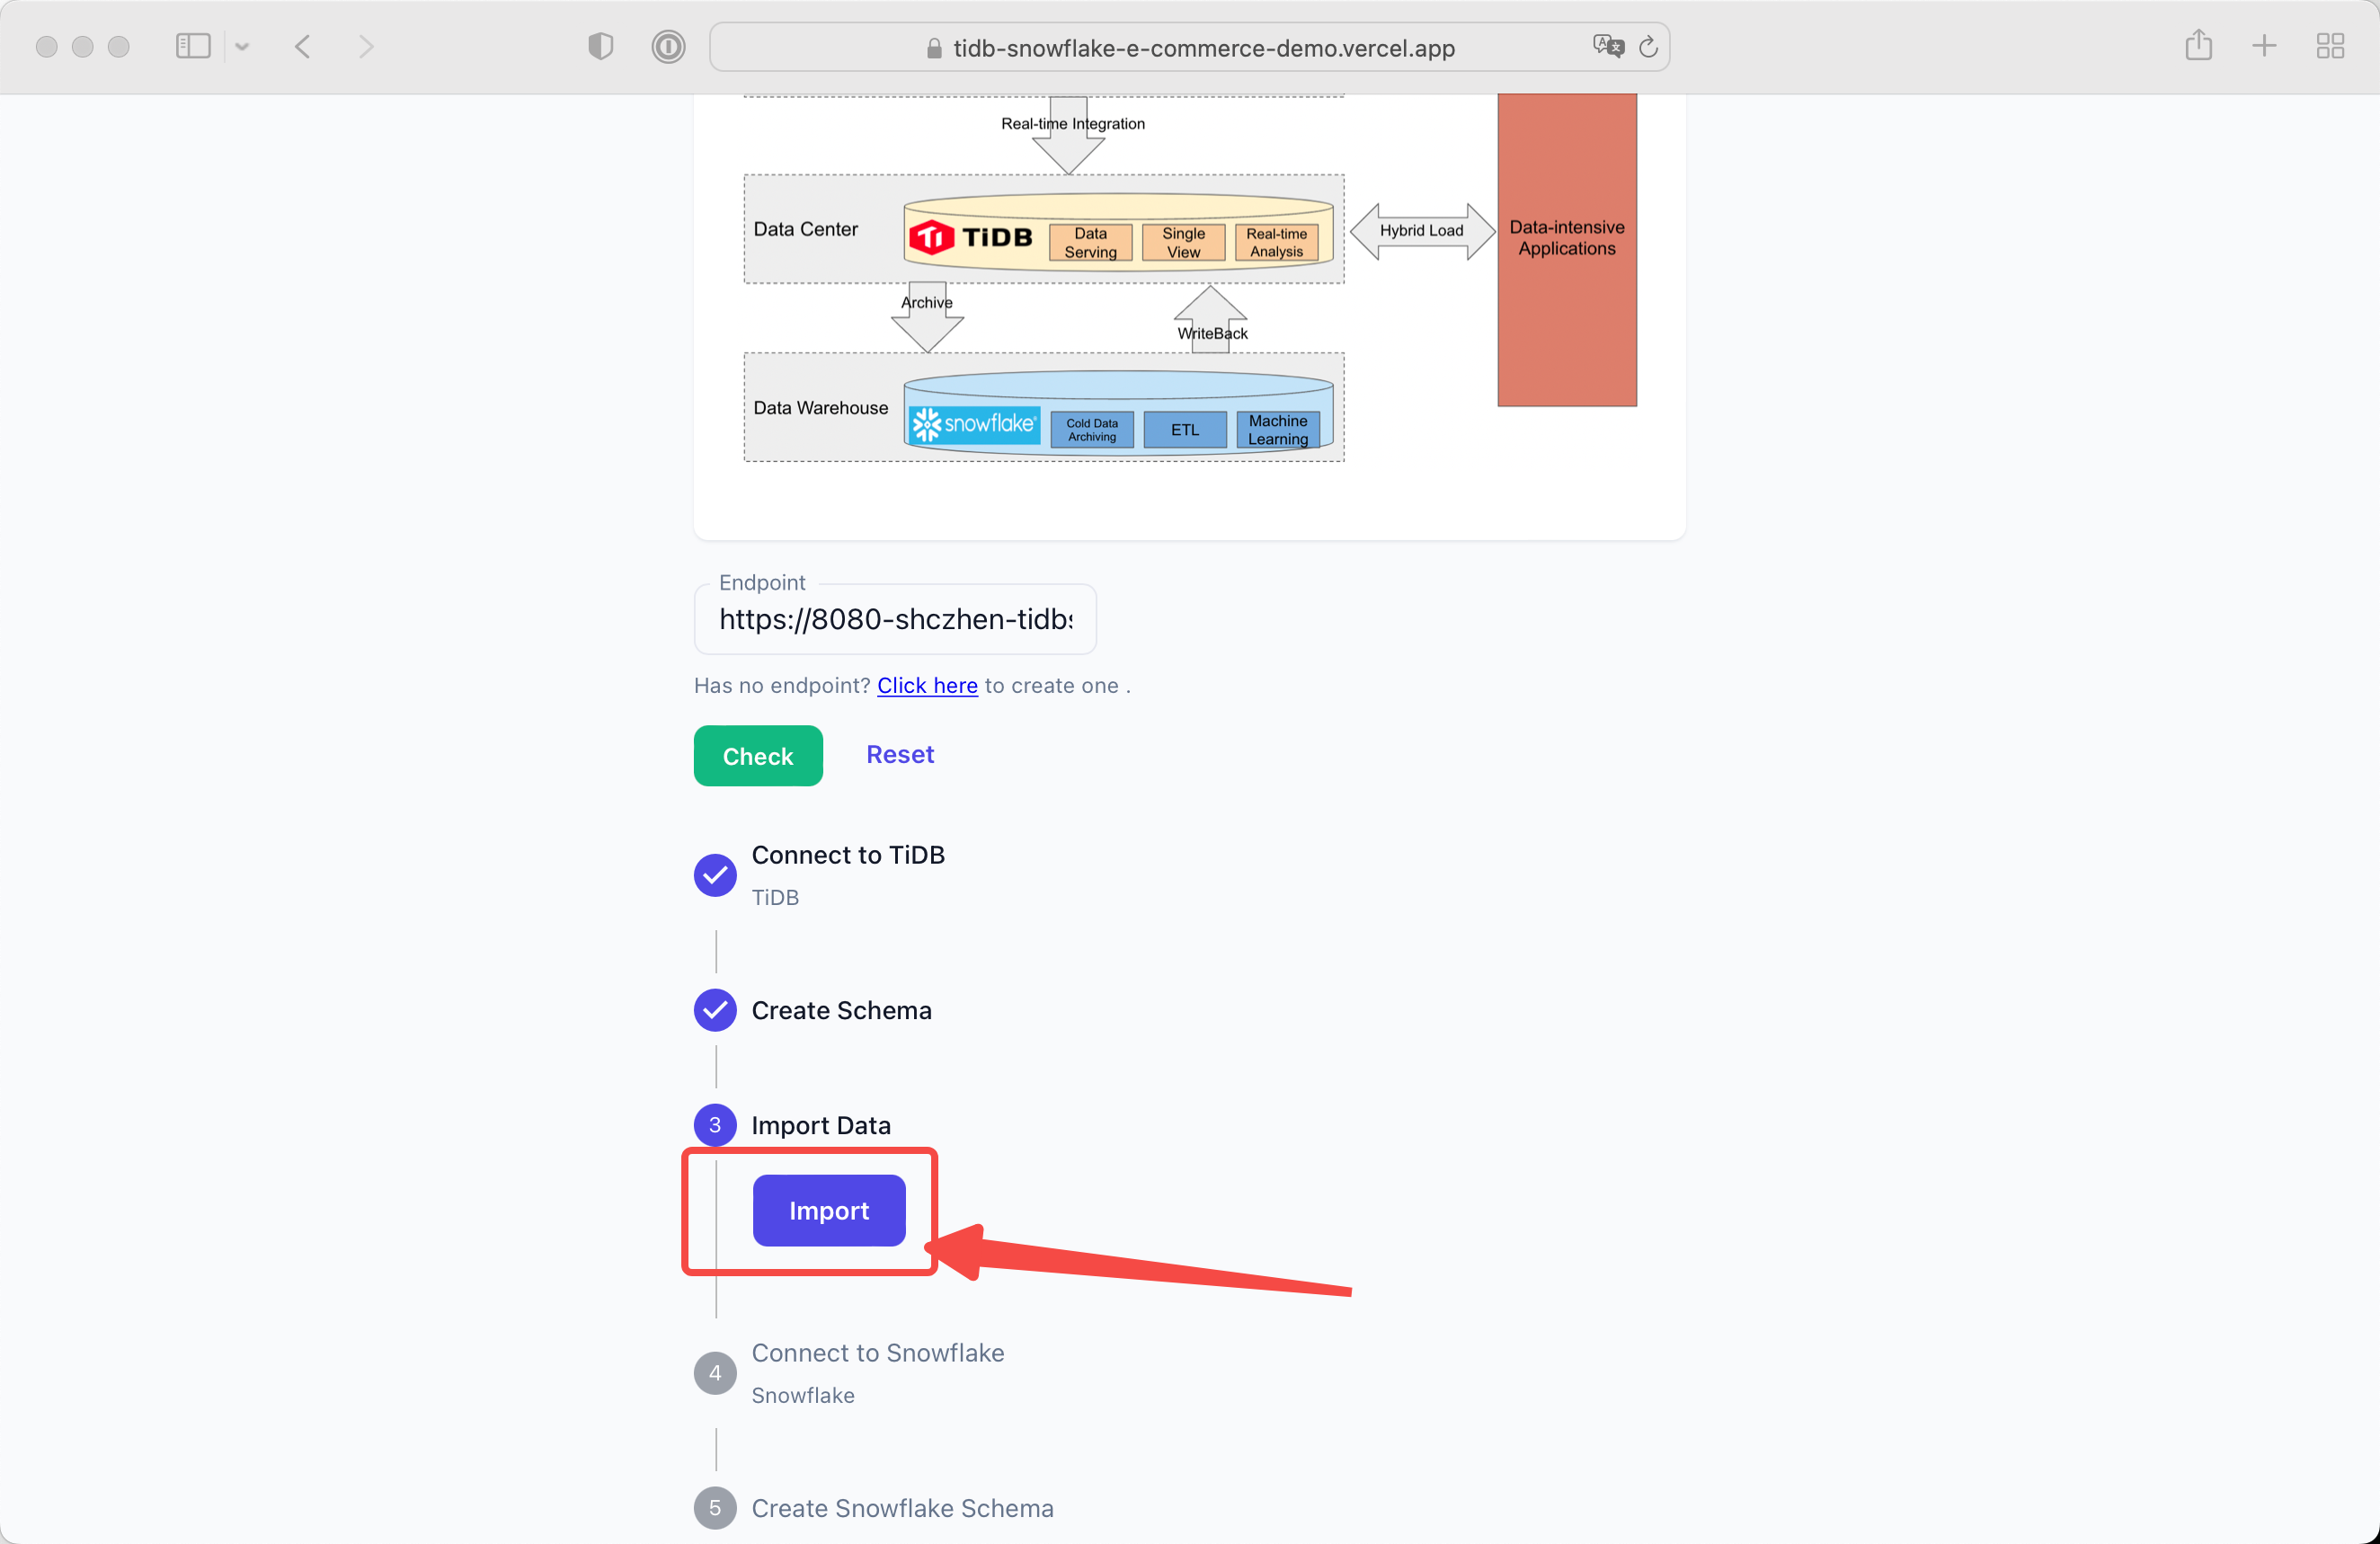
This is the first page of live demo:
As you can see, we need a custom backend endpoint to support this demo.
We recommend user create a gitpod workspace as the backend, by clicking the link in helper text on the first page.
The backend need TiDB and Snowflake connection, you can use your existing instance to try this demo.
If you have no TiDB or Snowflake instances, don't worry.
In this scenario, user could create a trial account of TiDB Cloud, Snowflake and ETLeap(for data pipeline from TiDB to Snowflake).
You can click the Gitpod button on Github repo, or click the URL in live demo page.
Then authorize the Gitpod, a new workspace will run automatically.
We define scripts in gitpod.yml so that all works will automatically run.
The backend server will serve port 8080 if run successfully. But in Gitpod workspace, the port need to be forwarded. You can get the public 8080 port URL like the picture below.
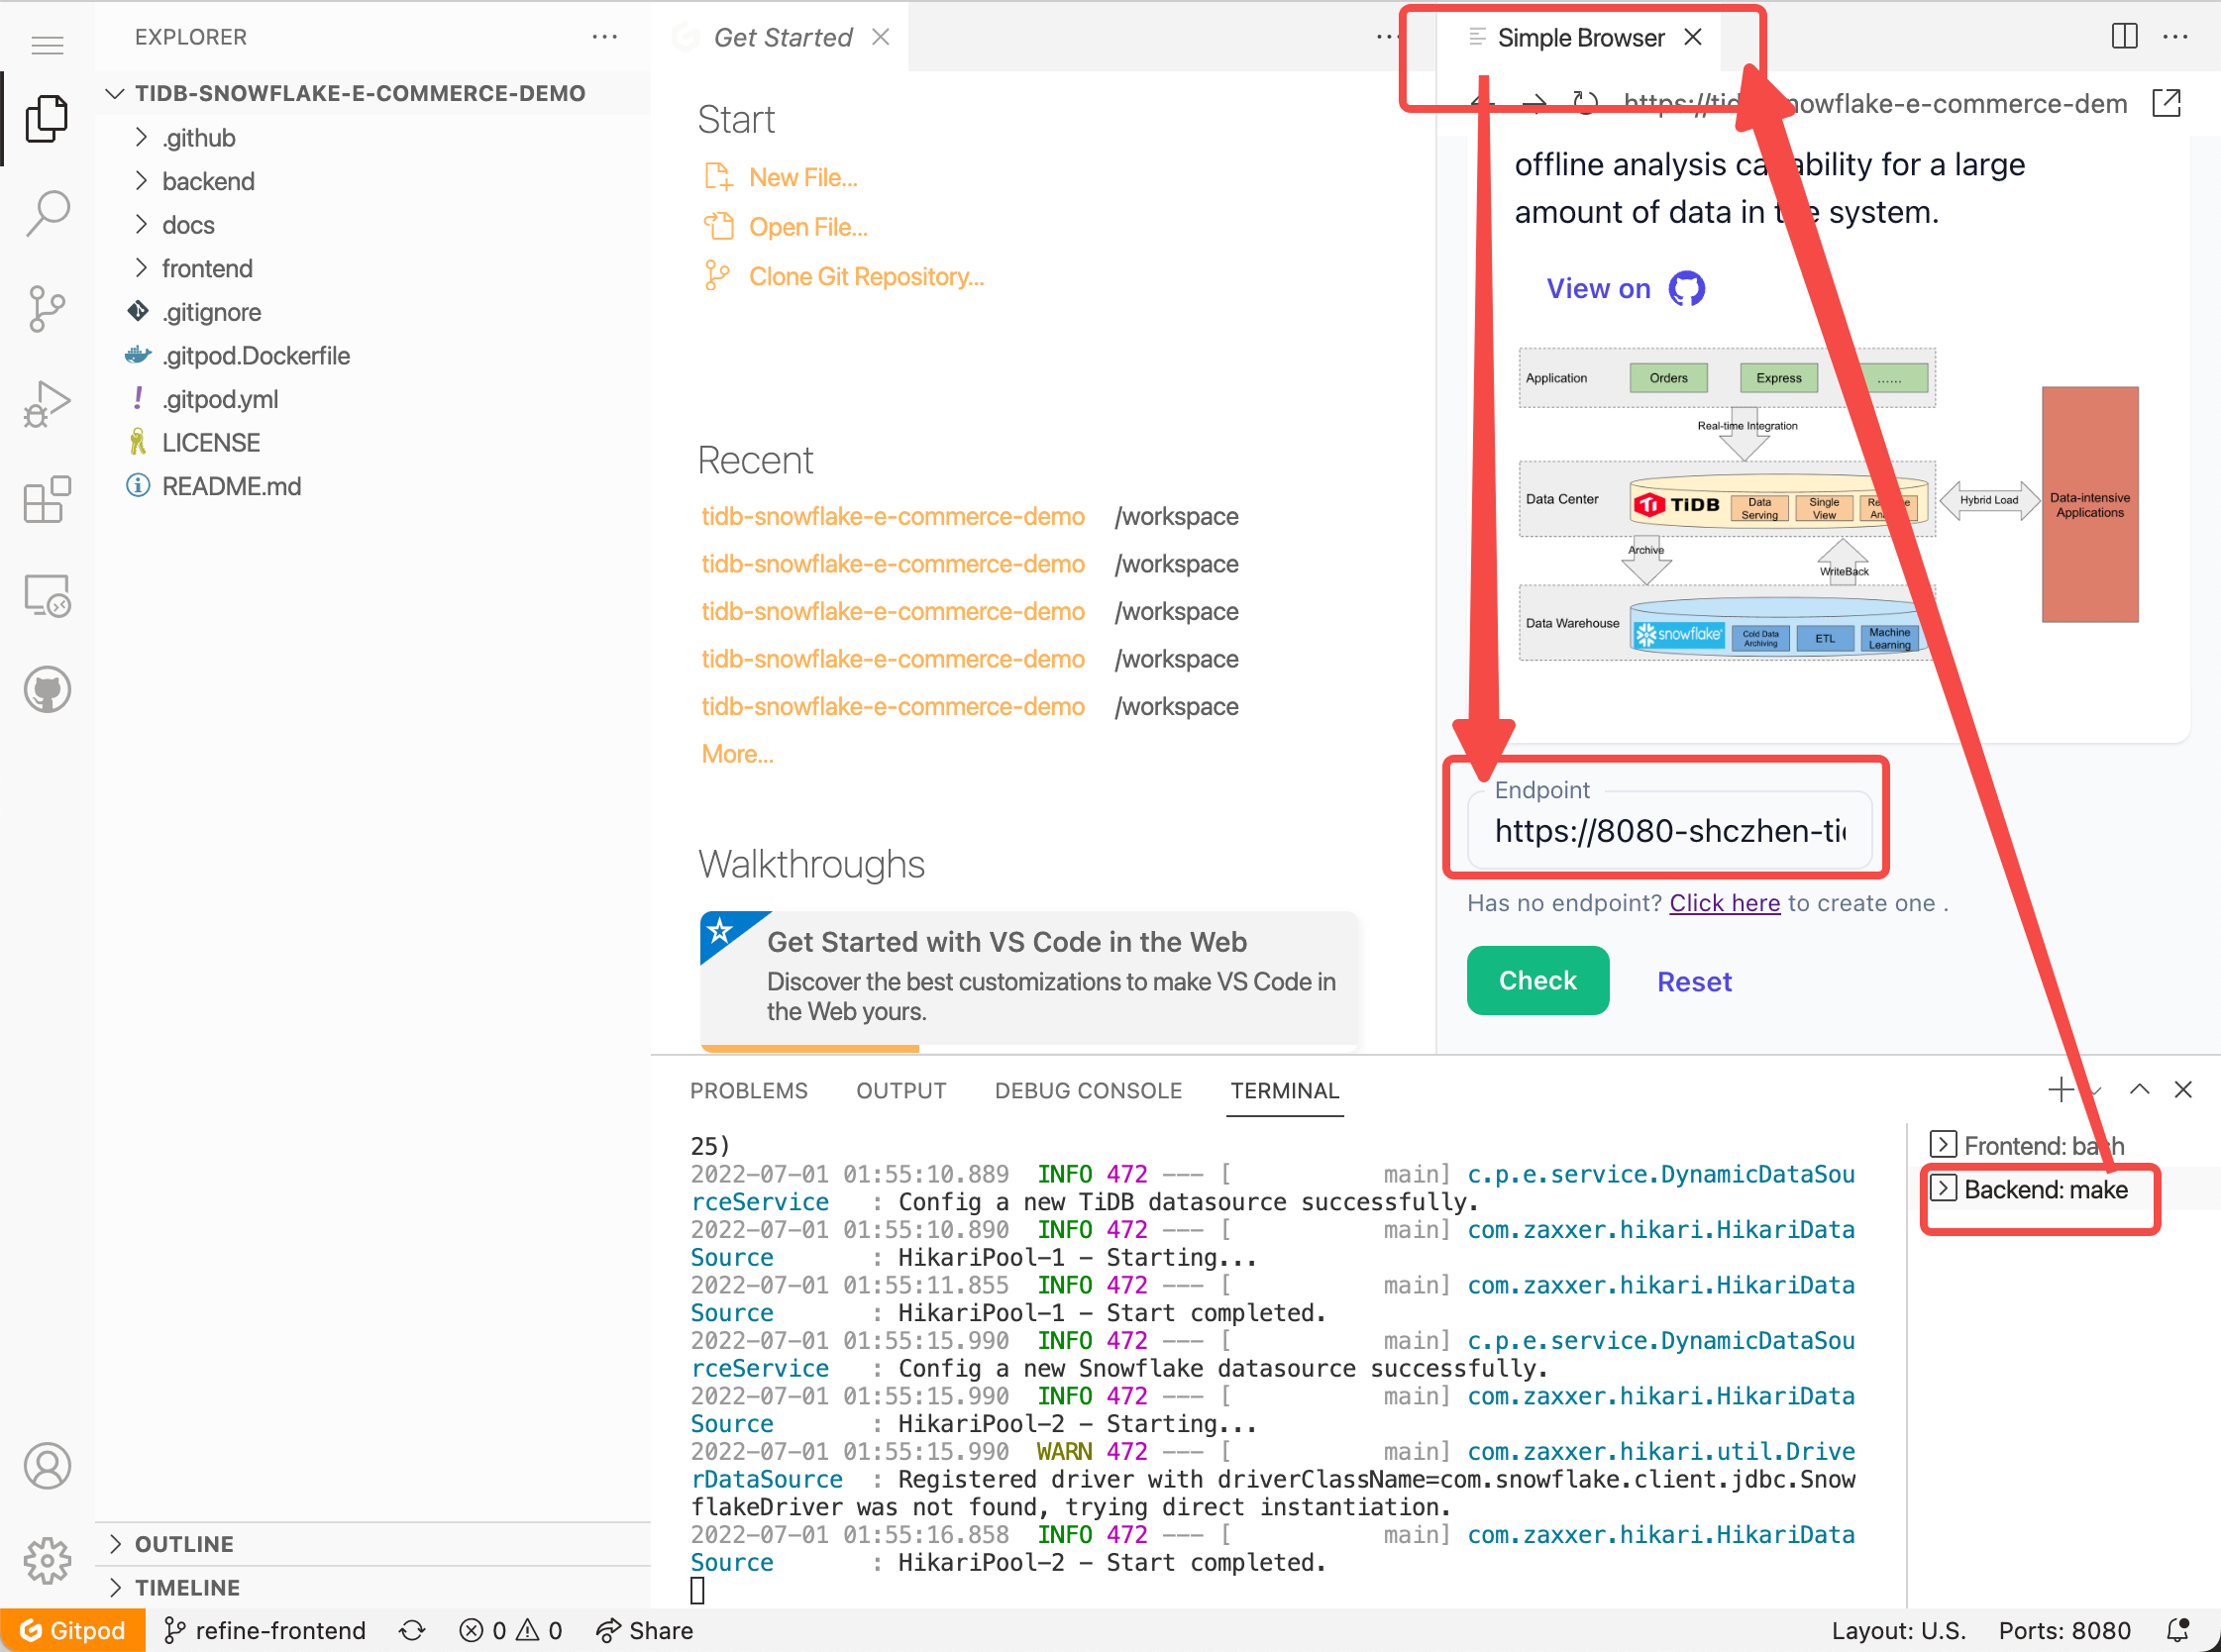
Gitpod workspace will open a preview tab of live demo after port 8080 is ready. We recommend here to copy the URL or Endpoint, paste on our live demo website using your own browser.
Gitpod Preview browser tab has many limitations, so that we recommend using your own browser tab intstead of Gitpod Preview tab.
Visit our live demo here: https://tidb-snowflake-e-commerce-demo.vercel.app
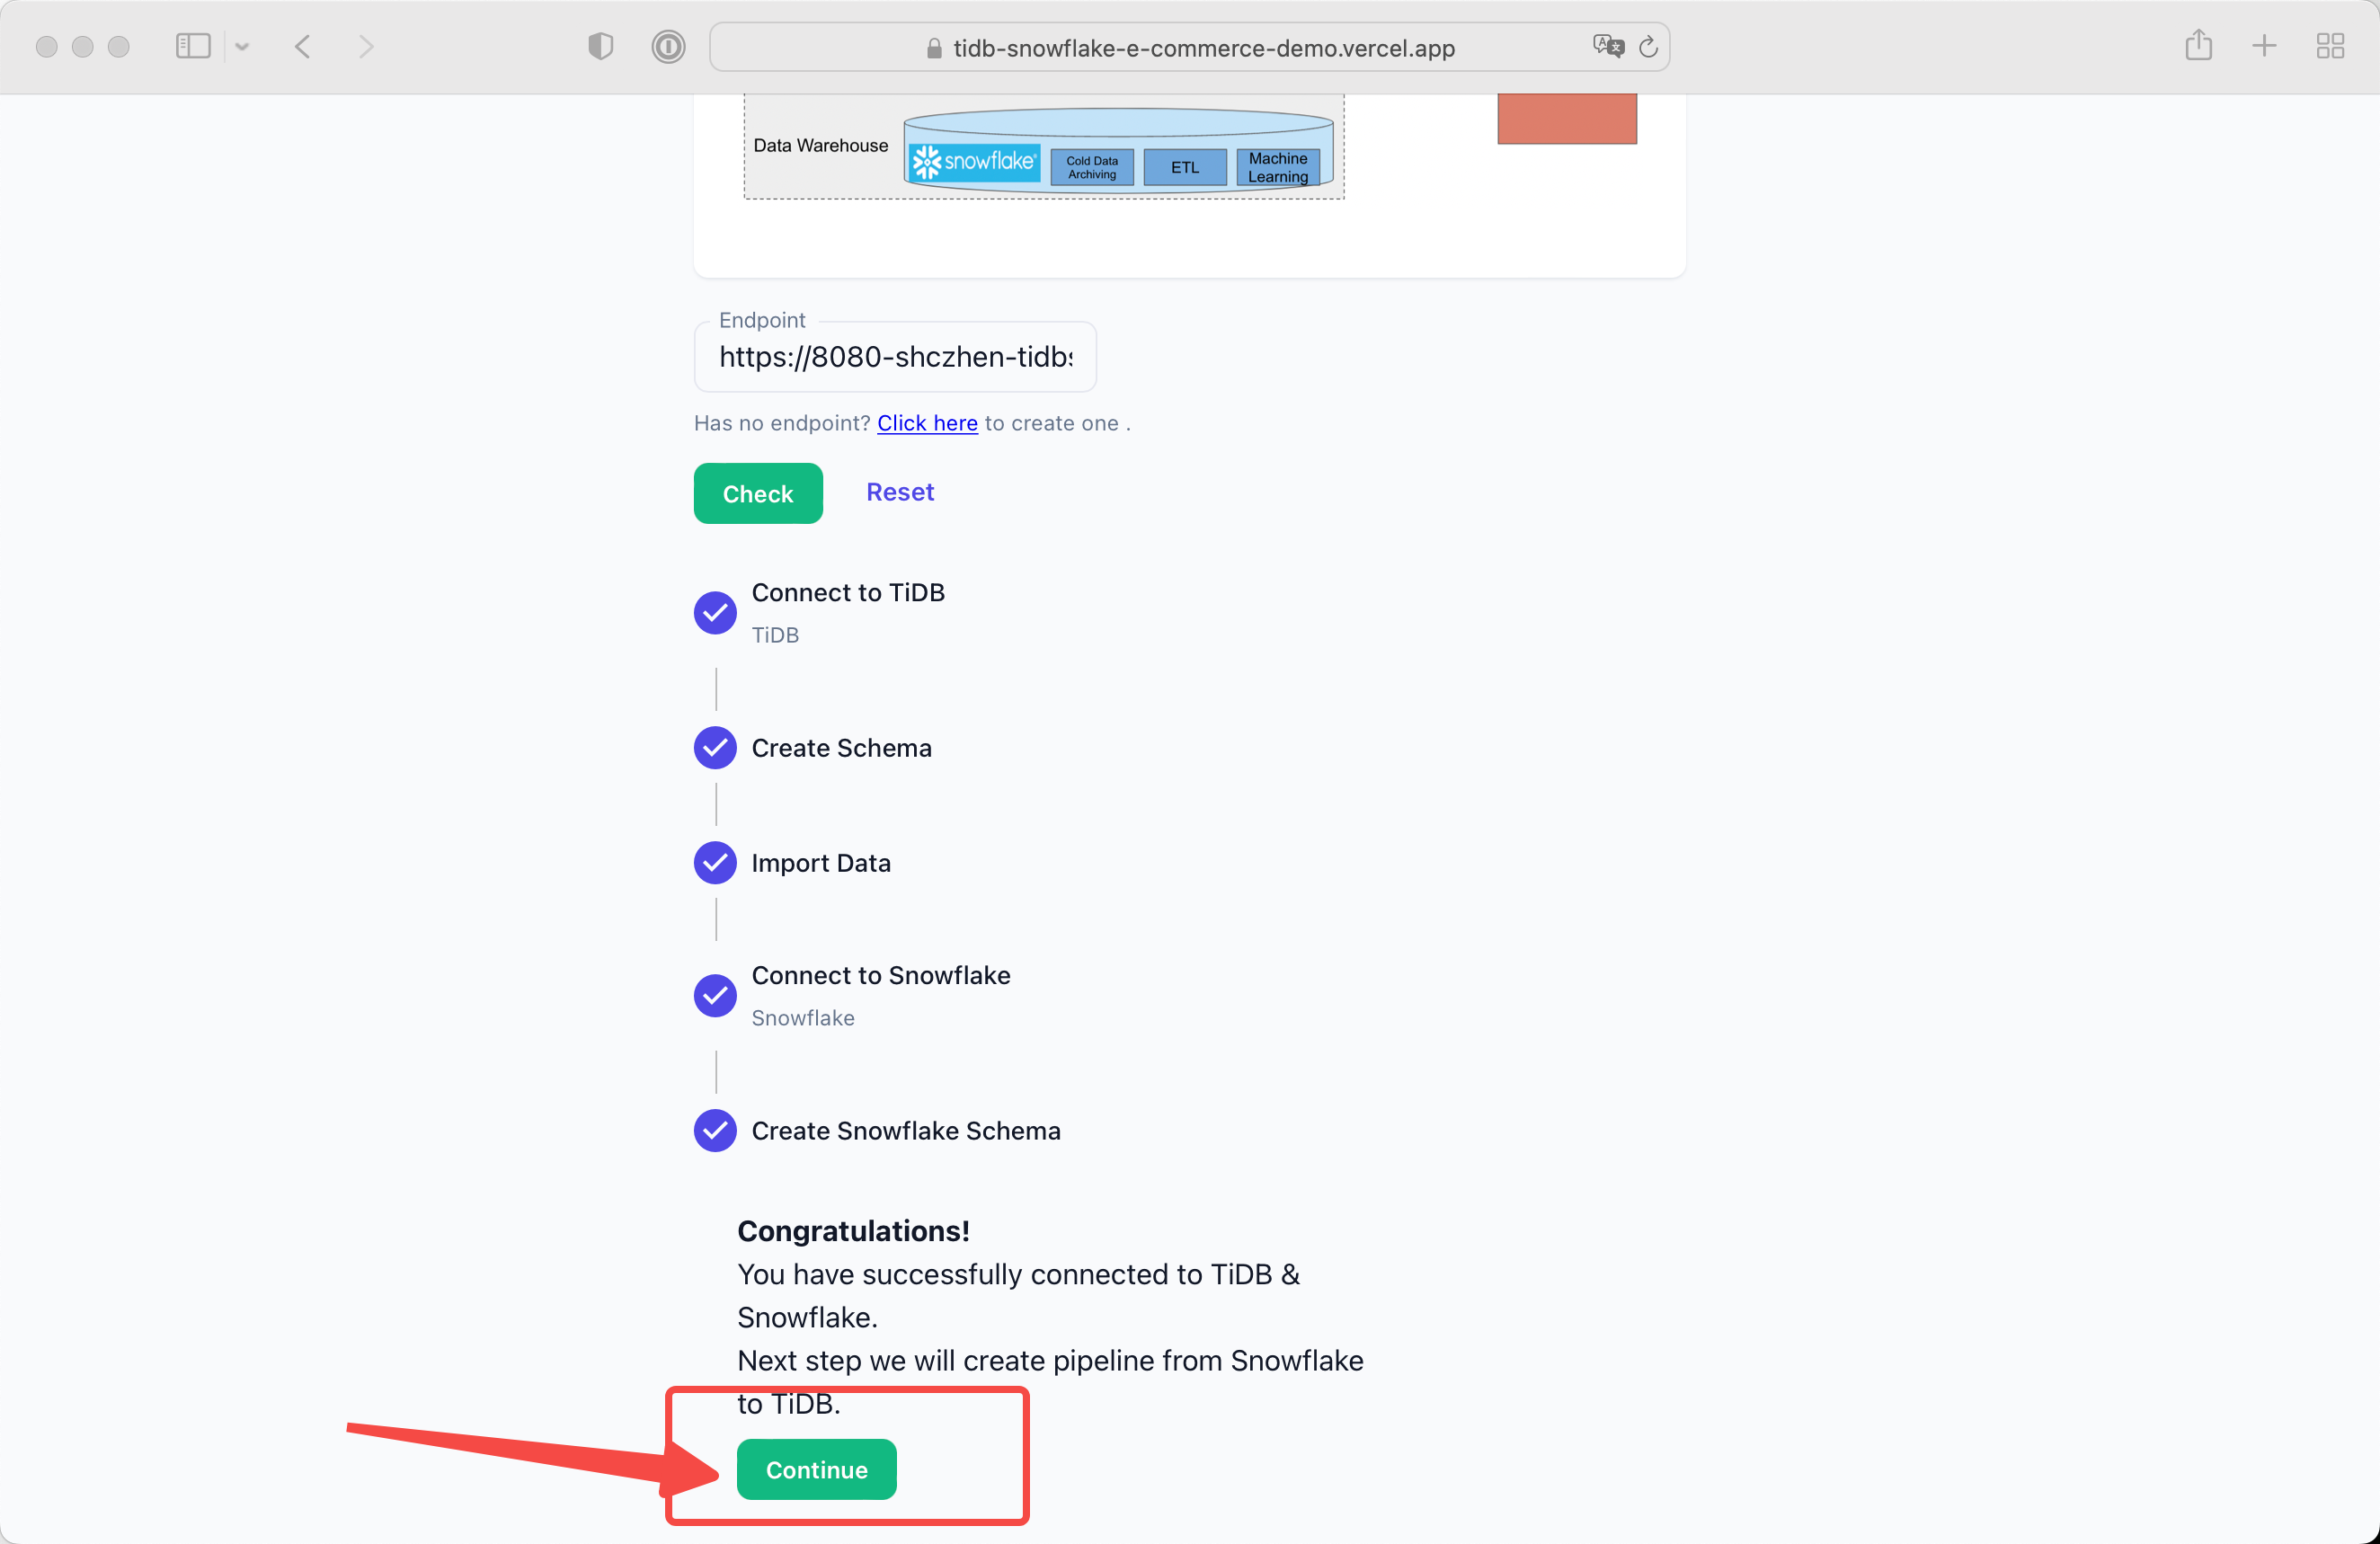
Paste and check the endpoint URL you get from previous step.
You will see the Config Stepper if the backend is not fully ready.
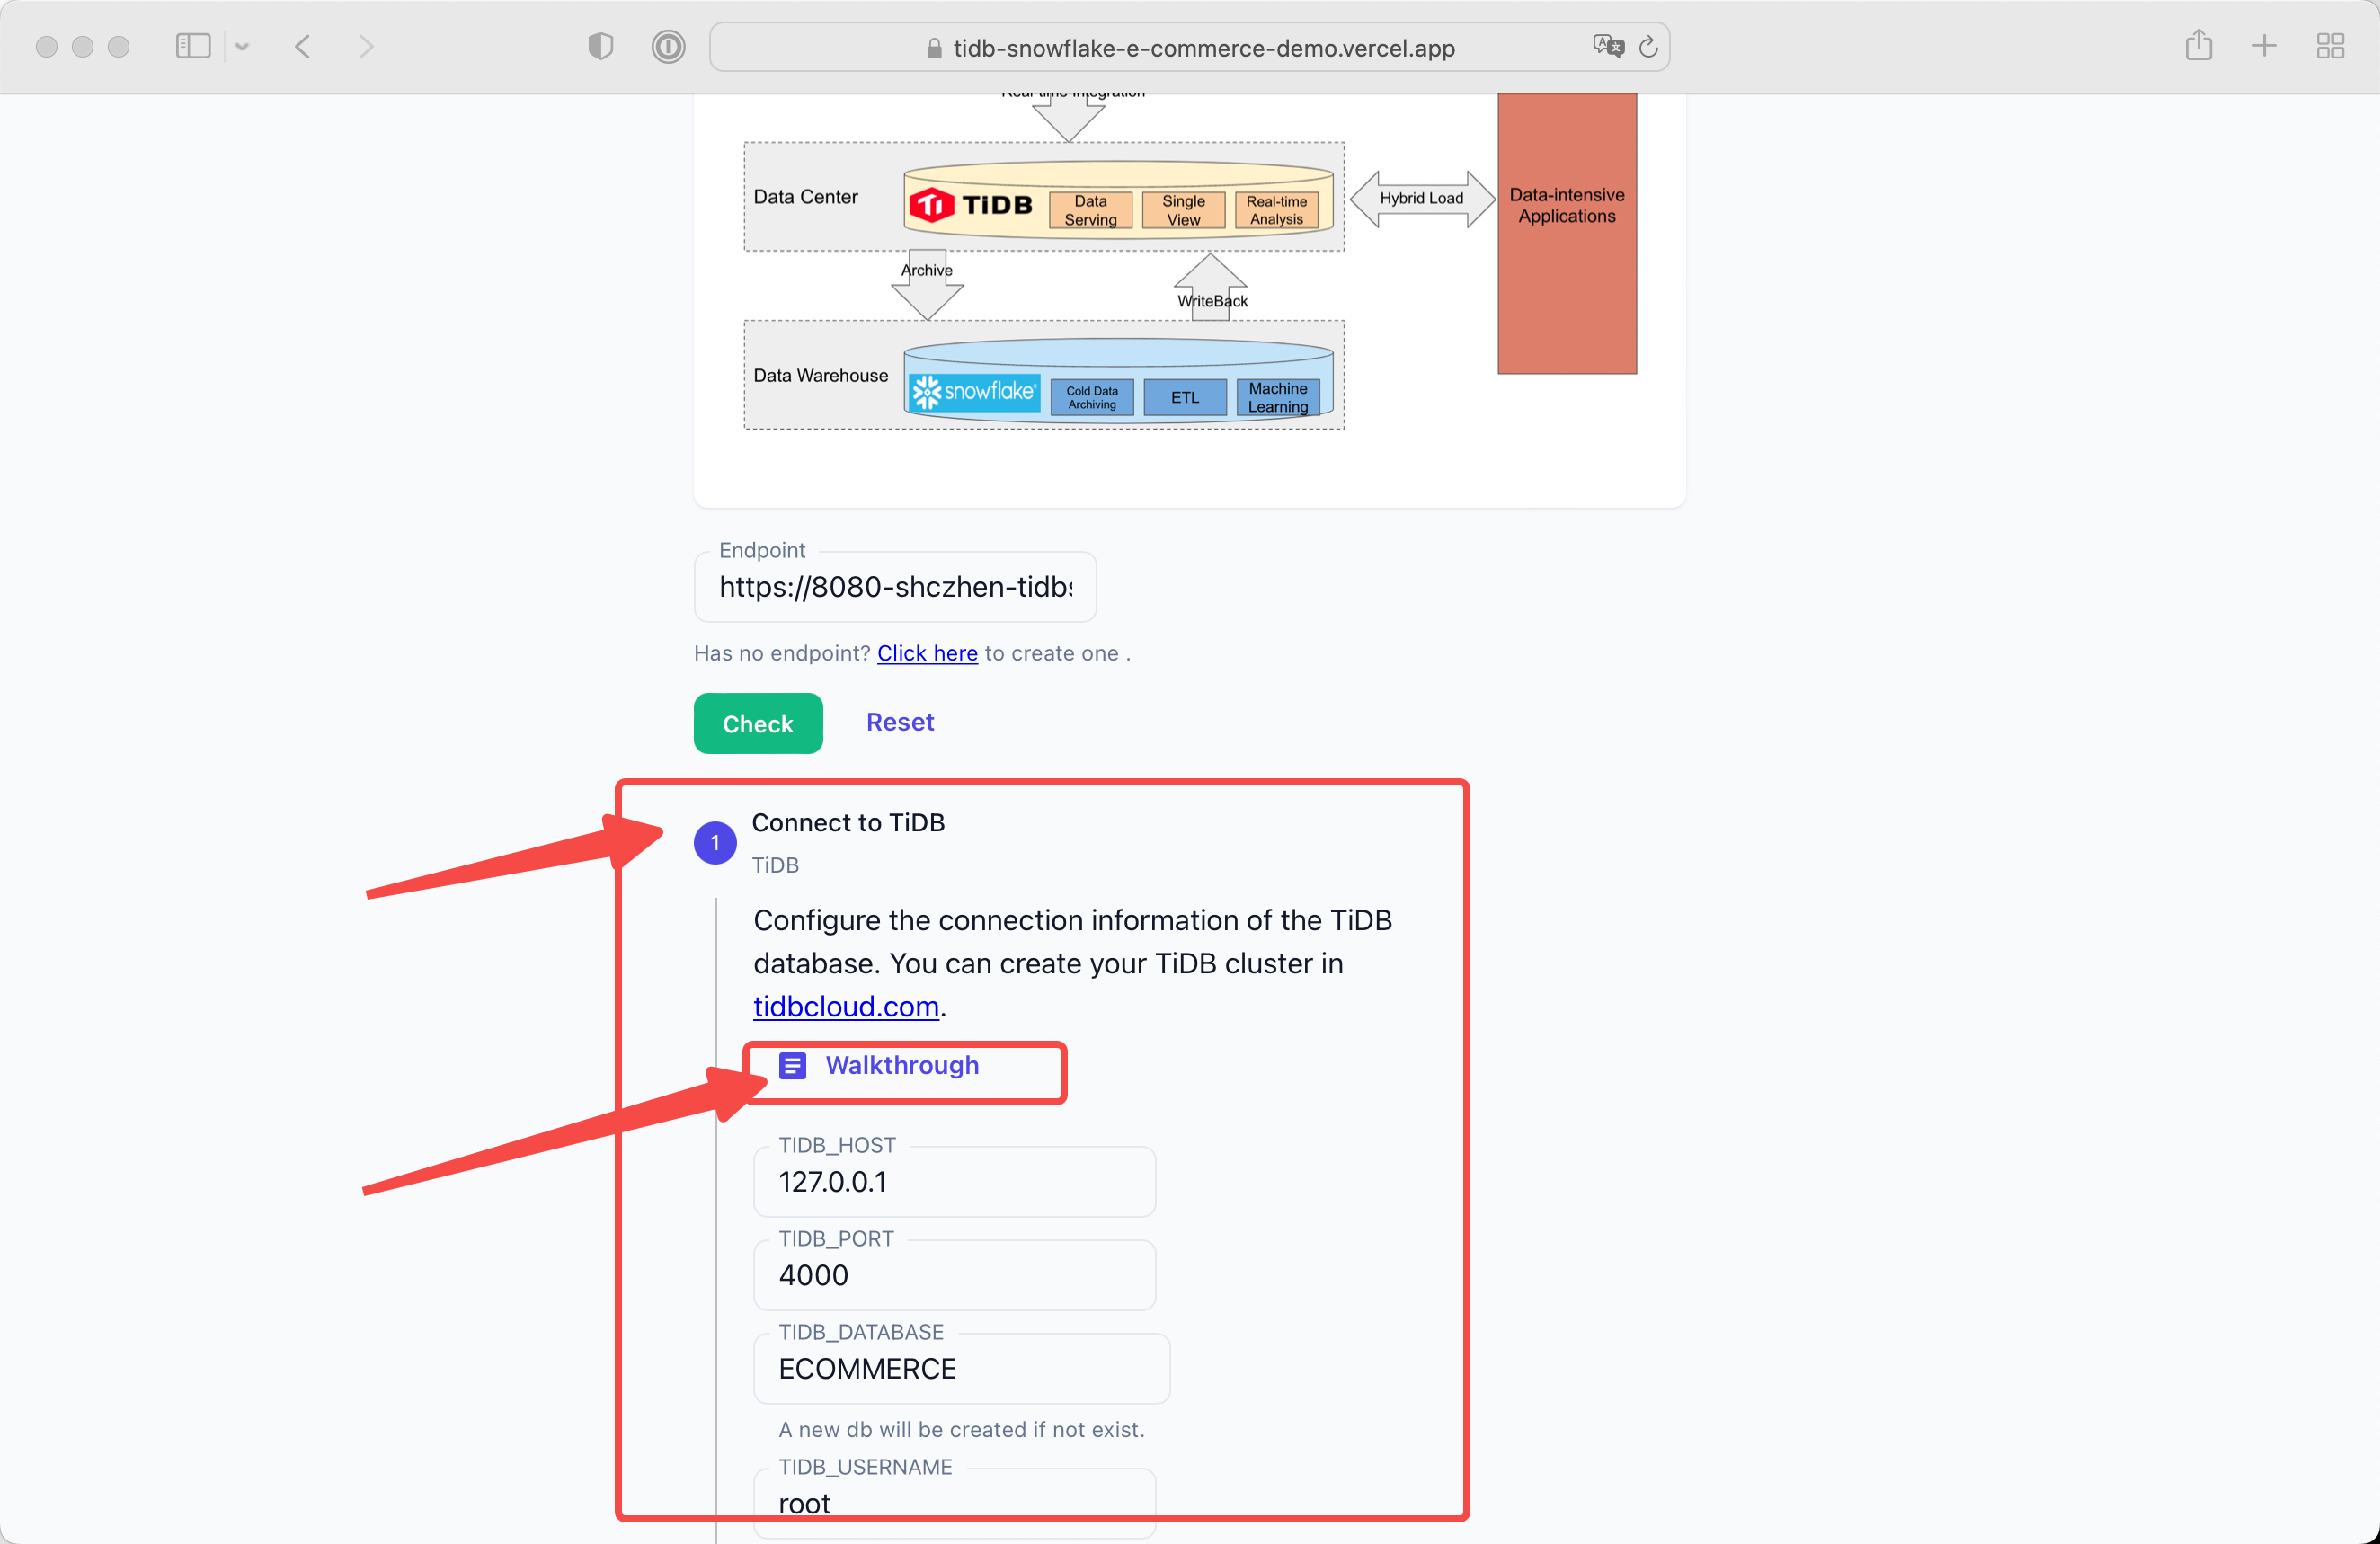
Click the Walkthrough button and you will get a guidance for creating TiDB Cloud.
We recommend TiDB Cloud here instead of a self-host TiDB instance.
-
If you do not have a TiDB Cloud account, click TiDB Cloud to sign up for an account.
-
Sign in with your TiDB Cloud account.
-
To create a Developer Tier cluster for one year free, you can either select the Developer Tier plan on the plan page or click Create a Cluster (Dev Tier).
-
On the Create a Cluster (Dev Tier) page, set up your cluster name, password, cloud provider (for now, only AWS is available for Developer Tier), and region (a nearby region is recommended). Then click Create to create your cluster.
-
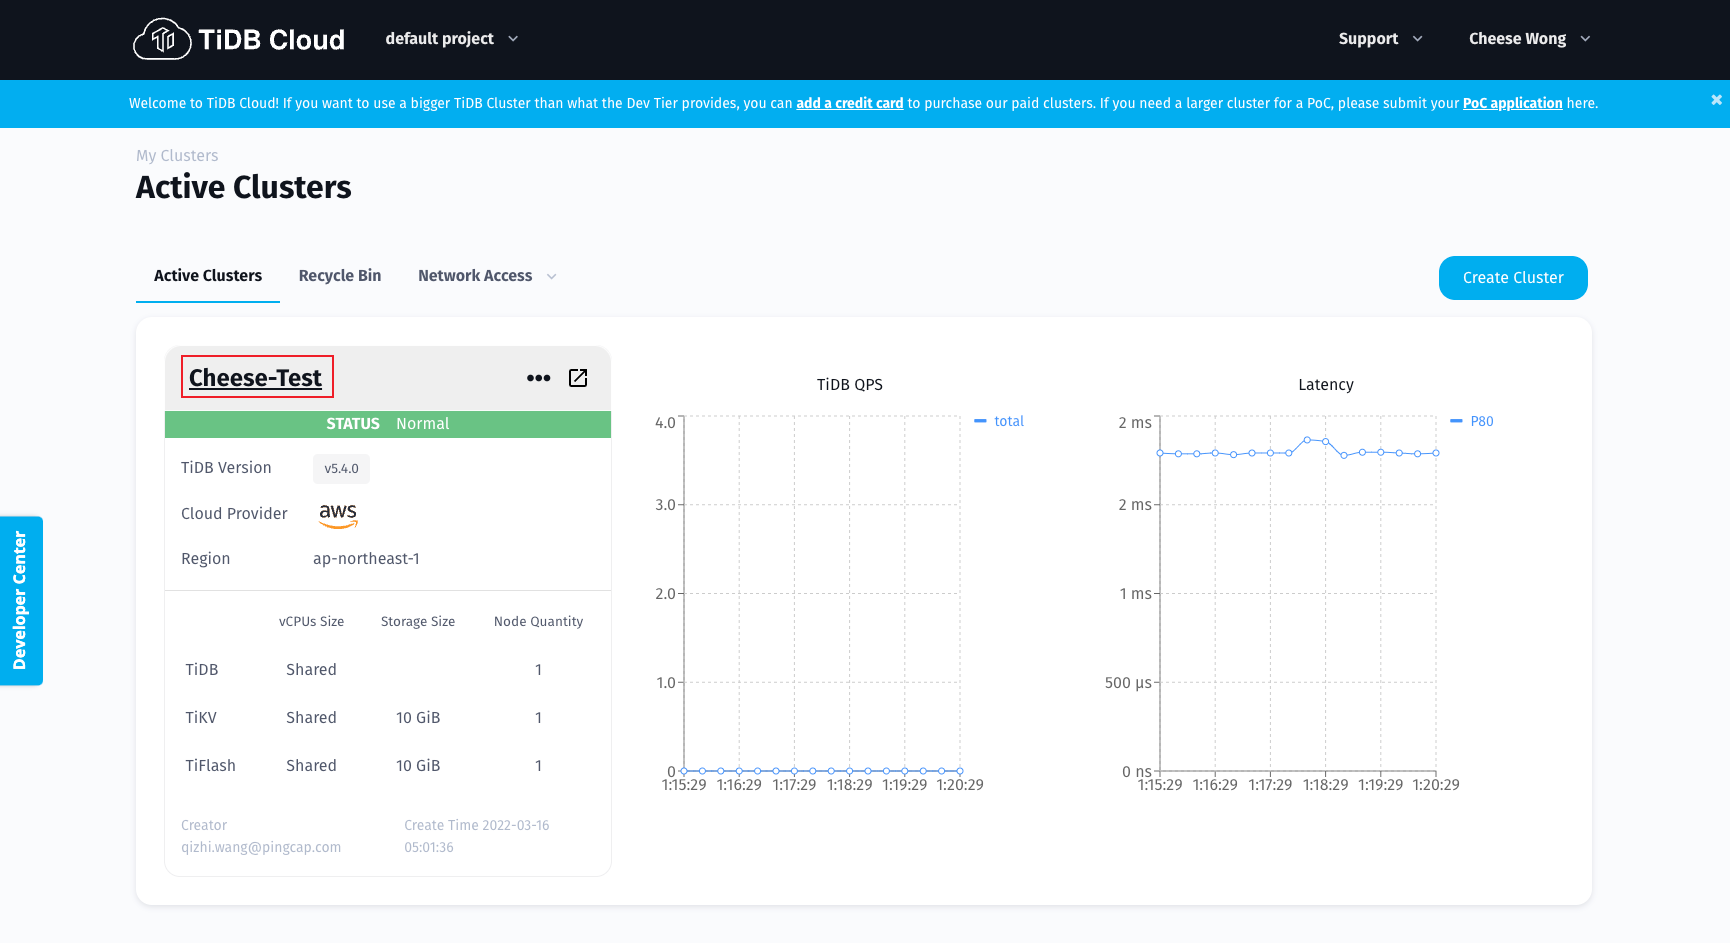
Your TiDB Cloud cluster will be created in approximately 5 to 15 minutes. You can check the creation progress at Active Clusters.
-
After creating a cluster, on the Active Clusters page, click the name of your newly created cluster to navigate to the cluster control panel.
-
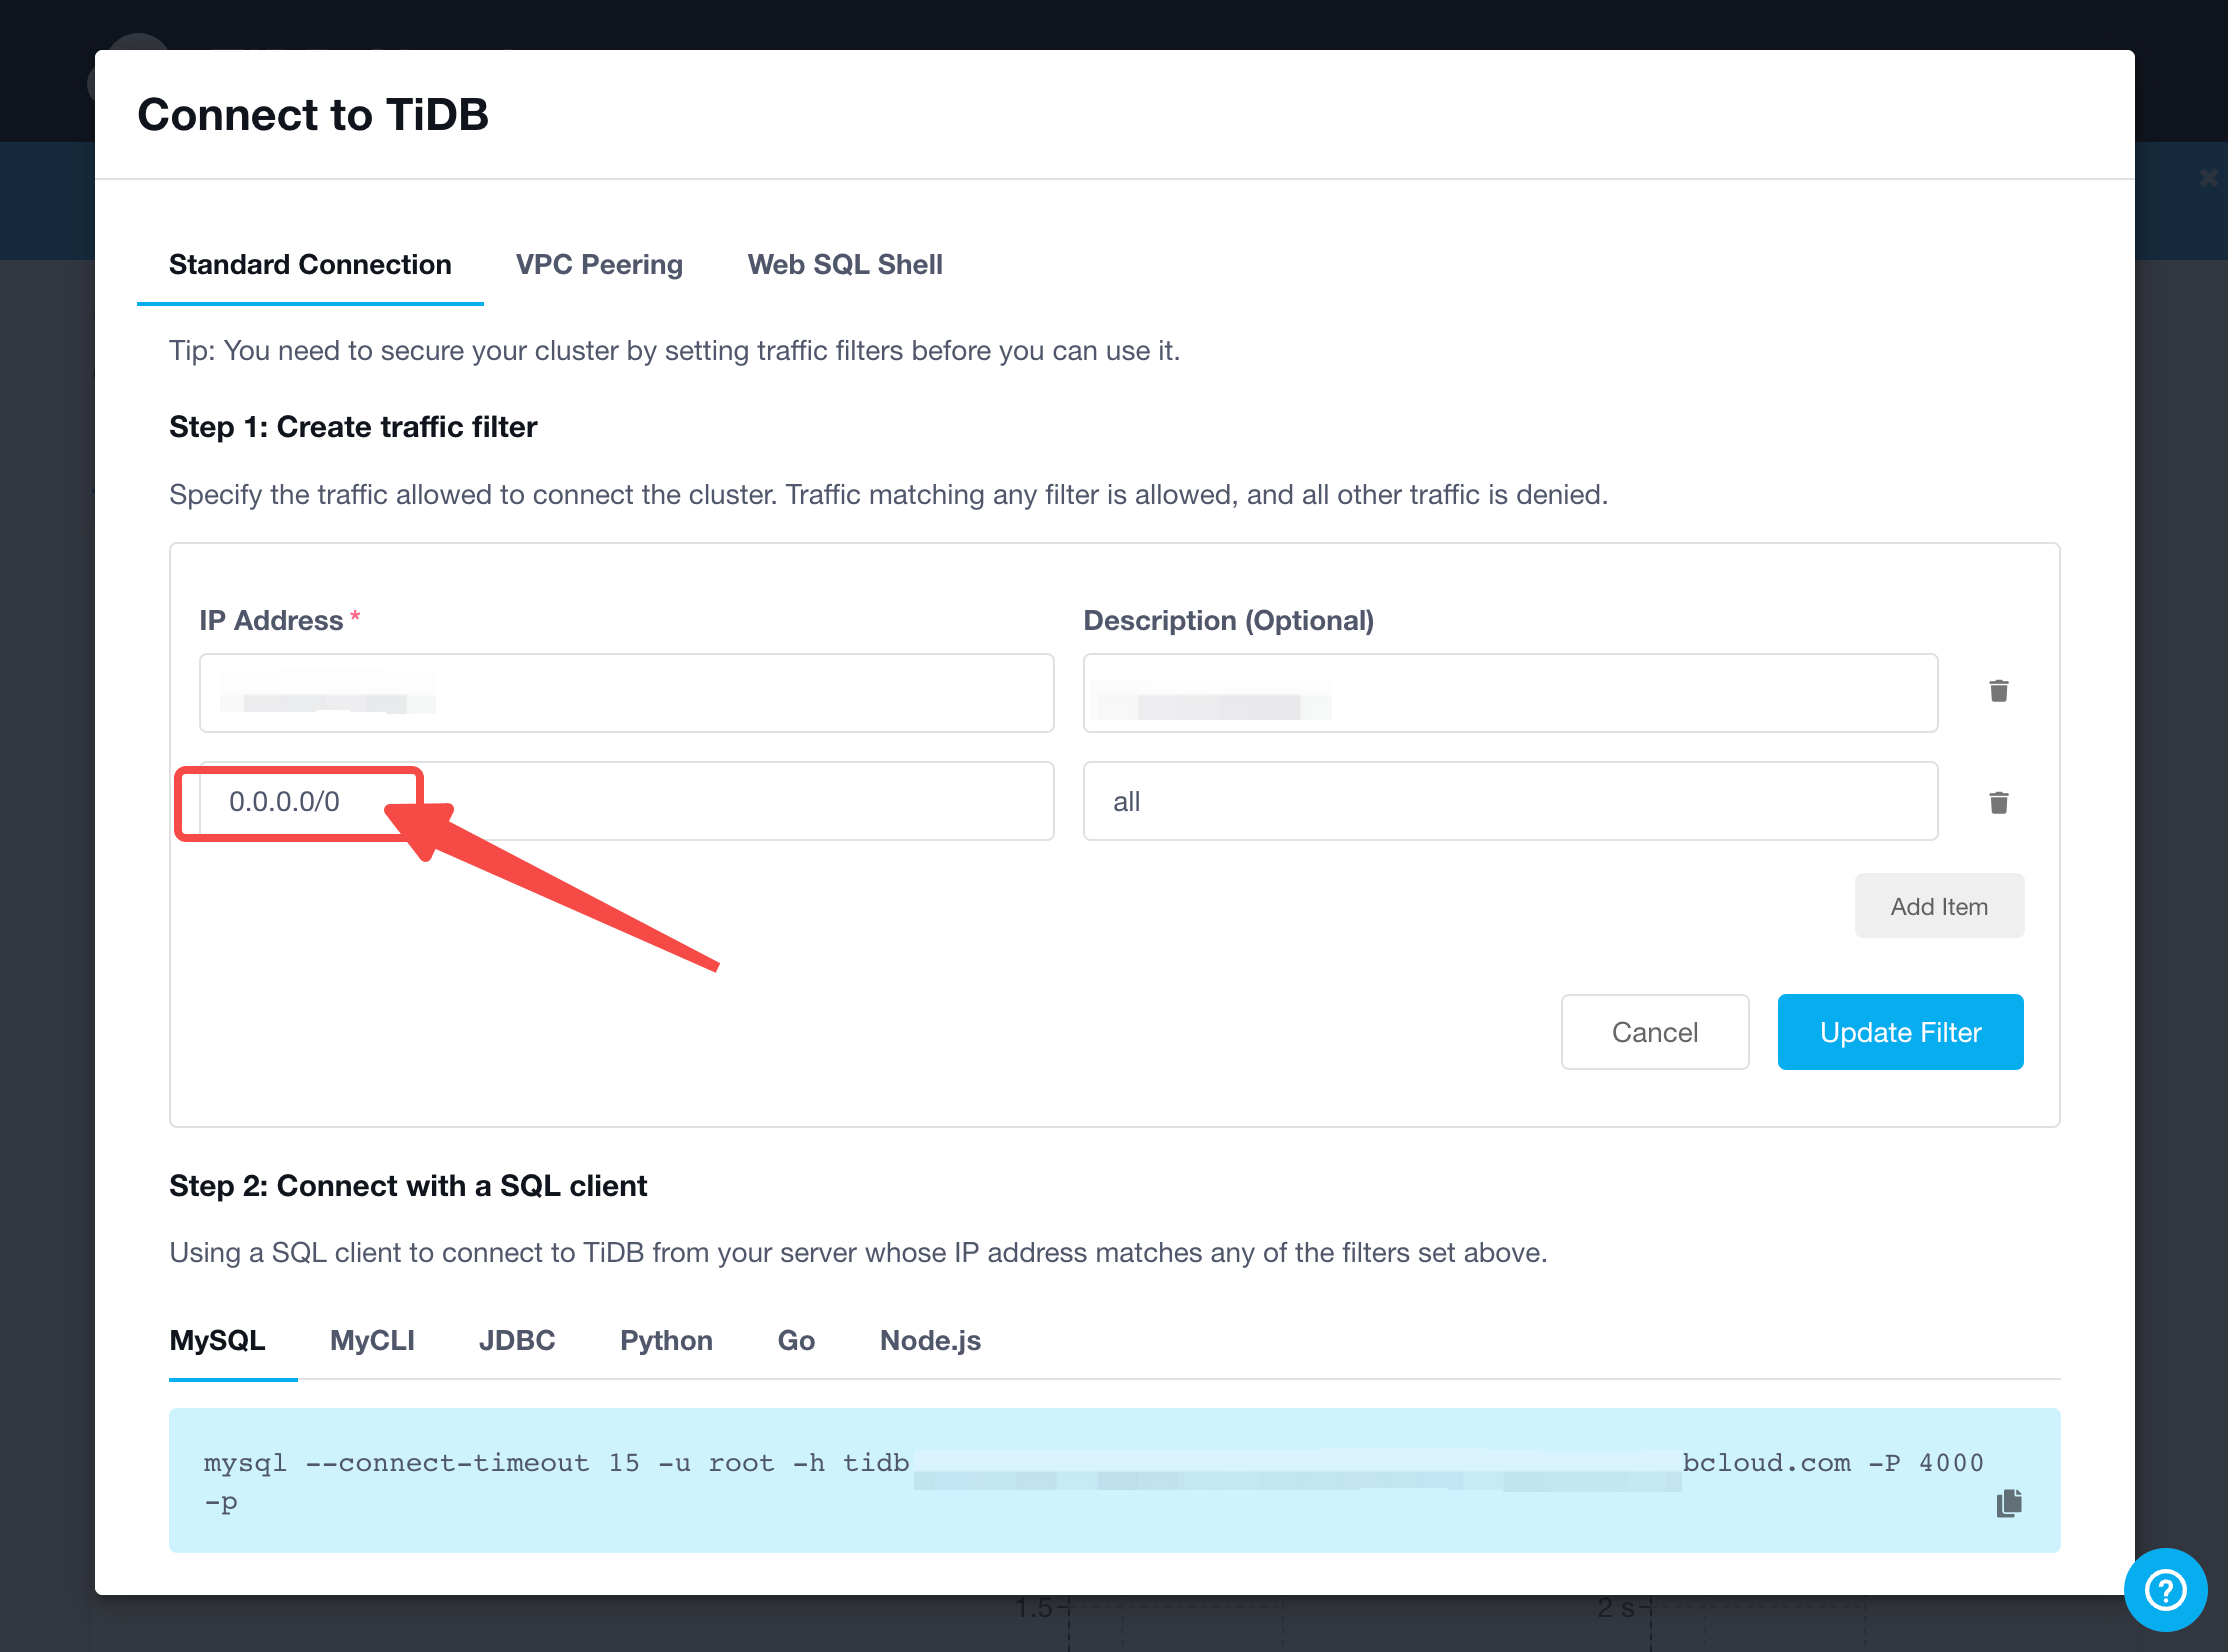
Click Connect to create a traffic filter (a list of client IPs allowed for TiDB connection).
-
In the popup window, click Add Your Current IP Address to fill in your current IP address, and then click Create Filter to create a traffic filter.
-
Copy the string to connect with a SQL client for later use.

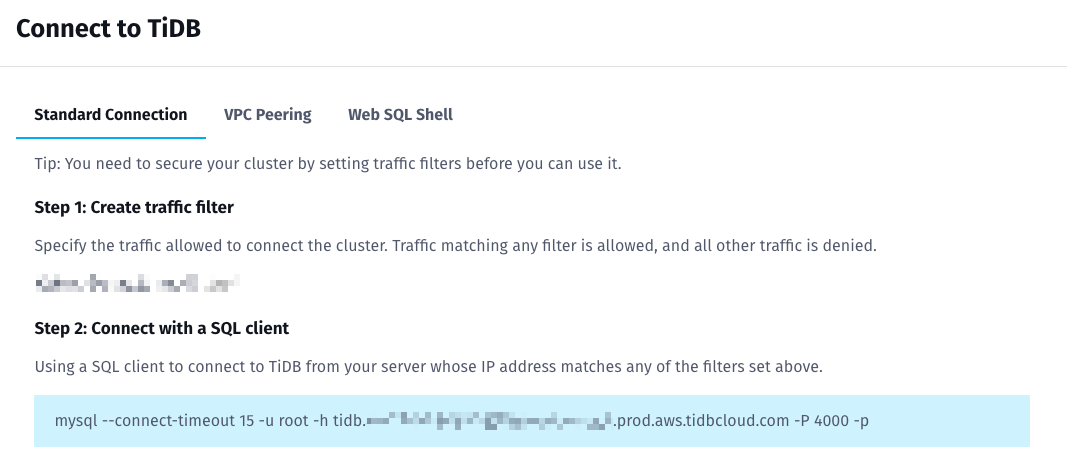
Tip: For Gitpod Workspace usage, we can set an Allow All traffic filter here by setting an IP address
0.0.0.0/0.
Configure the TiDB Cloud Host Address and password.
In this demo we will create a database ECOMMERCE.
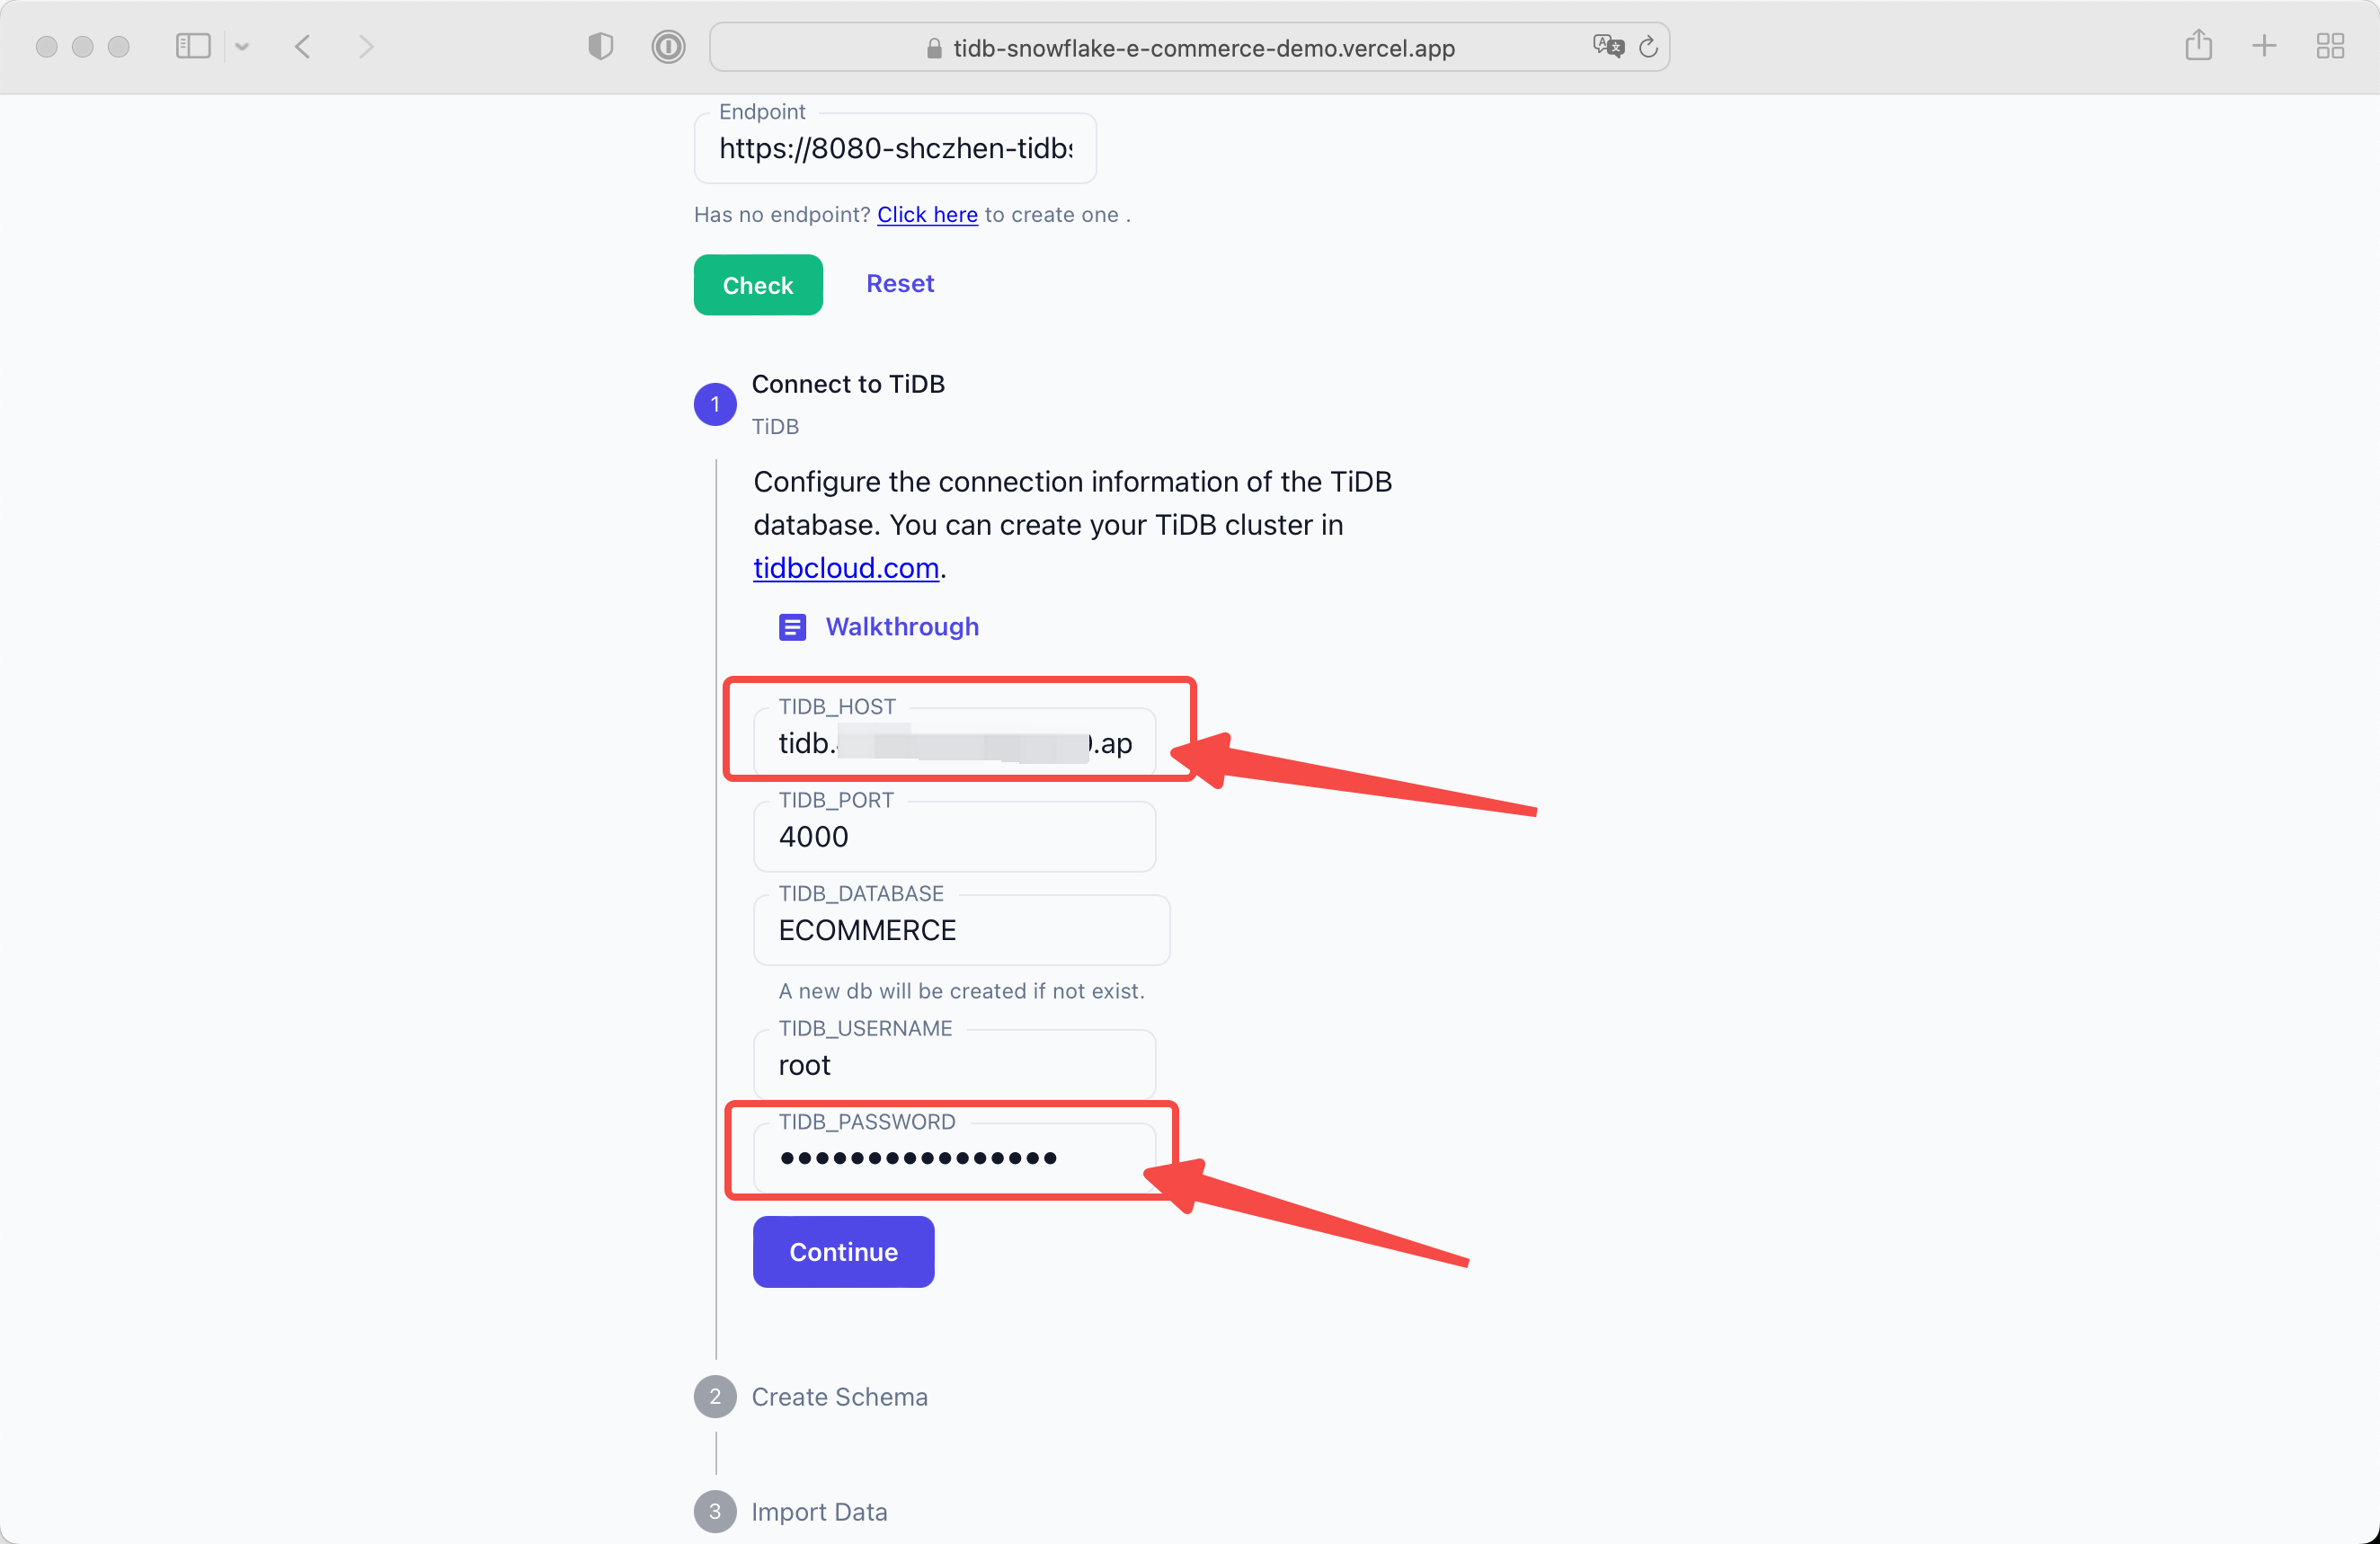
Click Continue after all settled.
You will see the next stepper if the backend successfully connect to TiDB instance. If you see error message, don't worry. Check your input, make sure each input fields are correct. Do remember set a Allow All traffic filter if you use TiDB Cloud.
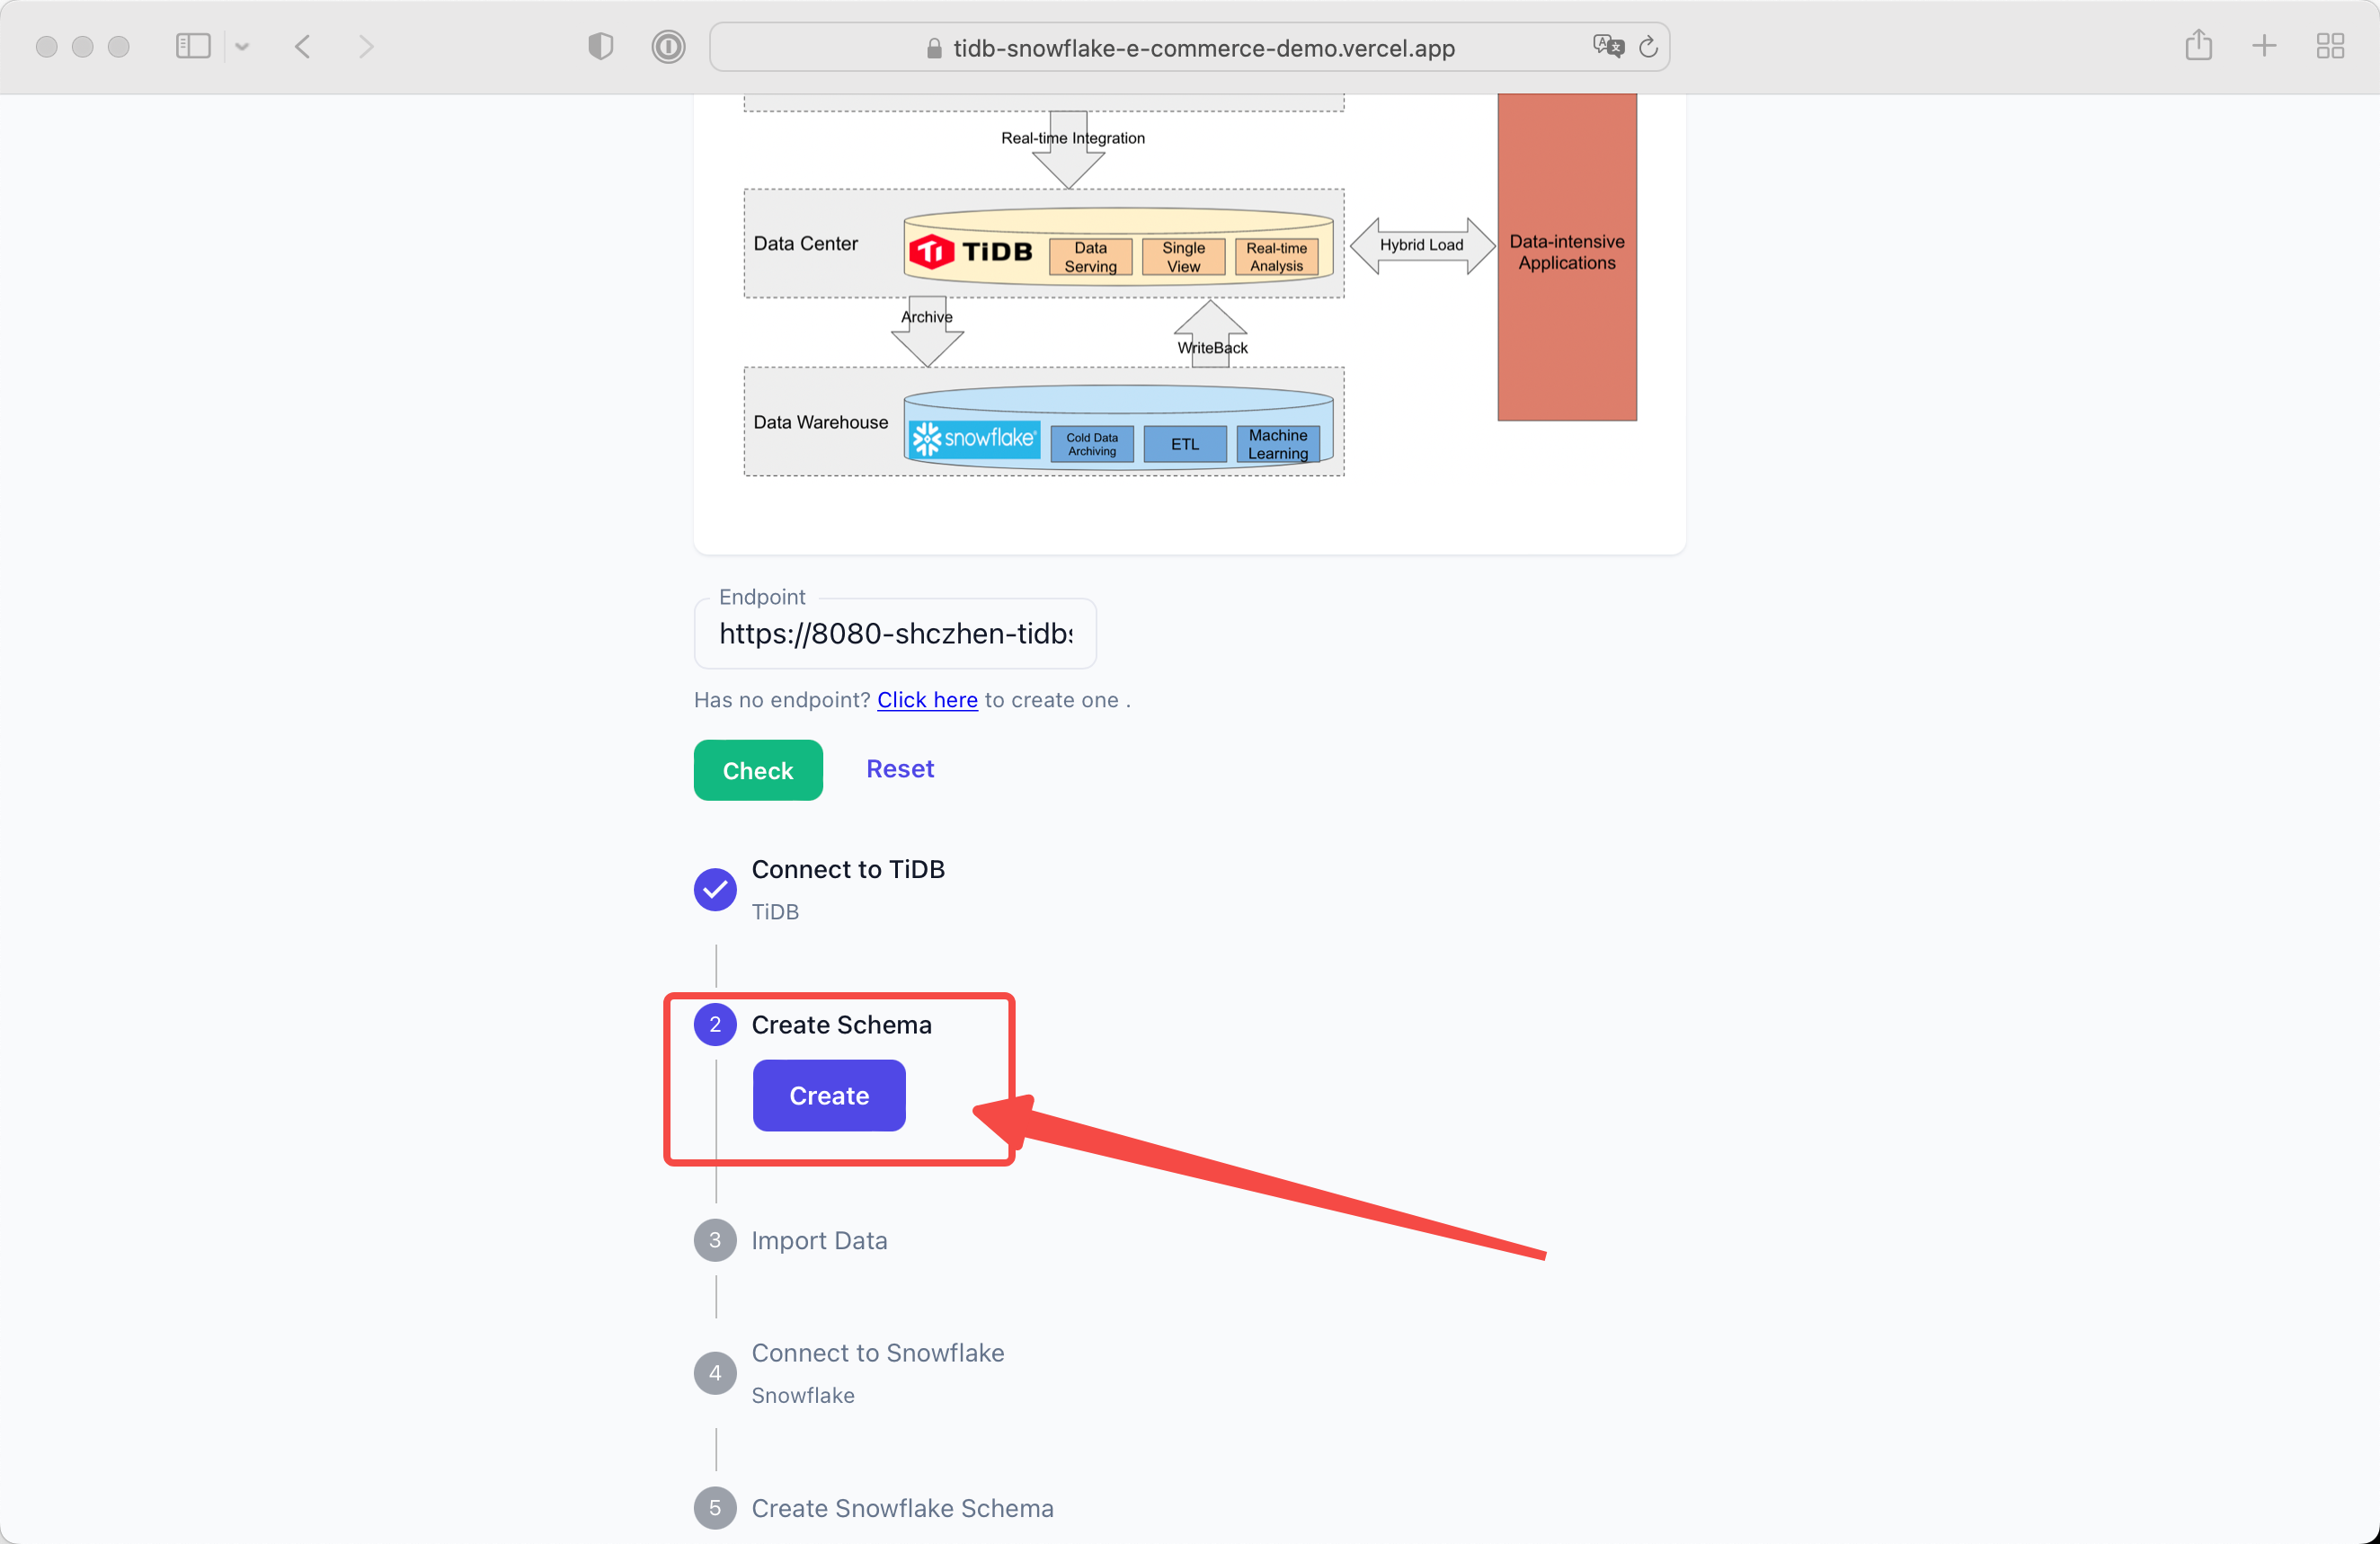
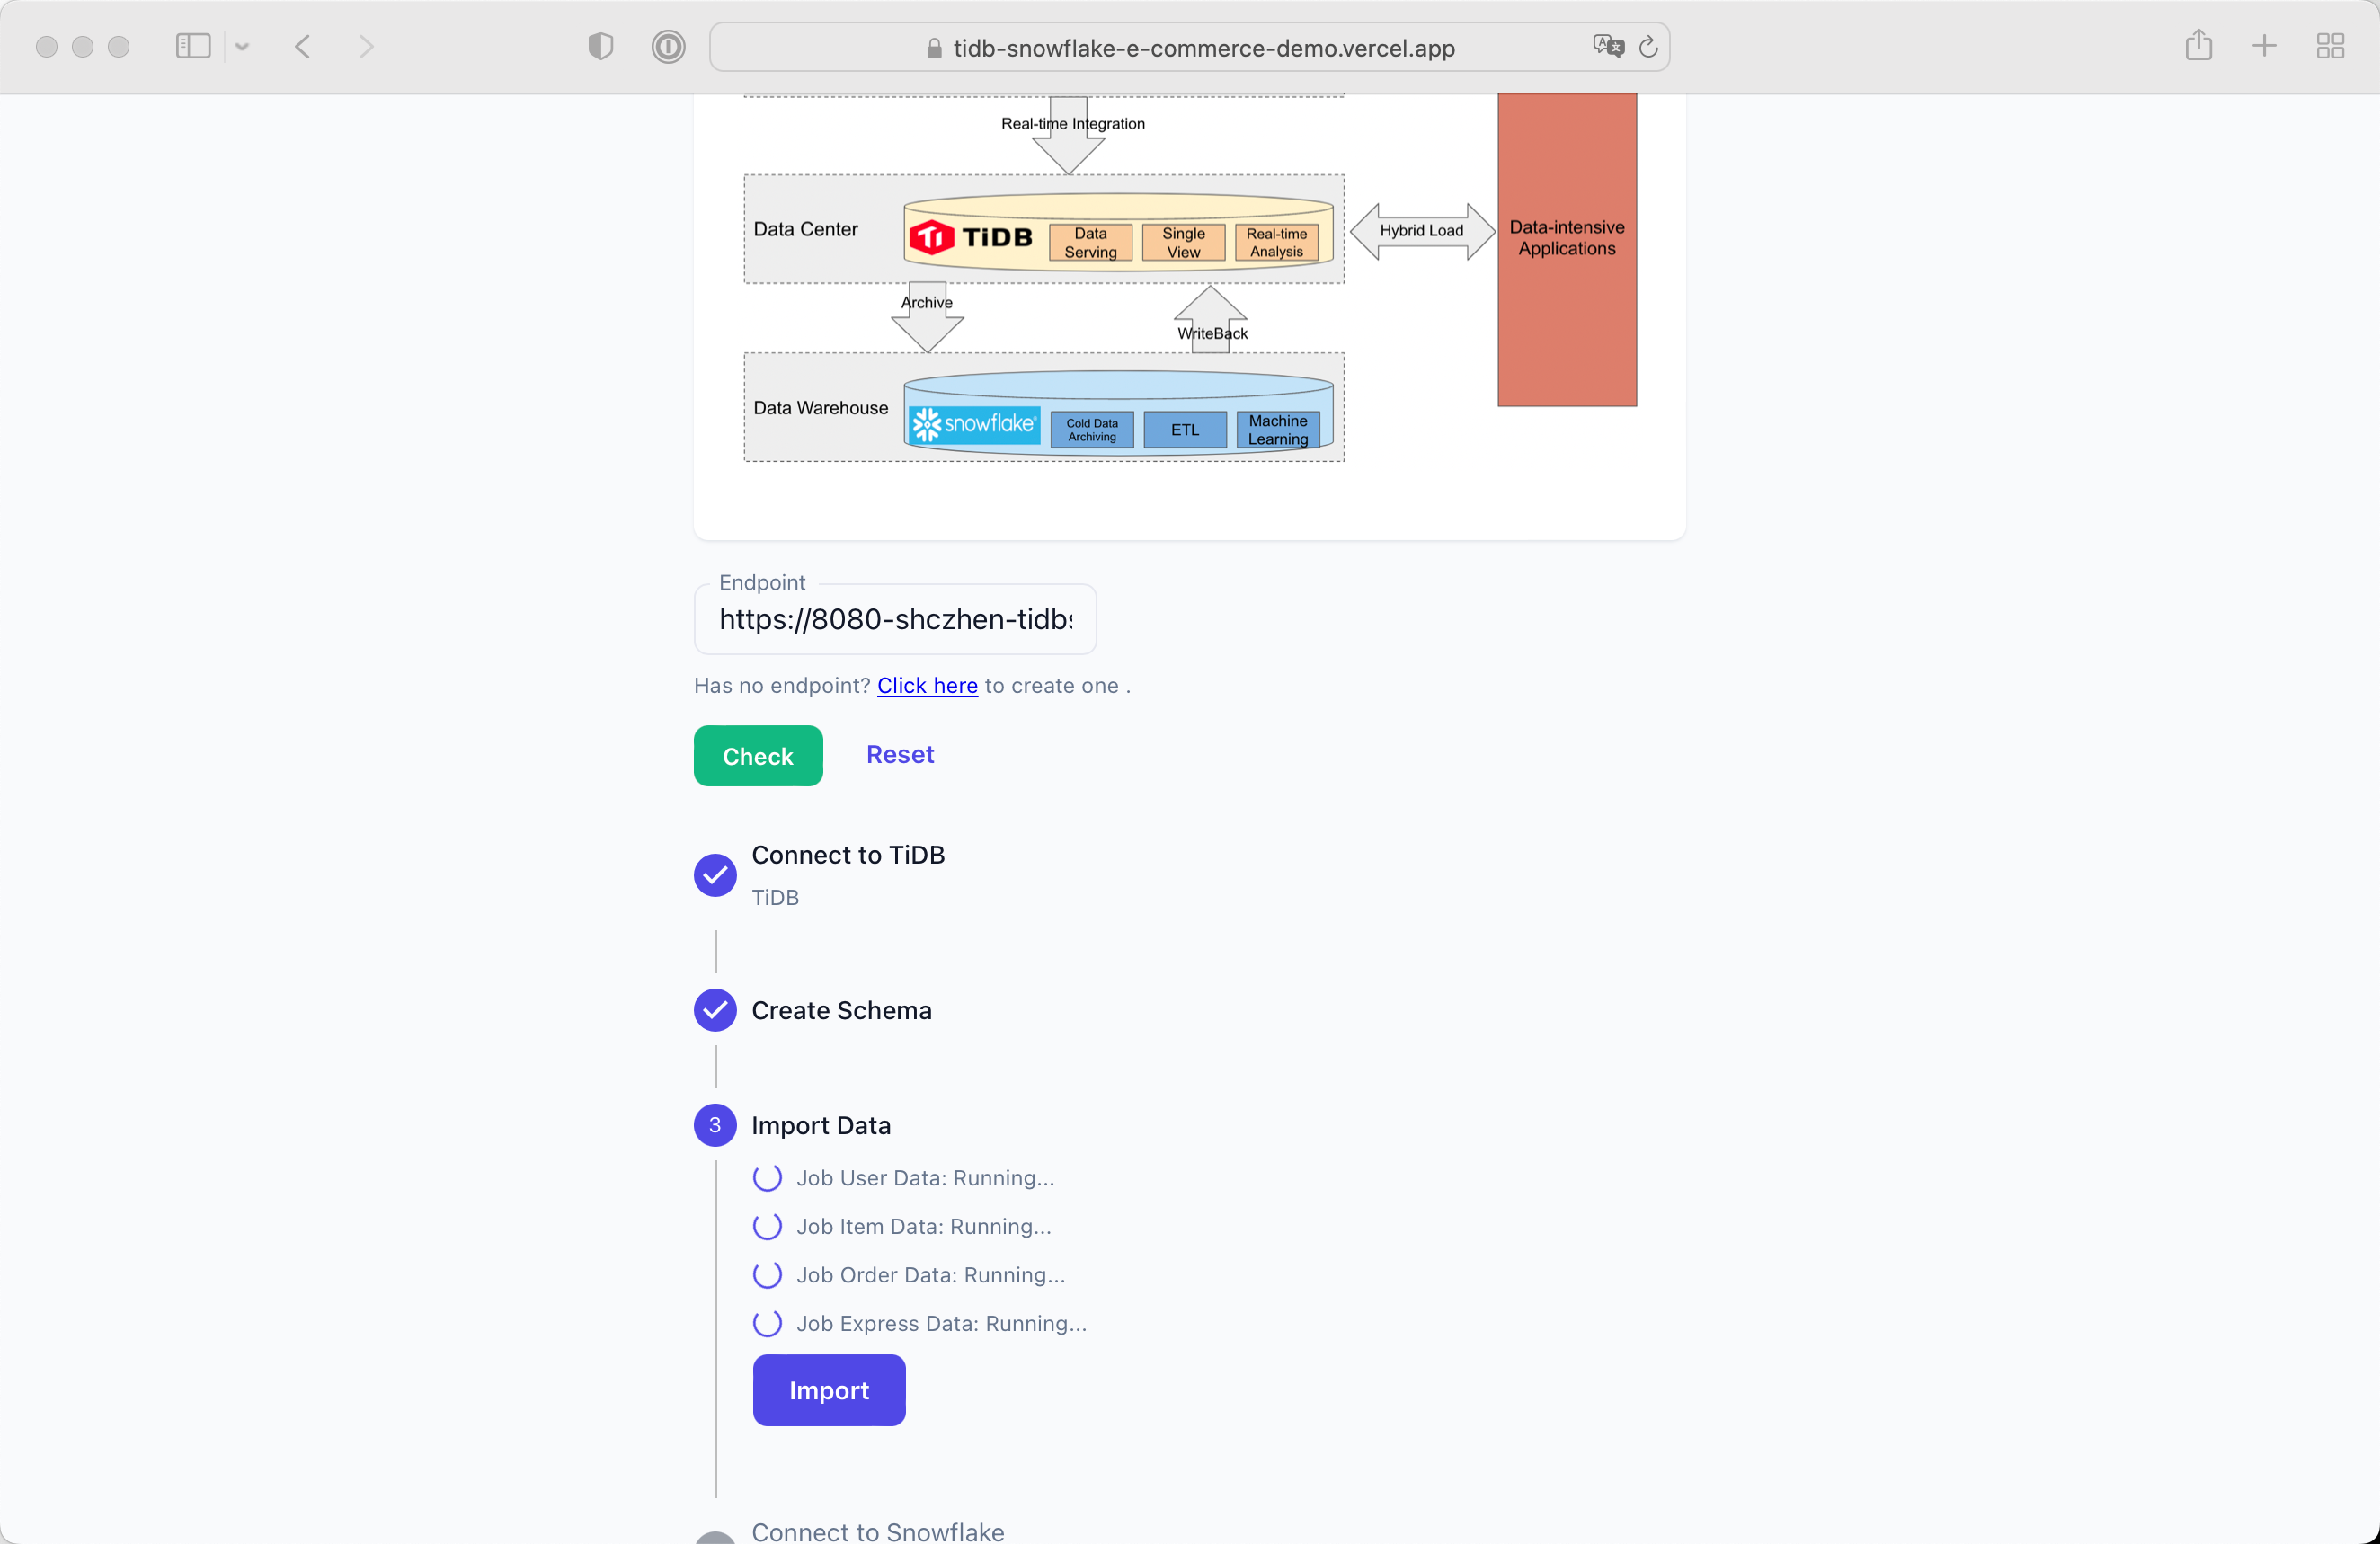
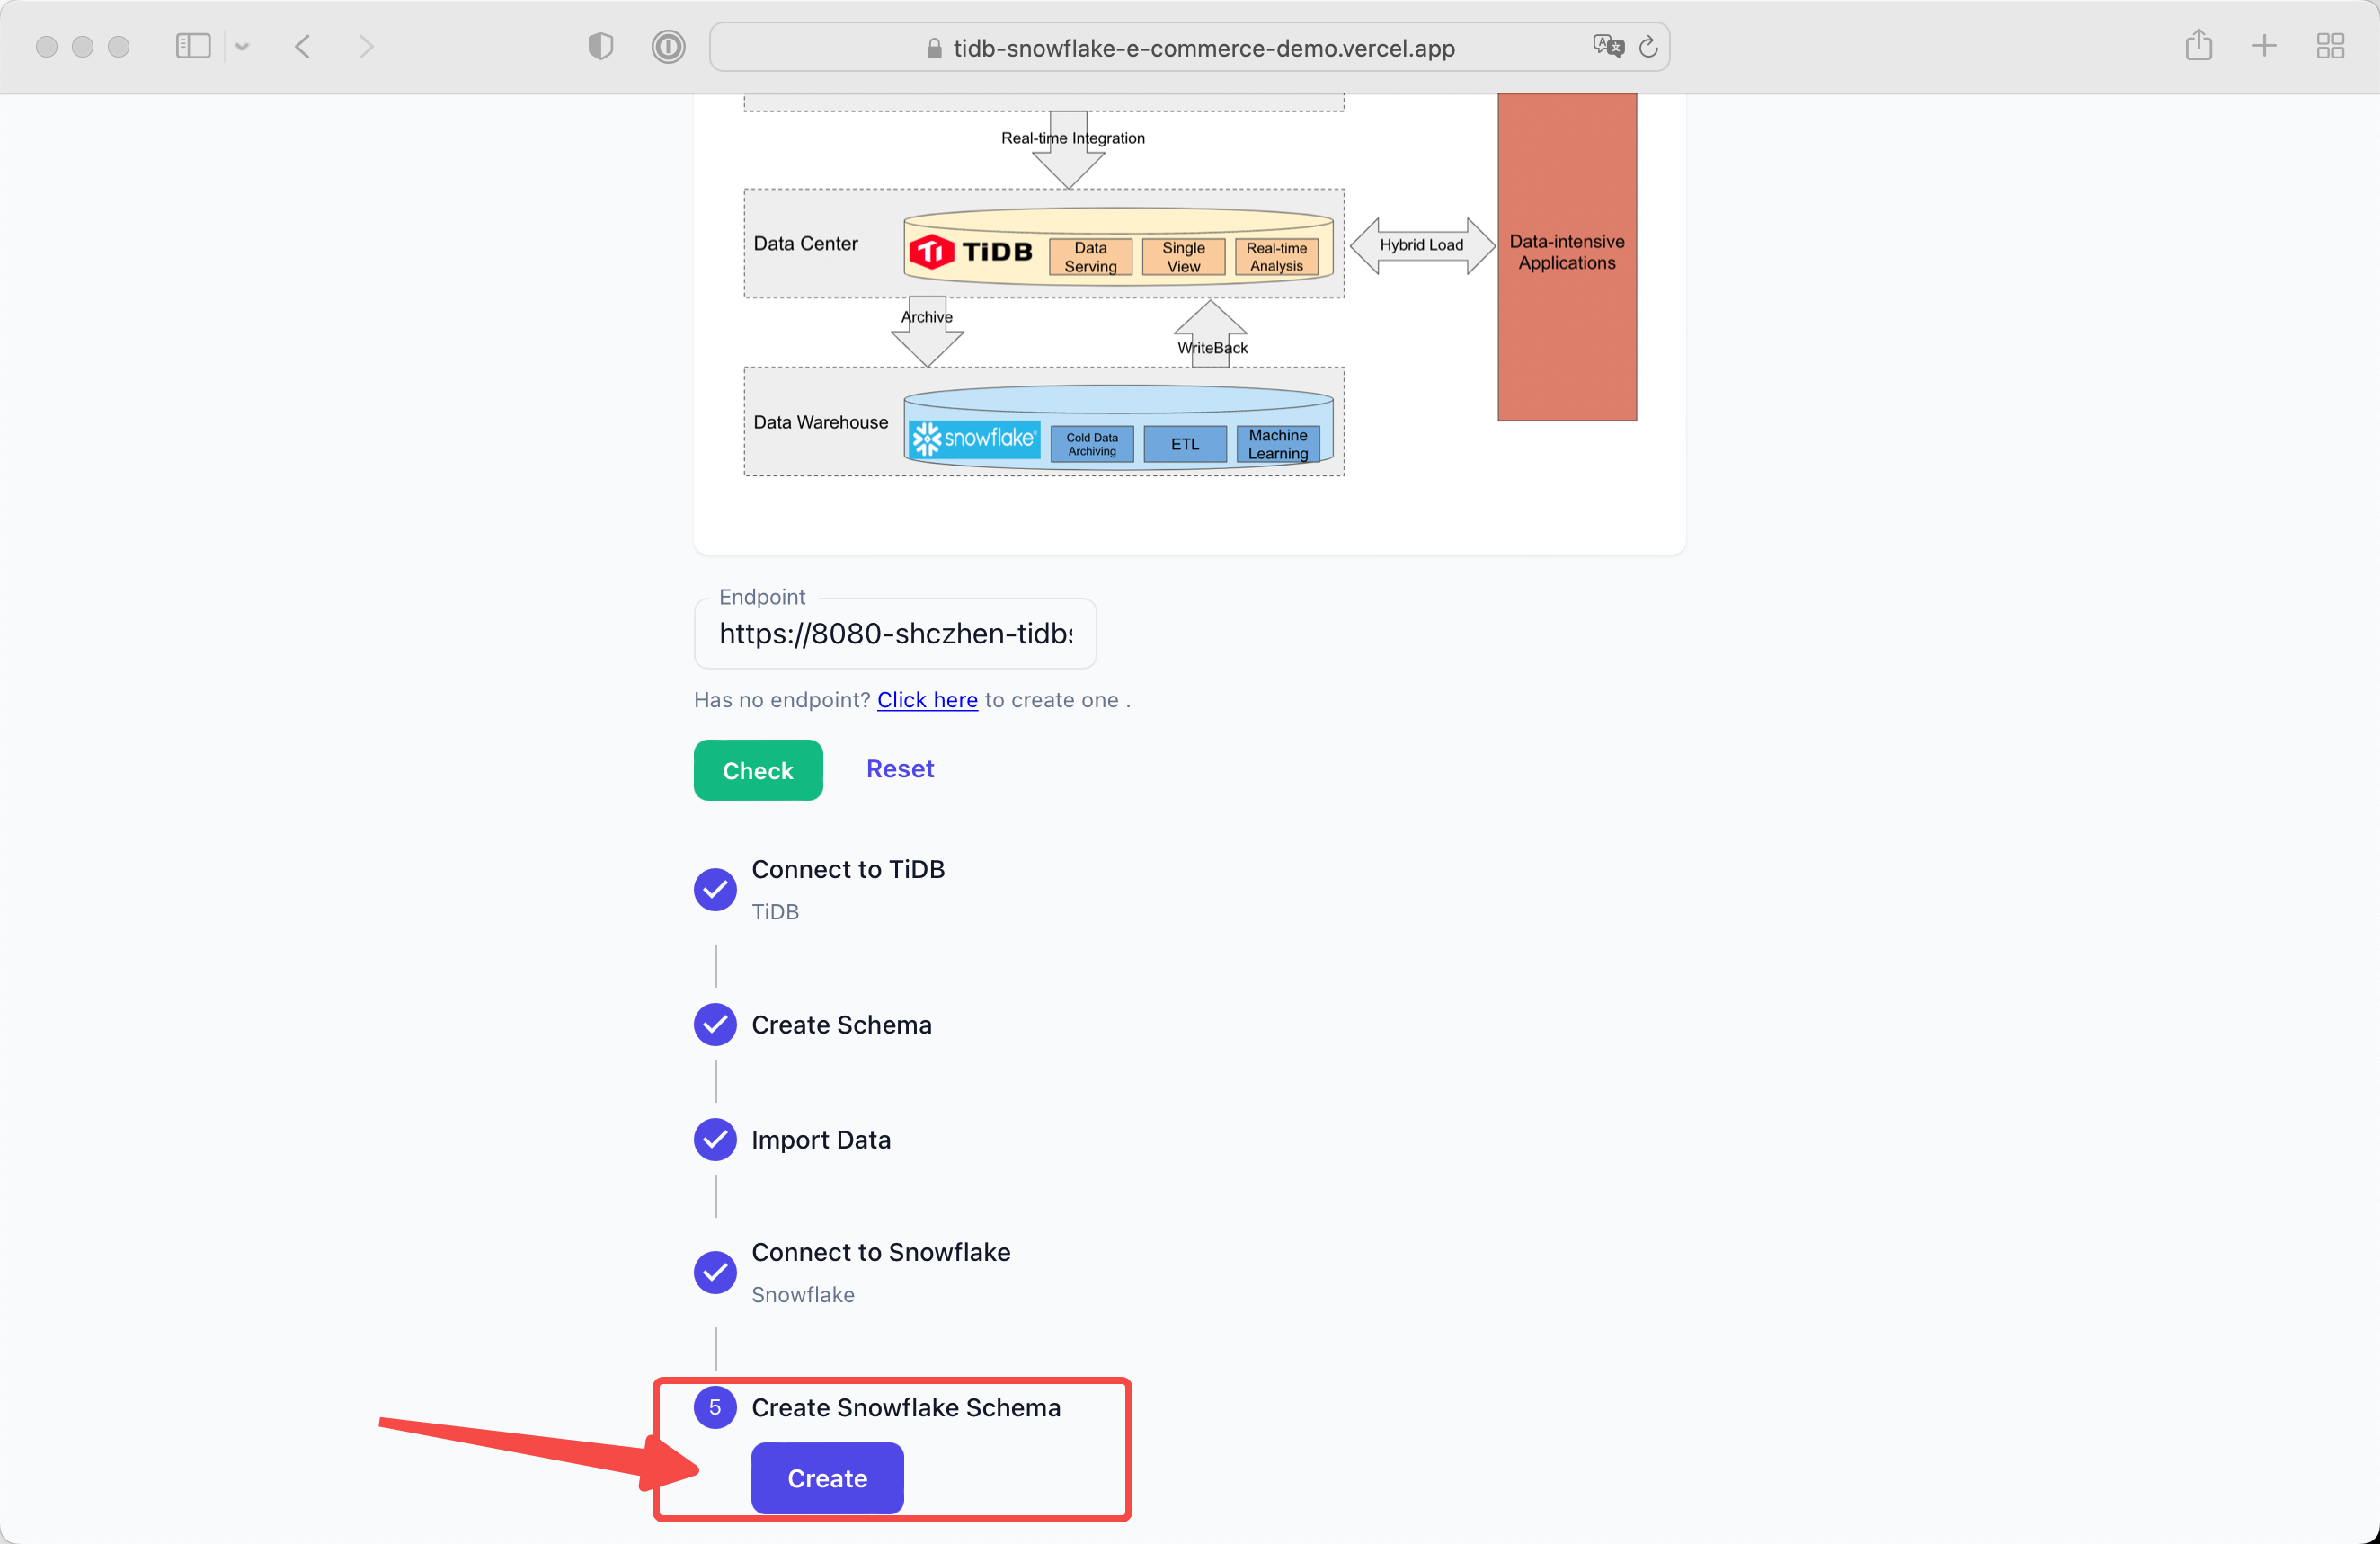
Click the Create button and the schema will be created.
Click the Import button and the initial data will be imported.
You can check the status anytime.
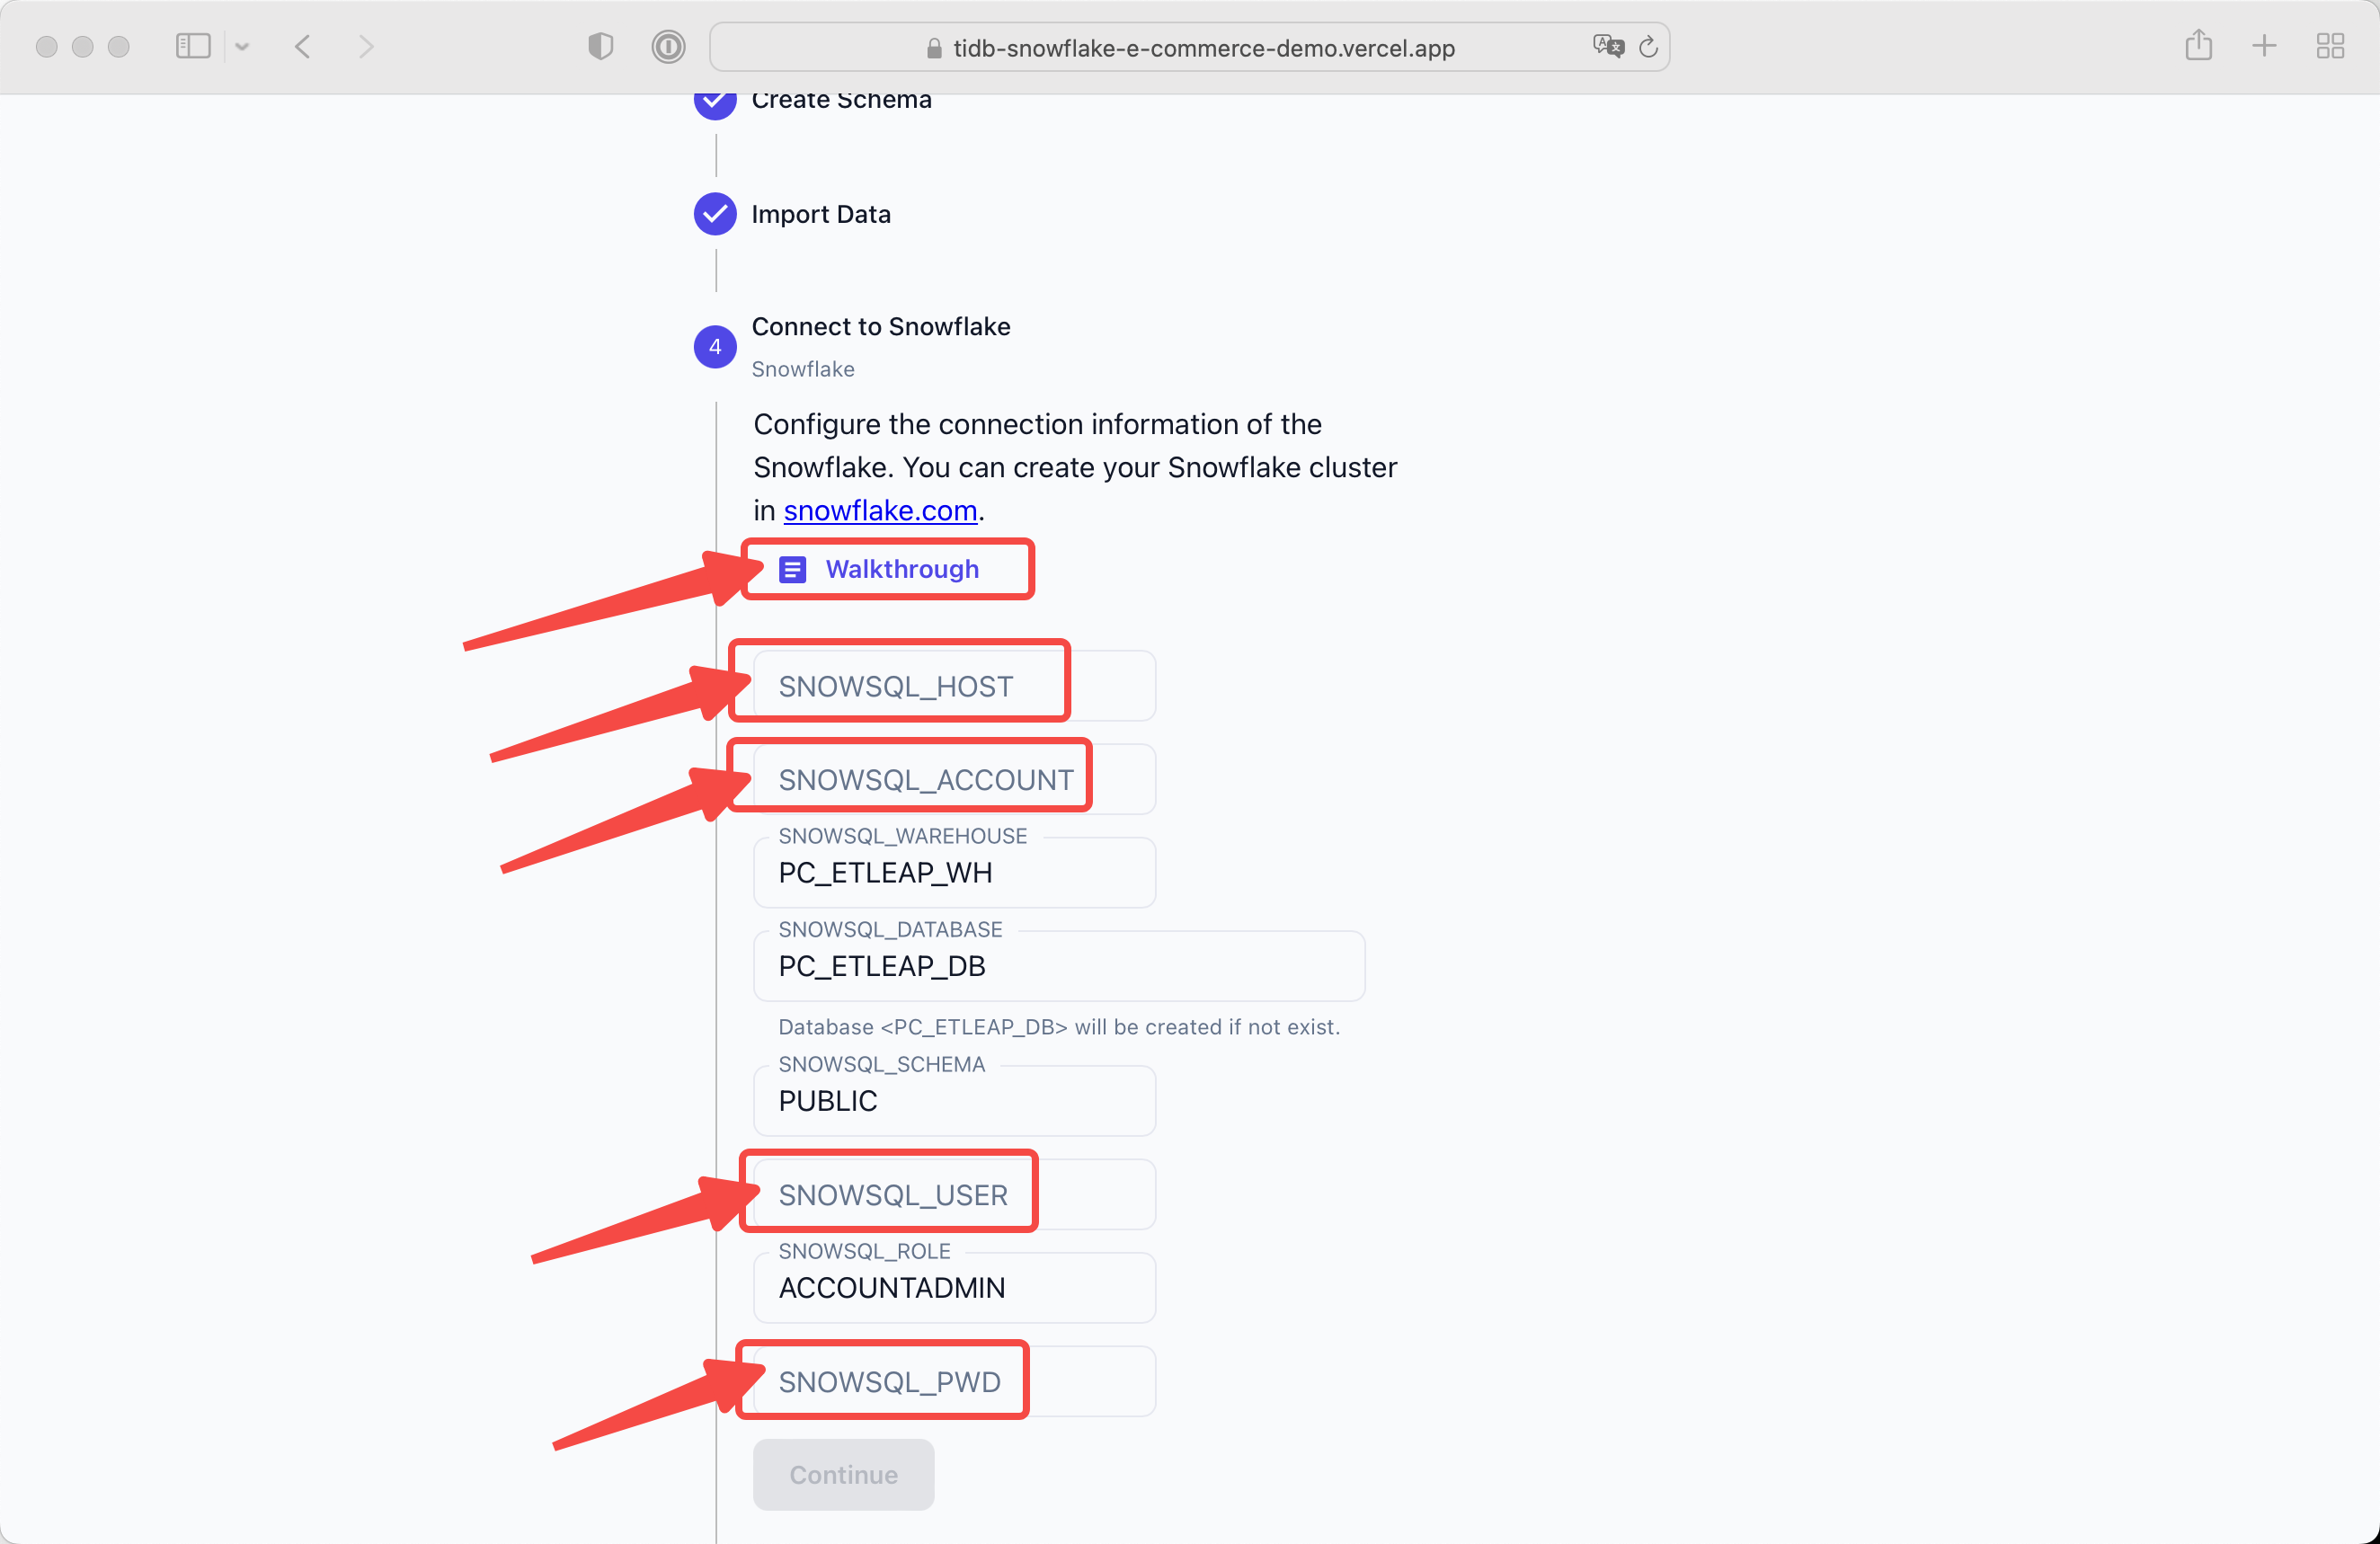
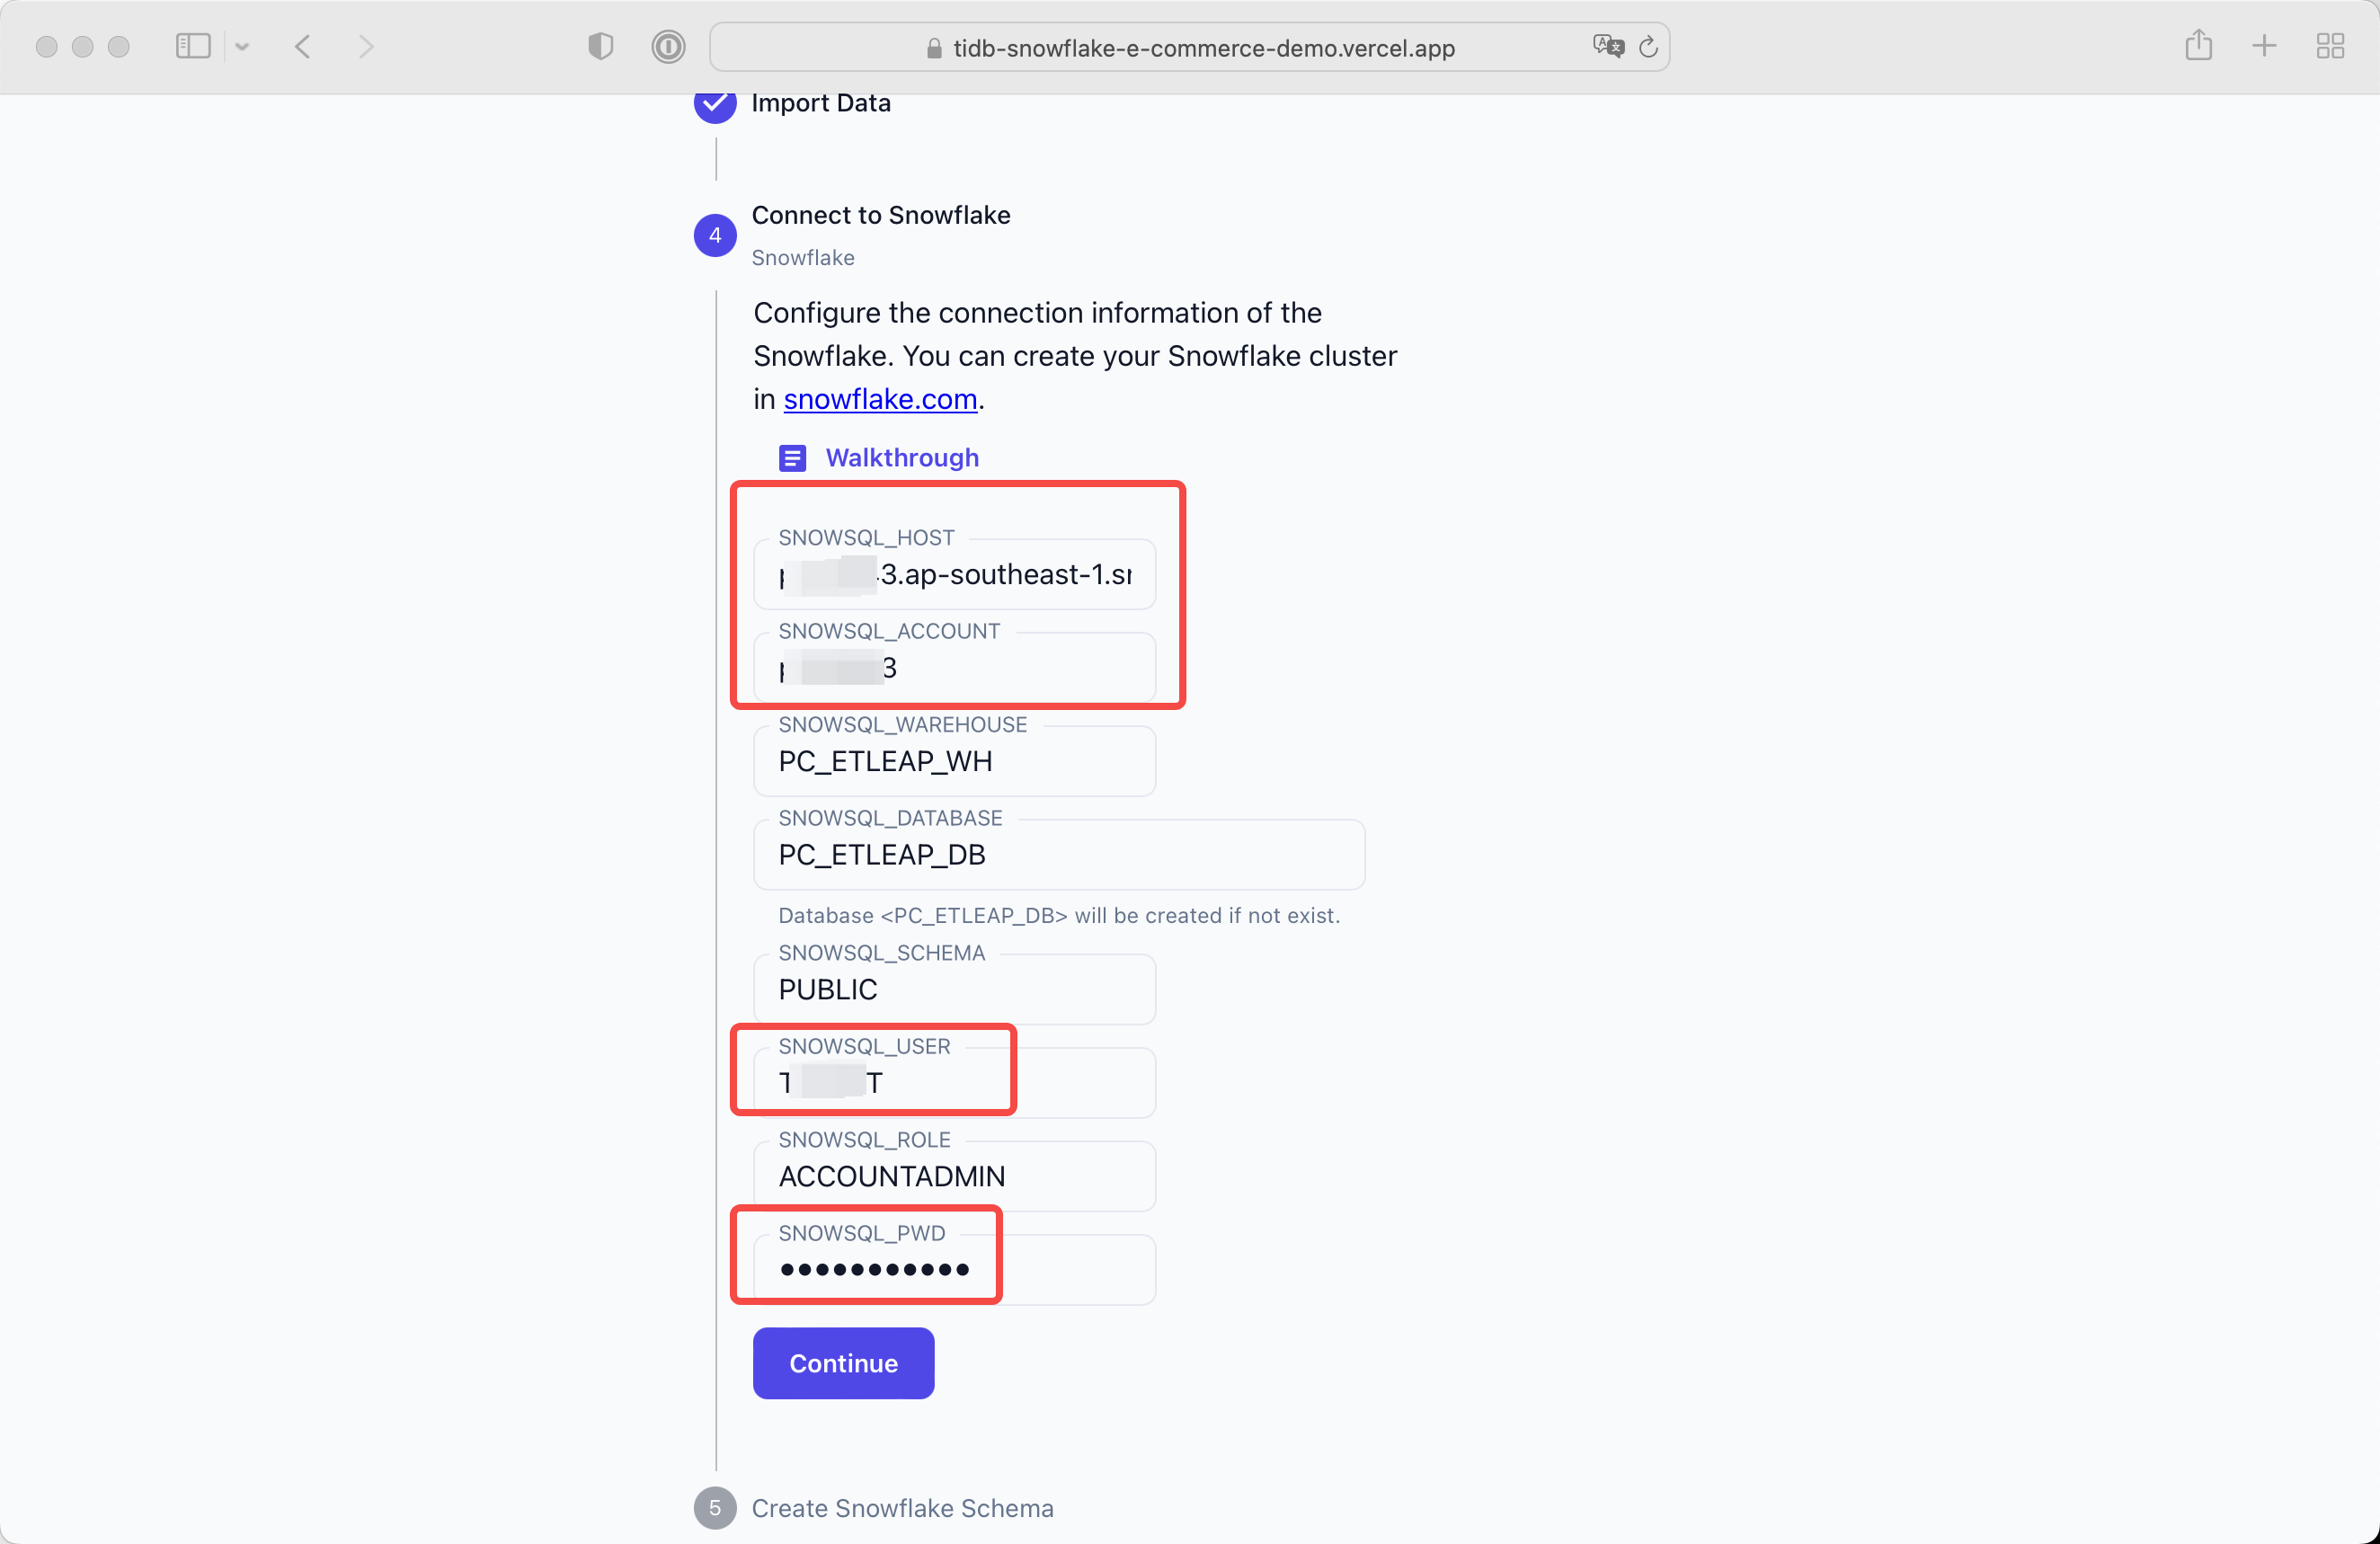
Click the Walkthrough button and you will get a guidance for creating Snowflake cluster.
-
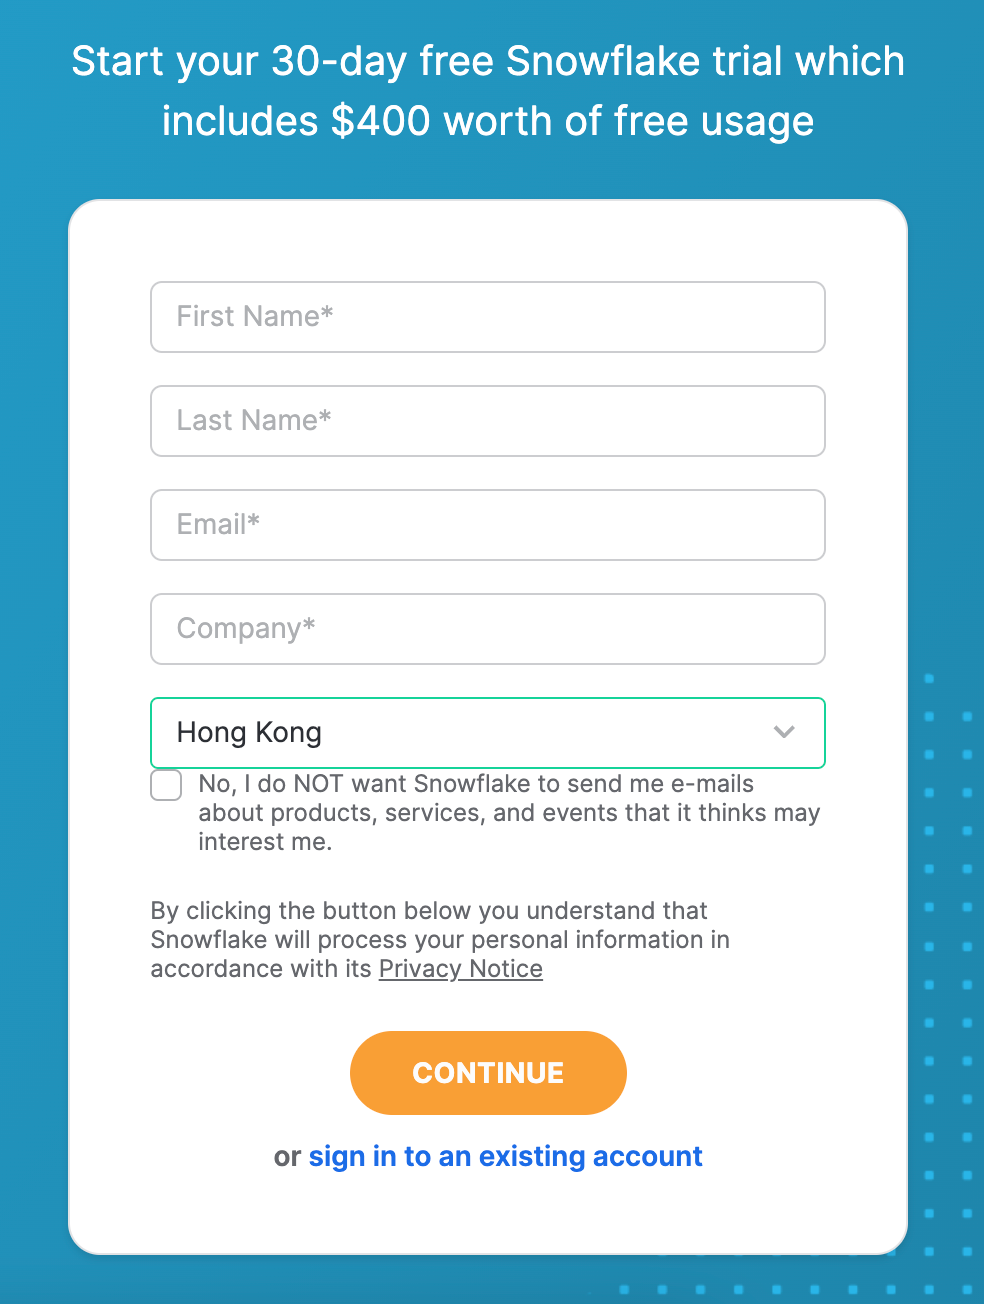
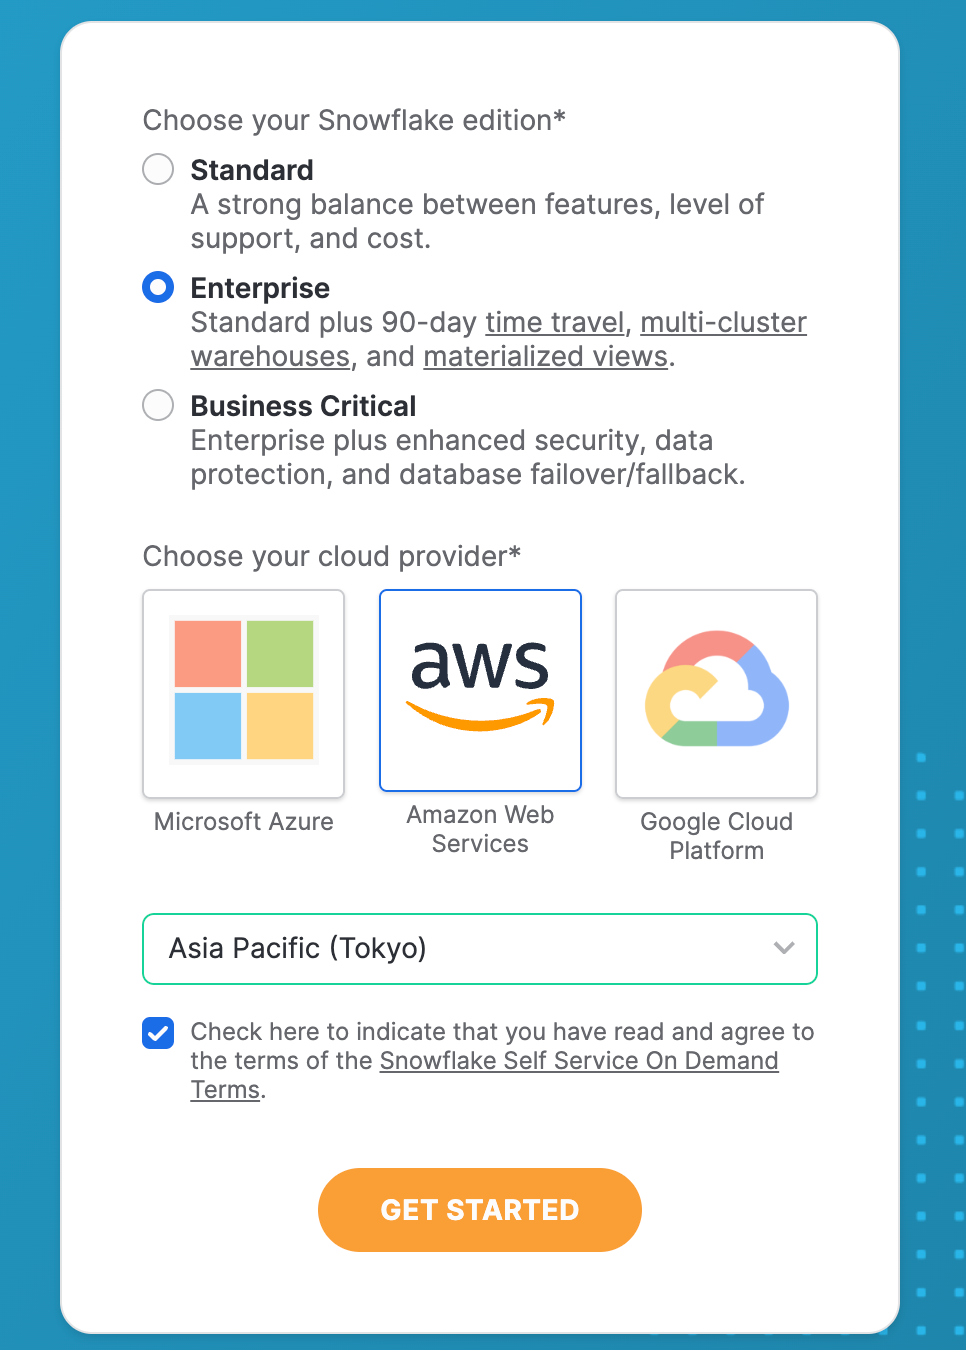
Create Snowflake account(snowflake.com):
-
Config version, cloud provider and region:
-
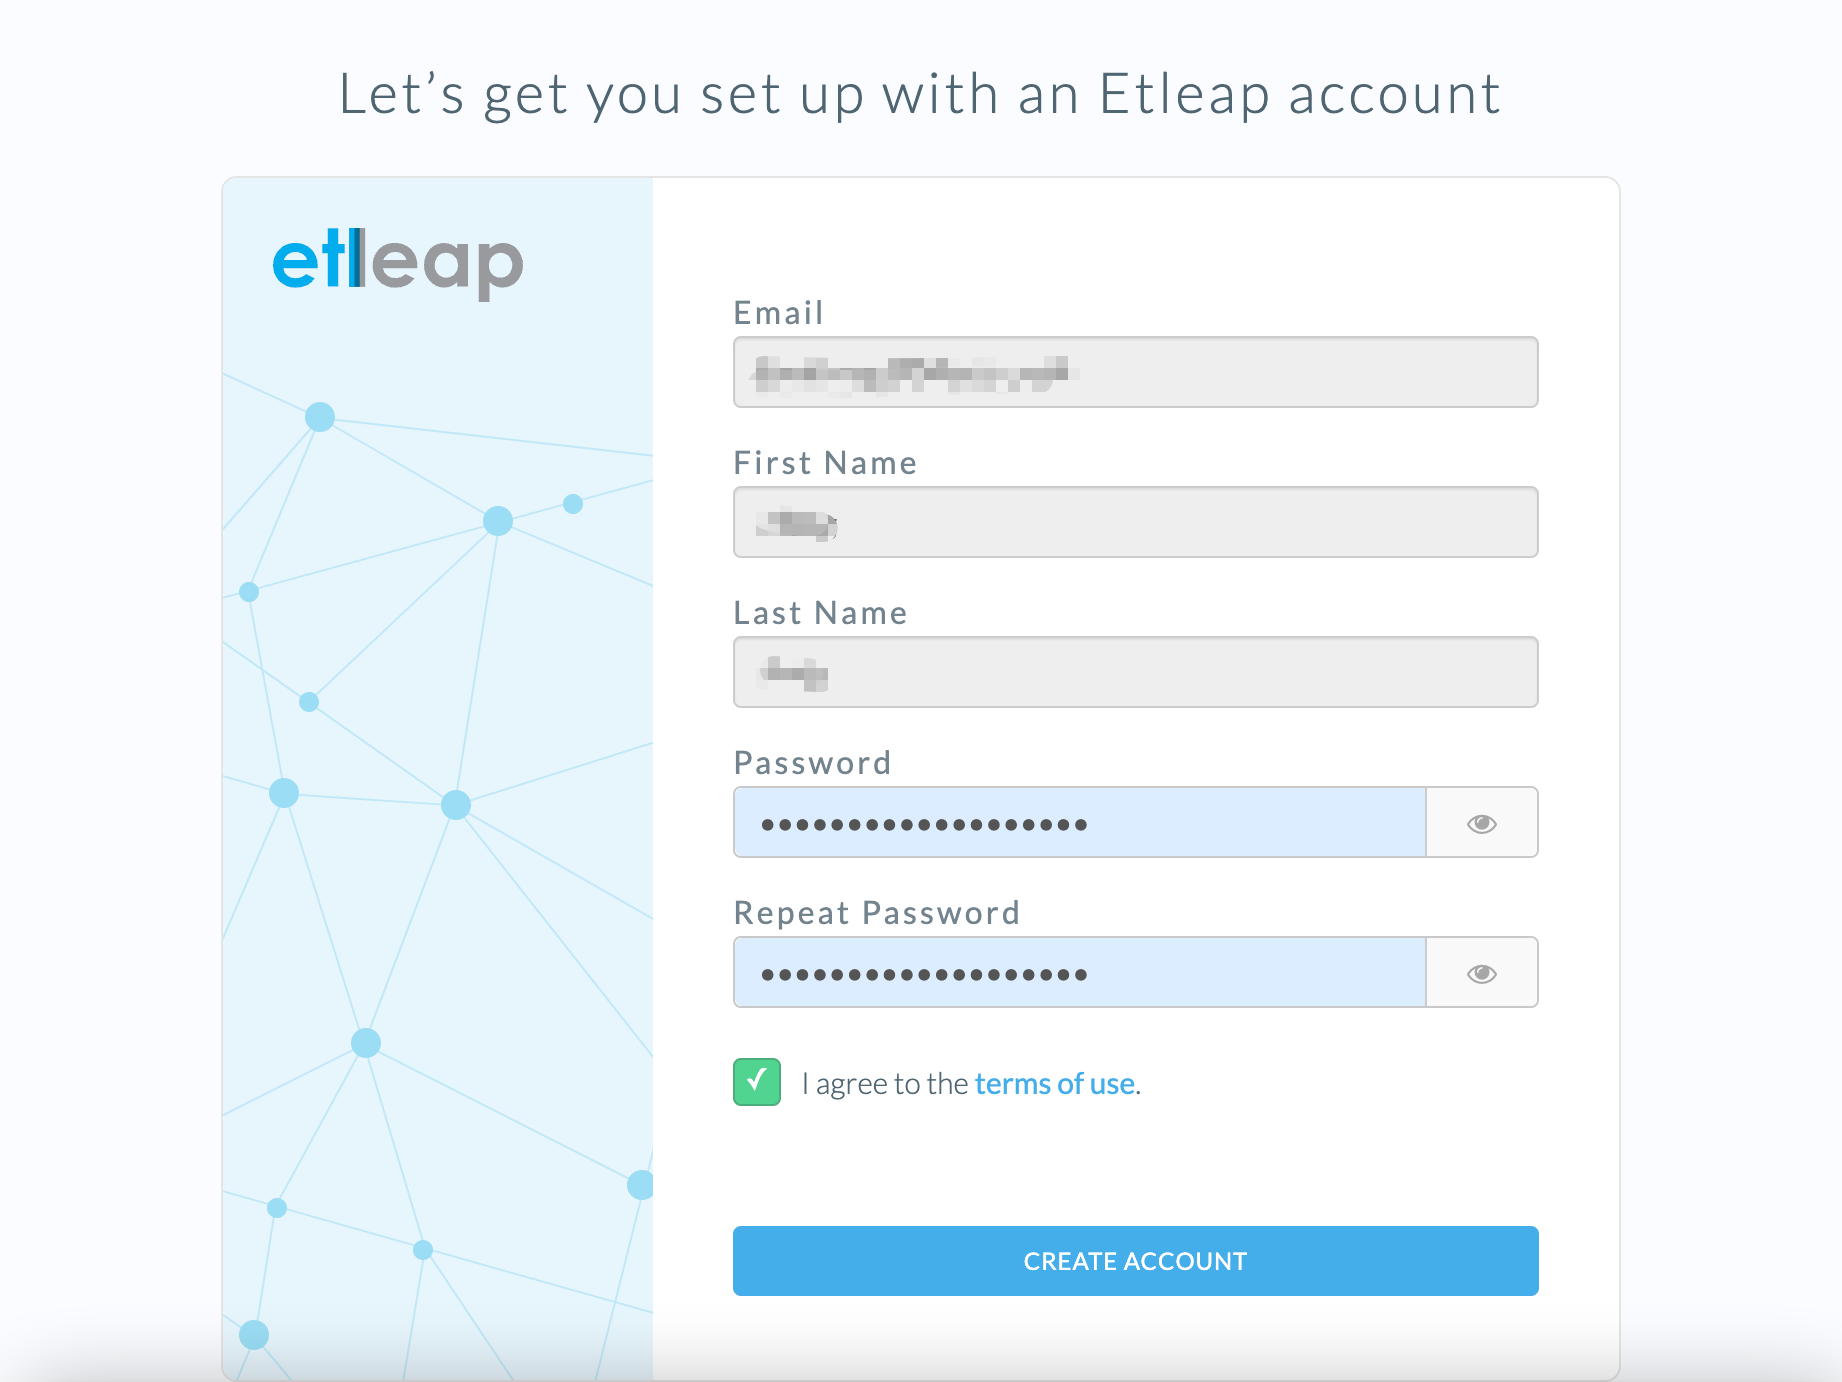
Get details from link in email which will automatically be sent to you after submitting:
Then we can get(for example):
SNOWSQL_USERNAMESNOWSQL_PASSWORDSNOWSQL_ROLE:ACCOUNTADMIN
-
Get Snowflake URL from link in email which will automatically be sent to you after activating account:
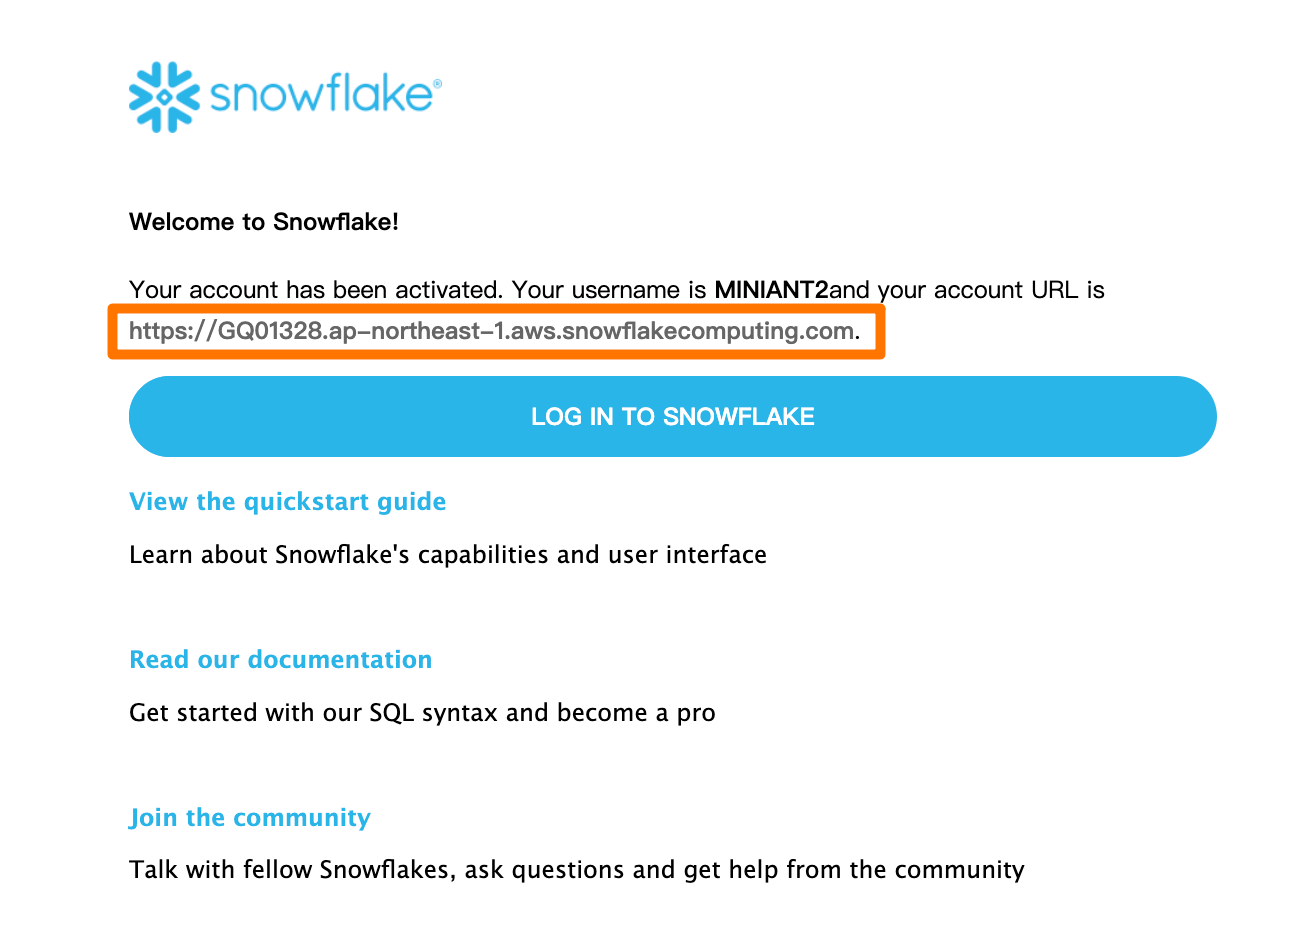
Then we can get(for example):
SNOWSQL_HOST:GQ01328.ap-northeast-1.aws.snowflakecomputing.comSNOWSQL_ACCOUNT:GQ01328
-
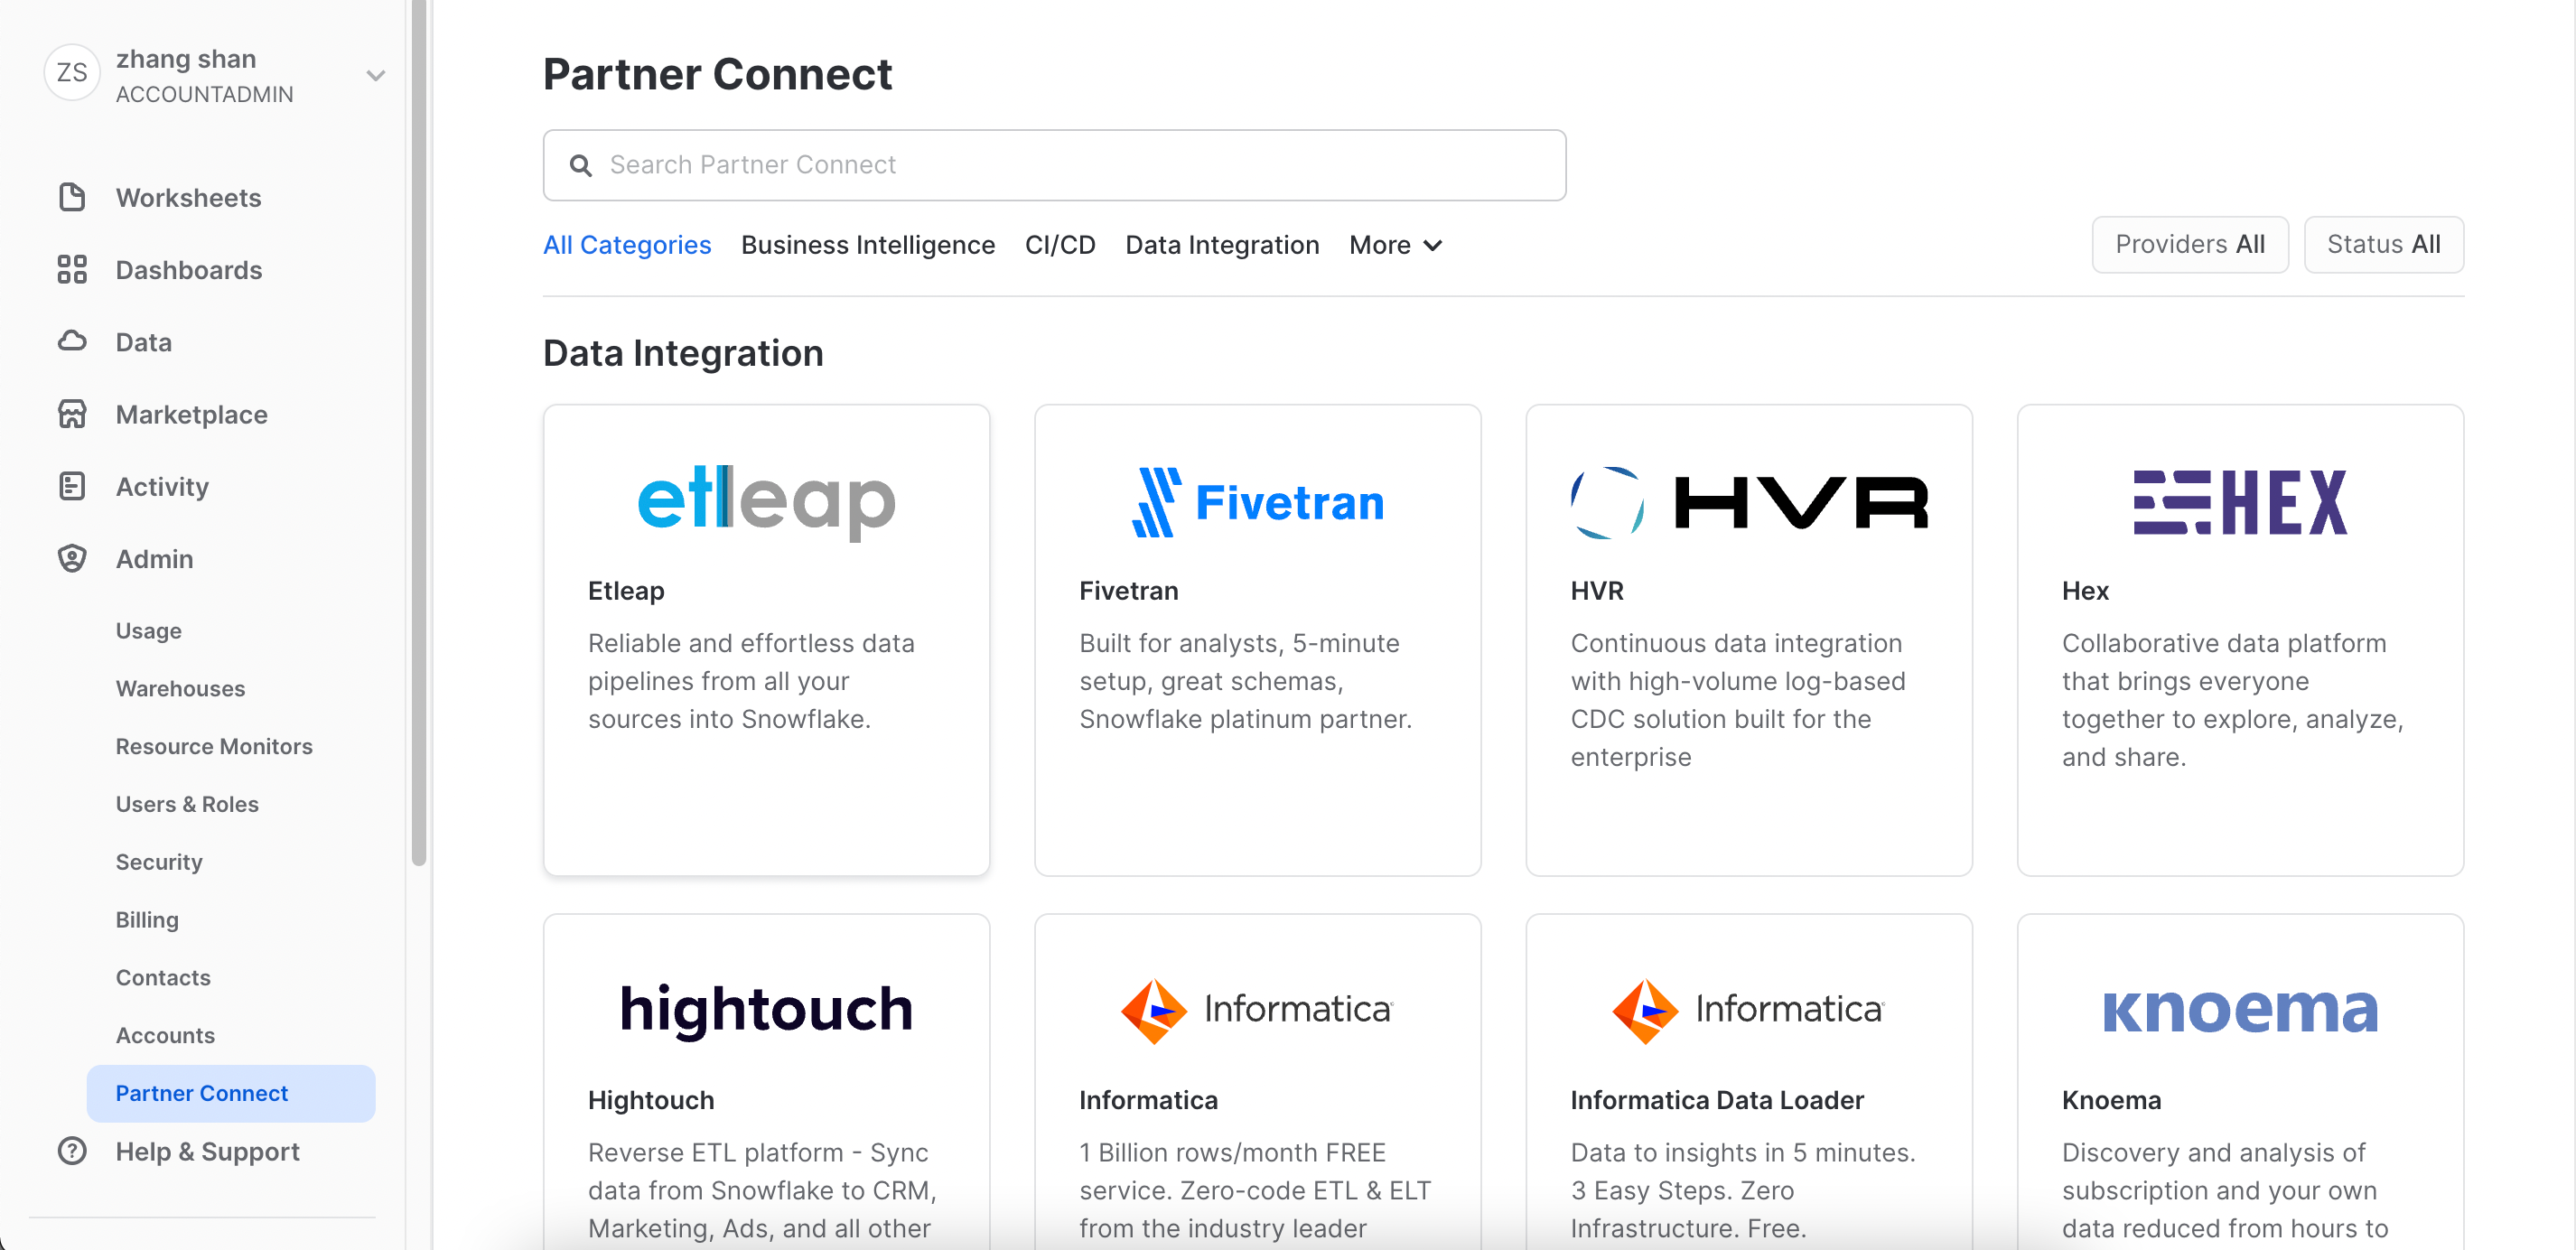
Visit snowflake manage page, then choose
Admin>Partner Connecton left navigation, then chooseETLeap:This step is for further data pipeline from TiDB to Snowflake.
Note: A Snowflake trial account will expire after 30 days and ETLeap will expire after 15 days.
-
Click
Connect: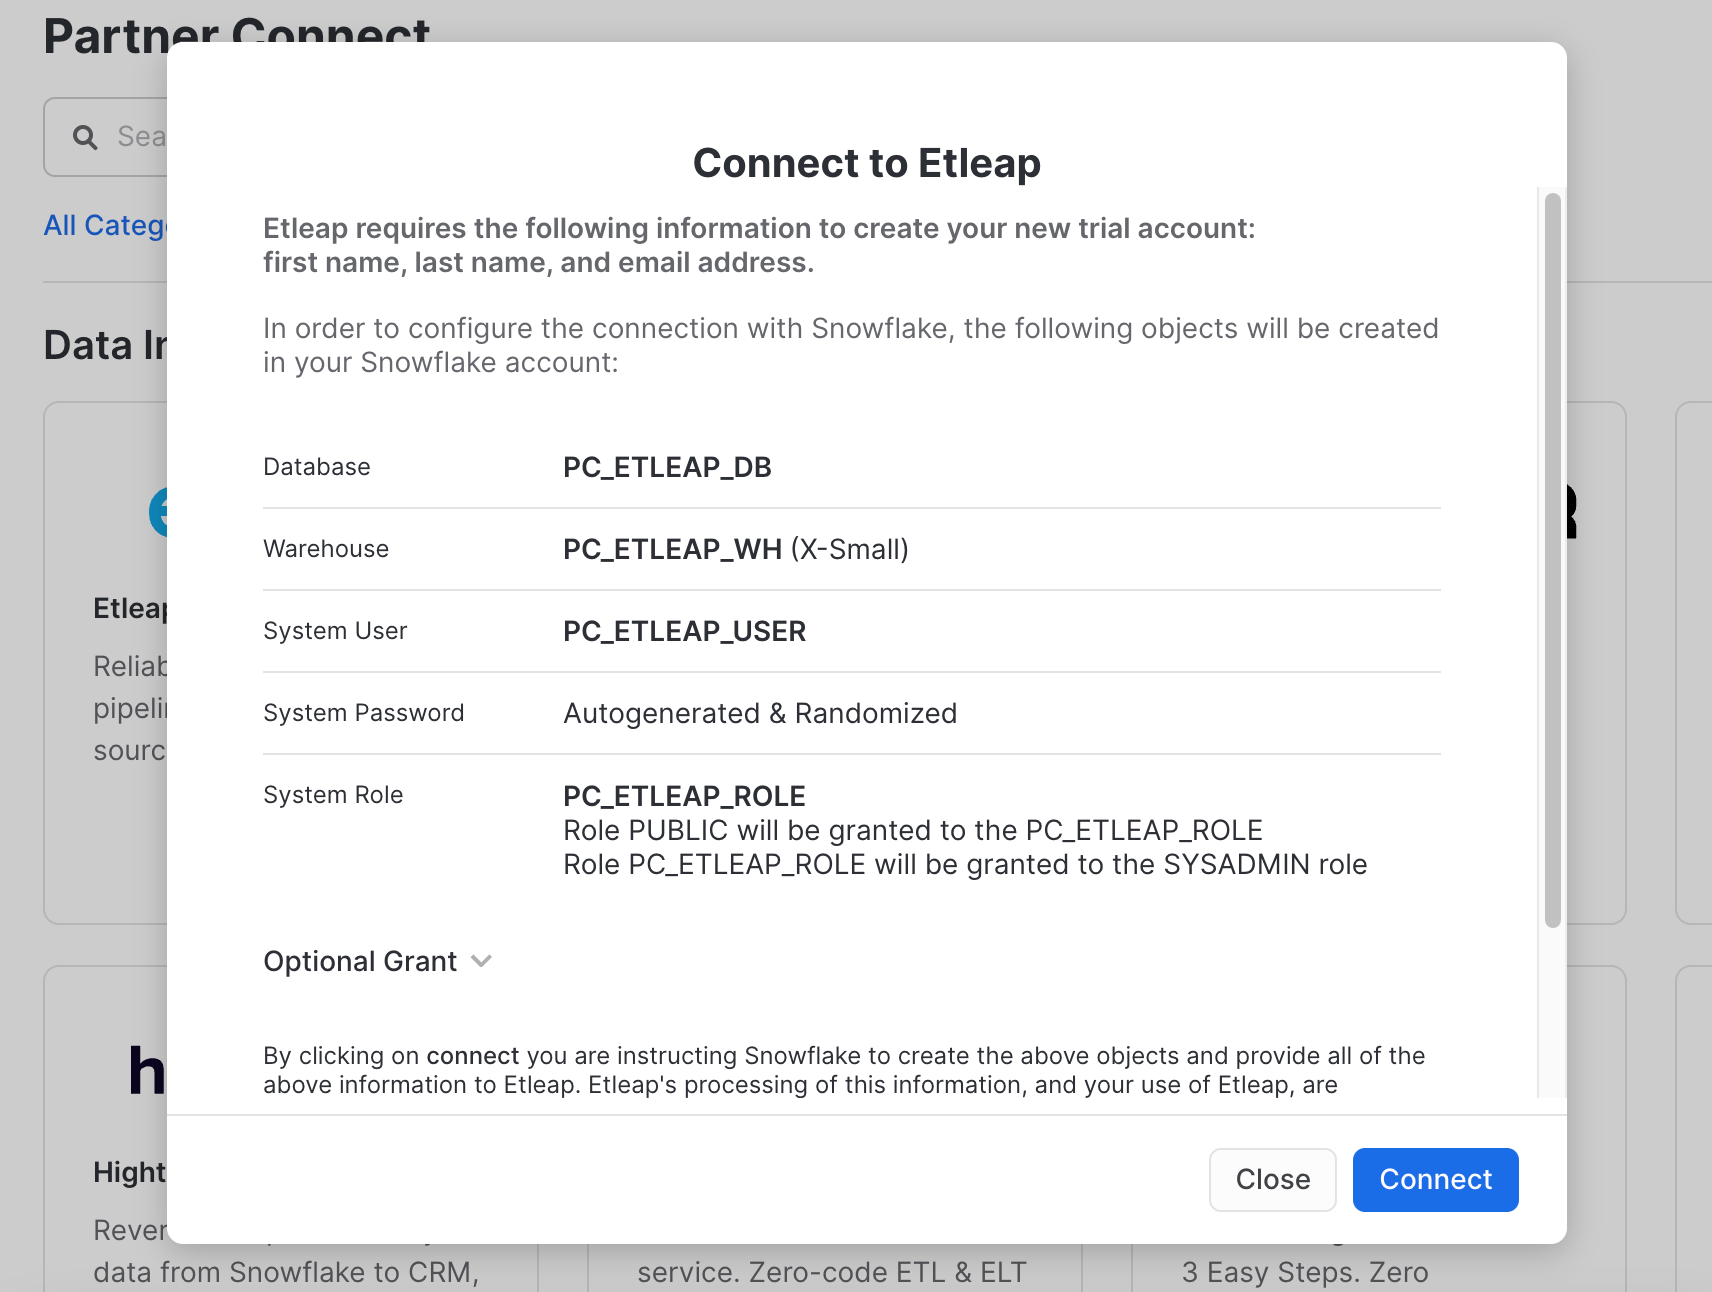
Then we can get(for example):
SNOWSQL_DATABASE:PC_ETLEAP_DBSNOWSQL_WAREHOUSE:PC_ETLEAP_WHSNOWSQL_SCHEMA:PUBLIC
-
Active
ETLeap: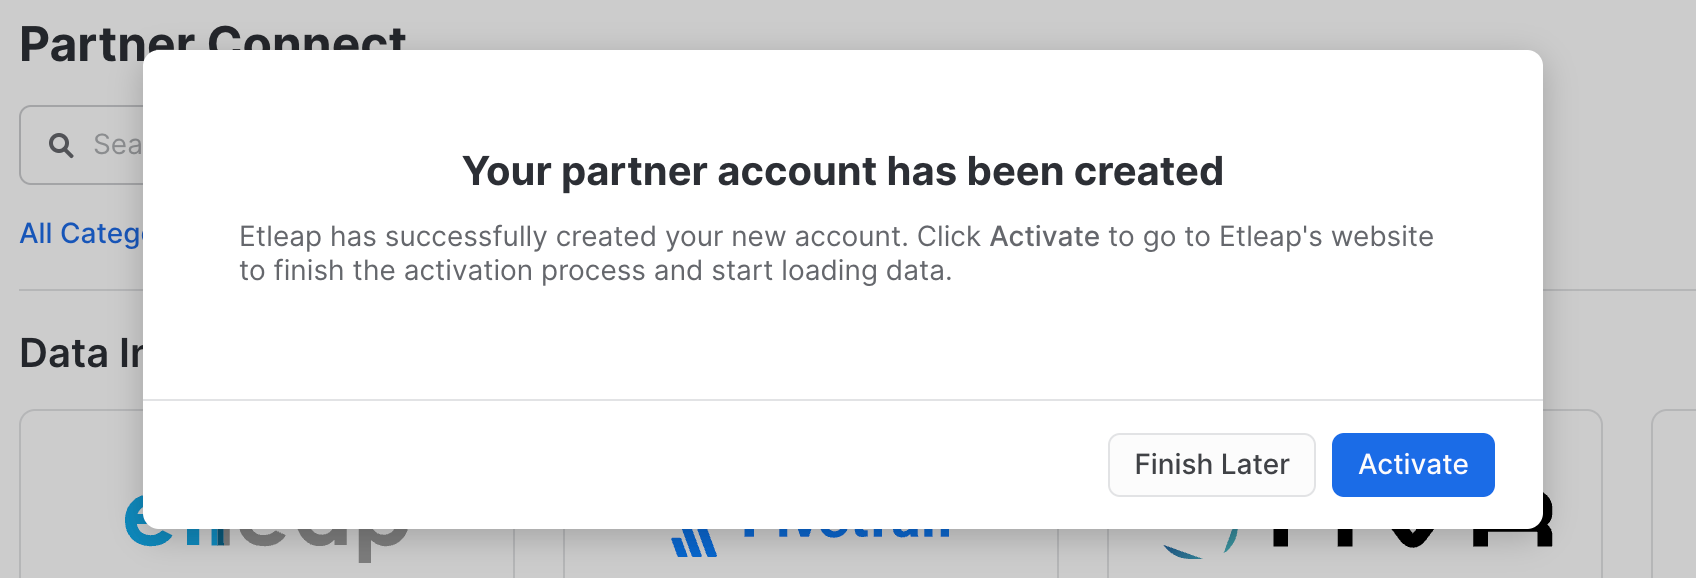
-
After all settled, we can get all these data:
SNOWSQL_HOST=GQ01328.ap-northeast-1.aws.snowflakecomputing.com
SNOWSQL_ACCOUNT=GQ01328
SNOWSQL_WAREHOUSE=PC_ETLEAP_WH
SNOWSQL_DATABASE=PC_ETLEAP_DB
SNOWSQL_SCHEMA=PUBLIC
SNOWSQL_USER=<admin username>
SNOWSQL_ROLE=ACCOUNTADMIN
SNOWSQL_PWD=<admin password>
Click Continue and backend will check the connection.
After all settled, you can click Continue button.
You'll be directed to demo console page.
After initial configuration, you will be directed to Console - Pipeline page.
In this page, we will perform offiline analysis on Snowflake, and create a pipeline between TiDB and Snowflake. So that Snowflake analysis data will be written back to TiDB.
You can edit your endpoint at any time by click the edit icon on header.
And switch to other pages by click left navigation.
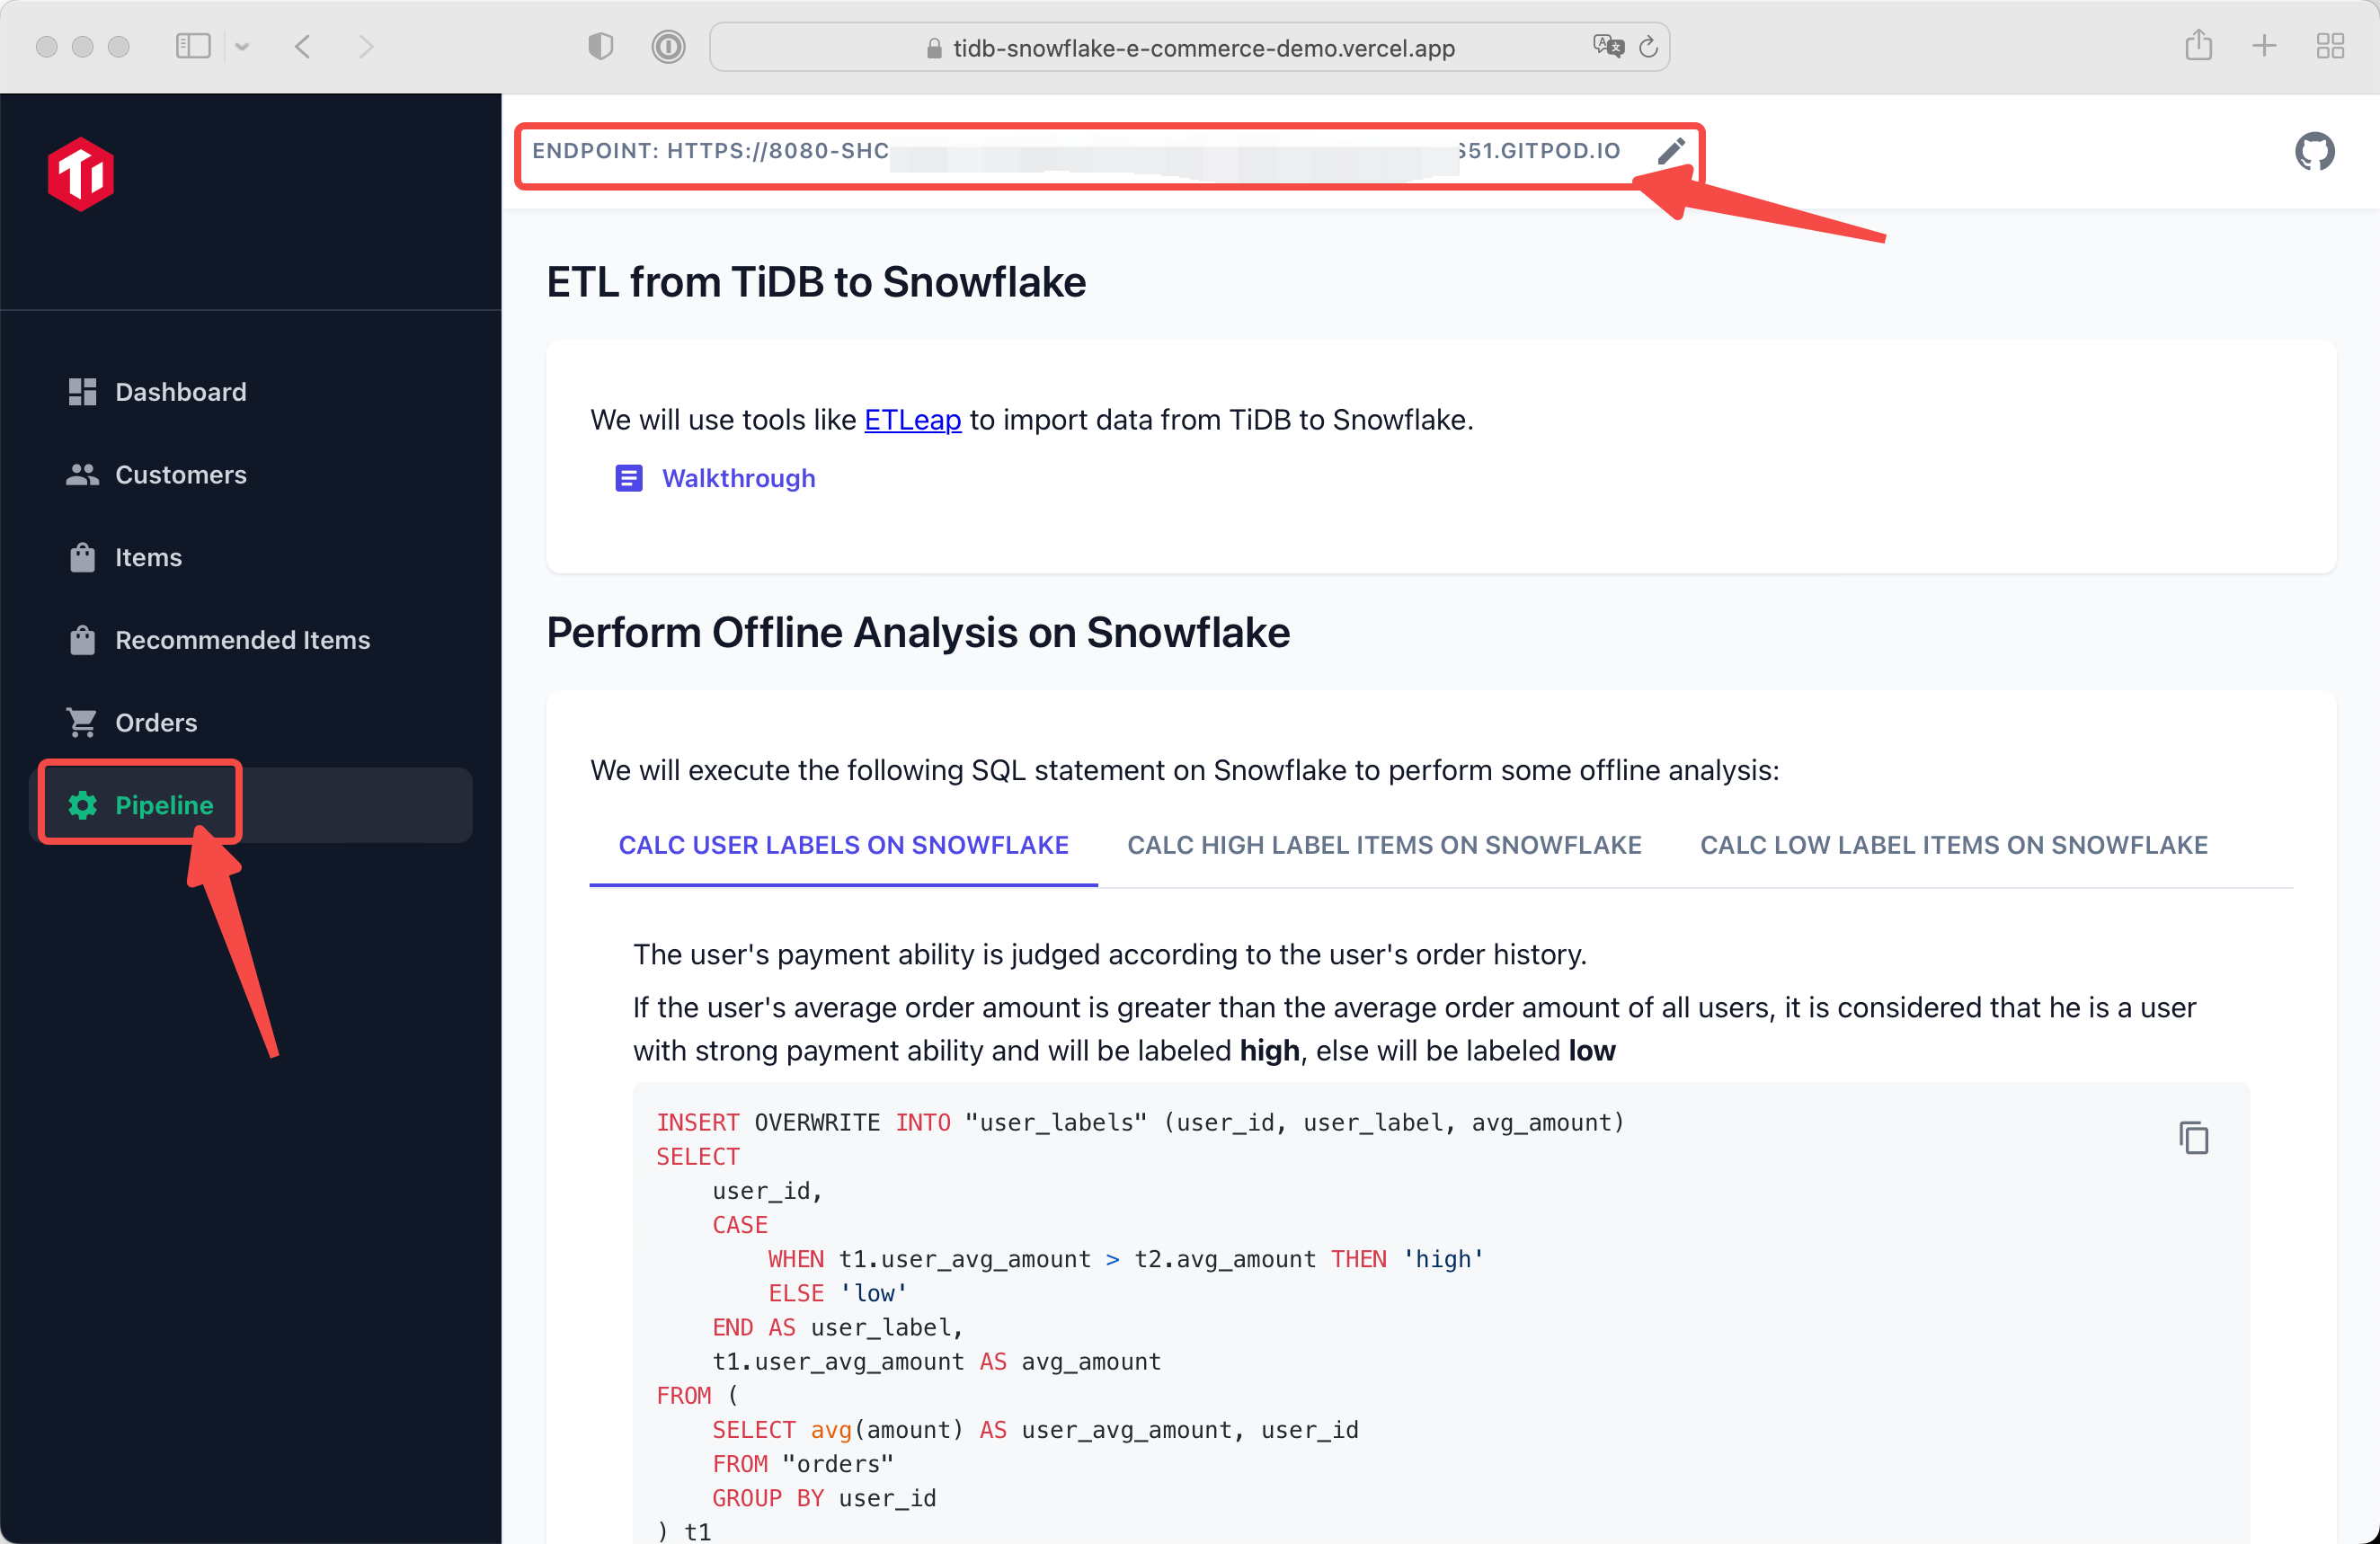
🚀 You can easily synchronize data from TiDB to Snowflake using the following proven ETL tools: (Click the link to check out the step-by-step guide)
- ETLeap
- AirByte (Coming soon!)
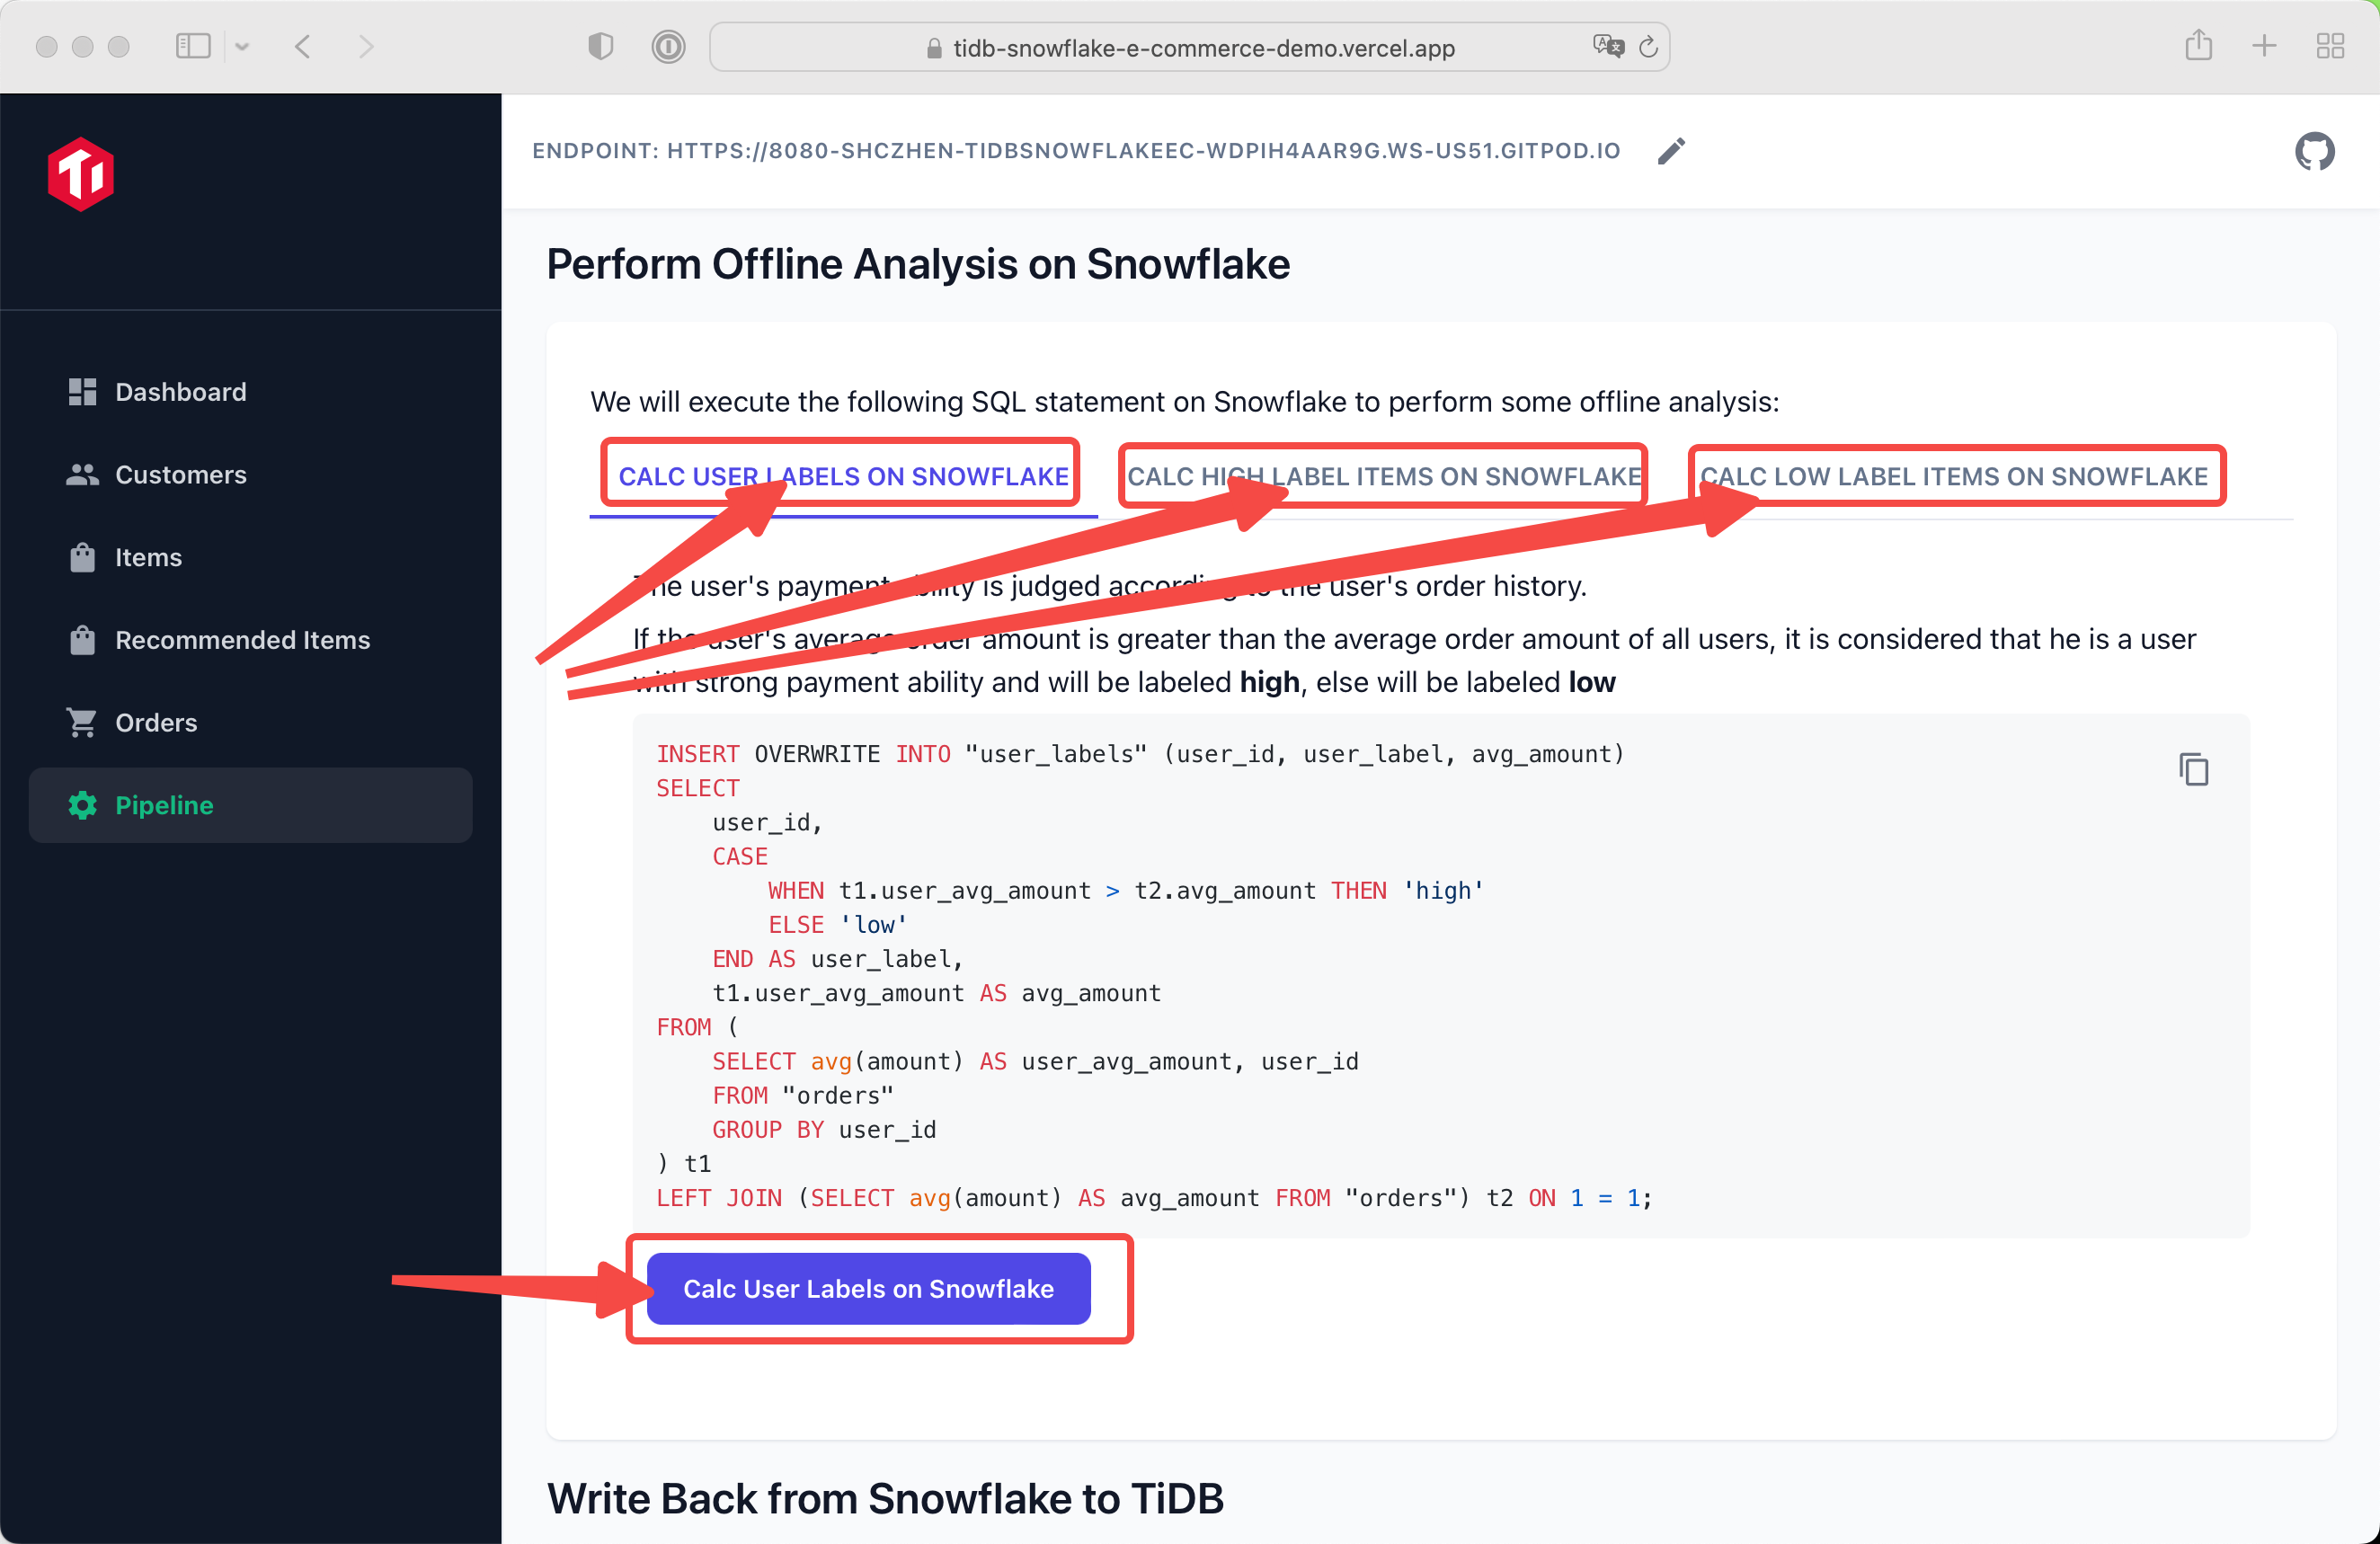
You can see three tabs, each tab perform different calculate job.
You can easily run the calculation by clicking the button below.
After calculation, item label and user label will display correctly in Items page and Recommended Items page.
You can easily wirte back analysis data from Snowflake to TiDB by clicking the button.
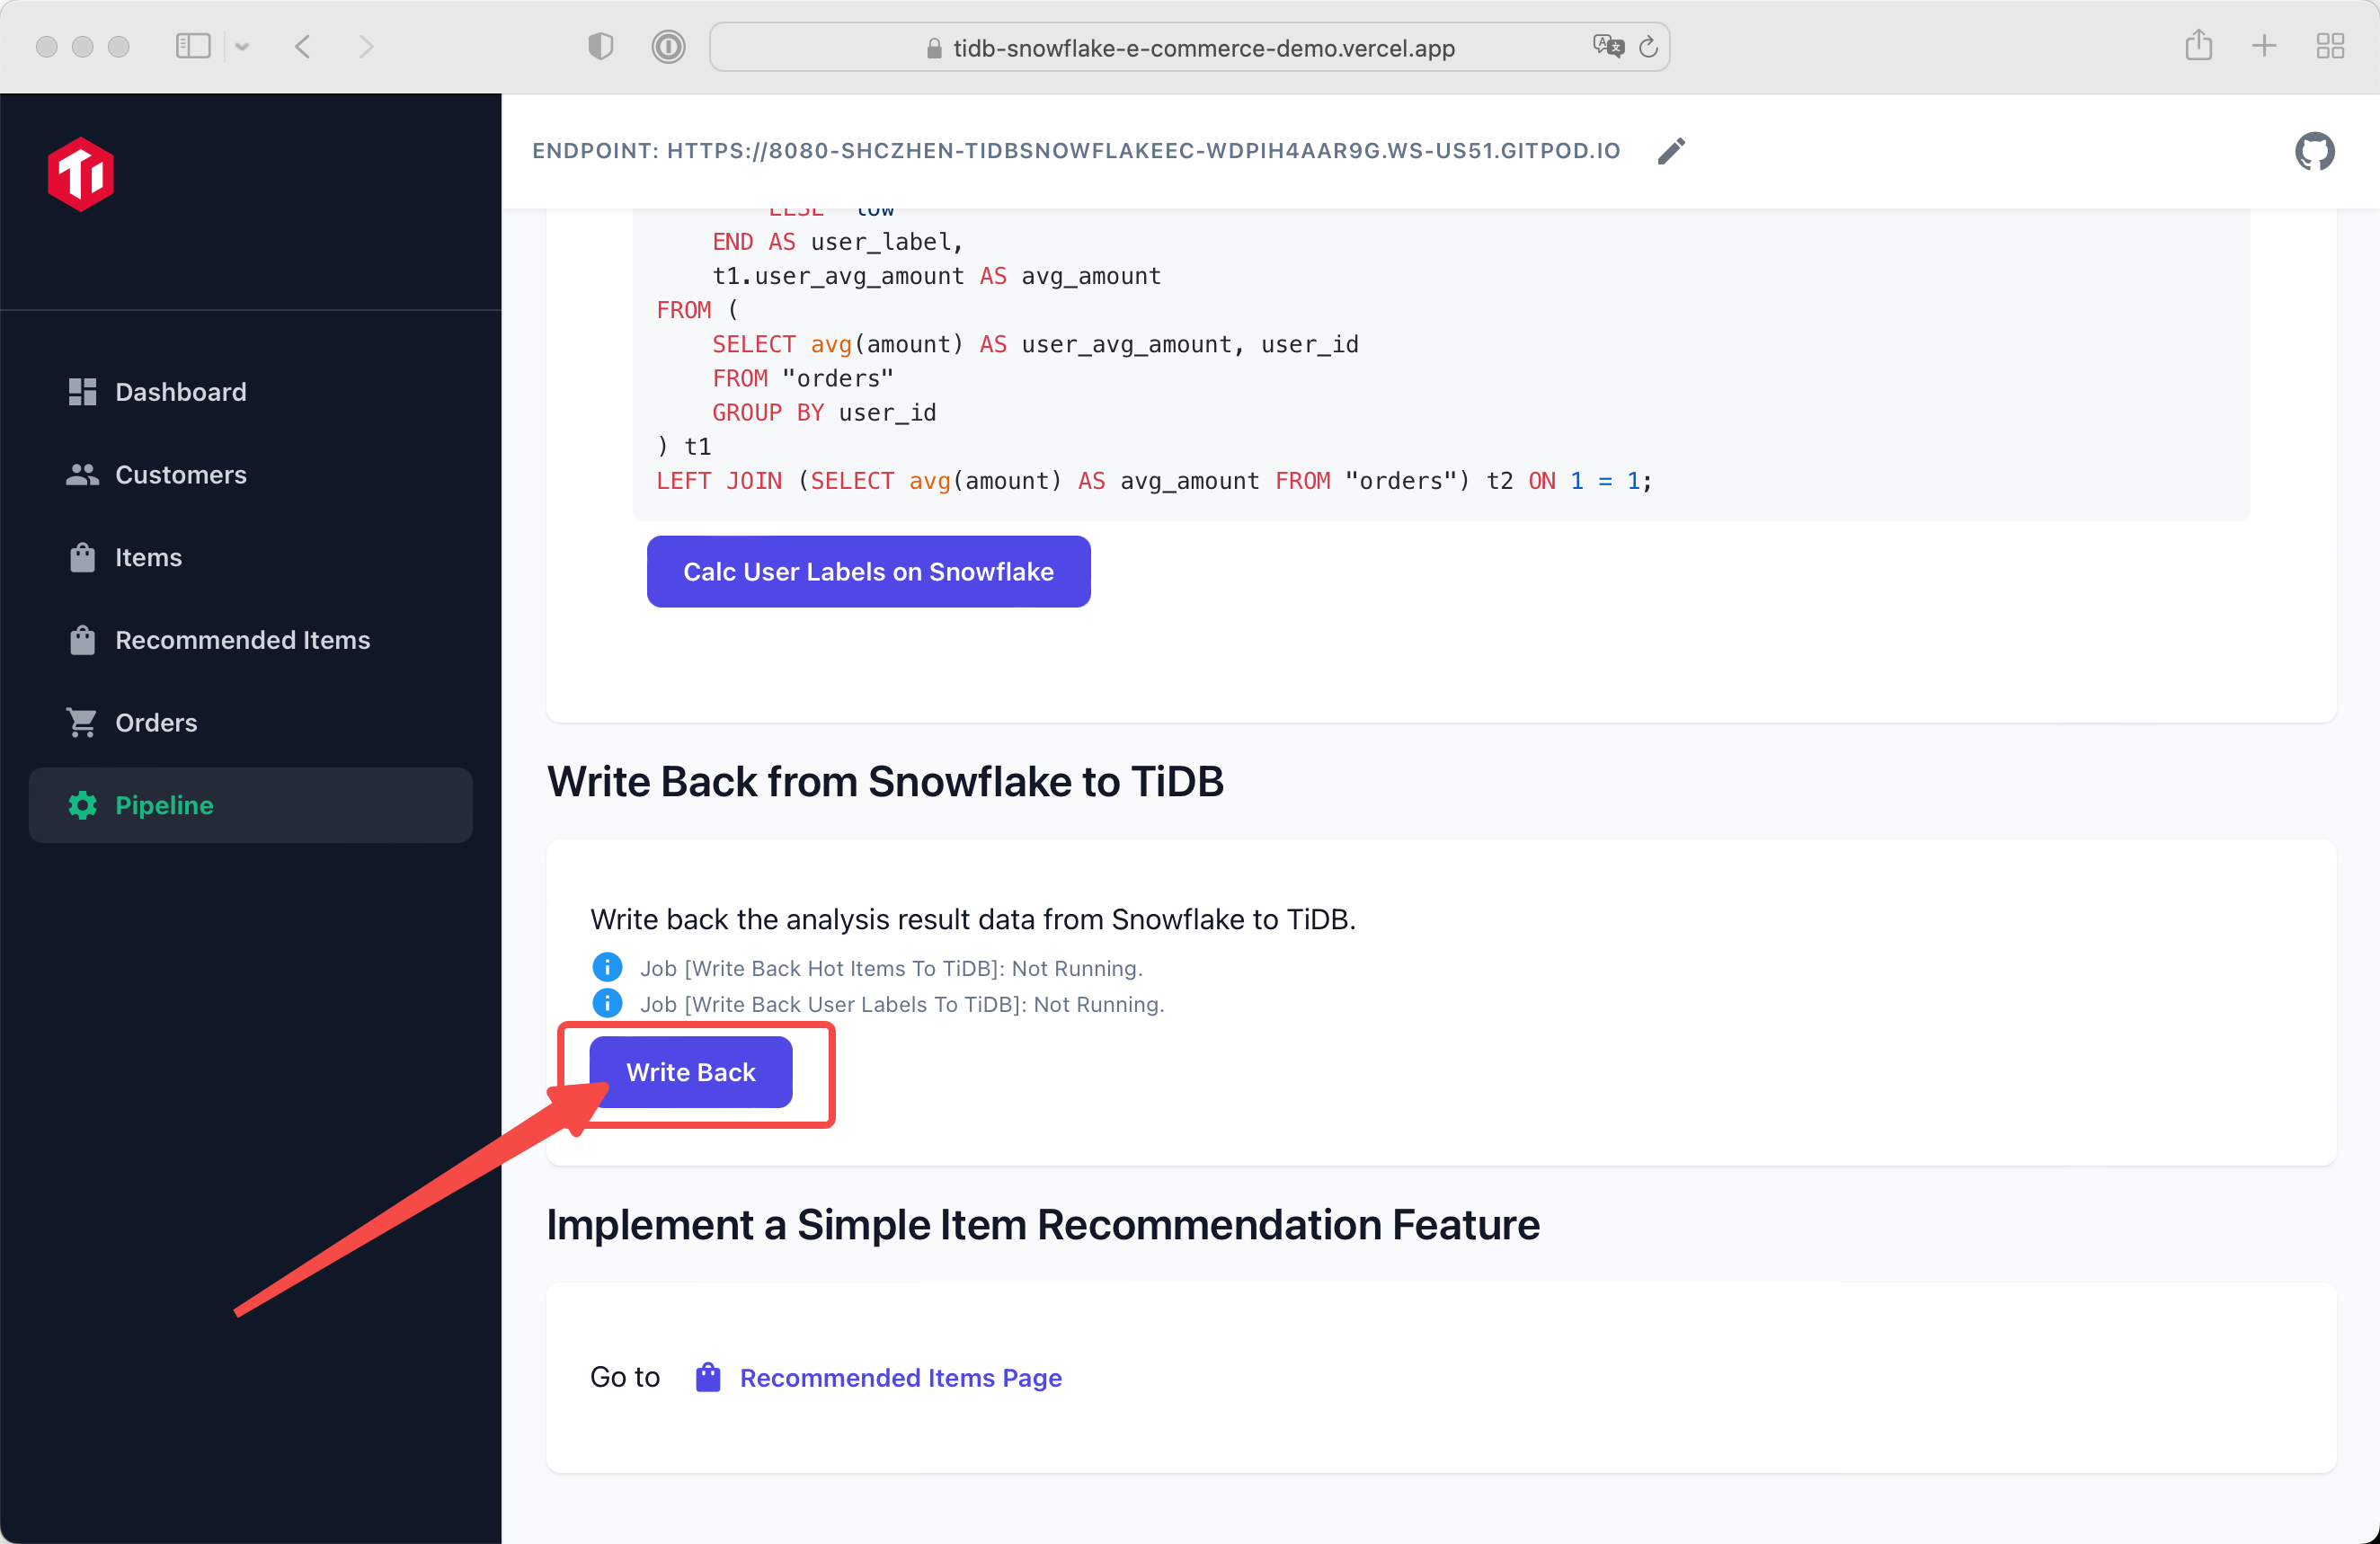
After writting data back to TiDB, you have finished all initial steps of this demo.
Then you can visit Recommend Items page to take a view of labeled items. Or you can visit any other page you like.