When starting to build an app, there are two points we can start from:
- Data structure - What data the app stores and produces and what actions can be done to modify that data
- The UI (User Interface) - How does the app looks to the user
In this tutorial we will start with the UI (User Interface), but that doesn't mean you should always start there. That is the visible part of our app that our users will see and interact with.
In this chapter we will learn how to create a basic React app. The app will contain a basic view that will render a list of conversations within our app. We will gradually create our app, so for now, instead of using real data, we will use in-memory fake data instead of calling a server.
In order to save time, instead of starting from scratch, we will use a boilerplate to kick-start our application.
When it comes to React apps, the most popular boilerplate is create-react-app
which is also officially maintained by Facebook, the creators of React.
We'll launch create-react-app using yarn create (so we won't need to install create-react-app permanently),
and run the react-app command to create the basis for our WhatsApp Clone.
In your command line, navigate to the folder you want to put your app's folder in and run:
$ yarn create react-app whatsapp-clone-client --template typescript
Note how we used the
clientpostfix. That's because we're planning to create a server as well on later chapters.
It will create a directory called whatsapp-clone-client inside the current folder.
Inside that directory, it will generate the initial project structure and install the needed dependencies.
No configuration or complicated folder structures, just the files you need to build your app.
In our project, we're gonna use TypeScript (indicated by the
--typescriptcommand). The main advantage of using TypeScript over using plain JavaScript is that if we want, we get to tell the compiler what types and data structures we expect in certain places, so that the compiler (which unlike a human never forgets) will remind us when we make a mistake and assume something that is not true. The more information we will provide to the compiler, the more the compiler will be able to help us.
Once the installation is done, you can open your project folder:
$ cd whatsapp-clone-client
Inside the newly created project, you can run some built-in commands:
$ yarn start
Runs the app in development mode. Open [http://localhost:3000](http://localhost:3000) to view it in the browser:

Let's look at what create-react-app has created for us in order to understand everything that's going on.
First thing, let's look at what webpage is being served to the browser.
That webpage in index.html that sits under the public folder.
@@ -0,0 +1,43 @@
+┊  ┊ 1┊<!DOCTYPE html>
+┊  ┊ 2┊<html lang="en">
+┊  ┊ 3┊  <head>
+┊  ┊ 4┊    <meta charset="utf-8" />
+┊  ┊ 5┊    <link rel="icon" href="%PUBLIC_URL%/favicon.ico" />
+┊  ┊ 6┊    <meta name="viewport" content="width=device-width, initial-scale=1" />
+┊  ┊ 7┊    <meta name="theme-color" content="#000000" />
+┊  ┊ 8┊    <meta
+┊  ┊ 9┊      name="description"
+┊  ┊10┊      content="Web site created using create-react-app"
+┊  ┊11┊    />
+┊  ┊12┊    <link rel="apple-touch-icon" href="%PUBLIC_URL%/logo192.png" />
+┊  ┊13┊    <!--
+┊  ┊14┊      manifest.json provides metadata used when your web app is installed on a
+┊  ┊15┊      user's mobile device or desktop. See https://developers.google.com/web/fundamentals/web-app-manifest/
+┊  ┊16┊    -->
+┊  ┊17┊    <link rel="manifest" href="%PUBLIC_URL%/manifest.json" />
+┊  ┊18┊    <!--
+┊  ┊19┊      Notice the use of %PUBLIC_URL% in the tags above.
+┊  ┊20┊      It will be replaced with the URL of the `public` folder during the build.
+┊  ┊21┊      Only files inside the `public` folder can be referenced from the HTML.
+┊  ┊22┊
+┊  ┊23┊      Unlike "/favicon.ico" or "favicon.ico", "%PUBLIC_URL%/favicon.ico" will
+┊  ┊24┊      work correctly both with client-side routing and a non-root public URL.
+┊  ┊25┊      Learn how to configure a non-root public URL by running `npm run build`.
+┊  ┊26┊    -->
+┊  ┊27┊    <title>React App</title>
+┊  ┊28┊  </head>
+┊  ┊29┊  <body>
+┊  ┊30┊    <noscript>You need to enable JavaScript to run this app.</noscript>
+┊  ┊31┊    <div id="root"></div>
+┊  ┊32┊    <!--
+┊  ┊33┊      This HTML file is a template.
+┊  ┊34┊      If you open it directly in the browser, you will see an empty page.
+┊  ┊35┊
+┊  ┊36┊      You can add webfonts, meta tags, or analytics to this file.
+┊  ┊37┊      The build step will place the bundled scripts into the <body> tag.
+┊  ┊38┊
+┊  ┊39┊      To begin the development, run `npm start` or `yarn start`.
+┊  ┊40┊      To create a production bundle, use `npm run build` or `yarn build`.
+┊  ┊41┊    -->
+┊  ┊42┊  </body>
+┊  ┊43┊</html>
As you can see, this file is a regular HTML file. You will want to edit it's <title> to name our real app:
@@ -24,7 +24,7 @@
 ┊24┊24┊      work correctly both with client-side routing and a non-root public URL.
 ┊25┊25┊      Learn how to configure a non-root public URL by running `npm run build`.
 ┊26┊26┊    -->
-┊27┊  ┊    <title>React App</title>
+┊  ┊27┊    <title>WhatsApp Clone</title>
 ┊28┊28┊  </head>
 ┊29┊29┊  <body>
 ┊30┊30┊    <noscript>You need to enable JavaScript to run this app.</noscript>
In the public folder we will place assets that are not going to change, like favicon.ico, static images and the HTML templates.
When we will prepare to app for production, a script from create-react-app will place those assets in a build folder and reference them into the
HTML template.
Another file in the public folder is the manifest.json file that gives browsers information about our app in case the users will install the app permanently on their
mobile phones or desktop apps.
You can read more about it here: https://developers.google.com/web/fundamentals/web-app-manifest/.
@@ -1,6 +1,6 @@
 ┊1┊1┊{
-┊2┊ ┊  "short_name": "React App",
-┊3┊ ┊  "name": "Create React App Sample",
+┊ ┊2┊  "short_name": "WhatsApp Clone",
+┊ ┊3┊  "name": "An open source chat app",
 ┊4┊4┊  "icons": [
 ┊5┊5┊    {
 ┊6┊6┊      "src": "favicon.ico",
Now the HTML file has in it's tag just one <div id="root"></div> tag which is empty.
So how do we get the nice React logo that is being rendered onto our screen?
create-react-app has scripts that will run the src/index.tsx file together with our HTML template, so let's look what this file is doing.
@@ -0,0 +1,17 @@
+┊  ┊ 1┊import React from 'react';
+┊  ┊ 2┊import ReactDOM from 'react-dom';
+┊  ┊ 3┊import './index.css';
+┊  ┊ 4┊import App from './App';
+┊  ┊ 5┊import * as serviceWorker from './serviceWorker';
+┊  ┊ 6┊
+┊  ┊ 7┊ReactDOM.render(
+┊  ┊ 8┊  <React.StrictMode>
+┊  ┊ 9┊    <App />
+┊  ┊10┊  </React.StrictMode>,
+┊  ┊11┊  document.getElementById('root')
+┊  ┊12┊);
+┊  ┊13┊
+┊  ┊14┊// If you want your app to work offline and load faster, you can change
+┊  ┊15┊// unregister() to register() below. Note this comes with some pitfalls.
+┊  ┊16┊// Learn more about service workers: https://bit.ly/CRA-PWA
+┊  ┊17┊serviceWorker.unregister();
The important thing to see here is that React is calling it's render method and telling it to render the App component into a document where id equals root.
So now you know where React is coming into our html template.
But where does the App React component comes from and where does React itself comes from?
The index.tsx file imports this code from outside of the file using the import command.
In the case of the App component, we can see it bring it from the path './App', which is in the same folder ('src').
Getting React, it is simply calling it by name instead of a path. That means that the import will automatically look for a folder named react under the node-modules folder.
node-modules is a default folder which will include all of the libraries we want to use in our app.
yarn will install those libraries according to the dependencies listed inside the package.json file, so let's look into that.
Under dependencies you can see all the libraries our app currently depends on.
@@ -0,0 +1,43 @@
+┊  ┊ 1┊{
+┊  ┊ 2┊  "name": "whatsapp-clone-client",
+┊  ┊ 3┊  "version": "0.1.0",
+┊  ┊ 4┊  "private": true,
+┊  ┊ 5┊  "repository": {
+┊  ┊ 6┊    "type": "git",
+┊  ┊ 7┊    "url": "https://github.com/Urigo/WhatsApp-Clone-Client-React.git"
+┊  ┊ 8┊  },
+┊  ┊ 9┊  "dependencies": {
+┊  ┊10┊    "@testing-library/jest-dom": "^4.2.4",
+┊  ┊11┊    "@testing-library/react": "^9.3.2",
+┊  ┊12┊    "@testing-library/user-event": "^7.1.2",
+┊  ┊13┊    "@types/jest": "^24.0.0",
+┊  ┊14┊    "@types/node": "^12.0.0",
+┊  ┊15┊    "@types/react": "^16.9.0",
+┊  ┊16┊    "@types/react-dom": "^16.9.0",
+┊  ┊17┊    "react": "^16.13.1",
+┊  ┊18┊    "react-dom": "^16.13.1",
+┊  ┊19┊    "react-scripts": "3.4.1",
+┊  ┊20┊    "typescript": "~3.7.2"
+┊  ┊21┊  },
+┊  ┊22┊  "scripts": {
+┊  ┊23┊    "start": "react-scripts start",
+┊  ┊24┊    "build": "react-scripts build",
+┊  ┊25┊    "test": "react-scripts test",
+┊  ┊26┊    "eject": "react-scripts eject"
+┊  ┊27┊  },
+┊  ┊28┊  "eslintConfig": {
+┊  ┊29┊    "extends": "react-app"
+┊  ┊30┊  },
+┊  ┊31┊  "browserslist": {
+┊  ┊32┊    "production": [
+┊  ┊33┊      ">0.2%",
+┊  ┊34┊      "not dead",
+┊  ┊35┊      "not op_mini all"
+┊  ┊36┊    ],
+┊  ┊37┊    "development": [
+┊  ┊38┊      "last 1 chrome version",
+┊  ┊39┊      "last 1 firefox version",
+┊  ┊40┊      "last 1 safari version"
+┊  ┊41┊    ]
+┊  ┊42┊  }
+┊  ┊43┊}
### Editor ideas notes start:
Version dependencies solver - different ideas
Multiple versions install vs. single version
Look at lock files
look at npm_modules
Yarn 2.0
Talk about StrictMode https://reactjs.org/docs/strict-mode.html
### Editor ideas notes end:
You can also see other values in there like scripts, which will teach yarn new commands that we can use.
The right side will name the command and the left would be the actual command that it will run.
Another file that got created is tsconfig.json:
@@ -0,0 +1,25 @@
+┊  ┊ 1┊{
+┊  ┊ 2┊  "compilerOptions": {
+┊  ┊ 3┊    "target": "es5",
+┊  ┊ 4┊    "lib": [
+┊  ┊ 5┊      "dom",
+┊  ┊ 6┊      "dom.iterable",
+┊  ┊ 7┊      "esnext"
+┊  ┊ 8┊    ],
+┊  ┊ 9┊    "allowJs": true,
+┊  ┊10┊    "skipLibCheck": true,
+┊  ┊11┊    "esModuleInterop": true,
+┊  ┊12┊    "allowSyntheticDefaultImports": true,
+┊  ┊13┊    "strict": true,
+┊  ┊14┊    "forceConsistentCasingInFileNames": true,
+┊  ┊15┊    "module": "esnext",
+┊  ┊16┊    "moduleResolution": "node",
+┊  ┊17┊    "resolveJsonModule": true,
+┊  ┊18┊    "isolatedModules": true,
+┊  ┊19┊    "noEmit": true,
+┊  ┊20┊    "jsx": "react"
+┊  ┊21┊  },
+┊  ┊22┊  "include": [
+┊  ┊23┊    "src"
+┊  ┊24┊  ]
+┊  ┊25┊}
That file specifies options for the Typescript compiler when it takes our code and transforms it from Typescript into Javascript.
Some noticeable configuration options for that file are:
target- What kind of Javascript should the compilers output? in our casees5is the version of Javascript that is supported by many browsers. If you know that your app would run only on newer browsers or a Node environment, you can change that value to a newer version and gain performance improvements.lib- If you are using new syntax from Javascript, the compiler can add to it's output libraries that would help you support the new syntax even if the browsers don't know those.strict- We can give Typescript a lot of information or not so much. The more we give it the more it can help us. adding the strict option will make the compiler warn us when we won't give it enough information.
For the full set of options, check out the official docs;
Now, let's look at our App's code in src/App.tsx:
@@ -0,0 +1,26 @@
+┊  ┊ 1┊import React from 'react';
+┊  ┊ 2┊import logo from './logo.svg';
+┊  ┊ 3┊import './App.css';
+┊  ┊ 4┊
+┊  ┊ 5┊function App() {
+┊  ┊ 6┊  return (
+┊  ┊ 7┊    <div className="App">
+┊  ┊ 8┊      <header className="App-header">
+┊  ┊ 9┊        <img src={logo} className="App-logo" alt="logo" />
+┊  ┊10┊        <p>
+┊  ┊11┊          Edit <code>src/App.tsx</code> and save to reload.
+┊  ┊12┊        </p>
+┊  ┊13┊        <a
+┊  ┊14┊          className="App-link"
+┊  ┊15┊          href="https://reactjs.org"
+┊  ┊16┊          target="_blank"
+┊  ┊17┊          rel="noopener noreferrer"
+┊  ┊18┊        >
+┊  ┊19┊          Learn React
+┊  ┊20┊        </a>
+┊  ┊21┊      </header>
+┊  ┊22┊    </div>
+┊  ┊23┊  );
+┊  ┊24┊}
+┊  ┊25┊
+┊  ┊26┊export default App;
We can see that our app is just a function named App.
const App means we declare a variable named App and const means it cannot be changed after it has been declared (you can't do App = XX; later in the app);
Next we assign App with a function. Something like: const App = () => {}.
That way of creating functions is called arrow functions. It is almost equivalent to const App = function(){}.
So it is a function that doesn't accept any parameters into it.
That function returns jsx. A visual language from React that describes how our component should look like.
So all a React component is, is simply a function that returns how it look like.
We then export this function so that React could import it from index.tsx.
In our own component we will import things like the logo and styles that the component uses and those will be imported together with it each time something will import our component.
The last thing we haven't explained is the following part: App: React.FC.
Those are Typescript typings. Everything after : describes the types of the App variable and has no affect on the behavior and execution of the app.
It will tell Typescript how App is supposed to look like, so that in case we make a mistake, Typescript will warn us before we get the app running.
So what are the types of React.FC? You can check it out inside by using command+click on it's name.
You see that it accepts P as props into the component and needs to return React.Element or null.
Let's test out how typescript typings work: Declare a Typescript interface named AppProps that includes a property called name of type string. Now use that interface to describe the shape that app's props should have: update the line that declares app to const App: React.FC<AppProps> = ({name}) => {
Now open the file src/index.tsx.
You can see that our editor is calling out that there is an error in our code because no name prop is passed to the App component.
You will encounter those errors a lot as you develop. Always read the errors all the way. Take your time to understand each sentence there because that will save you a lot of time. That is true also when you are not programming and just encounter errors in the apps you are using...
As the error message suggests, give the App component a name prop. If you pass a prop that is not a string like true or 1+1, TypeScript will let you know with an error.
The default for React.FC is that there are no props passed inside so if we'll bring that back but keep sending the name value from index.tsx in the code, you should now get an error because you are passing a props that the component doesn't accept.
Those errors can be very useful when your app grows. Make sure to define types on the component itself like we have done now. It would make it easier to identify the issues.
Next, we have App.css. This is used to style our App component.
Play around with changing some of the values and see how it changes your view.
Right now the link between the styles and the components is done by class names (App-header, etc).
Later on we'll learn better strategies of sorting our styles and making
sure they are not touching components that we don't want them to affect.
Next file - App.test.tsx.
This file contains automatic tests to make sure our app is doing what it's supposed to do.
We are programmers, that means that many times our job is to take something manual and making it automatic. That's why we should also strive to automate things we do ourselves. Type checking is one area, testing is another. If we can automate tests and run them all the time, it can save us a lot of time and bring us a lot of confidence that when we change our code, we haven't destroyed anything.
The testing tool that create-react-app provides us with is Jest.
Right now we have only one simple test - it renders the App React component and makes sure nothing crashes.
Run the test by running yarn test in the command line.
Now go and remove the export from the app component. see how the tests picked up immediately that something is wrong.
In a later chapter we'll learn how to test more things to make sure we get guarantees that things are working as expected.
Checkout the package versions on the package.json file.
you can see the ^ sign. That means that every time someone will get this code and run yarn, what yarn will do is to get the newest version on that range.
We don't want that. We want to first be notified when a new version is out and we want to explicitly update it.
That's why we need to add 2 things into our code:
First, to delete all ^ (while also let's update all dependencies to their current latest).
@@ -7,17 +7,17 @@
 ┊ 7┊ 7┊    "url": "https://github.com/Urigo/WhatsApp-Clone-Client-React.git"
 ┊ 8┊ 8┊  },
 ┊ 9┊ 9┊  "dependencies": {
-┊10┊  ┊    "@testing-library/jest-dom": "^4.2.4",
-┊11┊  ┊    "@testing-library/react": "^9.3.2",
-┊12┊  ┊    "@testing-library/user-event": "^7.1.2",
-┊13┊  ┊    "@types/jest": "^24.0.0",
-┊14┊  ┊    "@types/node": "^12.0.0",
-┊15┊  ┊    "@types/react": "^16.9.0",
-┊16┊  ┊    "@types/react-dom": "^16.9.0",
-┊17┊  ┊    "react": "^16.13.1",
-┊18┊  ┊    "react-dom": "^16.13.1",
+┊  ┊10┊    "@testing-library/jest-dom": "5.8.0",
+┊  ┊11┊    "@testing-library/react": "10.0.4",
+┊  ┊12┊    "@testing-library/user-event": "10.3.2",
+┊  ┊13┊    "@types/jest": "25.2.3",
+┊  ┊14┊    "@types/node": "14.0.4",
+┊  ┊15┊    "@types/react": "16.9.35",
+┊  ┊16┊    "@types/react-dom": "16.9.8",
+┊  ┊17┊    "react": "16.13.1",
+┊  ┊18┊    "react-dom": "16.13.1",
 ┊19┊19┊    "react-scripts": "3.4.1",
-┊20┊  ┊    "typescript": "~3.7.2"
+┊  ┊20┊    "typescript": "3.9.3"
 ┊21┊21┊  },
 ┊22┊22┊  "scripts": {
 ┊23┊23┊    "start": "react-scripts start",
@@ -40,4 +40,4 @@
┊40┊40┊ "last 1 safari version"
┊41┊41┊ ]
┊42┊42┊ }
-┊43┊ ┊}
+┊ ┊43┊}🚫↵Second, to add the following command that will make each yarn add <package-name> command automatically add the library without any additions or ^ signs into it.
@@ -0,0 +1 @@
+┊ ┊1┊save-exact=true
There is no need to upgrade your dependencies at all. If they work it's ok. But, it is highly recommended. Packages keep improving all the time with important things that would help your app and will save you time. If you make it a routine to upgrade it makes it much easier then to upgrade every couple of months. In order to discover if there are new versions of libraries there are 2 options.
One is to manually run a check every day or so to find new packages out there.
You can do that by going to your command line in the root folder of the project and type yarn outdated.
But if you want to get notified when there is a new version of your dependencies, you can check out Renovate.
If your project is hosted somewhere, for example Github, it will analyze your package.json and submit a new PR when a new release happened from one of your dependencies.
If you want to save your code somewhere where you can track versions, using git and Github is a good choice. Here is a nice guide to start: https://try.github.io/.
You can check out the .gitignore file create-react-app has set up for us in the root folder.
That file will tell .git what not to save and not to upload.
Some developers write code in a different style than others and it might be annoying while doing code reviews or even merging conflicts. That's why we want to make it consistent. We're going to use Prettier which has an opinionated set of styling rules and supports many languages. Your IDE most likely supports it too.
$ yarn add prettier
We're going to define a npm script called format, few styling rules and we're also going to ignore node_modules:
@@ -0,0 +1,3 @@
+┊ ┊1┊node_modules
+┊ ┊2┊.prettierrc.yml
+┊ ┊3┊package.json🚫↵@@ -0,0 +1,3 @@
+┊ ┊1┊tabWidth: 2
+┊ ┊2┊singleQuote: true
+┊ ┊3┊jsxBracketSameLine: true@@ -14,6 +14,7 @@
┊14┊14┊ "@types/node": "14.0.4",
┊15┊15┊ "@types/react": "16.9.35",
┊16┊16┊ "@types/react-dom": "16.9.8",
+┊ ┊17┊ "prettier": "2.0.5",
┊17┊18┊ "react": "16.13.1",
┊18┊19┊ "react-dom": "16.13.1",
┊19┊20┊ "react-scripts": "3.4.1",@@ -23,7 +24,8 @@
┊23┊24┊ "start": "react-scripts start",
┊24┊25┊ "build": "react-scripts build",
┊25┊26┊ "test": "react-scripts test",
-┊26┊ ┊ "eject": "react-scripts eject"
+┊ ┊27┊ "eject": "react-scripts eject",
+┊ ┊28┊ "format": "prettier \"**/*.{ts,tsx,css,graphql}\" --write"
┊27┊29┊ },
┊28┊30┊ "eslintConfig": {
┊29┊31┊ "extends": "react-app"Now let's run:
$ yarn format
Prettier should format your code:
@@ -14,8 +14,7 @@
 ┊14┊14┊          className="App-link"
 ┊15┊15┊          href="https://reactjs.org"
 ┊16┊16┊          target="_blank"
-┊17┊  ┊          rel="noopener noreferrer"
-┊18┊  ┊        >
+┊  ┊17┊          rel="noopener noreferrer">
 ┊19┊18┊          Learn React
 ┊20┊19┊        </a>
 ┊21┊20┊      </header>
Remember to run
yarn formatbefore you commit your changes!
End of intro
Assuming that everything is set, we will now create our first screen - ChatsListScreen.
The ChatsListScreen component is responsible for showing the active conversations within our app.
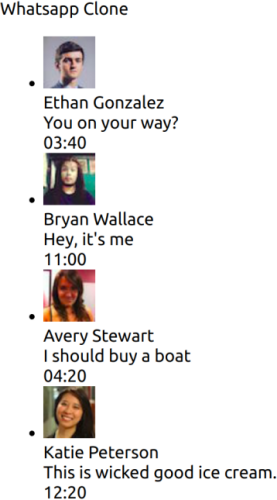
It's best to first schematically plan how our view's gonna look like. This would help us illustrate the intended view and also understand which React.Components / elements take part in it. This is how our screen's gonna look like:

Let's break down the image above and see what components are we gonna have in the ChatsListScreen:
- Navbar - Which should contain a simple static title for now.
- ChatsList - Where each item's gonna contain some data regards the user we're chatting with and information about the chat.
First let's remove the current React code and add our own code into it.
For now, let's create fake data on our HTML.
As this data will be changed and we are not going to manually add HTML tags every time there is a new message, let's move our data into a JSON structure. For now it would be a structure we will manually create. That way we can already make our React component behave like our final version.
@@ -1,23 +1,31 @@
 ┊ 1┊ 1┊import React from 'react';
-┊ 2┊  ┊import logo from './logo.svg';
-┊ 3┊  ┊import './App.css';
 ┊ 4┊ 2┊
 ┊ 5┊ 3┊function App() {
 ┊ 6┊ 4┊  return (
-┊ 7┊  ┊    <div className="App">
-┊ 8┊  ┊      <header className="App-header">
-┊ 9┊  ┊        <img src={logo} className="App-logo" alt="logo" />
-┊10┊  ┊        <p>
-┊11┊  ┊          Edit <code>src/App.tsx</code> and save to reload.
-┊12┊  ┊        </p>
-┊13┊  ┊        <a
-┊14┊  ┊          className="App-link"
-┊15┊  ┊          href="https://reactjs.org"
-┊16┊  ┊          target="_blank"
-┊17┊  ┊          rel="noopener noreferrer">
-┊18┊  ┊          Learn React
-┊19┊  ┊        </a>
-┊20┊  ┊      </header>
+┊  ┊ 5┊    <div>
+┊  ┊ 6┊      <div>Whatsapp Clone</div>
+┊  ┊ 7┊      <div>
+┊  ┊ 8┊        <ul>
+┊  ┊ 9┊          <li>
+┊  ┊10┊            <img
+┊  ┊11┊              src="https://randomuser.me/api/portraits/thumb/men/1.jpg"
+┊  ┊12┊              alt="Profile"
+┊  ┊13┊            />
+┊  ┊14┊            <div>Ethan Gonzalez</div>
+┊  ┊15┊            <div>You on your way?</div>
+┊  ┊16┊            <div>10:25</div>
+┊  ┊17┊          </li>
+┊  ┊18┊          <li>
+┊  ┊19┊            <img
+┊  ┊20┊              src="https://randomuser.me/api/portraits/thumb/men/2.jpg"
+┊  ┊21┊              alt="Profile"
+┊  ┊22┊            />
+┊  ┊23┊            <div>Bryan Wallace</div>
+┊  ┊24┊            <div>Hey, it's me</div>
+┊  ┊25┊            <div>13:27</div>
+┊  ┊26┊          </li>
+┊  ┊27┊        </ul>
+┊  ┊28┊      </div>
 ┊21┊29┊    </div>
 ┊22┊30┊  );
 ┊23┊31┊}
If all we do in the function is just returning a value, instead of const App: React.FC = () => { return () }; we can also do const App: React.FC = () => ();
So let's use that for our ChatsList component.
We have to import React to make sure it will work.
We also have to export our component function so that the App component would be able to import it.
(You can't import Javascript variables from a file if that file won't explicitly export it).
As we don't use those styles and logos anymore, we can delete the src/App.css and the src/logo.svg files from our app.
Now let's move ChatsList into it's own component:
@@ -0,0 +1,28 @@
+┊  ┊ 1┊import React from 'react';
+┊  ┊ 2┊
+┊  ┊ 3┊const ChatsList: React.FC = () => (
+┊  ┊ 4┊  <div>
+┊  ┊ 5┊    <ul>
+┊  ┊ 6┊      <li>
+┊  ┊ 7┊        <img
+┊  ┊ 8┊          src="https://randomuser.me/api/portraits/thumb/men/1.jpg"
+┊  ┊ 9┊          alt="Profile"
+┊  ┊10┊        />
+┊  ┊11┊        <div>Ethan Gonzalez</div>
+┊  ┊12┊        <div>You on your way?</div>
+┊  ┊13┊        <div>10:25</div>
+┊  ┊14┊      </li>
+┊  ┊15┊      <li>
+┊  ┊16┊        <img
+┊  ┊17┊          src="https://randomuser.me/api/portraits/thumb/men/2.jpg"
+┊  ┊18┊          alt="Profile"
+┊  ┊19┊        />
+┊  ┊20┊        <div>Bryan Wallace</div>
+┊  ┊21┊        <div>Hey, it's me</div>
+┊  ┊22┊        <div>13:27</div>
+┊  ┊23┊      </li>
+┊  ┊24┊    </ul>
+┊  ┊25┊  </div>
+┊  ┊26┊);
+┊  ┊27┊
+┊  ┊28┊export default ChatsList;
and let's import that component into the App component and use the shorter syntax for the functional component:
@@ -1,31 +1,11 @@
 ┊ 1┊ 1┊import React from 'react';
+┊  ┊ 2┊import ChatsList from './components/ChatsList';
 ┊ 2┊ 3┊
 ┊ 3┊ 4┊function App() {
 ┊ 4┊ 5┊  return (
 ┊ 5┊ 6┊    <div>
 ┊ 6┊ 7┊      <div>Whatsapp Clone</div>
-┊ 7┊  ┊      <div>
-┊ 8┊  ┊        <ul>
-┊ 9┊  ┊          <li>
-┊10┊  ┊            <img
-┊11┊  ┊              src="https://randomuser.me/api/portraits/thumb/men/1.jpg"
-┊12┊  ┊              alt="Profile"
-┊13┊  ┊            />
-┊14┊  ┊            <div>Ethan Gonzalez</div>
-┊15┊  ┊            <div>You on your way?</div>
-┊16┊  ┊            <div>10:25</div>
-┊17┊  ┊          </li>
-┊18┊  ┊          <li>
-┊19┊  ┊            <img
-┊20┊  ┊              src="https://randomuser.me/api/portraits/thumb/men/2.jpg"
-┊21┊  ┊              alt="Profile"
-┊22┊  ┊            />
-┊23┊  ┊            <div>Bryan Wallace</div>
-┊24┊  ┊            <div>Hey, it's me</div>
-┊25┊  ┊            <div>13:27</div>
-┊26┊  ┊          </li>
-┊27┊  ┊        </ul>
-┊28┊  ┊      </div>
+┊  ┊ 8┊      <ChatsList />
 ┊29┊ 9┊    </div>
 ┊30┊10┊  );
 ┊31┊11┊}
and let's do the same for our Navbar:
@@ -1,10 +1,11 @@
 ┊ 1┊ 1┊import React from 'react';
 ┊ 2┊ 2┊import ChatsList from './components/ChatsList';
+┊  ┊ 3┊import ChatsNavbar from './components/ChatsNavbar';
 ┊ 3┊ 4┊
 ┊ 4┊ 5┊function App() {
 ┊ 5┊ 6┊  return (
 ┊ 6┊ 7┊    <div>
-┊ 7┊  ┊      <div>Whatsapp Clone</div>
+┊  ┊ 8┊      <ChatsNavbar />
 ┊ 8┊ 9┊      <ChatsList />
 ┊ 9┊10┊    </div>
┊10┊11┊ );@@ -0,0 +1,5 @@
+┊ ┊1┊import React from 'react';
+┊ ┊2┊
+┊ ┊3┊const ChatsNavbar: React.FC = () => <div>Whatsapp Clone</div>;
+┊ ┊4┊
+┊ ┊5┊export default ChatsNavbar;React apps tend to store React.Components under a directory located at src/components, and so we're gonna follow this pattern.
We will create a directory called ChatsListScreen in the components dir where we're simply gonna import and put together the Navbar and ChatsList components.
This is how the contents of that directory should look like:
ChatsListScreen
├── index.tsx
├── ChatsList
└── ChatsNavbar
We will use the index.tsx file to define that component, this way we can import it using the directory name:
@@ -1,14 +1,10 @@
 ┊ 1┊ 1┊import React from 'react';
-┊ 2┊  ┊import ChatsList from './components/ChatsList';
-┊ 3┊  ┊import ChatsNavbar from './components/ChatsNavbar';
+┊  ┊ 2┊import ChatsListScreen from './components/ChatsListScreen';
 ┊ 4┊ 3┊
-┊ 5┊  ┊function App() {
-┊ 6┊  ┊  return (
-┊ 7┊  ┊    <div>
-┊ 8┊  ┊      <ChatsNavbar />
-┊ 9┊  ┊      <ChatsList />
-┊10┊  ┊    </div>
-┊11┊  ┊  );
-┊12┊  ┊}
+┊  ┊ 4┊const App: React.FC = () => (
+┊  ┊ 5┊  <div>
+┊  ┊ 6┊    <ChatsListScreen />
+┊  ┊ 7┊  </div>
+┊  ┊ 8┊);
 ┊13┊ 9┊
┊14┊10┊export default App;@@ -0,0 +1,12 @@
+┊ ┊ 1┊import React from 'react';
+┊ ┊ 2┊import ChatsNavbar from './ChatsNavbar';
+┊ ┊ 3┊import ChatsList from './ChatsList';
+┊ ┊ 4┊
+┊ ┊ 5┊const ChatsListScreen: React.FC = () => (
+┊ ┊ 6┊ <div>
+┊ ┊ 7┊ <ChatsNavbar />
+┊ ┊ 8┊ <ChatsList />
+┊ ┊ 9┊ </div>
+┊ ┊10┊);
+┊ ┊11┊
+┊ ┊12┊export default ChatsListScreen;Now, we have our app rendering our view, but it is completely static and manual in the code.
If we had 10 messages, we wouldn't want to type all of those HTML tags again and again. Also if the data will change, the app should do this update itself without the need of hand written code.
So let's create a file that lists just the data of our chats and then make our React component render a line for each entry in that file.
We will create the file in a JSON format:
@@ -0,0 +1,49 @@
+┊  ┊ 1┊export const messages = [
+┊  ┊ 2┊  {
+┊  ┊ 3┊    id: '1',
+┊  ┊ 4┊    content: 'You on your way?',
+┊  ┊ 5┊    createdAt: new Date(Date.now() - 60 * 1000 * 1000),
+┊  ┊ 6┊  },
+┊  ┊ 7┊  {
+┊  ┊ 8┊    id: '2',
+┊  ┊ 9┊    content: "Hey, it's me",
+┊  ┊10┊    createdAt: new Date(Date.now() - 2 * 60 * 1000 * 1000),
+┊  ┊11┊  },
+┊  ┊12┊  {
+┊  ┊13┊    id: '3',
+┊  ┊14┊    content: 'I should buy a boat',
+┊  ┊15┊    createdAt: new Date(Date.now() - 24 * 60 * 1000 * 1000),
+┊  ┊16┊  },
+┊  ┊17┊  {
+┊  ┊18┊    id: '4',
+┊  ┊19┊    content: 'This is wicked good ice cream.',
+┊  ┊20┊    createdAt: new Date(Date.now() - 14 * 24 * 60 * 1000 * 1000),
+┊  ┊21┊  },
+┊  ┊22┊];
+┊  ┊23┊
+┊  ┊24┊export const chats = [
+┊  ┊25┊  {
+┊  ┊26┊    id: '1',
+┊  ┊27┊    name: 'Ethan Gonzalez',
+┊  ┊28┊    picture: 'https://randomuser.me/api/portraits/thumb/men/1.jpg',
+┊  ┊29┊    lastMessage: messages.find((m) => m.id === '1'),
+┊  ┊30┊  },
+┊  ┊31┊  {
+┊  ┊32┊    id: '2',
+┊  ┊33┊    name: 'Bryan Wallace',
+┊  ┊34┊    picture: 'https://randomuser.me/api/portraits/thumb/men/2.jpg',
+┊  ┊35┊    lastMessage: messages.find((m) => m.id === '2'),
+┊  ┊36┊  },
+┊  ┊37┊  {
+┊  ┊38┊    id: '3',
+┊  ┊39┊    name: 'Avery Stewart',
+┊  ┊40┊    picture: 'https://randomuser.me/api/portraits/thumb/women/1.jpg',
+┊  ┊41┊    lastMessage: messages.find((m) => m.id === '3'),
+┊  ┊42┊  },
+┊  ┊43┊  {
+┊  ┊44┊    id: '4',
+┊  ┊45┊    name: 'Katie Peterson',
+┊  ┊46┊    picture: 'https://randomuser.me/api/portraits/thumb/women/2.jpg',
+┊  ┊47┊    lastMessage: messages.find((m) => m.id === '4'),
+┊  ┊48┊  },
+┊  ┊49┊];
We are giving IDs for the values just like a database gives a unique id for each value.
This is so we can reference specific values, for example, last message would actually reference the other array instead of duplicating the values.
Now let's change ChatsList component to import the data from that file. Then to use the Javascript map function to render a line for each data entry:
@@ -1,26 +1,15 @@
 ┊ 1┊ 1┊import React from 'react';
+┊  ┊ 2┊import { chats } from '../../db';
 ┊ 2┊ 3┊
 ┊ 3┊ 4┊const ChatsList: React.FC = () => (
 ┊ 4┊ 5┊  <div>
 ┊ 5┊ 6┊    <ul>
-┊ 6┊  ┊      <li>
-┊ 7┊  ┊        <img
-┊ 8┊  ┊          src="https://randomuser.me/api/portraits/thumb/men/1.jpg"
-┊ 9┊  ┊          alt="Profile"
-┊10┊  ┊        />
-┊11┊  ┊        <div>Ethan Gonzalez</div>
-┊12┊  ┊        <div>You on your way?</div>
-┊13┊  ┊        <div>10:25</div>
-┊14┊  ┊      </li>
-┊15┊  ┊      <li>
-┊16┊  ┊        <img
-┊17┊  ┊          src="https://randomuser.me/api/portraits/thumb/men/2.jpg"
-┊18┊  ┊          alt="Profile"
-┊19┊  ┊        />
-┊20┊  ┊        <div>Bryan Wallace</div>
-┊21┊  ┊        <div>Hey, it's me</div>
-┊22┊  ┊        <div>13:27</div>
-┊23┊  ┊      </li>
+┊  ┊ 7┊      {chats.map((chat) => (
+┊  ┊ 8┊        <li key={chat.id}>
+┊  ┊ 9┊          <img src={chat.picture} alt="Profile" />
+┊  ┊10┊          <div>{chat.name}</div>
+┊  ┊11┊        </li>
+┊  ┊12┊      ))}
 ┊24┊13┊    </ul>
 ┊25┊14┊  </div>
 ┊26┊15┊);
When running map on the chats array, it will run a function for each entry in the array and return a value.
The function will receive the current entry as a parameter.
In our case the function will get the current chat and will return a JSX line with the data of that specific chat.
Notice we are also adding the key tag with the ID of each chat.
If you remove that and render again you will see the following error inside the console of your Chrome developer tools:
Warning: Each child in a list should have a unique "key" prop.
By telling React how to identify and distinguish each element using the key value we help solve that problem and also making React faster.
Read here for more in depth explanation.
Now that we've rendered a line for each chat, let's add also the last message's content and creation date for each chat:
@@ -8,6 +8,8 @@
 ┊ 8┊ 8┊        <li key={chat.id}>
 ┊ 9┊ 9┊          <img src={chat.picture} alt="Profile" />
 ┊10┊10┊          <div>{chat.name}</div>
+┊  ┊11┊          <div>{chat.lastMessage.content}</div>
+┊  ┊12┊          <div>{chat.lastMessage.createdAt}</div>
 ┊11┊13┊        </li>
 ┊12┊14┊      ))}
 ┊13┊15┊    </ul>
Try to run the app again.
You can see we get a Typescript error. This is because Typescript is smart enough and tells us there might be no last message. So we add a check. Remember to always check for null or undefined if optional, don’t write shorter write safer:
@@ -8,8 +8,10 @@
 ┊ 8┊ 8┊        <li key={chat.id}>
 ┊ 9┊ 9┊          <img src={chat.picture} alt="Profile" />
 ┊10┊10┊          <div>{chat.name}</div>
+┊  ┊11┊          {chat.lastMessage && (
 ┊11┊12┊          <div>{chat.lastMessage.content}</div>
 ┊12┊13┊          <div>{chat.lastMessage.createdAt}</div>
+┊  ┊14┊          )}
 ┊13┊15┊        </li>
 ┊14┊16┊      ))}
 ┊15┊17┊    </ul>
Now let's try again.
Now we have a syntax error - A JSX return value can't have more then a single root Element. So in order to return a root element from the function but still display multiple elements in the same level, we can use React.Fragment to wrap the returned elements:
@@ -9,8 +9,10 @@
 ┊ 9┊ 9┊          <img src={chat.picture} alt="Profile" />
 ┊10┊10┊          <div>{chat.name}</div>
 ┊11┊11┊          {chat.lastMessage && (
-┊12┊  ┊          <div>{chat.lastMessage.content}</div>
-┊13┊  ┊          <div>{chat.lastMessage.createdAt}</div>
+┊  ┊12┊            <React.Fragment>
+┊  ┊13┊              <div>{chat.lastMessage.content}</div>
+┊  ┊14┊              <div>{chat.lastMessage.createdAt}</div>
+┊  ┊15┊            </React.Fragment>
 ┊14┊16┊          )}
 ┊15┊17┊        </li>
 ┊16┊18┊      ))}
Let's try again. This time it looks like the format is not correct, so let's format the date using the moment library.
Let's install the moment library to wrap lastMessage.createdAt with a better format.
Moment has the ability to wrap date objects nicely and rewrite them in a pretty format.
This way we can have an elegant time format at which the message was sent e.g. 11:34.
To install:
$ yarn add moment
And now let's import the library by its name, wrap the value of each chat and call the format function with our requested format:
@@ -1,5 +1,6 @@
 ┊1┊1┊import React from 'react';
 ┊2┊2┊import { chats } from '../../db';
+┊ ┊3┊import moment from 'moment';
 ┊3┊4┊
 ┊4┊5┊const ChatsList: React.FC = () => (
 ┊5┊6┊  <div>
@@ -11,7 +12,7 @@
┊11┊12┊ {chat.lastMessage && (
┊12┊13┊ <React.Fragment>
┊13┊14┊ <div>{chat.lastMessage.content}</div>
-┊14┊ ┊ <div>{chat.lastMessage.createdAt}</div>
+┊ ┊15┊ <div>{moment(chat.lastMessage.createdAt).format('HH:mm')}</div>
┊15┊16┊ </React.Fragment>
┊16┊17┊ )}
┊17┊18┊ </li>If you try to run the app you'll see that everything is there, but it's not hard to notice that it's missing some style:
In the next chapter we will take care of styling our application with Material-UI and styled-components - we will give it the desired look and make it more user friendly. For now the ChatsListScreen serves no purpose, because you can't really do anything with it, but it can be used as a great basis to build on top of as we make progress.
TODO: Define and use Prettier. TODO: Editor and Prettier, extensions - Auto Import, GitLens, npm Intellisense, TypeScript Importer - works when Auto Import doesn't TODO: react-dev-tools, go through everything on dev tools. TODO: build. show built code. show it on file and show it on the browser. TODO: Go through all of https://facebook.github.io/create-react-app/docs/ TODO: Should we talk about Storybook? TODO: Should we use “” or ‘’? TODO: Should we use date-fns instead of moment?
| < Intro | Next Step > |
|---|