
A browser based audio waveform visualisation frontend component from BBC R&D.
Peaks.js is a modular client-side JavaScript component designed for the display of and interaction with audio waveforms in the browser.
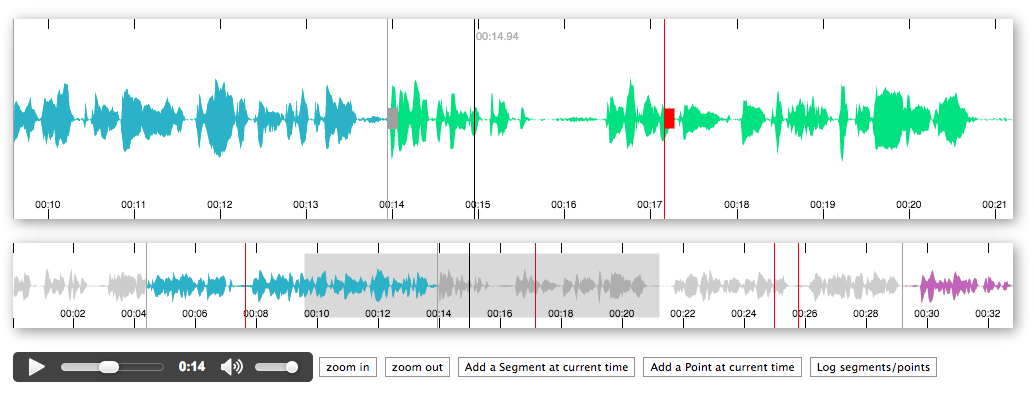
Peaks.js was developed by BBC R&D to allow users to make accurate clippings of audio content in the browser, using a backend API that serves the waveform data.
Peaks.js uses HTML5 canvas technology to display waveform at different zoom levels and provides some basic convenience methods for interacting with waveforms and creating time-based visual sections for denoting content to be clipped or for reference, eg: distinguishing music from speech or identifying different music tracks.
You can read more about the project here.
- npm:
npm install --save peaks.js - bower:
bower install --save peaks.js - Browserify CDN:
http://wzrd.in/standalone/peaks.js
Peaks.js can be included in any web page by following these steps:
- include it your web page
- include a media element and its waveform data file
- initialise Peaks.js
<div id="peaks-container"></div>
<audio>
  <source src="test_data/sample.mp3" type="audio/mpeg">
  <source src="test_data/sample.ogg" type="audio/ogg">
</audio>
<script src="bower_components/requirejs/require.js" data-main="app.js"></script>
Start using AMD and require.js
AMD modules work out of the box without any optimiser.
// in app.js
// configure peaks path
requirejs.config({
  paths: {
    peaks: 'bower_components/peaks.js/src/main',
    EventEmitter: 'bower_components/eventemitter2/lib/eventemitter2',
    Konva: 'bower_components/konvajs/konva',
    'waveform-data': 'bower_components/waveform-data/dist/waveform-data.min'
  }
});

// require it
require(['peaks'], function(Peaks) {
  var p = Peaks.init({
    container: document.querySelector('#peaks-container'),
    mediaElement: document.querySelector('audio'),
    dataUri: 'test_data/sample.json'
  });

  p.on('peaks.ready', function() {
    // do something when the waveform is displayed and ready
  });
});
A working example is provided in index.html.
This works well with systems such as Meteor, webpack and browserify (with babelify transform).
import Peaks from 'peaks.js';

const p = Peaks.init({ … });This works well with systems such as Meteor, webpack and browserify.
var Peaks = require('peaks.js');

var p = Peaks.init({ … });<script src="node_modules/peaks.js/peaks.js"></script>
<script>
(function(Peaks) {
var p = Peaks.init({ … });
})(peaks);
</script>Peaks.js uses waveform data files produced by audiowaveform. These can be generated in either binary (.dat) or JSON format. Binary format is preferred because of the smaller file size, but this is only compatible with browsers that support Typed Arrays.
You should also use the -b 8 option when generating waveform data files, as Peaks.js does not currently support 16-bit waveform data files, and also to minimise file size.
To generate a binary waveform data file:
audiowaveform -i sample.mp3 -o sample.dat -b 8
To generate a JSON format waveform data file:
audiowaveform -i sample.mp3 -o sample.json -b 8
Refer to the man page audiowaveform(1) for full details of the available command line options.
Since 0.3.0, Peaks.js can use the Web Audio API to generate waveforms, which means you would not have to pre-generate a dat or json file beforehand.
To do so, omit the dataUri option and make sure you pass in a valid AudioContext instance as the audioContext option. You may also want to make sure your browser is compatible with Web Audio.
var myAudioContext = new AudioContext();

var p = Peaks.init({
  container: document.querySelector('#peaks-container'),
  mediaElement: document.querySelector('audio'),
  audioContext: myAudioContext
});

p.on('peaks.ready', function() {
  // do something when the waveform is displayed and ready
});Notice: be aware it can be CPU intensive if your audio file has a long duration.
The available options for configuration of the viewer are as follows:
var options = {
  /** REQUIRED OPTIONS **/
  // Containing element
  container: document.getElementById('peaks-container'),

  // HTML5 Media element containing an audio track
  mediaElement: document.querySelector('audio'),

  /** Optional config with defaults **/
  // URI to waveform data file in binary or JSON
  dataUri: {
    arraybuffer: '../test_data/sample.dat',
    json: '../test_data/sample.json',
  },

  // A Web Audio AudioContext instance which can be used
  // to render the waveform if dataUri is not provided
  audioContext: new AudioContext(),

  // async logging function
  logger: console.error.bind(console),

  // default height of the waveform canvases in pixels
  height: 200,

  // Array of zoom levels in samples per pixel (big >> small)
  zoomLevels: [512, 1024, 2048, 4096],

  // Bind keyboard controls
  keyboard: false,

  // Keyboard nudge increment in seconds (left arrow/right arrow)
  nudgeIncrement: 0.01,

  // Colour for the in marker of segments
  inMarkerColor: '#a0a0a0',

  // Colour for the out marker of segments
  outMarkerColor: '#a0a0a0',

  // Colour for the zoomed in waveform
  zoomWaveformColor: 'rgba(0, 225, 128, 1)',

  // Colour for the overview waveform
  overviewWaveformColor: 'rgba(0,0,0,0.2)',

  // Colour for the overview waveform rectangle
  // that shows what the zoom view shows
  overviewHighlightRectangleColor: 'grey',

  // Colour for segments on the waveform
  segmentColor: 'rgba(255, 161, 39, 1)',

  // Colour of the play head
  playheadColor: 'rgba(0, 0, 0, 1)',

  // Colour of the play head text
  playheadTextColor: '#aaa',

  // Show current time next to the play head
  // (zoom view only)
  showPlayheadTime: false,

  // the color of a point marker
  pointMarkerColor: '#FF0000',

  // Colour of the axis gridlines
  axisGridlineColor: '#ccc',

  // Colour of the axis labels
  axisLabelColor: '#aaa',

  // Random colour per segment (overrides segmentColor)
  randomizeSegmentColor: true,

  // Zoom view adapter to use. Valid adapters are:
  // 'animated' (default) and 'static'
  zoomAdapter: 'animated',

  // Array of initial segment objects with startTime and
  // endTime in seconds and a boolean for editable.
  // See below.
  segments: [{
    startTime: 120,
    endTime: 140,
    editable: true,
    color: "#ff0000",
    labelText: "My label"
  },
  {
    startTime: 220,
    endTime: 240,
    editable: false,
    color: "#00ff00",
    labelText: "My Second label"
  }],

  // Array of initial point objects
  points: [{
    time: 150,
    editable: true,
    color: "#00ff00",
    labelText: "A point"
  },
  {
    time: 160,
    editable: true,
    color: "#00ff00",
    labelText: "Another point"
  }]
}The marker and label Konva.js objects may be overridden to give the segment markers or label your own custom appearance (see main.js / waveform.mixins.js, Konva Polygon Example and Konva Text Example):
{
  segmentInMarker: mixins.defaultInMarker(p.options),
  segmentOutMarker: mixins.defaultOutMarker(p.options),
  segmentLabelDraw: mixins.defaultSegmentLabelDraw(p.options)
}The top level Peaks object exposes a factory function to create new Peaks instances.
Returns a new Peaks instance with the assigned options. You can create and manage several Peaks instances within a single page with one or several configurations.
var peaksInstance = Peaks.init({ … });
var secondPeaksInstance = Peaks.init({ … });Starts media playback, from the current time position.
var instance = Peaks.init({ … });

console.log(instance.player.play());Pauses media playback.
var instance = Peaks.init({ … });

console.log(instance.player.pause());Returns the current time from the associated media element, in seconds.
var instance = Peaks.init({ … });

console.log(instance.player.getCurrentTime()); // -> 0Seeks the media element to the given time, in seconds.
var instance = Peaks.init({ … });

instance.player.seek(5.85);
console.log(instance.player.getCurrentTime()); // -> 5.85Plays a given segment of the media.
var instance = Peaks.init({ … });

var segment = instance.segments.add({
  startTime: 5.0,
  endTime: 15.0,
  editable: true
});

// Plays from 5.0 to 15.0, then stops.
instance.player.playSegment(segment);Zooms in the waveform zoom view by one level.
var instance = Peaks.init({ …, zoomLevels: [512, 1024, 2048, 4096] });

instance.zoom.zoomOut(); // zoom level is now 1024Zooms in the waveform zoom view by one level.
var instance = Peaks.init({ …, zoomLevels: [512, 1024, 2048, 4096] });

instance.zoom.zoomIn(); // zoom level is still 512

instance.zoom.zoomOut(); // zoom level is now 1024
instance.zoom.zoomIn(); // zoom level is now 512 againSets the zoom level to the element in the options.zoomLevels array at index index.
var instance = Peaks.init({ …, zoomLevels: [512, 1024, 2048, 4096] });

instance.zoom.setZoom(3); // zoom level is now 4096Returns the current zoom level, as an index into the options.zoomLevels array.
var instance = Peaks.init({ …, zoomLevels: [512, 1024, 2048, 4096] });

instance.zoom.zoomOut();
console.log(instance.zoom.getZoom()); // -> 1
Segments give the ability to visually tag timed portions of the audio media. This is a great way to provide visual cues to your users.
Adds a segment to the waveform timeline. Accepts the following parameters:
startTime: the segment start time (seconds)endTime: the segment end time (seconds)editable: (optional) sets whether the segment is user editable (boolean, defaults tofalse)color: (optional) the segment color. If not specified, the segment is given a default color (see thesegmentColorandrandomizeSegmentColoroptions).labelText: (option) a text label which is displayed when the user hovers the mouse pointer over the segment.id: (optional) the segment identifier. If not specified, the segment is automatically given a unique identifier.
var instance = Peaks.init({ … });

// Add non-editable segment, from 0 to 10.5 seconds, with a random color
instance.segments.add({startTime: 0, endTime: 10.5});
Alternatively, provide an array of segment objects to add all those segments at once.
var instance = Peaks.init({ … });

instance.segments.add([
  {
    startTime: 0,
    endTime: 10.5,
    labelText: '0 to 10.5 seconds non-editable demo segment'
  },
  {
    startTime: 3.14,
    endTime: 4.2,
    color: '#666'
  }
]);Returns an array of all segments present on the timeline.
Returns the segment with the given id, or null if not found.
Removes any segment which starts at startTime (seconds), and which optionally ends at endTime (seconds).
The return value indicates the number of deleted segments.
var instance = Peaks.init({ … });

instance.segments.add([{ startTime: 10, endTime: 12 }, { startTime: 10, endTime: 20 }]);

// remove both segments as they start at `10`
instance.segments.removeByTime(10);

// remove only the first segment
instance.segments.removeByTime(10, 12);Removes segments with the given identifier.
var instance = Peaks.init({ … });

instance.segments.removeById('peaks.segment.3');Removes all segments.
var instance = Peaks.init({ … });

instance.segments.removeAll();
Points give the ability to visually tag points in time of the audio media.
Adds one or more points to the waveform timeline. Accepts the following parameters:
time: the point time (seconds)editable: (optional) sets whether the point is user editable (boolean, defaults tofalse)color: (optional) the point color. If not specified, the point is given a default color (see thepointMarkerColoroption).labelText: (optional) a text label which is displayed next to the segment. If not given, the point's time is displayed.id: (optional) the point identifier. If not specified, the point is automatically given a unique identifier.
var instance = Peaks.init({ … });

// Add non-editable point, with a random color
instance.points.add({ time: 3.5 });
Alternatively, provide an array of point objects to add several at once.
var instance = Peaks.init({ … });

instance.points.add([
  {
    time: 3.5,
    labelText: 'Test point',
    color: '#666'
  },
  {
    time: 5.6,
    labelTect: 'Another test point',
    color: '#666'
  }
]);Returns an array of all points present on the timeline.
Returns the point with the given id, or null if not found.
Removes any point at the given time (seconds).
var instance = Peaks.init({ … });

instance.points.removeByTime(10);Removes points with the given identifier.
var instance = Peaks.init({ … });

instance.points.removeById('peaks.point.3');Removes all points.
var instance = Peaks.init({ … });

instance.points.removeAll();Releases resources used by an instance. This can be useful when reinitialising Peaks.js within a single page application.
var instance = Peaks.init({ … });

// later:
instance.destroy();Peaks instances emit events to enable you to extend its behaviour according to your needs.
| Event name | Arguments |
|---|---|
error |
Error err |
| Event name | Arguments |
|---|---|
peaks.ready |
(none) |
segments.ready (deprecated) |
(none) |
user_seek.overview |
Number time |
user_seek.zoomview |
Number time |
| Event name | Arguments |
|---|---|
zoom.update |
Number currentZoomLevel, Number previousZoomLevel |
| Event name | Arguments |
|---|---|
segments.add |
Array<Segment> segments |
segments.remove |
Array<Segment> segments |
segments.remove_all |
(none) |
segments.dragged |
Segment segment |
| Event name | Arguments |
|---|---|
points.add |
Array<Point> points |
points.remove |
Array<Point> points |
points.remove_all |
(none) |
points.dragged |
Point point |
You might want to build a minified standalone version of Peaks.js, to test a contribution or to run additional tests. The project bundles everything you need to do so.
git clone git@github.com:bbc/peaks.js.git
cd peaks.js
npm installThis command will produce a UMD-compatible minified standalone version of Peaks.js, which allows you to use it with AMD or CommonJS module loaders, or even as vanilla JavaScript.
npm run buildThe output of the build is a file named peaks.js, alongside its associated source map.
This command will serve a local demo page containing a single Peaks instance. Look at the file index.html to see an example of Peaks.js in use.
npm startThen open http://localhost:9000 in a Web browser.
npm test should work for simple one time testing.
If you are developing and want to repeatedly run tests in a browser on your machine simply launch npm run test-watch.
See COPYING.
This project includes sample audio from the radio show Desert Island Discs, used under the terms of the Creative Commons 3.0 Unported License.
Copyright 2017 British Broadcasting Corporation