Skip to content
New issue

Have a question about this project? Sign up for a free GitHub account to open an issue and contact its maintainers and the community.

By clicking “Sign up for GitHub”, you agree to our terms of service and privacy statement. We’ll occasionally send you account related emails.

Already on GitHub? Sign in to your account

简单实现 React Router v4 #23

Open
hacker0limbo opened this issue Jul 20, 2021 · 0 comments
Open

简单实现 React Router v4 #23

hacker0limbo opened this issue Jul 20, 2021 · 0 comments
Labels
react router react router 笔记整理 react react 笔记整理

Comments

@hacker0limbo
Copy link
Owner

React Router v6 其实已经计划在开发中了, 这篇文章只是通过实现一个简单的 v4 大致了解一下路由的基本概念.

需求与实现效果

需要实现三个基本组件:

  • Route
  • Link
  • Redirect

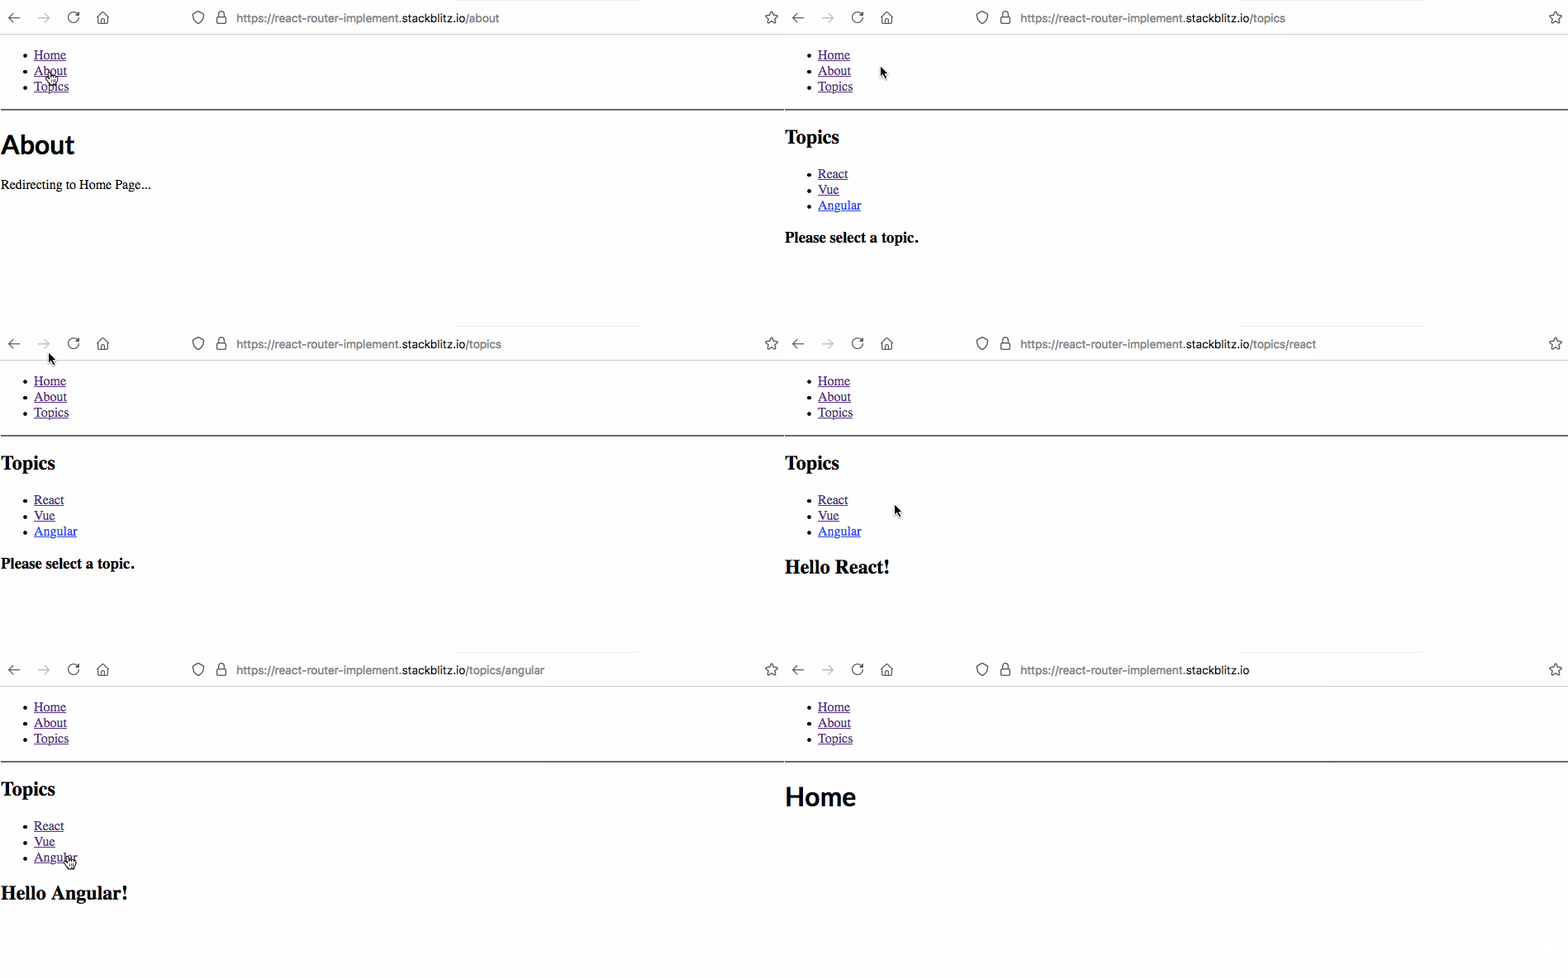
最后的效果如下: demo

需要实现的有三个基本页面:

  • Home: 对应路由 /, 单纯渲染主页面
  • Aboout: 对应路由 /about, 该页面 1.5s 后重定向到主页面
  • Topic: 对应路由: /topics, 该页面包含三个子路由, 对应三个子页面, 分别为: /topics/react, topics/vue, topics/angular

最后, App 组件的列表导航栏能直接定位到各自路由渲染对应内容, 当然在浏览器内直接输入路径也是可以的. 通过点击浏览器的回退/前进按钮进行路由导航也是可行的

源码在此: https://stackblitz.com/edit/react-router-implement

v4 的基本理念

与 v3 不同, v4 不在对路由进行集中式管理(虽然理论上还是可以做到). 整个路由系统更强调一切都是组件. 比较核心的两个组件 RouteLink, 定义可以理解为如下:

  • Route: 根据给定的 path 属性和浏览器当前的路径(url)是否匹配决定渲染内容, 即根据路由渲染 UI
  • Link: 通过该组件改变当前浏览器路径(url)

关于 React Router v4 和 v5 的设计哲学和理念, 可参考这两篇文章:

实现

测试页面

页面组件与路由配置如下:

export function Home() {
  return <h1>Home</h1>;
}

export class About extends React.Component {
  constructor(props) {
    super(props);
    this.state = {
      loading: true
    };
    this.timer = null;
  }

  componentDidMount() {
    this.timer = setTimeout(() => {
      this.setState({
        loading: false
      });
    }, 1500);
  }

  componentWillUnmount() {
    clearTimeout(this.timer);
  }

  render() {
    return this.state.loading ? (
      <div>
        <h1>About</h1>
        Redirecting to Home Page...
      </div>
    ) : (
      <Redirect to="/" />
    );
  }
}

export function Topic({ topicName }) {
  return <h2>Hello {topicName}!</h2>;
}

export const Topics = ({ match }) => {
  const items = [
    { name: 'React', slug: 'react' },
    { name: 'Vue', slug: 'vue' },
    { name: 'Angular', slug: 'angular' }
  ];

  return (
    <div>
      <h2>Topics</h2>
      <ul>
        {items.map(({ name, slug }) => (
          <li key={name}>
            <Link to={`${match.url}/${slug}`}>{name}</Link>
          </li>
        ))}
      </ul>
      {items.map(({ name, slug }) => (
        <Route
          key={name}
          path={`${match.path}/${slug}`}
          render={() => <Topic topicName={name} />}
        />
      ))}
      <Route
        exact
        path={match.url}
        render={() => <h3>Please select a topic.</h3>}
      />
    </div>
  );
};

export default function App() {
  return (
    <div>
      <ul>
        <li>
          <Link to="/">Home</Link>
        </li>
        <li>
          <Link to="/about">About</Link>
        </li>
        <li>
          <Link to="/topics">Topics</Link>
        </li>
      </ul>

      <hr />

      <Route exact path="/" component={Home} />
      <Route path="/about" component={About} />
      <Route path="/topics" component={Topics} />
    </div>
  );
}

Route

根据之前的定义, Route 组件是根据 pathurl 的匹配情况来决定是否渲染对应内容, 即如果匹配我们渲染 UI, 不匹配, 我们返回 null. 同时在 v4 中, Route 组件通过接受 component 或者 render 回调函数来渲染需要的 UI. 两者的区别仅在于若需要传入其他 props 时用 render 回调函数比较好, 否则直接传入一个组件即可. 用法大致如下:

const Settings = ({ match }) => {
  return (
    // ...
  )
}

// 直接传入一个组件, 组件参数包括 match 等路由参数
<Route
  path="/settings"
  exact
  component={Settings}
/>

// 传入一个回调函数, 可自定义渲染内容, 回调函数参数包括 match 等路由参数
<Route
  path="/settings"
  exact
  render={(props) => {
    return <Settings authed={isAuthed} {...props} />;
  }}
/>

最初的实现如下:

class Route extends React.Component {
  constructor(props) {
    super(props)
  }

  render() {
    const {
      path,
      exact,
      component,
      render,
    } = this.props

    const match = matchPath(
      window.location.pathname,
      { path, exact }
    )

    if (match) {
      if (component) {
        return React.createElement(component, { match });
      }

      if (render) {
        return render({ match });
      }
    }

    return null;
  }
}

Route.propTypes = {
  path: PropTypes.string,
  exact: PropTypes.bool,
  component: PropTypes.func,
  render: PropTypes.func,
}

几个点需要注意:

  • path 属性不是必须的, 根据官网定义: Routes without a path always match. 即当不指定 path 时, 默认直接匹配当前浏览器 url, 那么给定的组件一定会被渲染
  • matchPath 是一个外部函数, 下面会实现, 用于检查 Route 组件的 path 属性和当前浏览器的 url 是否匹配以及具体匹配情况

至此已经完成了基本框架, 即对于当前的 url 和给定的 path 是否匹配, 匹配渲染 UI, 否则不做任何事情

前端路由与事件

对于前端路由, 一般有 4 种方式可以改变浏览器地址, 不包括 hash

  • 直接手动输入地址
  • 点击浏览器上的前进后退按钮
  • 点击 <a> 标签进行地址跳转
  • 手动在 JS 代码里触发 history.push(replace)State 函数

对于目前的 Route 组件来说, 是需要感知到 url 的变化来进行比较然后渲染 UI. 第一种情况其实不用考虑, 每次用户输入一遍 url 之后组件都被重新 mount, 所有逻辑都会走一遍意味着匹配包括渲染等都会被执行. 现在考虑第二种情况. 浏览器提供了 onpopstate 监听浏览器前进与后退. 不过需要注意的是, 调用 history.push(replace)State 并不会触发 onpopstate 事件.

修改一下 Route 代码:

class Route extends React.Component {
  constructor(props) {
    super(props)
  }
  componentDidMount() {
    window.addEventListener("popstate", this.handlePop);
  }

  componentWillUnmount() {
    window.removeEventListener("popstate", this.handlePop);
  }

  handlePop = () => {
    this.forceUpdate();
  };

  render() {
    const {
      path,
      exact,
      component,
      render,
    } = this.props

    const match = matchPath(
      window.location.pathname,
      { path, exact }
    )

    if (match) {
      if (component) {
        return React.createElement(component, { match });
      }

      if (render) {
        return render({ match });
      }
    }

    return null;
  }
}

Route.propTypes = {
  path: PropTypes.string,
  exact: PropTypes.bool,
  component: PropTypes.func,
  render: PropTypes.func,
}

这里在 mount 的时候监听 onpopstate 事件, 回调函数作用是让组件重新渲染一次. 在 unmount 的时候移除监听器. 这样就实现了点击浏览器前进后退按钮后, 能够重新根据变化的 url 渲染 UI.

路由的匹配

实现 matchPath 之前, 先考虑 exact 属性. v4 中的匹配可以存在"模糊匹配"和"精确匹配". 声明 exact 属性表示需要精确匹配, 即 path 属性和 window.location.pathname 完全一样. 例如:

path window.location.pathname exact matches?
/one /one/two true no
/one /one/two false yes

注意当 exact 未被声明即是 false 的时候, 即使当前的 url/one/two, path 声明的是 /one, 也算是匹配成功. 因此对于匹配规则, 可以单纯的认为只要从开头包含部分即可.

matchPath 最后返回一个 match 对象, 包含 3 个属性:

  • isExact: 是否是精确匹配
  • path: Route 组件给定的路径
  • url: 和 window.location.pathname 匹配后匹配的部分

以该 demo 为例, 假设当前浏览器的路径为 /topics/react, url 即匹配的部分为:

path window.location.pathname matched url
/ /topics/react /
/about /topics/react null
/topics /topics/react /topics
/topics/vue /topics/react null
/topics/react /topics/react /topics/react

matchPath 的完整实现如下:

const matchPath = (pathname, options) => {
  const { exact = false, path } = options;

  if (!path) {
    // if a Route isn’t given a path, it will automatically be rendered
    return {
      path: null,
      url: pathname,
      isExact: true
    };
  }

  const match = new RegExp(`^${path}`).exec(pathname);

  if (!match) {
    return null;
  }

  const url = match[0];
  const isExact = pathname === url;

  if (exact && !isExact) {
    // There was a match, but it wasn't
    // an exact match as specified by
    // the exact prop.
    return null;
  }

  return {
    path,
    url,
    isExact
  };
};

这里注意两个点:

  • 当未给定 path, 默认为完全匹配, 也就是匹配成功. url 就是当前的浏览器地址
  • 如果给定了 exact 属性, 但是得到的结果并不是完全匹配, 也就是 isExactfalse. 说明还是匹配不成功. 直接返回 nunll

Link

之前提到的改变浏览器 url 可以有 4 种方法. 前两种已经描述用于 Route 组件, Link 组件则适用于后两种方法. 本质上 Link 组件可以看成是 <a> 标签的扩展, 只不过关于路由的跳转不再使用默认浏览器行为, 而是使用 history.push(replace)State 方法

Link 组件使用大致如下:

<Link to="/some-path" replace={false} />

两个属性:

  • to 属性表示将要跳转的路径
  • replace 属性表明当前的跳转是要当做 history 的添加, 也就是可以前进后退. 还是表示当前路由记录被取代. 默认为 false

完整实现如下:

class Link extends React.Component {
  constructor(props) {
    super(props);
  }

  handleClick = e => {
    e.preventDefault();
    const { replace, to } = this.props;

    if (replace) {
      historyReplace(to);
    } else {
      historyPush(to);
    }
  };

  render() {
    const { to, children } = this.props;
    return (
      <a href={to} onClick={this.handleClick}>
        {children}
      </a>
    );
  }
}

Link.propTypes = {
  to: PropTypes.string.isRequired,
  replace: PropTypes.bool
};

这里需要实现两个方法 historyPushhistoryReplace, 是我们根据 history.pushStatehistory.replaceState 自定义的工具函数.

const historyPush = (path) => {
  history.pushState({}, null, path);
};

const historyReplace = (path) => {
  history.replaceState({}, null, path);
};

至此会发现其实存在一个问题. 测试页面上点击 Link 组件虽然更新了浏览器地址, 但是组件却没有对应的进行更新. 这是因为调用 history.push(replace)State 并不会触发 onpopstate 事件. 为了解决这一问题需要手动在触发 history.push(replace)State 时候对 Route 进行渲染. 具体做法如下:

维护一个数组, 该数组存放已经渲染过的 Route 组件. 当 Route 组件 mount 之后就将其注册进数组中, 对应提供注册和取消注册两个函数:

const instances = [];

const register = (comp) => instances.push(comp);
const unregister = (comp) => instances.splice(instances.indexOf(comp), 1);

随后在 Route 组件里, 当 mount 之后就将本身注册进数组

class Route extends React.Component {
  componentDidMount() {
    window.addEventListener("popstate", this.handlePop)
    register(this)
  }

  componentWillUnmount() {
    unregister(this)
    window.removeEventListener("popstate", this.handlePop)
  }

  // ...
}

最后更新 historyPushhistoryReplace 函数, 当触发时手动更新所有注册过的 Route, 让 Route 里的逻辑重新跑一遍也因此能重新渲染更新 UI

const historyPush = (path) => {
  history.pushState({}, null, path);
  instances.forEach((instance) => instance.forceUpdate());
};

const historyReplace = (path) => {
  history.replaceState({}, null, path);
  instances.forEach((instance) => instance.forceUpdate());
};

至此, 当 Link 改变浏览器路径之后, Route 组件能够识别到路径的变化然后进行重新匹配并渲染对应的组件

Redirect

Redirect 组件和 Link 组件很相似, 唯一不同的是 Redirect 不渲染任何 UI, 纯粹用于改变浏览器地址. 而 Link 类似于 <a> 会简单渲染一段文本, 实现如下:

export class Redirect extends React.Component {
  constructor(props) {
    super(props);
  }

  componentDidMount() {
    const { to, push = false } = this.props;

    if (push) {
      historyPush(to);
    } else {
      historyReplace(to);
    }
  }

  render() {
    return null;
  }
}

Redirect.propTypes = {
  to: PropTypes.string.isRequired,
  push: PropTypes.bool
};

Hash

以上均是针对 history 路由, 相比而言 hash 路由基本原理也是类似, 而且更简单的在于 Link 组件不需要过多的处理只需要添加 #, Route 组件能直接通过 onhashchange 识别到路由的变化

前端路由

不管是基于 hash 还是 history 的路由, 均是由前端来控制. 这样的好处是对于单页面应用不再需要刷新. 但是弊端也有. 比如用户进行多次跳转之后一不小心刷新了页面, 那么又会回到最开始的状态, 用户体验较差

参考

@hacker0limbo hacker0limbo added react react 笔记整理 react router react router 笔记整理 labels Jul 20, 2021
Sign up for free to join this conversation on GitHub. Already have an account? Sign in to comment
Labels
react router react router 笔记整理 react react 笔记整理
Projects
None yet
Development

No branches or pull requests

1 participant