- Let's step through solving a lab together. Scroll to the top of the page like so. Note: This screenshot is slightly outdated, but that makes no difference! What we're concerned with is in the right panel that you see that you have three instructions ready for you.

- In the right pane, you can see that there are some tasks to be completed before we can click next lesson.
- Fork this Lab
- Run Local Tests
- Submit Pull Request
- What does that mean? Think of Learn as your teacher and the labs are the exams to be completed by the student (you!). You need to Fork (copy) the exam we created for everyone, take that copy back to your desk and begin working on it. This is your copy and only you will see those changes. It would be very silly for all students to be working on the same exam at the same time, wouldn't it?
- When you fork a lab, you have your own copy. So how do we fork the lab? First things first, we need to click the Github button (the button that looks like a cat) to the right of the Open button. You can do that, or click the link provided by the word Fork in "Fork this Lab" above. Both will bring you to the same spot.

- When you tap that button/link, you should be directed to a page that looks like this:
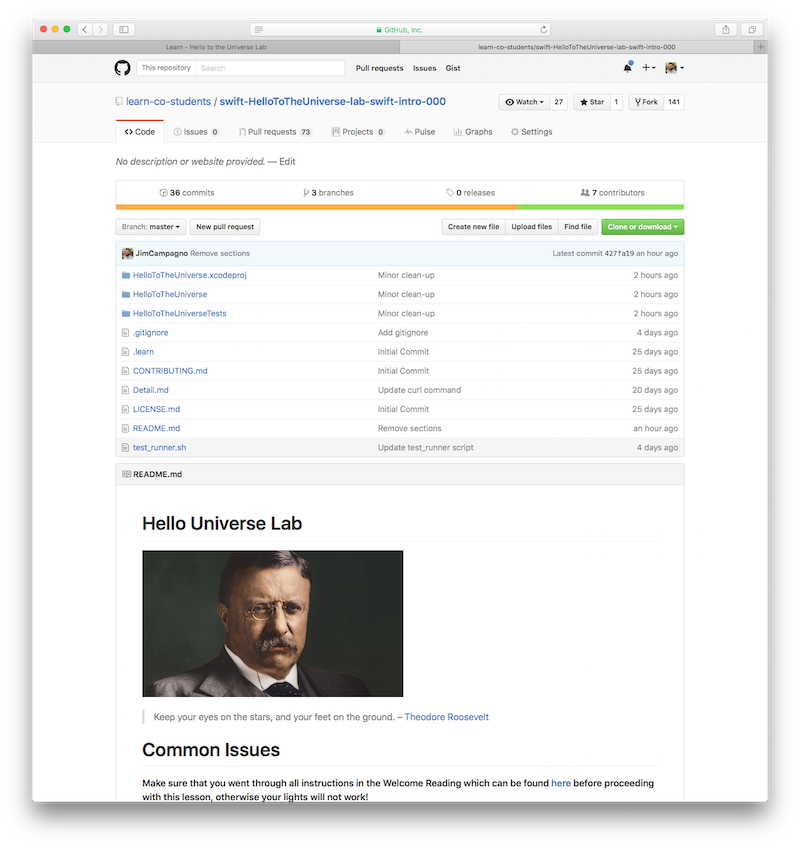
- Well, that looks familiar. Sticking with our analogy, we've found our way to the original copy of the exam! What we were looking at before was Learn taking this exact file and presenting it to you in its own way.
- If you look hard enough on this page, you should find the Fork button in the upper right corner of the screen below your profile image.
- When you tap the Fork button, you should be presented with the following screen:

-
Sticking with our analogy, we want to take a copy of this exam (lab) back to our desk. GitHub is now asking us: Which desk? Click your GitHub account. In this image, my account is in the upper left.
-
As soon as you tap your account you should be presented with the following screen. It might come and go VERY fast (where you barely see it), but this is what it looks like:

-
It's got a picture of a fork, a book and a photocopy machine, Github is also using our analogy!. Here, we are forking (or creating a copy of) the repository (lab) and storing our own version of this repository (lab) in our account.
-
When that is complete, we should be brought to a screen that looks like this :
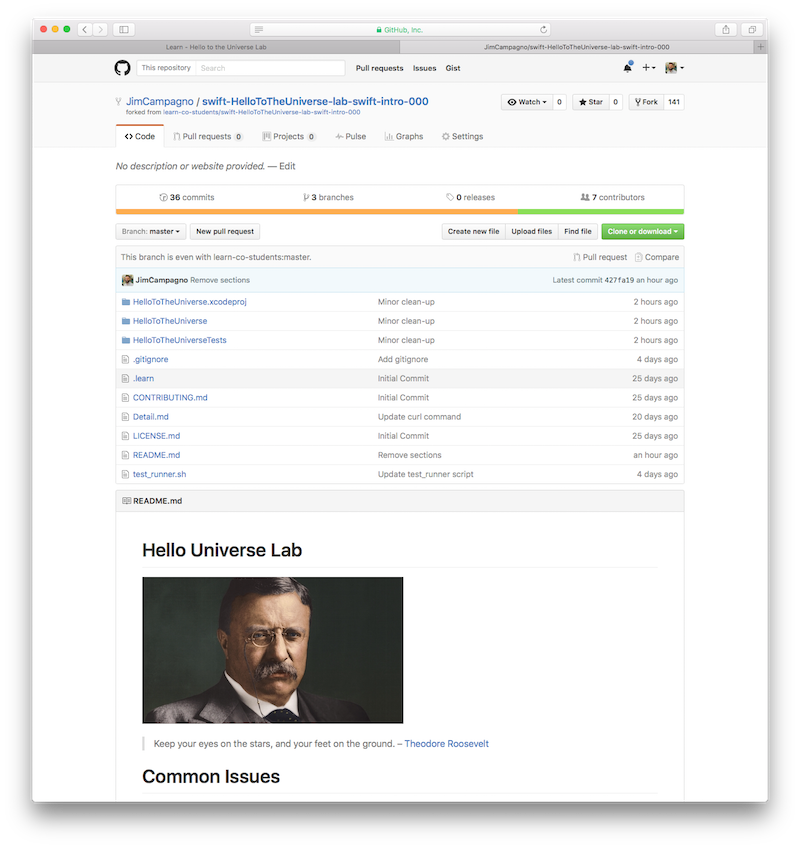
- That looks familiar too! We now have our repository (exam) where we can begin working! Not so fast. We have our own version of this repository stored on our account on Github, but we need to now bring down these various files associated with the repository to our local machine (the computer you're sitting at!).
- Once these files associated with this repository are downloaded to our computer, we can open the necessary files the instructions tell us to open and begin writing code!
- How do we download these files to our computer?
- Click the green "Clone or download" button in the right-center of the Github page.

- What we're most concerned with now is the link presented to the left of the copy clipboard icon. You want to make sure it states Clone with SSH, if it doesn't, select that before copying the link. You should have setup your SSH key in the Welcome Reading. If you haven't done that yet, please scroll to the section of Setting Up Github at this link here. Follow those steps to setup your SSH key.

- Copy this link by either clicking the Copy Clipboard Item or highlighting over the link presented and copying it.
- Now we need to open Terminal.

-
In the next few steps, there are commands that we will be asking you to make in the Terminal application. If you find that every time you type in these commands that you're receiving errors, you might have to install Git.
-
Type
gitfrom the Terminal. If you don't have it installed already, it will prompt you to install it.

-
If you find that installation of Git isn't working this way, check out this link here and follow those instructions before coming back here.
-
We need to find a place on our computer where we want to store these files. We suggest saving them in your Developer folder, so that way they aren't scattered all over your desktop. Take a look at the following commands I typed in to enter the Developer folder.

-
Now that we're in the Developer folder, we need to clone this repository down to our computer.
-
In terminal, type out
git clone -
After putting a space after
git clone, paste in what you had just copied earlier (the link you had copied from the prior instruction). After doing so, you should see this:

-
Now hit your return key.
-
You should see some commands being run in Terminal at this point. Afterwards you should see the following:

-
If you see something similar to what is displayed in the screenshot above, we have succesfully cloned down the repository to our computer. We can begin working!
-
Nice job.

- Open you terminal. We need to get in this newly created directory we cloned from the instructions above. To get to the directory that you're in, use the
cdcommand.

-
Auto-complete should make your life very easy here. You can begin to type swift after the
cdcommand and then hit your tab button on your keyboard. When doing so, you should see it begin to auto-complete that above line for you. After then hitting return, we are in our newly made directory (the lab). -
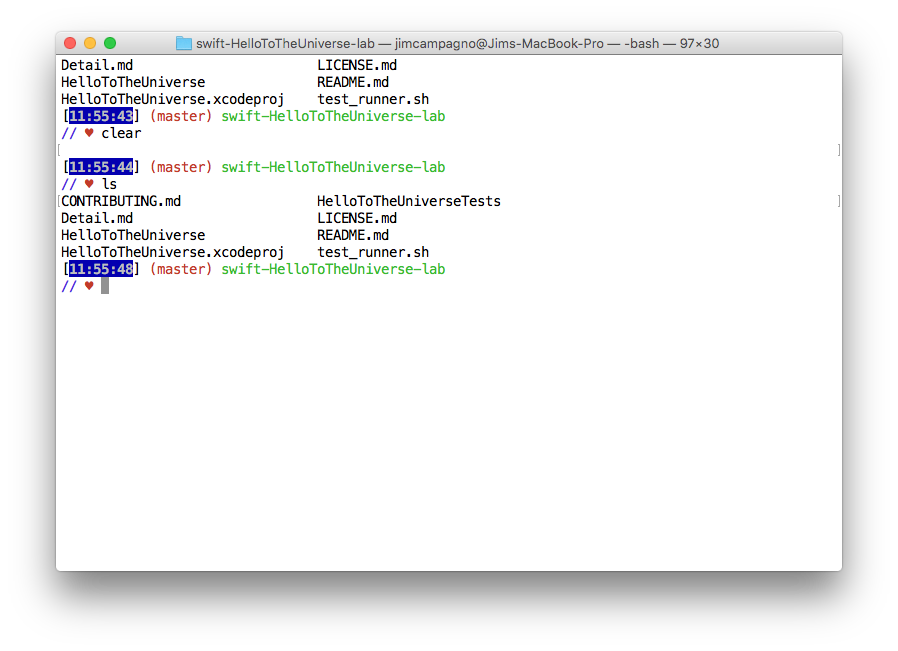
After entering your directory, you can type
lsto see what's inside. (lsis a command that will list all the files and folders that are in the particular directory that you're in.)
-
There are a bunch of files, the same ones we were able to see when we first forked the lab.
-
We generally write our code in a few files. Here (in this example), we need to open the
HelloToTheUniverse.xcodeprojfile. The lab should instruct you on what file to open (usually). If not, in general it's either going to be the.xcodeprojfile or the.xcworkspacefile. -
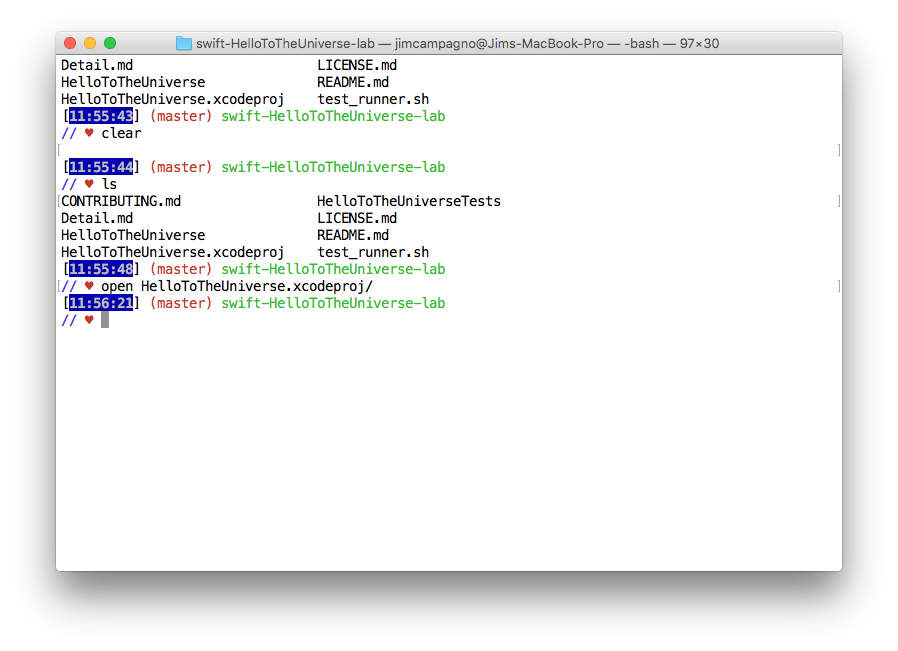
We want to begin by typing
openin Terminal, followed byHelloToTheUniverse.xcodeproj. Auto-complete is your friend. Don't forget when beginning to type Interface, you can hit the tab key to help complete it. -
Then hit return, it should open Xcode up for you.
- Xcode should now be displayed on screen like so:
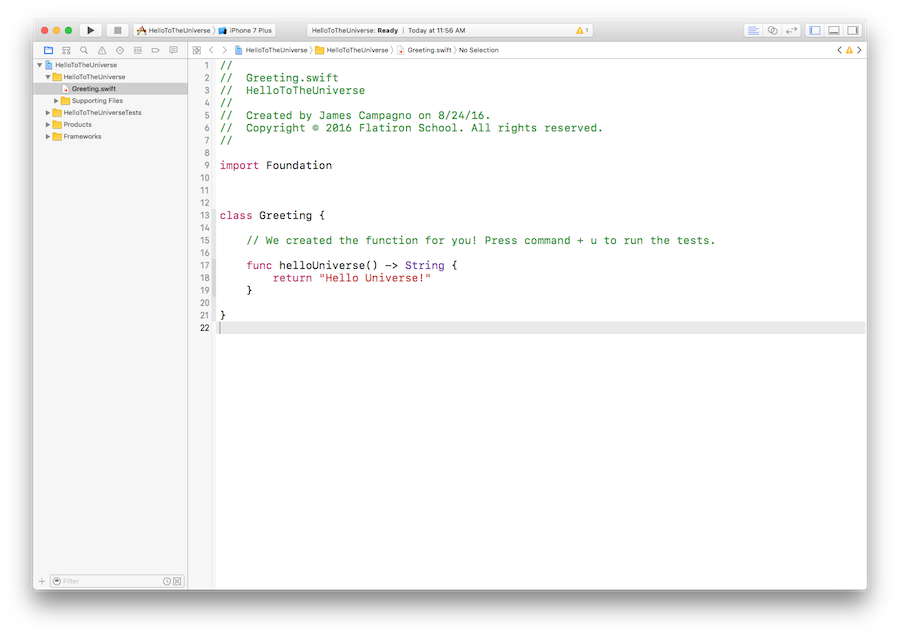
- In the left pane is where you should see various files. The instructions for each lab should direct you to the file where you should be writing your code. For instance, we will select the
Greeting.swiftfile. After doing so, Xcode will look like this:
We've provided you with the answer here but you should add a print statement here like so:
print("My name is Buzz and I can fly")
You can write whatever you want there, but I want you to create a print statement and add it to this helloUniverse() function. At the end of the day, your function should look like this:
func helloUniverse() -> String {
    print("My name is Buzz and I can fly")

    return "Hello Universe!"
}
We need to run the tests. You do that by pressing cmd + u. This will run the tests within Xcode. The tests written are checking to see that you implemented the helloUniverse() function correctly.
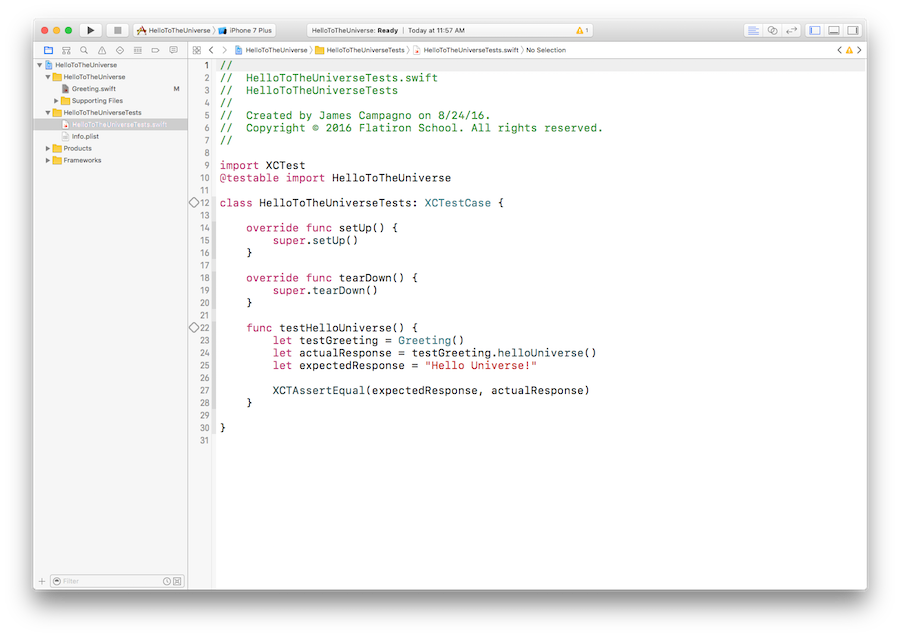
To see the tests for yourself, locate the HelloToTheUniverseTests.swift file like so:
Locate the HelloToTheUniverseTests.swift file in the Project navigator, like so:
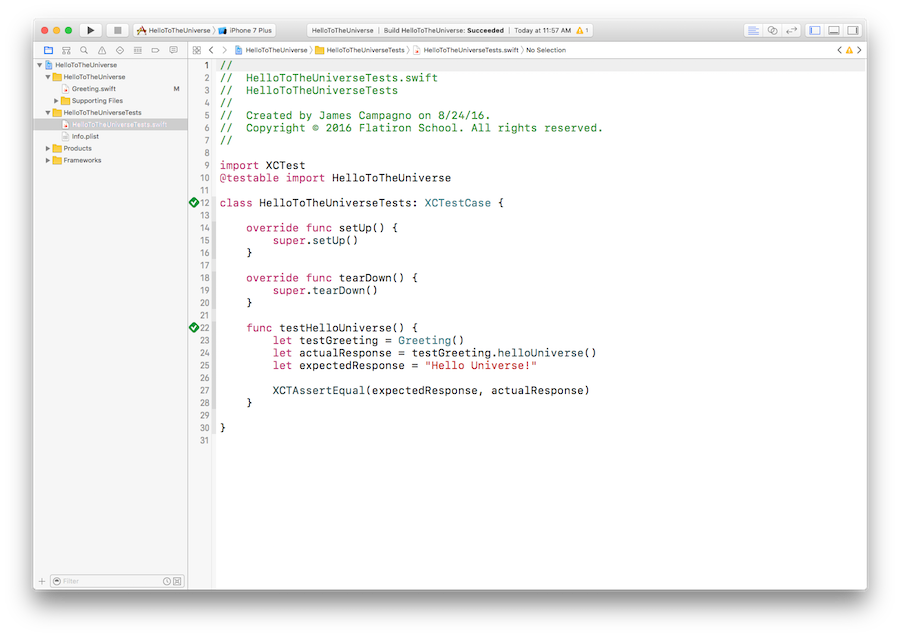
Lets run the tests and see what happens.
Press command + u
Now that we completed the lab, we need to submit a Pull request.
-
If Terminal isn't already open to the directory that contains this project, open terminal and navigate to that directory now.
-
Here we are getting to the directory:

- Now type in the following command,
git statusand hit the return key. - You should see that there are some untracked files listed (somewhat like this):

- Think of this as the changes that were made locally (at your desk). Github isn't yet aware of these changes, Github is the server. So you need to now send these files back up to Github; that way they are now saved on the server. How do you do that?
- We need to now go through a series of steps. Add these files (to a staging area), commit these files and then push these files up to Github.
- Adding. Type in
git add .then hit return. This will add all the files changed here to this staging area. - Commiting. Now type in
git commit -m "Complete problems"and hit return. You can commit your message and include a message alongside the commit. (The message always goes in quotation marks as you see in the above commit.) This way, you're tagging the list of changes you've made so that you can always go back and reference back your work. - Now type in
git pushorgit push origin master. This will push up all these files that have been added and committed. - Here is what those steps looks like:

- Github is now in sync with us. ☆NSYNC.

- So let's get back to Github! You should be here:

- Towards the left-middle of the page, you should see a gray button labeled "New pull request". Click that button. You should be brought to a screen that looks like this: (NOTE: This screenshot is slightly outdated in that it doesn't include my print statement stating that I'm Buzz and that I can fly!, on your screen it should show the print statement that you added, whatever that might be).

- The most relevant information here is at the top:

- We want to click the "Create pull request" button here. This is getting us closer to submitting our exam back to the teacher. This is the start of that process.
- When you click "Create pull request", you should be presented with the following screen:

- Our final step.. you now need to click the "Create pull request" button presented here. After doing so, you are done! You should see the following screen (but don't click "Merge pull request").

- You should see lovely green lights now in place of an empty circle on our list of instructions. If you find that the lights aren't working, make sure you completed all of the instructions in the welcome reading which you can find here.