You will find below the instructions to set up your computer for Le Wagon Web Development course.
Please read them carefully and execute all commands in the following order.
If you get stuck, don't hesitate to ask a teacher for help 🙋
You can also have a look at our cheatsheets for common issue fixes and tips ✔️
Let's start 🚀
To be able to interact when we are not in the same physical room, we will be using Zoom, a video conferencing tool.
Go to zoom.us/download.
Under Zoom Client click the Download button.
Open the file you have just downloaded to install the app.
Open the Zoom app.
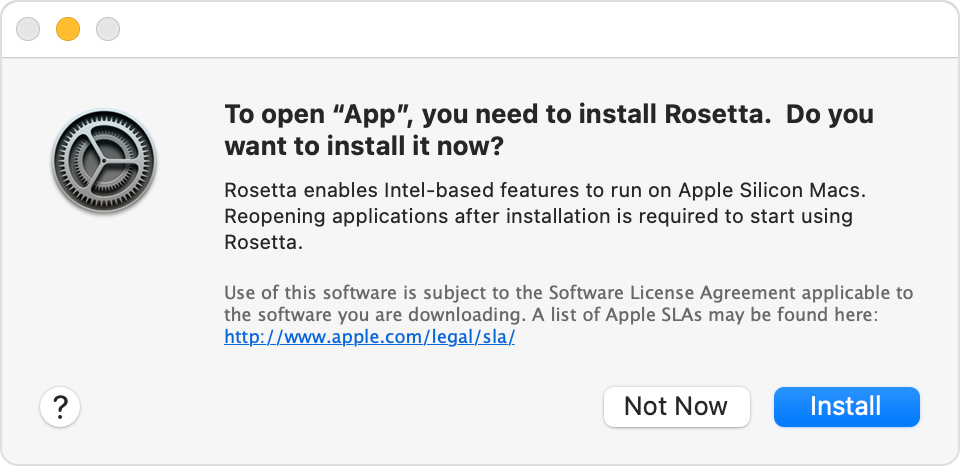
If you have a Mac with Apple silicon, you are asked to install Rosetta. Click Install, then enter your user name and password to allow installation to proceed.
If you already have a Zoom account, sign in using your credentials.
If not, click on the Sign Up Free link:

You will be redirected to Zoom's website to complete a form.
When it's done, go back to the Zoom app and sign in using your credentials.
You should then see a screen like this:

You can now close the Zoom app.
Have you signed up to GitHub? If not, do it right away.
👉 Upload a picture and put your name correctly on your GitHub account. This is important as we'll use an internal dashboard with your avatar. Please do this now, before you continue with this guide.

👉 Enable Two-Factor Authentication (2FA). GitHub will send you text messages with a code when you try to log in. This is important for security and also will soon be required in order to contribute code on GitHub.
Clicking the little red cross in the top left corner of the application window on a Mac does not really quit it, it just closes an active window. To quit the application for real either press Cmd + Q when the application is active, or navigate to APP_NAME -> Quit in the menu bar.

During this setup you will be asked to quit and re-open applications multiple times, please make sure you do it properly 🙏
Open a new terminal, copy-paste the following command and hit Enter:
xcode-select --installIf you receive the following message, you can just skip this step and go to next step.
# command line tools are already installed, use "Software Update" to install updatesOtherwise, it will open a window asking you if you want to install some software: click on "Install" and wait.

✔️ If you see the message "The software was installed" then all good 👍
❌ If the command xcode-select --install fails try again: sometimes the Apple servers are overloaded.
❌ If you see the message "Xcode is not currently available from the Software Update server", you need to update the software update catalog:
sudo softwareupdate --clear-catalogOnce this is done, you can try to install again.
Homebrew is a package manager: it's a software used to install other software from the command line. Let's install it!
Open a terminal and run:
/bin/bash -c "$(curl -fsSL https://raw.githubusercontent.com/Homebrew/install/HEAD/install.sh)"This will ask for your confirmation (hit Enter) and your macOS user account password (the one you use to log in when you reboot your Macbook).
Enter.
Next steps section to add Homebrew to your PATH:

# ⚠️ Only execute these commands if you saw this warning ☝
echo 'eval "$(/opt/homebrew/bin/brew shellenv)"' >> ~/.zprofile
eval "$(/opt/homebrew/bin/brew shellenv)"
If you already have Homebrew, it will tell you so, that's fine, go on.
Then install some useful software:
brew updateIf you get a /usr/local must be writable error, just run this:
sudo chown -R $USER:admin /usr/localbrew updateProceed running the following in the terminal (you can copy / paste all the lines at once).
brew upgrade git || brew install gitbrew upgrade gh || brew install ghbrew upgrade wget || brew install wgetbrew upgrade imagemagick || brew install imagemagickbrew upgrade jq || brew install jqbrew upgrade openssl || brew install opensslLet's install Visual Studio Code text editor.
Copy (Cmd + C) the command below then paste it in your terminal (Cmd + V):
brew install --cask visual-studio-codeThen launch VS Code by running the following command in your terminal:
code✔️ If a VS Code window has just opened, you're good to go 👍
❌ Otherwise, please contact a teacher
Let's install some useful extensions to VS Code.
Copy-paste the following commands in your terminal:
code --install-extension ms-vscode.sublime-keybindings
code --install-extension emmanuelbeziat.vscode-great-icons
code --install-extension github.github-vscode-theme
code --install-extension MS-vsliveshare.vsliveshare
code --install-extension rebornix.ruby
code --install-extension dbaeumer.vscode-eslint
code --install-extension Rubymaniac.vscode-paste-and-indent
code --install-extension alexcvzz.vscode-sqlite
code --install-extension anteprimorac.html-end-tag-labels
Here is a list of the extensions you are installing:
- Sublime Text Keymap and Settings Importer
- VSCode Great Icons
- Live Share
- Ruby
- ESLint
- Paste and Indent
- SQLite
Visual Studio Live Share is a VS Code extension which allows you to share the code in your text editor for debugging and pair-programming: let's set it up!
Launch VS Code from your terminal by typing code and pressing Enter.
Click on the little arrow at the bottom of the left bar 👇

- Click on the "Share" button, then on "GitHub (Sign in using GitHub account)".
- A popup appears asking you to sign in with GitHub: click on "Allow".
- You are redirected to a GitHub page in you browser asking you to authorize Visual Studio Code: click on "Continue" then "Authorize github".
- VS Code may display additional pop-ups: close them by clicking "OK".
That's it, you're good to go!
Launch a terminal, click on Terminal > Preferences and set the "Pro" theme as default profile.

In Window tab, set also your Window Size to Columns: 200, Rows: 50
Quit and restart your terminal: it should now have a nice black background, easier on the eyes.
Let's install the zsh plugin Oh My Zsh.
In a terminal execute the following command:
sh -c "$(curl -fsSL https://raw.github.com/ohmyzsh/ohmyzsh/master/tools/install.sh)"If asked "Do you want to change your default shell to zsh?", press Y
At the end your terminal should look like this:

✔️ If it does, you can continue 👍
❌ Otherwise, please ask for a teacher
CLI is the acronym of Command-line Interface.
In this section, we will use GitHub CLI to interact with GitHub directly from the terminal.
It should already be installed on your computer from the previous commands.
First in order to login, copy-paste the following command in your terminal:
email
gh auth login -s 'user:email' -wgh will ask you few questions:
What is your preferred protocol for Git operations? With the arrows, choose SSH and press Enter. SSH is a protocol to log in using SSH keys instead of the well known username/password pair.
Generate a new SSH key to add to your GitHub account? Press Enter to ask gh to generate the SSH keys for you.
If you already have SSH keys, you will see instead Upload your SSH public key to your GitHub account? With the arrows, select your public key file path and press Enter.
Enter a passphrase for your new SSH key (Optional). Type something you want and that you'll remember. It's a password to protect your private key stored on your hard drive. Then press Enter.
Title for your SSH key. You can leave it at the proposed "GitHub CLI", press Enter.
You will then get the following output:
! First copy your one-time code: 0EF9-D015
- Press Enter to open github.com in your browser...
Select and copy the code (0EF9-D015 in the example), then press Enter.
Your browser will open and ask you to authorize GitHub CLI to use your GitHub account. Accept and wait a bit.
Come back to the terminal, press Enter again, and that's it.
To check that you are properly connected, type:
gh auth status✔️ If you get Logged in to github.com as <YOUR USERNAME> , then all good 👍
❌ If not, contact a teacher.
Hackers love to refine and polish their shell and tools.
We'll start with a great default configuration provided by Le Wagon: lewagon/dotfiles.
As your configuration is personal, you need your own repository storing it. So you will fork Le Wagon repository.
Forking means that you will create a new repo in your own GitHub account $GITHUB_USERNAME/dotfiles, identical to the original Le Wagon one that you will be able to modify at will.
Open your terminal and set a variable for your GitHub username:
export GITHUB_USERNAME=`gh api user | jq -r '.login'`echo $GITHUB_USERNAME✔️ You should see your GitHub username printed.
❌ If not, stop here and ask for help. There may be a problem with the previous step (gh auth).
Time to fork the repo and clone it on your computer:
mkdir -p ~/code/$GITHUB_USERNAME && cd $_gh repo fork lewagon/dotfiles --cloneRun the dotfiles installer:
cd ~/code/$GITHUB_USERNAME/dotfileszsh install.shCheck the emails registered with your GitHub Account. You'll need to pick one at the next step:
gh api user/emails | jq -r '.[].email'✔️ If you see the list of your registered emails, you can proceed 👍
❌ If not, please reauthenticate to GitHub before running this command ☝️ again.
Run the git installer:
cd ~/code/$GITHUB_USERNAME/dotfiles && zsh git_setup.sh☝️ This will prompt you for your name (FirstName LastName) and your email.
gh api ... command. If you don't do that, Kitt won't be able to track your progress. 💡 Select the @users.noreply.github.com address if you don't want your email to appear in public repositories you may contribute to.
Please now reset your terminal by running:
exec zshLet's install rbenv, a software to install and manage ruby environments.
First, we need to clean up any previous Ruby installation you might have:
rvm implode && sudo rm -rf ~/.rvm
# If you got "zsh: command not found: rvm", carry on. It means `rvm` is not
# on your computer, that's what we want!

sudo rm -rf $HOME/.rbenv /usr/local/rbenv /opt/rbenv /usr/local/opt/rbenvEnter.
In the terminal, run:
brew uninstall --force rbenv ruby-buildexec zshThen run:
brew install rbenv libyamlNow, you are ready to install the latest ruby version and set it as the default version.
Run this command, it will take a while (5-10 minutes)
rbenv install 3.1.2Once the ruby installation is done, run this command to tell the system to use the 3.1.2 version by default.
rbenv global 3.1.2Reset your terminal and check your Ruby version:
exec zshThen run:
ruby -v✔️ If you see something starting with ruby 3.1.2p then you can proceed 👍
❌ If not, ask a teacher
If you are in China 🇨🇳 click here
# China only!
gem sources --remove https://rubygems.org/
gem sources -a https://gems.ruby-china.com/
gem sources -l
# *** CURRENT SOURCES ***
# https://gems.ruby-china.com/
# Ruby-china.com must be in the list now
Everyone, in China or not, continue here to install gems.
In the ruby world, we call external libraries gems: they are pieces of ruby code that you can download and execute on your computer. Let's install some!
First, we'll update bundler, which is what lets us install gems:
gem update bundlerIn your terminal, copy-paste the following command:
gem install colored faker http pry-byebug rake rails rest-client rspec rubocop-performance sqlite3:1.7.3 activerecord:7.1.3.2✔️ If you get xx gems installed, then all good 👍
❌ If you encounter the following error:
ERROR: While executing gem ... (TypeError)
incompatible marshal file format (can't be read)
format version 4.8 required; 60.33 given
Run the following command:
rm -rf ~/.gemrcRerun the command to install the gems.
sudo gem install! Even if you stumble upon a Stackoverflow answer (or the terminal) telling you to do so.
Node.js is a JavaScript runtime to execute JavaScript code in the terminal. Let's install it with nvm, a version manager for Node.js.
In a terminal, execute the following commands:
curl -o- https://raw.githubusercontent.com/nvm-sh/nvm/v0.39.1/install.sh | zshexec zshThen run the following command:
nvm -vYou should see a version. If not, ask a teacher.
Now let's install node:
nvm install 16.15.1When the installation is finished, run:
node -vIf you see v16.15.1, the installation succeeded ✔️ You can then run:
nvm cache clear❌ If not, contact a teacher
yarn is a package manager to install JavaScript libraries. Let's install it:
In a terminal, run the following commands:
npm install --global yarnexec zshThen run the following command:
yarn -v✔️ If you see a version, you're good 👍
❌ If not, ask for a teacher
In a few weeks, we'll talk about databases and SQL. SQLite is a database engine used to execute SQL queries on single-file databases. Let's install it:
In a terminal, execute the following commands:
brew install sqliteThen run the following command:
sqlite3 -version✔️ If you see a version, you're good 👍
❌ If not, ask for a teacher
Sometimes, SQLite is not enough and we will need a more advanced tool called PostgreSQL, an open-source robust and production-ready database system.
Let's install it now.
Run the following commands:
brew install postgresql@15 libpq
brew link --force libpq
brew services start postgresql@15Once you've done that, let's check that it worked:
psql -d postgresYou should you see a new prompt like this one 👇
psql (15.2)
Type "help" for help.

postgres=#
✔️ If this is the case, type \q then Enter to quit this prompt. You're good to go 👍
❌ If not, please ask for a teacher
Let's check if you successfully installed everything.
In you terminal, run the following command:
exec zshThen run:
curl -Ls https://raw.githubusercontent.com/lewagon/setup/master/check.rb > _.rb && ruby _.rb && rm _.rb || rm _.rb✔️ If you get a green Awesome! Your computer is now ready!, then you're good 👍
❌ If not, contact a teacher.
If you are unsure about what to do, you can follow this link. If you are already logged in, you can safely skip this section. If you are not logged in, click on Enter Kitt as a Student. If you manage to login, you can safely skip this step. Otherwise ask a teacher whether you should have received an email or follow the instructions below.
Register as a Wagon alumni by going to kitt.lewagon.com/onboarding. Select your batch, sign in with GitHub and enter all your information.
Your teacher will then validate that you are indeed part of the batch. You can ask them to do it as soon as you completed the registration form.
Once the teacher has approved your profile, go to your email inbox. You should have 2 emails:
- One from Slack, inviting you to the Le Wagon Alumni slack community (where you'll chat with your buddies and all the previous alumni). Click on Join and fill the information.
- One from GitHub, inviting you to
lewagonteam. Accept it otherwise you won't be able to access the lecture slides.
Slack is a communcation platform pretty popular in the tech industry.
Download the Slack app and install it.
Launch the app and sign in to lewagon-alumni organization.
Make sure you upload a profile picture 👇

The idea is that you'll have Slack open all day, so that you can share useful links / ask for help / decide where to go to lunch / etc.
To ensure that everything is working fine for video calls, let's test your camera and microphone:
- Open the Slack app
- Click your profile picture in the top right.
- Select
Preferencesfrom the menu. - Click
Audio & videoin the left-side column. - Below
Troubleshooting, clickRun an audio, video and screensharing test. The test will open in a new window. - Check that your preferred speaker, microphone and camera devices appear in the drop-down menus, then click
Start test.

✔️ When the test is finished, you should see green "Succeed" messages at least for your microphone and camera. 👍
❌ If not, contact a teacher.
You can also install Slack app on your phone and sign in lewagon-alumni!
It is mandatory that you protect your session behind a password.If it is not already the case, go to > System Preferences > Users & Groups and change your account password. You should also go to > System Preferences > Security > General. You should require a password 5 seconds after sleep or screen saver begins.
You can also go to > System Preferences > Mission Control and click on the Hot Corners button at the bottom left. Choose for the bottom right corner to start the screen saver. That way, when you leave your desk, you can quickly lock you screen by putting your mouse in the bottom right corner. 5 seconds after, your Macbook will be locked and will ask for a password to get back on the session.
As you become a programmer, you'll understand that leaving the keyboard takes a lot of time, so you'll want to minimize using the trackpad or the mouse. Here are a few tricks on macOS to help you do that.
Go to > System Preferences > Keyboard. Set Key Repeat to the fastest position (to the right) and Delay Until Repeat to the shortest position (to the right).
Read this script and cherry-pick some stuff you think will suit you. For instance, you can type in the terminal this one:
# Expanding the save panel by default
defaults write NSGlobalDomain NSNavPanelExpandedStateForSaveMode -bool true
defaults write NSGlobalDomain PMPrintingExpandedStateForPrint -bool true
defaults write NSGlobalDomain PMPrintingExpandedStateForPrint2 -bool true

# Save screenshots to the Desktop (or elsewhere)
defaults write com.apple.screencapture location "${HOME}/Desktop"

# etc..You are going to use most of the apps you've installed today really often. Let's pin them to your dock so that they are just one click away!
To pin an app to your dock, launch the app, right-click on the icon in the taskbar to bring up the context menu and choose "Options" then "Keep in Dock".

You must pin:
- Your terminal
- Your file explorer
- VS Code
- Your Internet browser
- Slack
- Zoom
Your computer is now all set for Le Wagon Web Development course 💪 👏
Enjoy the bootcamp, you will nail it 🚀