VexFlow 4 Tutorial
Below, we demonstrate different ways to display a VexFlow score in your project.
The quickest way is to add <script> tags into a static HTML page.
First, we add a <script> tag to include the VexFlow library.
<script src="https://cdn.jsdelivr.net/npm/vexflow/build/cjs/vexflow.js"></script>Below that, add a second <script> tag that renders a score:
<script>
console.log("VexFlow Build:", Vex.Flow.BUILD);

const { Factory } = Vex.Flow;

const factory = new Factory({
    renderer: { elementId: "output", width: 500, height: 200 },
});
const score = factory.EasyScore();
factory
    .System()
    .addStave({
        voices: [score.voice(score.notes("C#5/q, B4, A4, G#4", { stem: "up" })), score.voice(score.notes("C#4/h, C#4", { stem: "down" }))],
    })
    .addClef("treble")
    .addTimeSignature("4/4");
factory.draw();
</script>
You'll need to make sure you have a target <div> to contain the score. In the example above, we told VexFlow to look for a <div> with id="output", so your HTML page needs to include:
<div id="output"></div>You can use any CDN that serves NPM packages. Our favorites are jsdelivr and unpkg. Choose the one that works best for you!
jsdelivr
- Minified: https://cdn.jsdelivr.net/npm/vexflow/build/cjs/vexflow.js
- Debug: https://cdn.jsdelivr.net/npm/vexflow/build/cjs/vexflow-debug.js
unpkg
- Minified: https://unpkg.com/vexflow/build/cjs/vexflow.js
- Debug: https://unpkg.com/vexflow/build/cjs/vexflow-debug.js
Notice that the above URLs contain /cjs/ in the path. These VexFlow builds are used with Common JS projects (e.g., HTML pages with regular <script> tags, or Node.js scripts that use const Vex = require('vexflow');).
If your project uses ES Modules, you will need to import an entry file under build/esm/. Remember that ESM projects use <script type="module" ...> or specify "type": "module" in their package.json.
One easy way to test the ESM build is via Skypack:
<script type="module">
    import { Vex } from "https://cdn.skypack.dev/vexflow@beta/build/esm/entry/vexflow.js";

    Vex.Flow.setMusicFont("Bravura");

    const factory = new Vex.Flow.Factory({
        renderer: { elementId: "outputBravura", width: 500, height: 130 },
    });
    const score = factory.EasyScore();
    factory
        .System()
        .addStave({
            voices: [score.voice(score.notes("C#5/q, B4, A4, G#4", { stem: "up" })), score.voice(score.notes("C#4/h, C#4", { stem: "down" }))],
        })
        .addClef("treble")
        .addTimeSignature("4/4");
    factory.draw();
</script>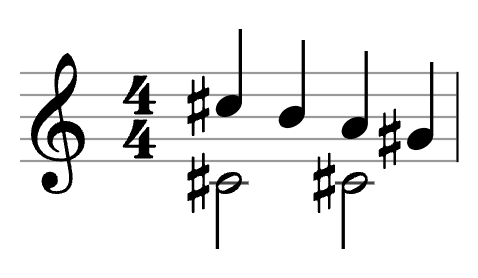
You can import VexFlow in your Node.js script. First, install the library:
npm install vexflowThe following program saves a PDF score:
import { Vex, Stave, StaveNote, Formatter } from "vexflow";
import { JSDOM } from "jsdom";
import { jsPDF } from "jspdf";
import "svg2pdf.js";

const VF = Vex.Flow;
console.log("VexFlow Build: " + JSON.stringify(VF.BUILD));

const dom = new JSDOM('<!DOCTYPE html><html><body><div id="vf"></div><body></html>');
global.window = dom.window;
global.document = dom.window.document;

// Create an SVG renderer and attach it to the DIV element named "vf".
const div = document.getElementById("vf");
const renderer = new VF.Renderer(div, VF.Renderer.Backends.SVG);

// Configure the rendering context.
renderer.resize(200, 200);
const context = renderer.getContext();
context.setFont("Arial", 10);

const stave = new Stave(10, 0, 190);

// Add a clef and time signature.
stave.addClef("treble").addTimeSignature("4/4");

// Connect it to the rendering context and draw!
stave.setContext(context).draw();

const notes = [
    new StaveNote({ keys: ["c/4"], duration: "q" }),
    new StaveNote({ keys: ["d/4"], duration: "q" }),
    new StaveNote({ keys: ["b/4"], duration: "qr" }),
    new StaveNote({ keys: ["c/4", "e/4", "g/4"], duration: "q" }),
];

// Helper function to justify and draw a 4/4 voice.
Formatter.FormatAndDraw(context, stave, notes);

const doc = new jsPDF();
const svgElement = div.childNodes[0];
doc.svg(svgElement).then(() => doc.save("score.pdf"));

console.log("Saved score.pdf");If your TypeScript project uses a bundler such as webpack or esbuild, you will need to make sure that VexFlow can be imported. The easiest way is to use npm:
npm install vexflowIn your app.ts, you can directly import the classes you need.
import { Vex, Flow, Factory, Stave, EasyScore } from "vexflow";To check that VexFlow is imported correctly, you can print out the build information.
console.log(Vex.Flow.BUILD);The output will look something like:
{
    "VERSION": "4.0.1",
    "ID": "efbdff60979ea561ff45bc4ab0b0a9dc12fde868",
    "DATE": "2022-02-28T01:06:16.478Z"
}
The VexFlow 4 library adds about 800 KiB to your app bundle. If you don't need all three music engraving fonts, you can import a different entry file that includes a single music font:
// Choose one of the import paths below to create a smaller bundle.
// Each path maps to a different entry file in the vexflow npm package.
import { Vex, Flow, Factory, Stave, EasyScore } from "vexflow/bravura";
import { Vex, Flow, Factory, Stave, EasyScore } from "vexflow/gonville";
import { Vex, Flow, Factory, Stave, EasyScore } from "vexflow/petaluma";
For example, the vexflow/gonville entry point adds about 450 KiB to your app bundle.
To get this to work in the current TypeScript (version 4.6 as of February 2022), you'll need to edit your tsconfig.json file to specify the entry file that "vexflow/bravura" resolves to. Do this with compilerOptions.paths.
{
    "compilerOptions": {
        "baseUrl": "./",
        "paths": {
            // Choose one of the options below to customize the font that will be statically compiled into your entry bundle.
            "vexflow/bravura":  ["node_modules/vexflow/entry/vexflow-bravura.ts"],  // 486 KiB
            "vexflow/gonville": ["node_modules/vexflow/entry/vexflow-gonville.ts"], // 439 KiB
            "vexflow/petaluma": ["node_modules/vexflow/entry/vexflow-petaluma.ts"]  // 460 KiB
        },
    ...
}
A future version of TypeScript will not require you to edit your tsconfig.json paths. Instead, TypeScript will understand the exports field in VexFlow's package.json, and importing "vexflow/petaluma" will automatically include only the Petaluma music font.
This feature might appear in TypeScript 4.7: