Best practices and lessons learned converting Azure Classic Cloud services to Azure App Service Web Apps
After running a web application in Azure Cloud Services since 2008, it was finally time to upgrade to a new service. I thought about Kubernetes, Web Apps and Serverless and decided that Web Apps make the most sense. I did not want to manage an AKS cluster and my workload was not going to require more than one or two servers. If I ran AKS, I would want to run .NET Core on Linux, but that is a whole additional upgrade. I liked the idea of serverless and need to get there as well. I plan on migrating my WebJob code to serverless, but again that will require some work since my worker process code references all my main business DLLs. Web Apps made the most sense and provided features to enhance my cloud experience.
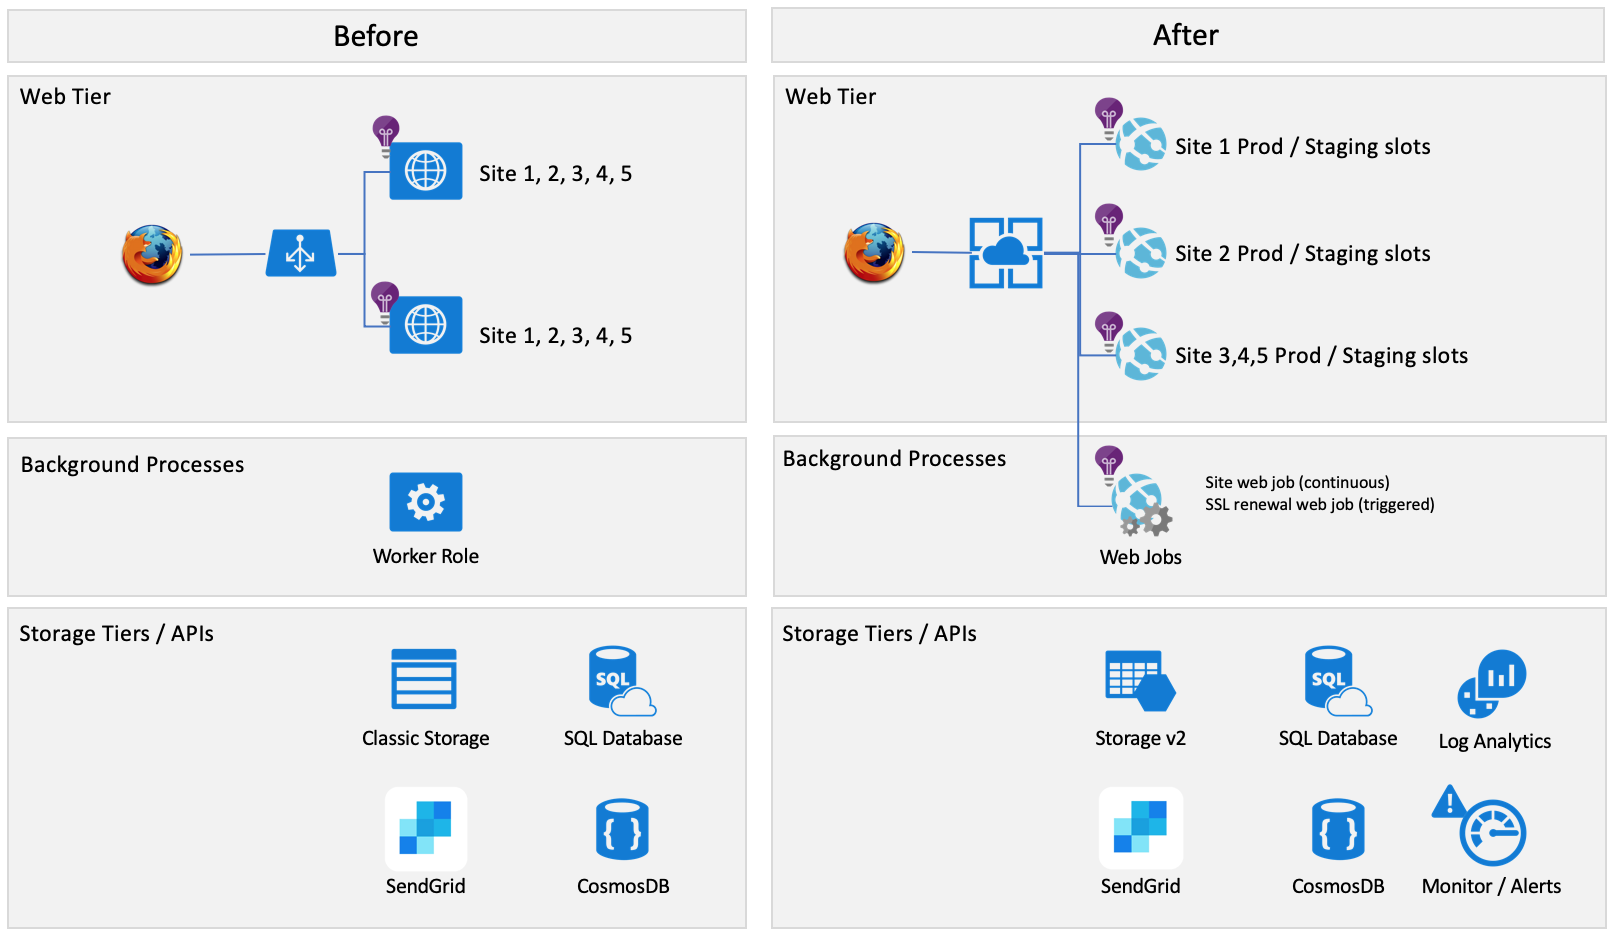
- A cloud service with two instances (A1v2) that hosts five different websites. Cost $95 a month.
- A cloud service with one instance (A0) that hosts a worker process. Cost $15 a month.
- A classic storage account.
- CosmosDB - the CosmosDB does not need migration
- SQL Database - the database doesnot need migration
- DNS at Register.com and GoDaddy.com
- SSL certification that covers all 5 sites from GoDaddy.
- A single Application Insights account
- SendGrid for email
- An App Service with two instances (S2) for windows that will have the following web apps. Cost $292 a month.
- Site one as a web app with a staging slot (this will be ported from WebForms to MVC)
- Site two as a web app with a staging slot (this will be ported from WebForms to MVC)
- Site three as a web app (that hosts 3 sites, different themes based upon the host header) with a staging slot
- Site that just runs two web jobs
- The existing worker role will run as a continous web job
- A new web job that runs Let's Encrypt auto renewer: https://github.com/ohadschn/letsencrypt-webapp-renewer
- The classic cloud storage account will be migrated to a Azure Storage v2 account.
- Four application insights accounts will be created.
- One for site 1
- One for site 2
- One for site 3
- One for the WebJob
- The SQL Database and CosmosDB will not change.
- The SSL certificates will use Let's Encrypt a free SSL service
- DNS entries will be updated to point to the new App Service sites
- A VNET will be created that uses Service Endpoints to route traffic quickly within Azure
- SendGrid for email
- The Visual Studio project that host the WebRole cannot update the NuGet Packages to the newer version without a lot of issues
- Deployments are slow. These can take 15 minutes.
- Remote Desktop (RDP) is turned off on the Cloud Services so debugging is a little more difficult. It would be nice to see more of the server without having RDP enabled.
- Cloud Services are old and eventually will be retired
- The Classic Storage accounts are old and do not support new features
- When you deploy to staging, you get a whole new set of computers. The deployment does not have an impact on the existing servers.
- VIP swaps are great. I will never use a service that does not support live releases. I release my code 24/7 without downtime.
- The cost was quite cheap.
- Reliable - I had zero downtime.
- You get all the new features of Web Apps.
- Staging slots for deployments
- Easily host many different web apps in seperate sites (this could be done in clouds services, but you could not view them since you got a GUID for the staging slot URL)
- You can do A/B traffic
- You can see logging and server info with Kudu
- You have ARM VNETs
- Faster deployments - 1 minute instead of 15
- You get all the benefits of newer storage
- Faster storage
- New features (encryption, service endpoints, premium speed)
- Seperate Application Insights accounts
- You can now monitor each site seperately
- Free SSL
- Our SSL costs were starting to add up and renewing was painful
- Determine what naming schema you will name your resources (resource groups, resources, etc.).
- Create the items by hand to ensure the names are available and that your naming standard will work. Some resource allow for CamelCase, dashes and then other are all lower case and just alphanumeric.
- Determine what Tags you will need to specify on your resources. Typically tags will include Environment (Dev/QA/Prod) and Cost Center for billing purposes.
- Azure Resouces were created in the following order:
- Resource Groups
- Application Insights accounts
- App Service
- Web Apps (this determines your CNAMEs)
- When the web app is created it was then linked to the Application Insights account
- Web Apps (this determines your CNAMEs)
- Storage Account
- Log Analytics account
- VNET
- Tags were applied
- Alerts were configured on new resources at the resource level and through the Log Analytics account
- I named my resource groups in the following naming convention:
- MyApp.Networking - for my VNET
- MyApp.Storage - for all my storage accounts
- MyApp.Web - for my App Service and WebApps
- MyApp.Database - for my SQL Database
- MyApp.CosmosDB - for my CosmosDB SQL API instance
- MyApp.LogAnalytics - for my log analytics. I will send my diagonistic data here from all my resources.
- Site 1
- The first site was a simple one page website. It was written in WebForms.
- I created a new MVC project in Visual Studio and went through the wizard to add application insights. I created the application insights in the portal first so that it was in a resource group of my choosing and named accordingly.
- I added some custom error section to my web.config and created a error page
- I copied over my HTML from the WebForms and my code behind. The code needed a few changes. Since this was a smalls site I just used the ViewBag for my fields and the HTML was changed to use a ViewBag as well.
- Site 2
- This was a more complex site and was written in WebForms
- I did the steps as the first site, but did have some additional tasks.
- I had to ensure PDF files were download inline and change the paths of my routes. A 5 page site took about 10 hours to convert.
- Site 3/4/5
- This is MVC, WebAPI and WebForms.
- I created a new ASP.NET site in Visual Studio and added MVC, WebAPI and WebForms.
- I manually merged the web.config file.
- I copied all the ASPX pages to the new site.
- I opened VS Code and did a namespace search and replace. When I did this in Visaul Studio the "designer" files did not get the namepace replaced.
- I then excluded each directory that had ASPX pages in it, then re-included it. This trigger something in Visual Studio and relinked the designer. 4000 compile error swhen away after this.
- WebJob
- I created a WebJob and converted the code.
- My code run as an endless while loop, so I just needed to edit the code to kick off an endless method
- I ran as a console app and could test
- I tested everything and made sure things worked.
- I branched/tagged my code, so I could reference it. I then removed my the projects that were no longer needed
- I removed my Cloud Service projects
- I removed my SSL project which was used to make a PFX from my GoDaddy renewal
- I removed my old Web App
- I removed my old Worker App
- I removed a console app that was used to run the same tasks as my worker role. This was used for loca testing.
- I now could consolidate and clean up my NuGet Packages
- I right clicked at the solution level and said manage NuGet packages
- I consolidated everything and tested
- I then was able to upgrade my packages which was problematic in the past
- I deleted all the packages in the packages folder then in Visual Studio said restore missing packages
- After I migrated my storage account, I could update my storage connection strings
- Overall the code was much cleaner and the build process has less code to download and less NuGet packages to restore.
- I created a new storage account
- I used Azure Storage Explorer to copy my items from my classic storage to my v2 storage
- I copied each blob container
- I copied each table
- The above turned out to be very easy. I only have 20 GB of data so it just took a few hours to copy.
- In the Azure Portal you can also click on "Migrate to ARM" storage. I had some containers that had old data and wanted to start fresh, so I oly copied the containers I needed and let my code recreate the ones needed for processing.
- I configured two autoscaling rules
- Default Rule:
- I configured auto-scaling to scale up one instance when average CPU is > 50% over the past 5 minutes
- I configured auto-scaling to scale down one stance thwn the average CPU < 50% over the past 5 minutes
- I set the min instance count to 2 and the max count to 6
- Nightly rule
- I configured a scheduled rule that will scale the site to 1 instance between 10PM and 7AM EST. The site has almost no traffic at these hours, based upon my telemetry in App Insights, and I am willing to risk a moment of downtime if an update is rolled out by Azure. My App Insight health probe check will tell me this.
- Default Rule:
- Build Process
- There is nothing to special about updating my build and release pipelines. Building the Visual Studio solution with the default task, compiled all my websites, the WebJob and was published as a zip file. I could then uploaded the Zip file as an artifact.
- Release Process
- Deploy Staging Stage
- Deploy support artifacts to my storage account
- Deploy site 1 to WebApp1, site 2 to WebApp2, site 3 to WebApp3 to staging slots
- Start WebApp1, WebApp2, WebApp3 staging slots
- Deploy WebJob to the WebApp-WebJob - I do not have a staging slot for this since the code is tested locally first. If a staging slot was used, the items would be getting processed out of the queues by either the production or staging slot. The other option I considered was stopping the production slot, deploying to staging and verifying the process works, then swapping. You would need to deploy all your webjobs with this apporach. If you WebJob uses triggers like queue triggers, then you need to consider the effects on deploying with an event base architecture.
- Deploy Production Stage
- Perform a Application Insights Release annotation for each App Insights account. This puts a marker so that when I view my telemetry I can tell a release occured.
- Swap staging to production for all three WebApps
- Stop Staging Stage
- When no one complains about the release...
- Delete the files in each staging slot for all three WebApps
- Stop all staging slots
- Deploy Staging Stage
- Clean Up
- I deleted my classic service connection from Azure DevOps and from the Azure portal
- I had to delete all my old classis alerts
- I recreated my alerts in the new Azure Alerts (this lets me send an email and SMS text)
- I created an Azure Storage throtting alert to know if my storage is getting throttled
- I created an RU alert on my CosmosDB to know if it is getting throttled
- I created a SQL Database DTU alert if my DTUs go above 75%
- I put a Delete lock on each of my resource group! This is a must to prevent an accidental deletion. A rouge ARM template, a person with too many permissions or you just cleaning items up can cause you to delete your Azure Resources. This will be a bad day for someone!
-
I created a Log Analytics workspace to review items (free tier)
- I went to my CosmosDB and select "Diagonistics"
- I configured my data to be sent to my Log Analytics
- Repeat the above steps for SQL Database
- You can also go to your Log Analytics and click on Azure Resouces to connect items.
- You want to setup your Action group (who to email/text) when an alert triggers in this Log Analytics account. These can get messy and you should just setup one (not create one for each alert).
-
I created an Application Insights health check for each of my 3 Web Apps.
- Site one checks if the home page is healthy
- Site two checks if the home page is healthy
- Site three calls a custom health probe URL that:
- Azure Storage - creates a blob named {guid}.txt and then deletes it. This makes sure that storage is working.
- Azure Database - A simple SELECT is run that just returns a single value.
- Azure CosmosDB - A simple SELECT is run that just returns a single value.
-
I created a free tier of Azure Security center. This showed me items like HTTPS is not enforce, I was using classic storage (before I deleted) and a few other items.
-
I navigated to each of my Application Insight accounts and pressed the "Application Dashboard" button. This created a dashboard where I can view all my website telemetry, heathprobes and live server streams.
- You can turn on Soft delete for the storage account. I could not use this feature since I save session state in storage and it would cause too many soft deletes. I will migrate this container to a premium Azure Storage account, for greater speed, then turn on soft delete for my storage account.
- If you need your application insight data for more than 90 days, then turn on continuous export.
- I send all my exceptions (from my code) to Application Insights. This avoids the need to create a custom logging for exceptions.
- You can also send your traces to Application Insights.
- Setting these up was quite easy. I went to my DNS provider and updated the records. I updated my A and CNAME. I you want to register the naked domain then you will need a TXT file.
- In the portal click Custom Domains on your Web App. Press validate. It will tell you if it is okay and what setting to set if it does not validate.
- Most of my resources are tagged for production since I just mainly have a production application. You should create a "Cost Center" tag which can be assigned to your resources so that billing can be broken apart between Dev/QA/Prod/etc. In the Azure portal, you can click on Subscriptions | Resources and then edit the tags in bulk.
- Websites
- I left the old cloud services running
- I deployed my new Web Apps
- I updated DNS
- I ran my WebJob (manual) trigger to get SSL certificates
- Traffic flowed to the new system (over the course of several hours)
- Once all the traffic was good, I turned off my cloud services
- Storage
- I copied all my blobs that were static
- I updated my web app and placed in the staging slot
- I told the site admins not to use any maintence screens
- I swap staging to production
- I copied any queue items that ended up in old storage account
- Users lost session state when that swap occurred
- This was done during some downtime, but only took about 1 minute be fully switched. The site is not generating tons of blob data so it was not a very stressful process. If I was going to do this on a more busy site, I would have had to come up with a better plan. I could have done a second copy with "only new items" between the accounts.
- I regenerated my storage keys for my old storage accounts. I did this so I did not have any unknown processes connecting and hopefully I would see an exception. The accounts will be deleted in a few months when no longer needed.
- Slots
- Staging Slots swaps the settings (not just the code).
- Staging Slots swaps the WebJobs, so becareful about having two running or swaping and stopping staging
- Stopping the staging slots saves resources.
- To create my slots I follow this:
- Create a staging slot, do not clone settings unless you want.
- In the production AND staging slot configure (you need to configure both). In my DevOps process I deploy to staging and swap to production. So, if you do not configure staging the same as production when you swap you will end up with bad an inconsistent configuration that will swap back and forth between production and staging. This could be a hard bug to catch.
- 64 bit
- ARR off - keep things stateless or at least not sticky
- Always On - on to keep website alive
- Application Insights - configure this in addition to adding to your code. By having both you will receive better telemetry such as dependencies and such.
- If you need to warm up your application, please see: https://docs.microsoft.com/en-us/azure/app-service/deploy-staging-slots#specify-custom-warm-up
- I avoid slot specific configuration values. If you specify one, then the site my recycle to set the values during a swap. Some people like to have their staging slot point a staging database and when they sway they do not want their connection string to swap, so they check off the slot specific value. I personally consider the staging slot as my chance to test in production and want to verify things are working (login to the site and do some read only tasks).
- Let's Encrypt
- I first used Let's Encypt as an Azure Site Extension. The extension installs a WebJob to renew the certificates. When I swapped the production slot to the staging slot the WebJob swapped as well. Well, I turn off my staging slots when not in use, so my WebJob stopped (no more SSL renewal).
- When I am done with my staging slot, I delete all the code. This was also removing my WebJob that renewed my certicates. The WebJob had to run in the same Web App as the SSL certicate that needs renewal. I could have deployed the Let's Encrypt web job to staging, but then I might have two running and trying to renew.
- The Azure Site extension requires a storage account. I ended up creating three storage account, one for each web app, which I did not like. I want less things to manage.
- I ended up using https://github.com/ohadschn/letsencrypt-webapp-renewer which allow me to renew all my SSL certicates in my WebJob Web App (a seperate web job outside of my website). This extension all allows for an email to be sent via SendGrid and your configuration values can be shared between your web apps which makes for a lot less configuration values.
- One note, the job failed the first time since it seems like the Let's Encrypt service got a lot of traffic at midnight UTC. I changed the CRON exxpression of the WebJob trigger to run at 5:15 in morning. An off hour time and not at the top of the hour.
- Azure Storage Explorer can copy Azure Storage Tables. I had really disliked the idea of writing custom code to migrate these tables. Luckily, I could just cut and paste. I would run this from a VM with Azure if you have a lot of data or use the ARM conversion tool in the Azure portal.
- Deploying code
- I used Azure DevOps to deploy my code. The default build process for Visual Studio 2017 publishes all the files in a zip file.
- When deploying code to a WebApp, the existing code files are not deleted first. You can do with some publishing settings, but I opted for a PowerShell task that removes the files using Kudu API. I used this script, but simpified some since I always am targeting a staging slot: https://mariocardinal.wordpress.com/2019/01/18/how-to-clean-up-the-wwwroot-folder-on-the-azure-web-app-using-powershell/. This will delete your web jobs as well since they are under the wwwroot directory.
- Convert the web jobs to Azure Functions (serverless).
- Convert to .NET core so I can deploy on Linux (cheaper and faster)
- Convert to use CosmosDB exclusively over SQL Database since I mainly store object documents.
- Currently, the region the resouces are deployed does not support VNETs for App Services (still in preview) which I want to turn on along with service endpoints to route my taffic more efficently in Azure. Service Endpoints skip alot of the default paths and route your traffic right to your storage, SQL or CosmosDB instance. Even if you do not need a VNET, it is worth using one just for this feature.