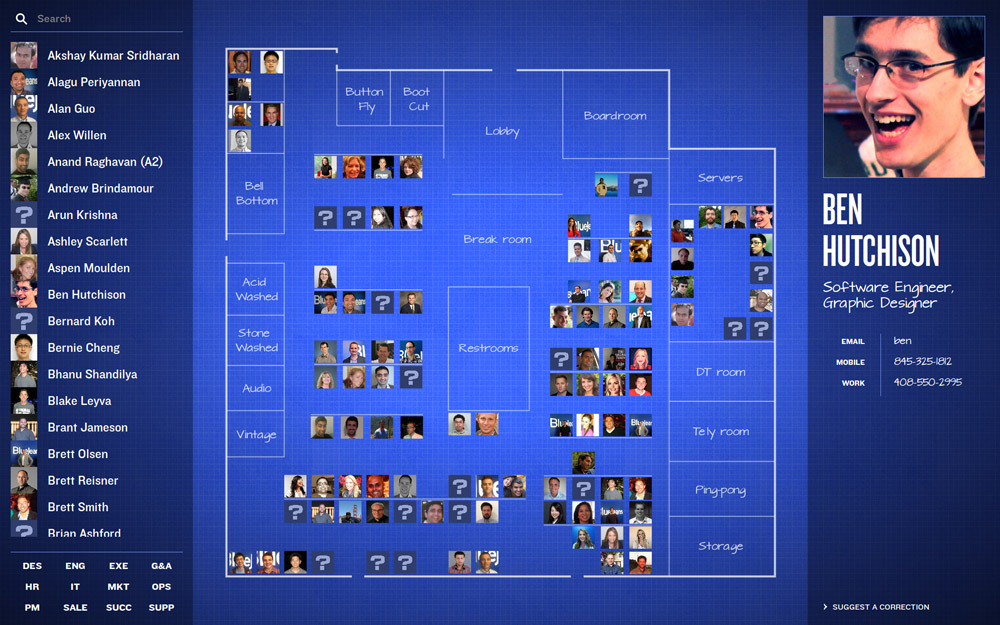
Where do people sit in the offices of Blue Jeans Network? What's that person's name, whose face I remember but never really met? I've heard of this person, but I don't know their face. Where are the different teams grouped? What is A2's email address?
- Backbone
- Express
- GraphicsMagick
- Handlebars
- jQuery
- LESS
- Mongo
- Node
- Q
- SVG
-
Clone the GitHub repository
git clone https://github.com/Aldaviva/floorplan.git cd floorplan -
Install dependencies
make install-depsThis installs Graphicsmagick and several NPM modules.
-
Set permissions so the server can write to the directories where CSS stylesheets and people's photos are saved
chmod +rwx public/styles data/photos -
Create a configuration file based on the example
cp config.example.json config.json -
You may edit the configuration file and change any settings you want, although the server will run with the default settings.
-
wwwPortis the TCP port on which the Floorplan HTTP server listens. Useful if you want the server to listen on a different port, like80or8080. With the default value of3000, you can access the Floorplan web interface by going tohttp://127.0.0.1:3000/. -
dbHostis the host on which the MongoDB server runs. Useful if you have a MongoDB server on a different computer. With the default value of"127.0.0.1", the MongoDB server is on the same computer as Floorplan. -
dbPortis the TCP port on which the MongoDB server listens. Useful if you have a non-default MongoDB configuration. With the default value of27017, Floorplan will connect to a MongoDB server with a default configuration. -
dbNameis the name of the MongoDB database that will be used to store people added to Floorplan. Useful if you want to run multiple different Floorplan instances on the same MongoDB server. With the default value of"floorplan", people documents will be stored in thepeoplecollection of thefloorplandatabase in your MongoDB server.If you want to connect to the database yourself, you can run
mongo floorplan > db.people.find() -
mountPointis the HTTP path under which the Floorplan web interface will be served. Useful if you want to reverse-proxy the Floorplan server through another HTTP server like Apache or Nginx due to TLS or a desire to serve multiple services on port 80. With the default value of"/", you can access the Floorplan web interface by going tohttp://127.0.0.1:3000/, but if you changedmountPointto/floorplan, you would have to go tohttp://127.0.0.1:3000/floorplan.
-
node index.js
Use Ctrl+C to stop.
Go to http://127.0.0.1:3000 in your web browser. You should see a blue page that says "MV" in the top left.
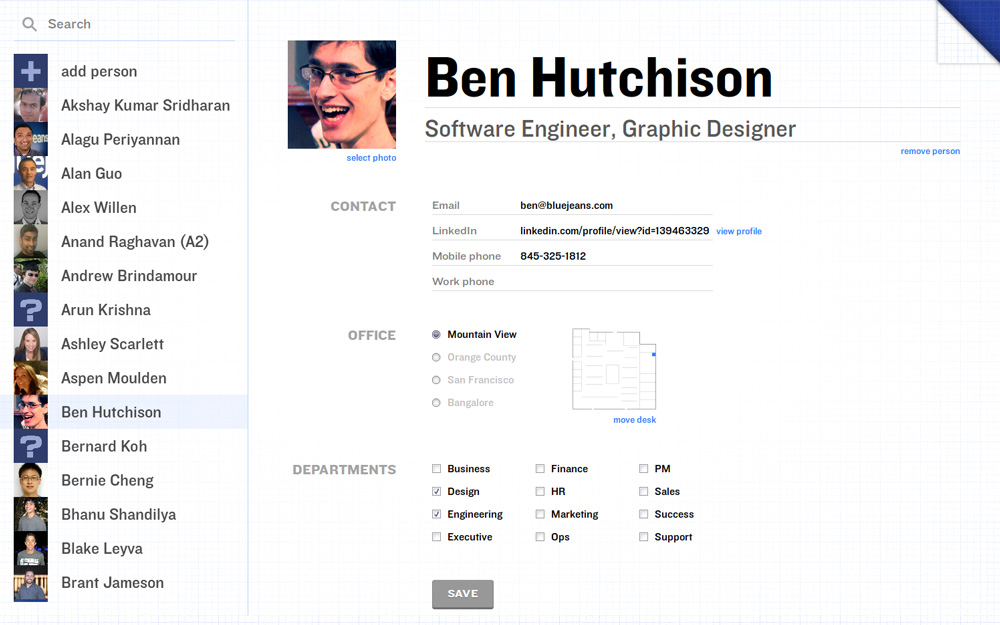
Go to http://127.0.0.1:3000/admin/` in your web browser. You should see a white page that says "add person" in the top left.
Fill in the person's full name and any other details you want to set, then click the blue Save button.
Now when you view the Floorplan, the new person should appear in the list to the left and, if you assigned an office and seat, their photo will appear in their seating position.
- Go to the
views/mapsdirectory. - Copy or edit the SVG files here.
- Restart the server for your changes to take effect.
- The SVG files define
- the dimensions of the office using the
/svg/@viewBoxattribute (minX,minY,width,height). (0,0) is the top-left corner of the SVG canvas. - the size and positions of the seats (
minX,minY) using the JavaScript<script>elemnent to definethis.SEATS.mv.iconSizeandthis.SEATS.mv.seatPositions. If you change the name of the office from"mv", make sure you change it here too. - the
polygon.backgroundelement is the shape of the office footprint, which turns white in the Admin UI's seat choosing interface so the page isn't visible through the walls. - the
g.wallsand childg.innerWallsgroups are the shapes that define where the walls of the office are, with differing styles - the
g.roomNamesgroup shows text on the Floorplan. Multiline text usestspanelements for positioning.g.roomgroups optionally shows detailed conference room information, some of which (endpoint:id,.statusBadge) rely on external systems to work. g.seatsandg.photosare always empty, and will be populated by the client-side presentation layer to show where people sit..arrowlinks in some maps are used to navigate between offices that are spatially local to each other.
- the dimensions of the office using the
- Map styles are set in
public/styles/Map.less, including the way walls and text are rendered. - The street address and optional Yelp review link are defined in
public/scripts/IntroView.js. - The office changer links in the top left are defined in
public/scripts/ListPane.js.- The total number of offices is defined in
public/styles/definitions.less. - The number of columns for the office changer links is defined in
public/styles/ListPane.less.
- The total number of offices is defined in
- The Admin UI office chooser is defined in
views/admin.hbs.
I find that the easiest way to generate the SVG files is to
-
Copy an existing SVG file
-
Open the SVG in Adobe Illustrator to set the walls and seating positions visually. The seats can just be squares for now. Room areas can be any shapes you want.
-
Export the SVG from Illustrator without overwriting my SVG using the View Code button
-
Set the
viewBoxattribute value's top left position, width, and height to be the same as the Illustrator artboard. -
Copy the
g.wallsandg.innerWallsgroups into my SVG -
Copy the
rectelements you made for the seating positions into a text editor, preferrably one with column editing like Sublime Text, and convert theirxandyattributes into a JavaScript array of[x, y]pairs:Temporary SVG code generated by Illustrator for seat rectangles
 <g class="seats">
     <rect width="20" height="20" x="146.363" y="927.371" />
     <rect width="20" height="20" x="847.134" y="813.174" />
 </g>
JavaScript seats object array
this.SEATS.mv = { iconSize: 20, seatPositions: [ [146.363, 927.371], [847.134, 813.174] ] }; -
Set the
g.room .roomAreato be the room area shapes you made. -
Change the
g.roomNamestext, restart the server, and line up the text coordinates using your browser's Developer Tools for fine positioning.