


Web editor for typed tree structures
To avoid having to hand write the scheme you can use one of the following generators:
| Environment | Generator |
|---|---|
| dotnet | typedtree-generator-dotnet |
| unity | typedtree-generator-unity |
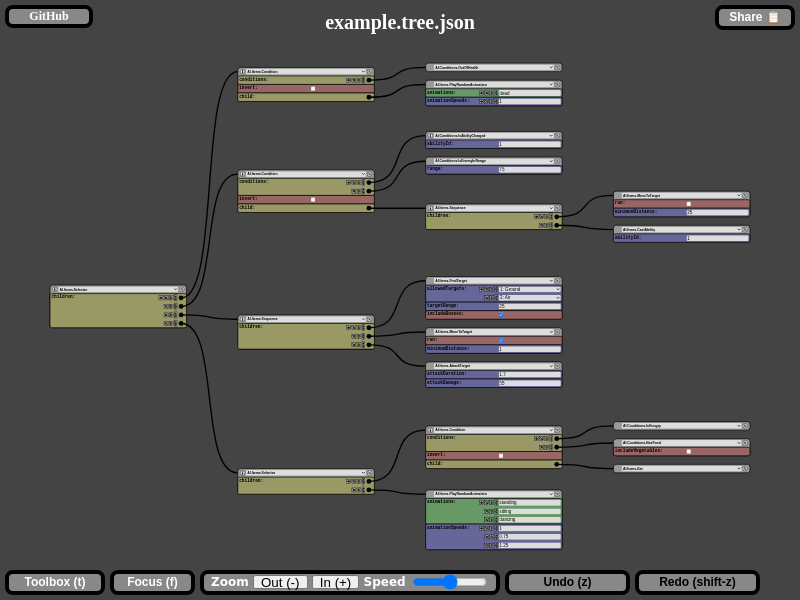
This editor is designed to be able to build tree structures according to a scheme and then output it to json. You create a simple scheme file describing the possible node types, load it up in the editor and then create tree's in a visual (and type safe) way.
Both the scheme and the tree formats are designed to be both hand-editable and easy to generate / parse. You could for example generate a scheme based on a class structure from the language you wish to load tree into.
This editor runs purely client-side and any content you load into it stays purely on your machine.
Tiny electron wrapper to ease in saving until native-file-system has become mainstream: electron-wrapper.
{
  "rootAlias": "AI.Item",
  "aliases": [
    {
      "identifier": "AI.Item",
      "values": [
        "AI.Items.Selector",
        "AI.Conditions.OutOfHealth"
      ]
    }
  ],
  "enums": [
    {
      "identifier": "AI.Target",
      "values": [
        { "value": 1, "name": "Ground" }
        { "value": 2, "name": "Air" }
      ]
    }
  ],
  "nodes": [
    {
      "nodeType": "AI.Items.Selector",
      "fields": [
        {
          "name": "children",
          "valueType": "AI.Item",
          "isArray": true
        }
      ]
    },
    {
      "nodeType": "AI.Conditions.OutOfHealth",
      "fields": [
        {
          "name": "minHealth",
          "valueType": "number"
        }
      ]
    }
  ],
  "featureNodeNames": true
}
Elements in the scheme:
rootAlias: Alias that the root-node has to be part of.aliases: Definition of all the aliases in the scheme. An alias is a named group of node types.enums: Definition of all the enums in the scheme. An enum is a named set of numbers.nodes: Definition of all the node-types in the scheme. Each node defines a type-name and a set of fields that this node can have.
Possible field value types are:
booleannumberstringAlias(Alias has to be defined in thealiasessection of the scheme)Enum(Enum has to be defined in theenumssection of the scheme)
Enums are a special type as they only live in the scheme, in the actual tree data they are represented by numbers. The fact that the field is an enum in the scheme will make the editor validate the number and show it as a dropdown in the ui.
{
  "$type": "AI.Items.Selector",
  "$name": "My selector",
  "children": [
    {
      "$type": "AI.Conditions.OutOfHealth",
      "minHealth": 10
    }
  ]
}
Format is plain json with some well-known fields:
$type: Indicates the node-type in the scheme this node was created from.$name: Optional name for the node.
{
  "scheme": ...,
  "tree": ...
}
TreePack is a single file containing both a scheme and a tree, can be useful for sharing purposes.
This project is written in TypeScript and is transpiled into es6 JavaScript. Tree is rendered with a combination of plain html and svg.
For dependency management Npm is used. Rollup is used for creating the output bundle, and deployments are minified using uglify-js and css-combine.
Any ide can be used of course but configuration files for vscode are included. Ci scripts are written in bash so windows users should use the wsl for running them.
Installing node (at least version 10 of node required) and executing: make
should be enough, build-output can be found in the ./build directory.
For local development execute: make watch which will start a local server
with hot-reloading.
For running the tslint linter you can execute: make lint but
when using vscode the tslint plugin should provide warnings for non-compliant code already.
Unit tests can be found in ./tests/unit and are using the Jest
framework. Run unit-tests by executing: make test.unit.
Code coverage for unit-tests is tracked with codecov.io.
Integration tests can be found in ./tests/integration. Integration test are also written with
Jest and are run in the puppeteer
environment (which is a headless chromium api) using
jest-puppeteer. Run integration-tests by executing:
make test.integration.
To make debugging easier screenshots are exported during integration test execution, they can be
found in the ./screenshots directory. Actually the image in this readme also comes from there.
Builds are run in azure-devops and
output is deployed to a azure blob-storage bucket. Output can be found here:
https://www.bastian.tech/typedtree-editor/refs/pull/[PULL_REQUEST_NUMBER]/merge/ or
www.bastian.tech/typedtree-editor/refs/heads/[BRANCH_NAME]/
www.bastian.tech/tree is a alias
to www.bastian.tech/typedtree-editor/refs/heads/master/
- NodeJs: At least version 10 is required.
- FileSaver: Library for saving files that works consistently in almost all browsers.
- lz-string: Library for compressing text.
- If
verify-tooling.shfails try removing the./node_modulesdirectory.
- Running the integration tests in the windows linux subsystem fails with
Error: Failed to launch chrome!This is a known puppeteer issue