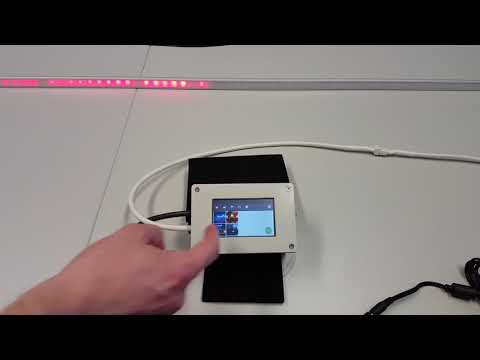
I started this project as a gift for my little cousin. The goal was to create an LED strip that could be controlled by a kid via touchscreen. The graphical layout is based on Googles Material Design Guidelines.

- Wemos D1 mini
An ESP8266 device is nice, because it is litte, cheap and we can add Wifi features later.
But any other Arduino compatible device should do. - WS2812B LED strip
or any other LED strip that is suported by FastLED- It is recommended to use a capacitor to smooth out the power supply.
I used one with 1000 µF and 16 V. - SK6812 is also supported since v2.7.0.
DefineFASTLED_RGBWincustom_values.h.- the white channel is irgnored for now
- It is recommended to use a capacitor to smooth out the power supply.
- level shifter from 3.3V to 5V
like Texas Instruments SN74HCT245N- a 20 pin IC socket for this chip is a good idea, too
- DHT22
to get current temperture and humidity
This is not necessary, but it is very cheap. So why not? - Nextion HMI touch screen
I used the 3.2" basic model (NX4024T032) You cannot simply use another size without putting much effort into resizing all graphics!- a few connectors to make it easier to (dis-)connect the display
XHP-4 - a microSD card to flash the firmware to the display
- a few connectors to make it easier to (dis-)connect the display
- Power supply like this
- a suitable male adapter like these (not tested)
- 470Ω resistor
- some more tools, cables and connectors
- I used Phoenix Contact MC 1,5/ 3-ST-3,5 and MCV 1,5/ 3-G-3,5 to connect the LED cables, because they are small and are specified to work with the expected current..
But they are not good looking. - adding a fuse is a good idea for security, too
- I used Phoenix Contact MC 1,5/ 3-ST-3,5 and MCV 1,5/ 3-G-3,5 to connect the LED cables, because they are small and are specified to work with the expected current..
Using VisualStudio Code and the PlatformIO Extension the necessary libraries are installed automatically vis platformio.ini.
Here is the Dependency Graph with the latest successfully tested versions.
Dependency Graph
|-- <Homie> 3.0.1
|   |-- <ArduinoJson> 6.11.5
|   |-- <AsyncMqttClient> 0.8.2
|   |   |-- <ESPAsyncTCP> 1.2.0
|   |   |   |-- <ESP8266WiFi> 1.0
|   |-- <Bounce2> 2.55.0
|   |-- <ESP Async WebServer> 1.2.3
|   |   |-- <ESPAsyncTCP> 1.2.0
|   |   |   |-- <ESP8266WiFi> 1.0
|   |   |-- <Hash> 1.0
|   |   |-- <ESP8266WiFi> 1.0
|   |   |-- <ArduinoJson> 6.11.5
|   |-- <Ticker> 1.0
|   |-- <ESP8266WiFi> 1.0
|   |-- <DNSServer> 1.1.1
|   |   |-- <ESP8266WiFi> 1.0
|   |-- <ESP8266HTTPClient> 1.2
|   |   |-- <ESP8266WiFi> 1.0
|   |-- <ESPAsyncTCP> 1.2.0
|   |   |-- <ESP8266WiFi> 1.0
|   |-- <ESP8266mDNS> 1.2
|   |   |-- <ESP8266WiFi> 1.0
|-- <ArduinoJson> 6.11.5
|-- <ESPAsyncTCP> 1.2.0
|   |-- <ESP8266WiFi> 1.0
|-- <DHT sensor library> 1.4.0
|   |-- <Adafruit Unified Sensor> 1.1.4
|-- <DallasTemperature> 3.9.1
|   |-- <OneWire> 2.3.5
|-- <OneWire> 2.3.5
|-- <Nextion> 0.0.0+20201108223110.sha.b8e2a3b
|   |-- <EspSoftwareSerial> 6.8.5
|-- <Embedis> 1.2.0
|-- <Adafruit Unified Sensor> 1.1.4
|-- <elapsedMillis> 1.0.6
|-- <FastLED> 3.3.3
|   |-- <SPI> 1.0
|   |-- <EspSoftwareSerial> 6.8.5
|-- <EEPROM> 1.0
|-- <EspSoftwareSerial> 6.8.5
In case you want to edit the content of the display to use other theme colors or add/replace some LED patterns, you also need the following programs.
Only tested and used with Windows 10.
- Nextion Editor
This software is needed if you want to change the content of the display - Inkscape
to edit the graphics - inkmake
to automatically create and export the necessary png files from the svg file- requires Ruby
- msxml
to automatically replace colors in the svg file before exporting to png
Before you can start to compile the project you need to make some changes to the Nextion library.
This is already done in the branch linked in the platformio.ini.
Open the following file with a text editor.
C:\Users\<username>\Documents\Arduino\libraries\ITEADLIB_Arduino_Nextion\NexConfig.h
Disable debug by commenting it.
//#define DEBUG_SERIAL_ENABLE And replace
//#define nexSerial Serialwith
#include <SoftwareSerial.h>
extern SoftwareSerial HMISerial;
#define nexSerial HMISerial
see:
- https://github.com/itead/ITEADLIB_Arduino_Nextion#uno-like-mainboards
- https://www.reddit.com/r/arduino/comments/4b6jfi/nexconfigh_for_nextion_display_on_arduino_uno/
You also might want to change some custom values in custom_values.h.
Like DISPLAY_TITLE, DATA_PIN, NUM_LEDS, LEDS_PER_METER, LED_TYPE or COLOR_ORDER.
When using the custom FastLED library you are also able to use RGBW SK6812 strips and DMA mode by defining these features.
First you need to combine the hardware components.

There is also a pcb view when you are done testing. (not tested!)
Next you need to compile and upload the Arduino sketch to your device. After you installed the libraries you define the parameters of your device before you can hit the upload button.
Be aware to not connect the LED stripe while the system is only powered by usb via the Arduino, because this will put to much power through the Arduino. I recomment to disconnect the LED strip and the display while programming the Arduino.

After this you copy the compiled HMI file (will be uploaded to the release page) to an FAT32 formatted microSD card, plug it into the display, and connect power to the display. This will automatically start the flashing of the firmware.
Since version 3.1.0 SuperLEDstrip supports controlling a WLED device.
- Configure
WLED_JSON_URLincustom_values.hbefor compiling - Tested with wled version
0.12.0. - Not all scenes look identical to SuperLEDstrip.
- Arcade scenes are not supported.
You can configure the purpose of your buttons in custom_values.h.
Like changing tha state of one or multiple output pins or switching between pre-defined scenes.
Just change the values of button01_do[].
You can also define some output pins in custom_values.h.
They can be inverted and you can define the initial state at start up.
Let's say you want to add an LED pattern you developed as the function mynewpattern().
First you need to add the pattern in SuperLEDstripe.ino if you create a new animation.
If your are only ading a new color pattern for an existing animation (like runningPalette) you can skip this part.
//     Pattern IDs              0          1      2         3        4    5     6               7              8     9        10
SimplePatternList gPatterns = { oneColor, stars, confetti, rainbow, bpm, kitt, flashingLights, runningPalette, xmas, Fire2012,  mynewpattern};
Add the new secen to the setScene() function in led_functions.h.
    case 304:   // swedish flag
      setupPaletteSweden();
      break;
While you are developing you might want to change the default scene to be your new one.
#define DEFAULT_SCENE 304To start the pattern from a cell (virtual button) from the display, you add the pattern to the according callback function in nextion_callback_functions.h.
Here it is p01c07PopCallback (p01 = page 1; c07 = cell 7).
void p01c07PopCallback(void *ptr) { gCurrentPatternNumber = 10; }You also need to change the graphics of the display, if you add a new pattern. First you need to download some pictures from the internet that are not includes in this project.
./Display/exported/get_images.shNow you can open the Display\exported\display_matarial_design.svg with Inkscape and enable the object manger.
Next you insert or create your new graphic (we will call it "tile" on top of the cell and group this with the object manager under the tile group of your choice (e.g. "tiles specials").
This is necessary, because the export script will automatically mark the different tile groups as (in-)visible.

In case you manually export the graphics you might want to change the theme colors and make the individual groups (in-)visible before each export.
For each tile group (settings, flags, ...) you need two exports. One with the pressed group disabled and one with it enabled.
The export script Display\exported\create_colored_svg_custom.bat will do all this automatically.
To use other theme colors you can change these in line 20.
call:SetColor dark, whiteIf you run create_colored_svg.bat the script will create all possible color combinations according to Googles material design color palette.
It took my computer about 24 hours to do this!
After the graphics are exported you need to replace the old ones in the Nextion file.
Open Display\400x240_black_white_light.HMI with the Nextion Editor.
Each tabulator of the interface has two pictures within the Nextion file. One with and one without 'pressed' objects.
So for the first tab you need to replace pictures 1 and 2.
Then you select the page (top right corner) and the tile you want the new pattern to be displayed at (here: p01c07) and change the attributes (bottem right) picc to 1 and picc2 to 2.

Now you can see the result by clicking Debug or hit Compile to create a binary file. Put this file (File | Open build folder) in the root directory of your microSD card , put it into the display, connect power and wait while the new firmware is flashed.
With the integration of homie-esp8266 there comes the ability to flash the firmware via wifi.
- make sure the device is connected to your mqtt broker
- install and configure the homie-ota server
- download the latest binary firmware release or compile it yourself with the Arduino IDE and select Sketch | Export compiled Binary
- Upload the firmware via the web interface of homie-ota or with the
upload_firmware.shscript - select firmware and device in the web interface and start the process
Instead of configuriong your device via the Config-Mode of Homie, you can define your Homie-Configuration in `Data/config.json'. To upload the file via Seriel (USB) connection use the following command:
pio run -t uploadfs
If you use a d1_mini_pro board you still need to define board = d1_mini in your platformio.ini.
Otherwise you get an std::bad_alloc error.
Once you got your device connected to your mqtt broker you can configure your smart home (in this case openHAB) to control SuperLEDstrip.

You can find configuration examples in the openhab folder.