NX - NG with Static JS and Windowed Observables
Shell application without context: https://nxn-gw-sj-sa-wo-static-eo2tt.ondigitalocean.app/shell/#/
My Profile standalone: https://nxn-gw-sj-sa-wo-static-eo2tt.ondigitalocean.app/my-profile/
My Profile hosted inside the shell app: https://nxn-gw-sj-sa-wo-static-eo2tt.ondigitalocean.app/shell/#/my-profile/
This repo is the result of the collaborative effort between Alex Earley, Doug Braxton and Mehmet "Mezo" Osmancik. Our goal was to design a FE solution that could be worked on by multiple teams using MFEs built with Angular and Git Submodules. "NXNGwSJSaWO" is a boilerplate NX project where each MFE is in it's own git submodule. Some submodules are required and are resolved on install. Others are optional and in their place the FE makes a request to some publicly hosted MFEs.
Micro Front End or MFEs are web apps that are hosted and compiled separately from each other. There are two types of MFE: Remote or Host. A Host app bootstraps Remote MFEs together into a cohesive experience for the user.
From NX Getting Started:
"Nx is a smart, fast and extensible build system with first class monorepo support and powerful integrations. It has a powerful core and a rich plugin ecosystem."
And from Setup MFE with Angular:
"...We made some changes to our @nrwl/angular:app generator to aid in the scaffolding of Module Federation configuration required for setting up a Micro Frontend Architecture. Therefore, using Nx it can be fairly straightforward to scaffold and build a Micro Frontend Architecture from a monorepo with all the additional benefits of Nx."
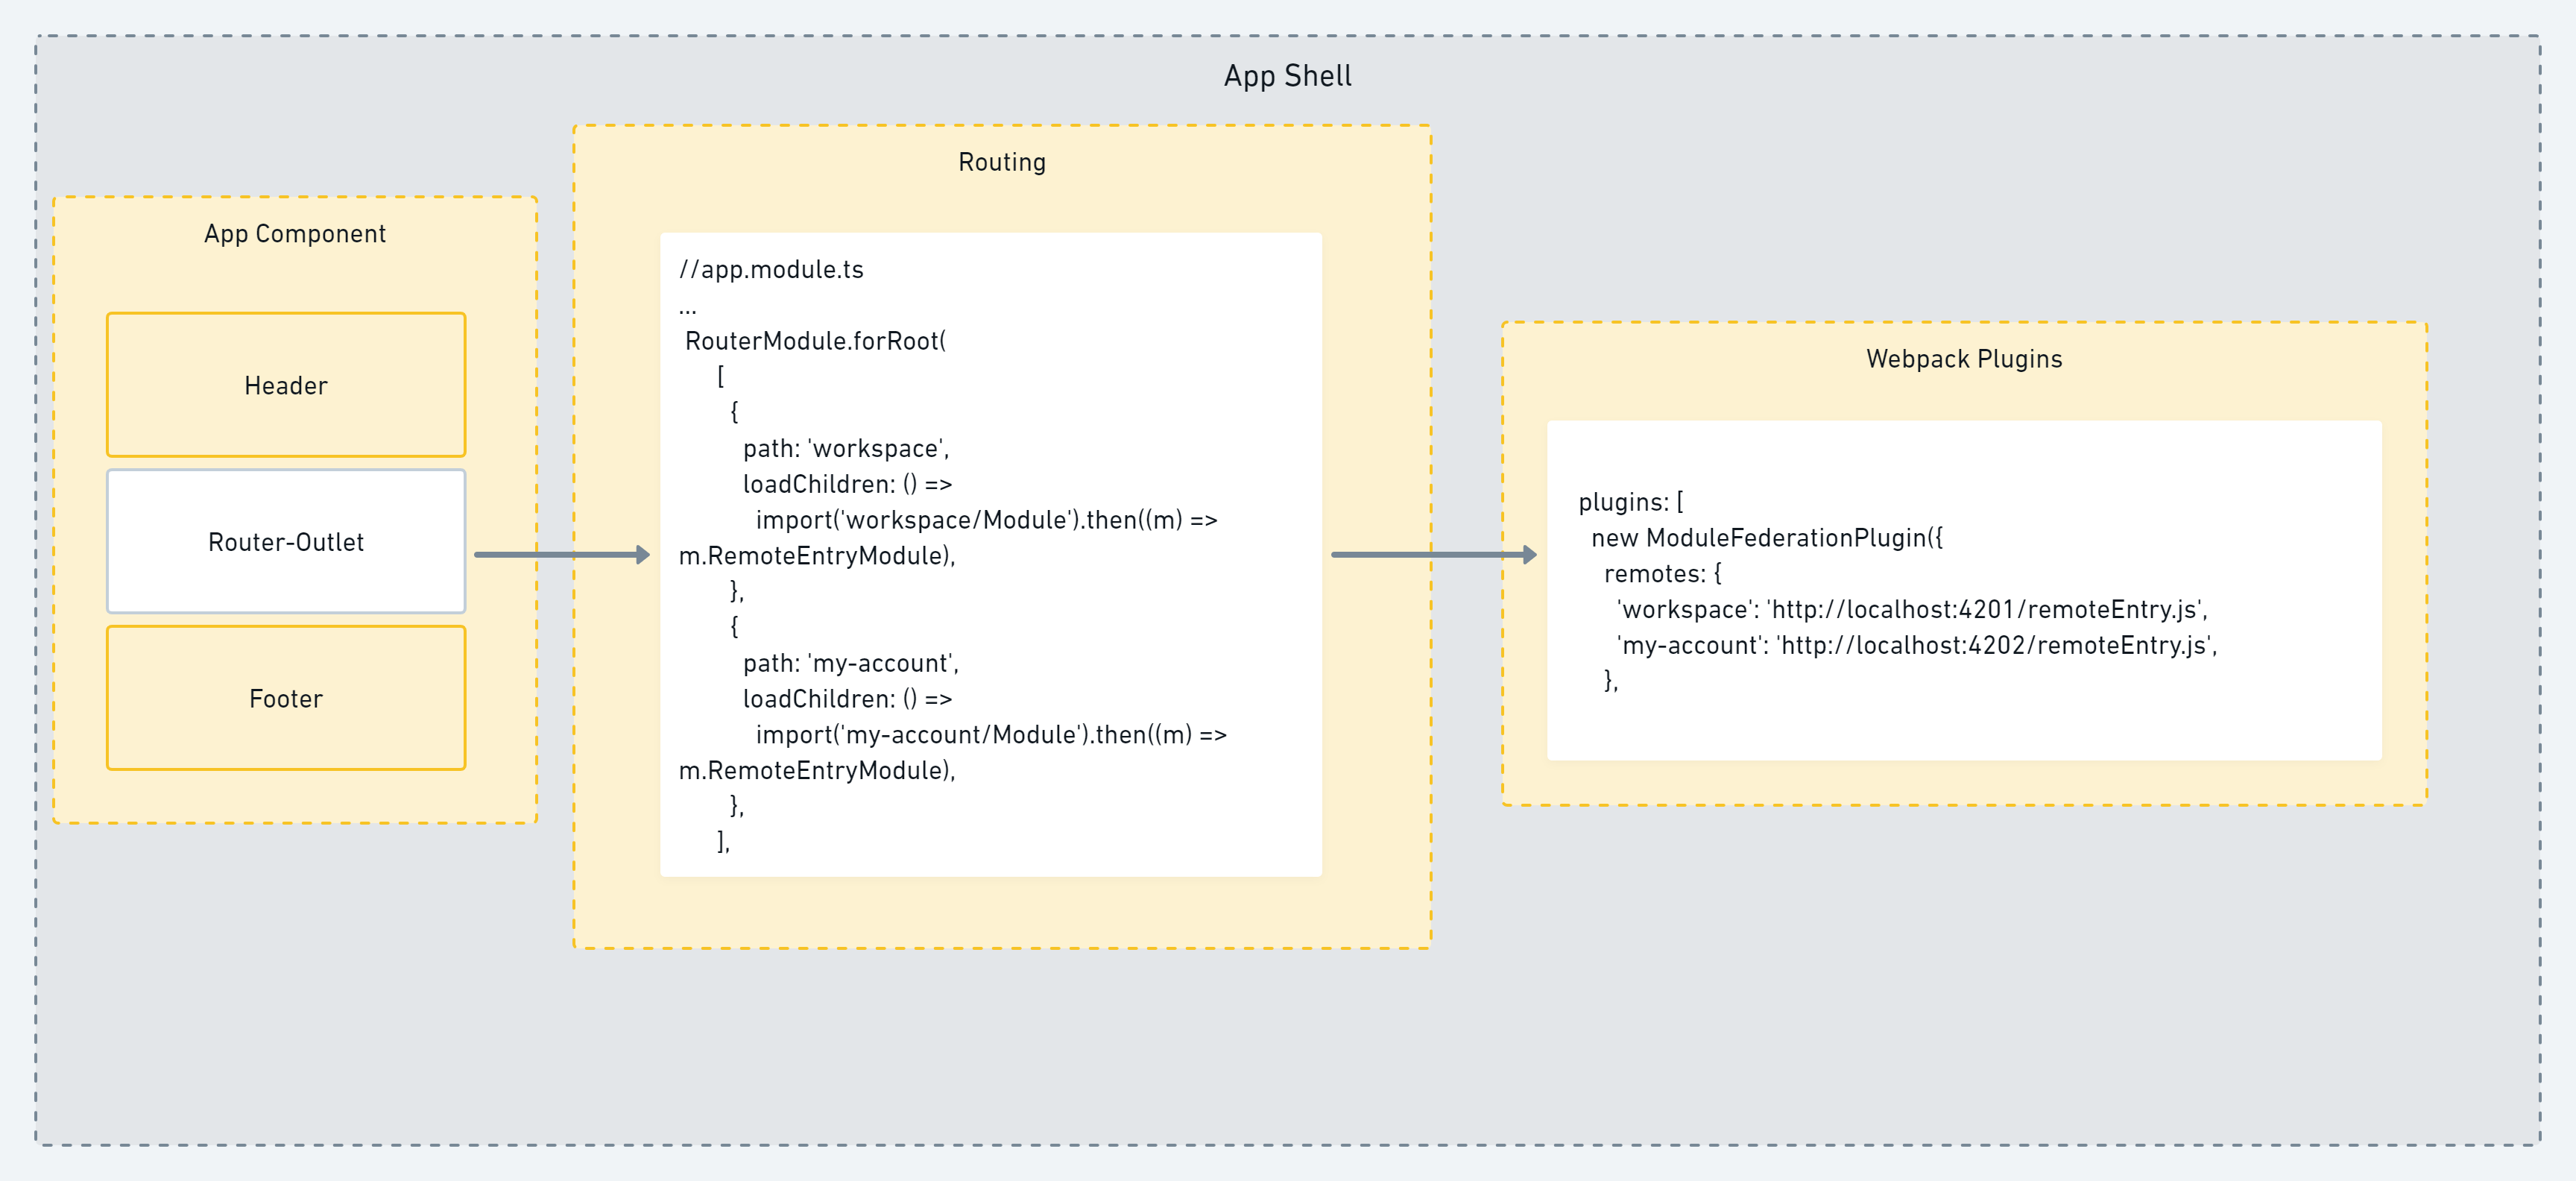
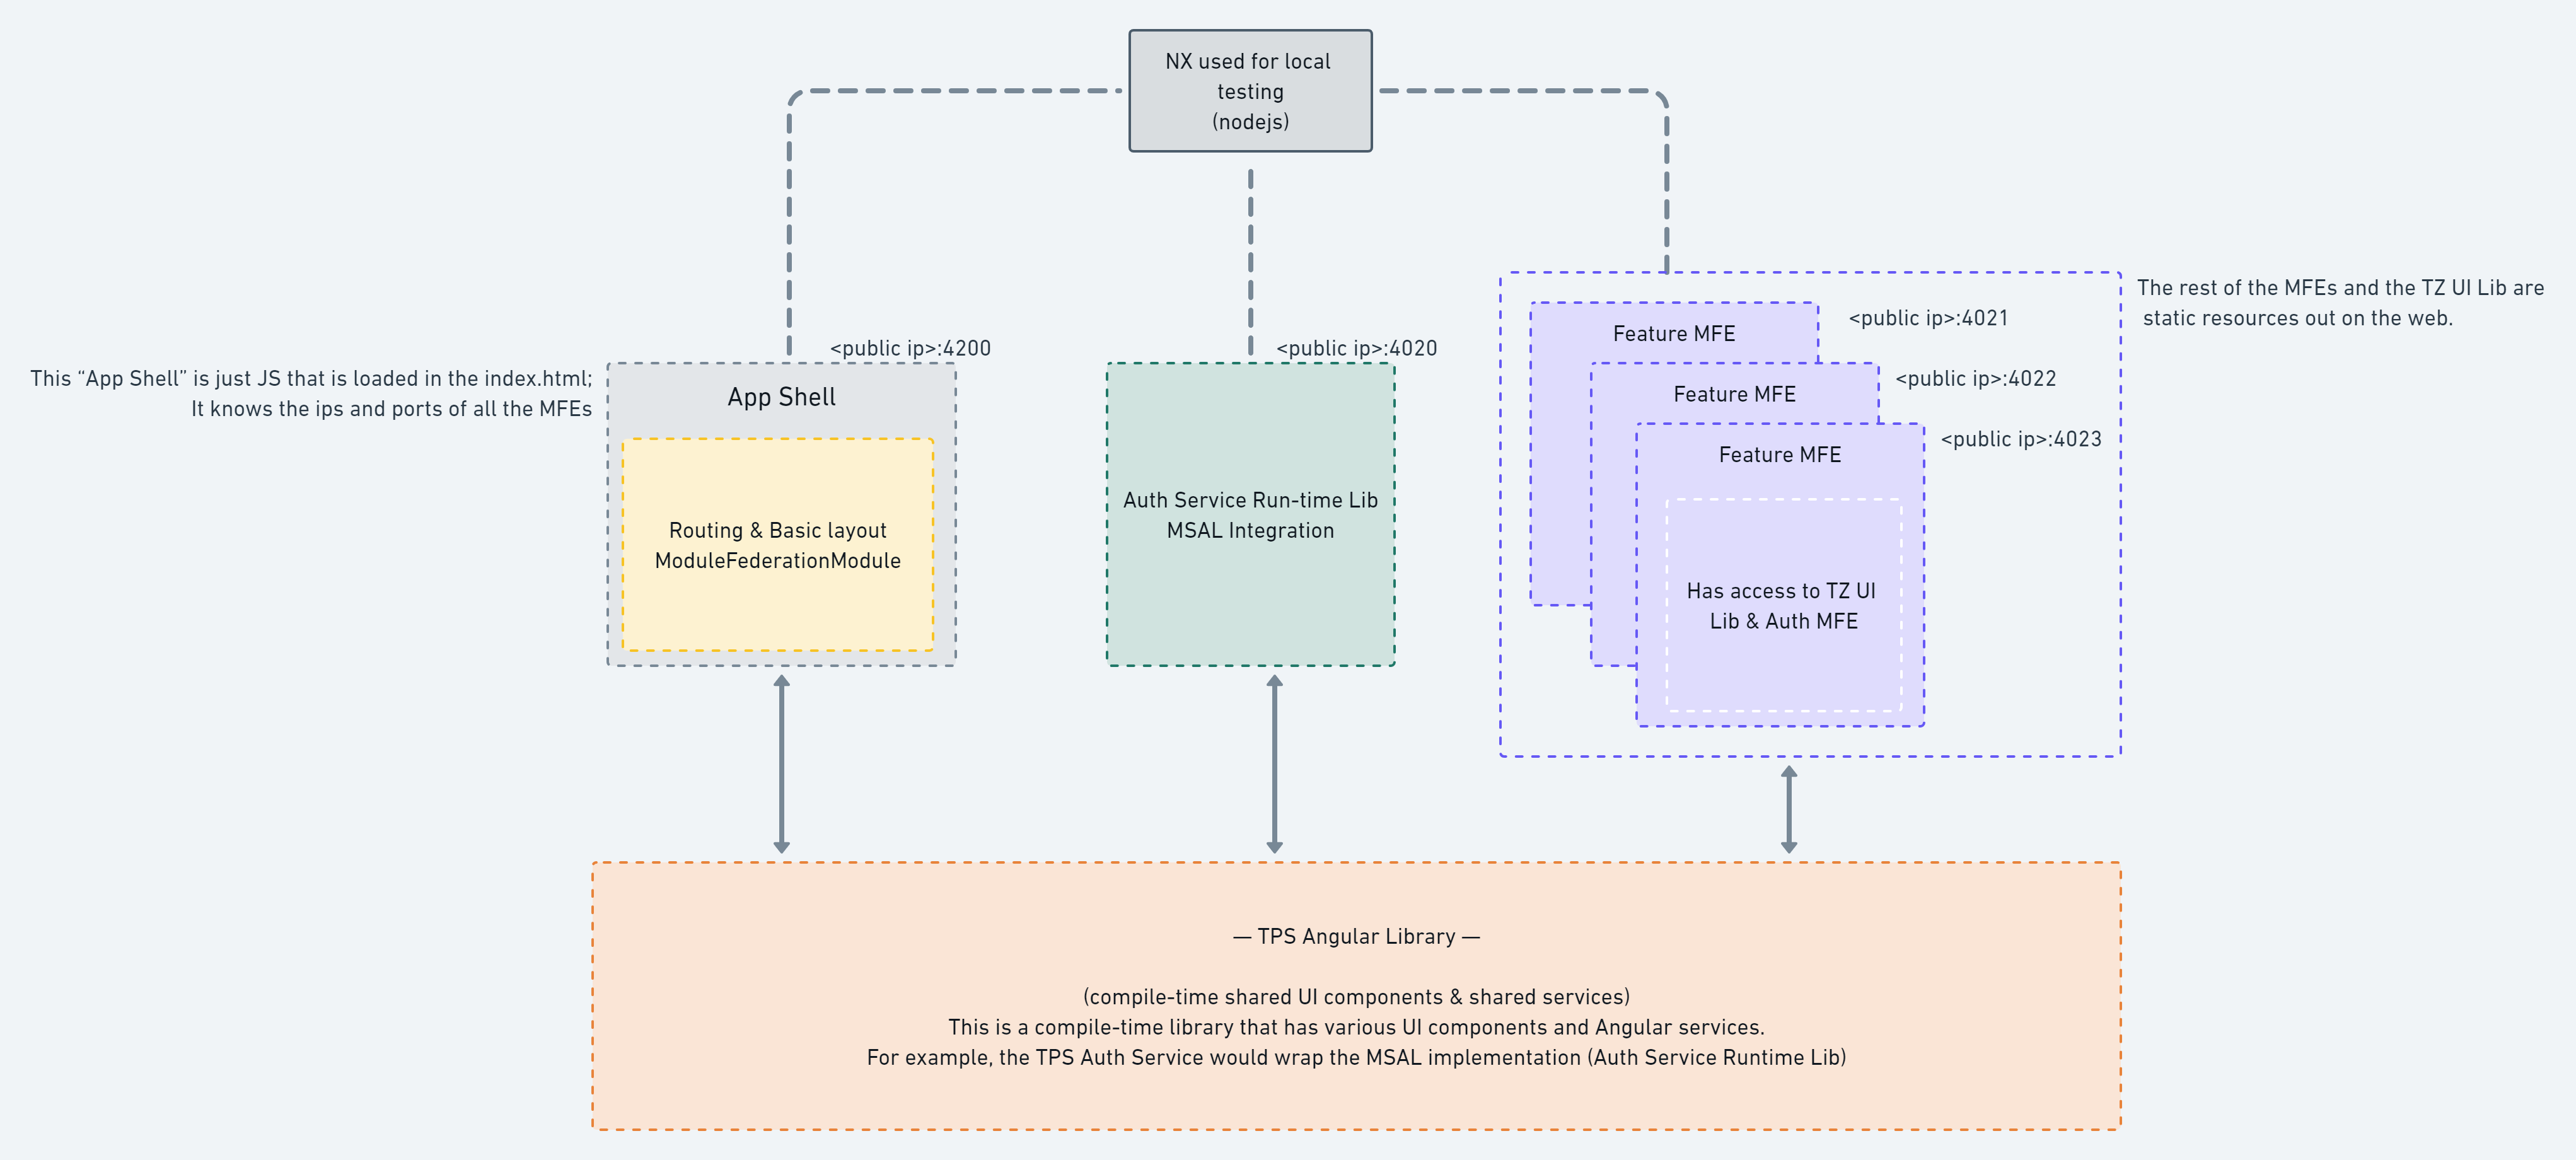
apps\  MFE Shell applications. Each app is hosted individually. A shell app contains routing that points to these remote applications. At this level, the apps should contain very little logic. Just the things necessary for routing and very basic layouts.
libs\ The "guts" of the apps. Most of the logic and UI binding will live here.
tools\ These are build steps, generators  amd schematics. Things to help standardize the dev environment.
static\ Stateless Javascript files that are loaded at runtime. Not related to Angular.
- VS Code
- Node
- Yarn
Clone this repo and run the following commands:
yarn global add nx
yarn install
yarn start
yarn create nx-workspace mfe-poc --packageManager=yarn
>apps
>do not use cloud
At this point, it will have created a folder called "mfe-poc". cd mfe-poc before continuing.
yarn add -D @nrwl/angular
yarn nx g @nrwl/angular:app mfe-poc-shell --mfe --mfeType=host --routing=true
>sass (scss) - or whatever works for your team =D
yarn nx g @nrwl/angular:app workspace --mfe --mfeType=remote --port=4201 --host=mfe-poc-shell --routing=false
yarn nx g @nrwl/angular:app my-account --mfe --mfeType=remote --port=4201 --host=mfe-poc-shell --routing=false
Out of the box, Angular MFEs are set up with a single module and two components. One is your standard App.Component and the other is an Entry.Component.
apps/my-feature/src/
  /app
    /remote-entry
        entry.component
        entry.module
    app.component
    app.module
  /assets
  /environments
If you are to navigate to localhost:4201 You will see the contents of app.component.
Add the RouterModule to RemoteEntryMopdule
import { RemoteEntryComponent } from './entry.component';

@NgModule({
  declarations: [RemoteEntryComponent],
  imports: [
    CommonModule,
    RouterModule.forChild([
      {
        path: '',
        component: RemoteEntryComponent,

      },
    ]),
  ],
  providers: [],
  exports: [RemoteEntryComponent],
})
export class RemoteEntryModule {}
Then add RemoteEntryComponent to AppComponent.html
<mfe-poc-my-account-entry></mfe-poc-my-account-entry>
And finally add RemoteEntryModule to AppModule imports
  imports: [
    BrowserModule,
    RemoteEntryModule
  ],
Now if you visit localhost:4200/my-account you should see the shell app and My Account's Entry Component
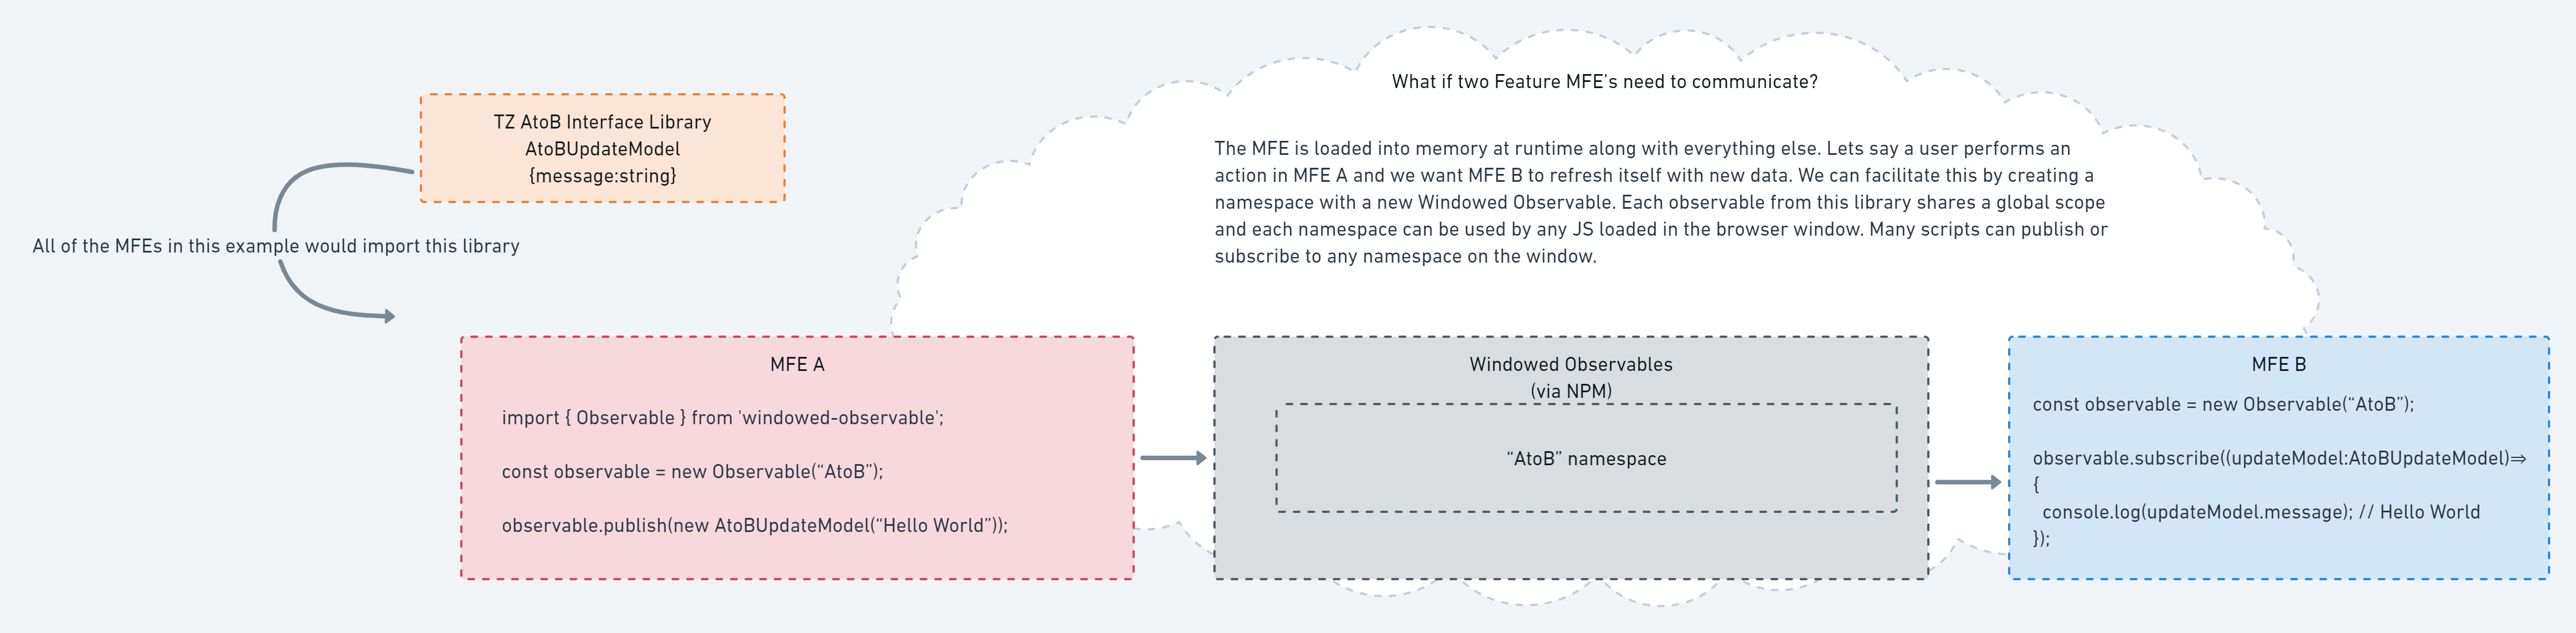
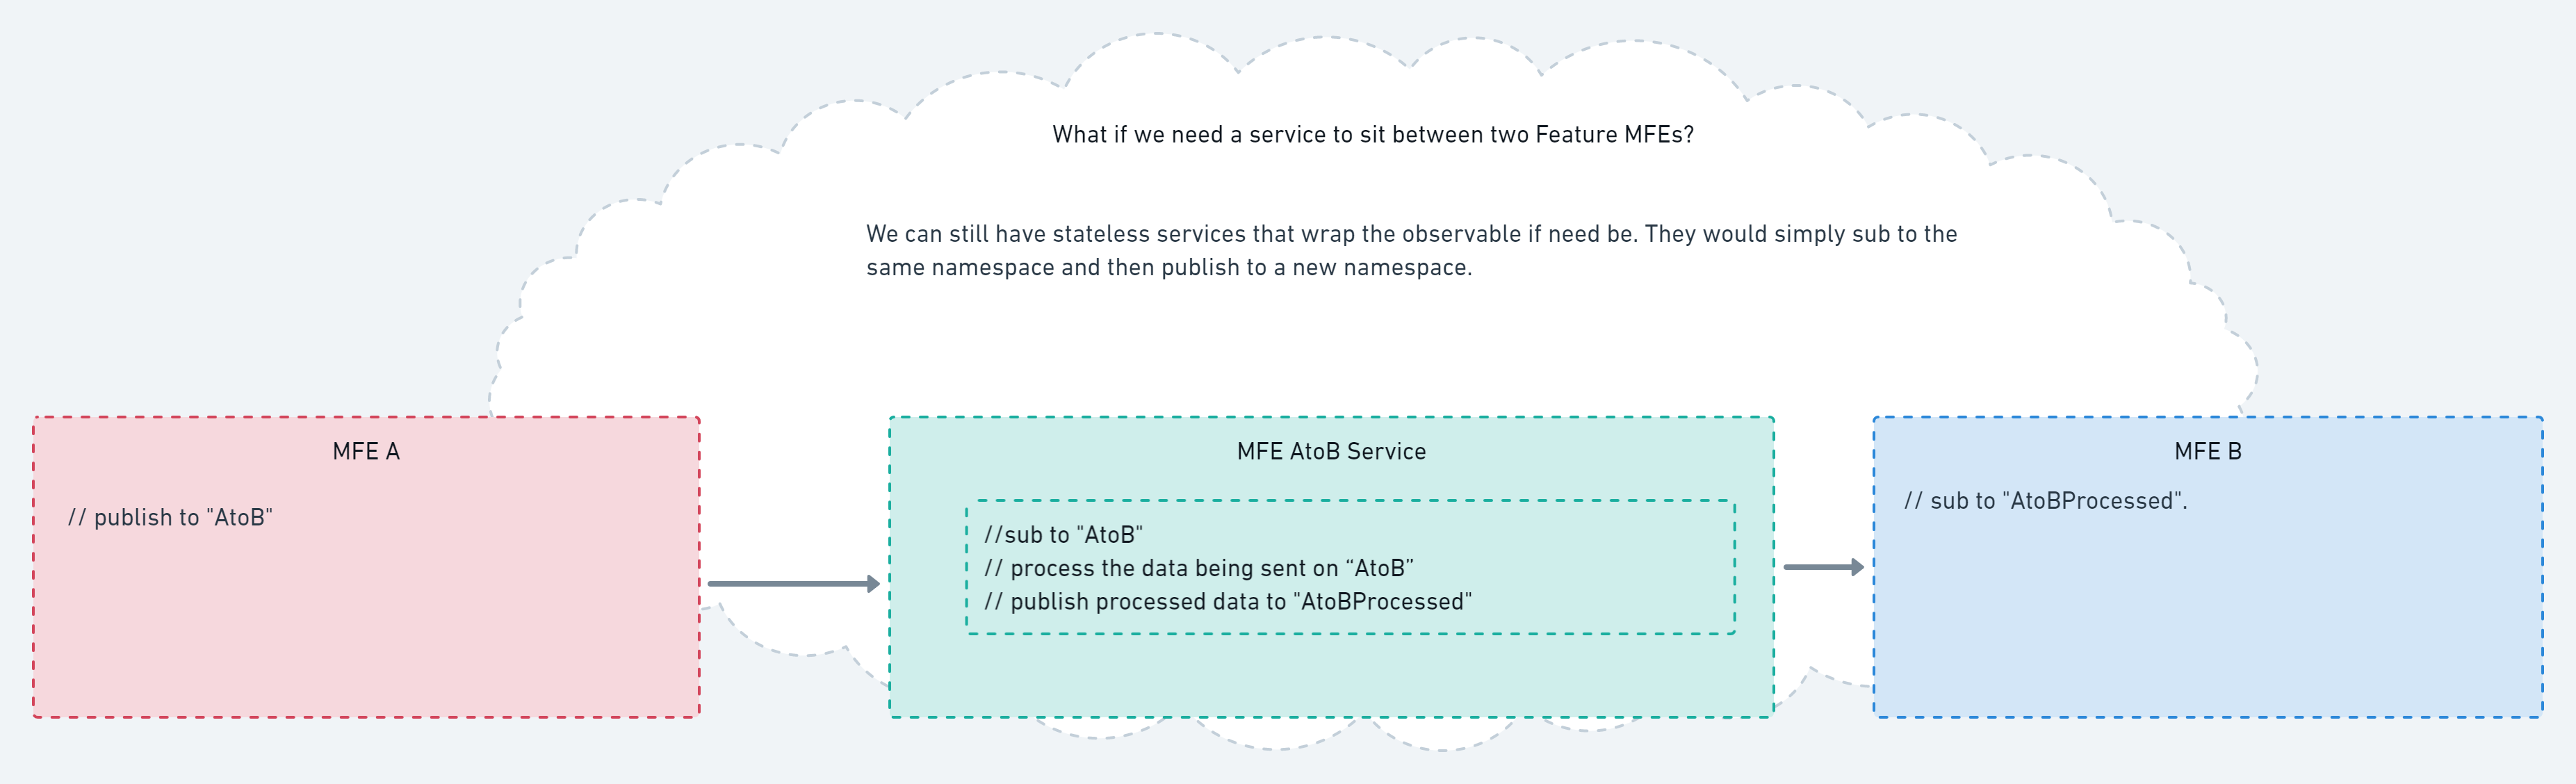
yarn add windowed-observable
These are stateless JS services that are loaded at runtime. So when these js services change, previously compiled code doesn't have to be updated and recompiled.
Just use plain JS or Webpack. Do not use angular for stateless services!
These files should extend the window object. Once loaded into an angular component, the component waits for the script to be fully loaded and processed. Once it is done, the angular script will react to this static file however it needs to. If certain components rely on a static JS lib, they should be disabled till the JS has loaded.
This pattern is best for stateless JS services that need to be shared across MFEs. These services may change but the MFEs using them don't have to. This is good for 3rd party configurations that are used in multiple MFEs. Like an authentication system integration. Wrap the implementation into a static JS service and inject it anywhere you need this service. If its injected and added to the window already, you don't have to do it again. You could inject it at the app shell level and use Windowed Observables to let the other components know when it's ready. Or you could have multiple components try to load it and if it already exists, just exit. Lots of ways you can use this pattern to deliver stateless services remotely across MFEs.
yarn add -global http-server
Once installed, add the following to your package.json scripts or create .cmd file
cd static && http-server -a localhost -p 4299 -d
in your app component's constructor, inject Renderer2. Then create a script element, subscribe to it's onload event, and add it to the document.
import { Component,Renderer2 } from '@angular/core';
declare let myService: any;

@Component({
  selector: 'mfe-poc-workspace-entry',
  templateUrl: './entry.component.html'
})
export class RemoteEntryComponent {
  constructor(private renderer: Renderer2) {
    const script = this.renderer.createElement('script');
    script.src = `http://localhost:4299/my.service.js`;
    script.onload = () => {
      console.log('Entry Component | my.service.js loaded');
      console.log(myService.helloWorld())
    }
    this.renderer.appendChild(document.head, script);
    console.log('Entry Component | CTOR DONE');
  }
}
Note: If multiple MFEs rely on the same static JS, do the injection at the shell level and publish a message when it's ready. Check the example on github. It is injecting the service att the shell level and publishes a message. The MyAccount MFE subscribes to this message. Search "myService loaded successfully" to see the pub/sub setup.
Domain Driven Design is an approach to software development that helps teams accurately abstract business needs, write maintainable code, and ensure all stakeholders are on the same page.
DDD is made up of many concepts. The 5 core concepts are as follows:
- The Domain
- The Model
- The Ubiquitous Language
- The Context
- The Bounded Contexts and the "Big Ball of Mud"
DDD Reference by Eric Evans (ISBN 978-1-4575-0119-7) Here are some samples from Vaughn Vernon's books on DDD - these samples do a fine job of outlining some of the key concepts. https://ptgmedia.pearsoncmg.com/images/9780134434421/samplepages/9780134434421.pdf https://ptgmedia.pearsoncmg.com/images/9780321834577/samplepages/0321834577.pdf
yarn add @angular-architects/ddd
ng g @angular-architects/ddd:init
Remember, only create and angular package if this logic needs to interface with your existing angular app! If you have standalone logic, create a stateless javascript service. If you have a "dumb" UI component, create a Web Component. Angular Services are stateful and require angular libraries. If your logic has nothing to do with angular or your app, then it doesn't need to be an Angular Library.
nx generate @nrwl/angular:lib mfe-poc-services-lib
nx g @nrwl/angular:service wrapper --project=mfe-poc-services-lib
Import into your App.Component...
//import { <Name of Service> } from '@<app-prefix>/<lib-prefix>';

import { WrapperService } from '@mfe-poc/mfe-poc-services-lib';
...
constructor(private wrapperService:WrapperService)
Now build the lib
nx build mfe-poc-services-lib
And build the app
nx build
A Git Submodule is a repo that can be cloned by itself but it is apart of another repo.
Do it manually
- create new repo
- update the .gitmodules file
- add empty directory
- Commit and Push
- git submodules update --init --recursive
Use the CLI
- create new repo
- cd into appropriate owning path (i.e. cd libs)
- add submodule using Git: git submodule add [repo URL]
- git commit -m "Add submodule X"; git push
When pulling:
- git clone --recurse-submodules [url] -- or --
- git clone [url], then git submodule update --init --recursive -- or --
- Perform git submodule update for the singular repo you want to pull.
Removing a "local MFE"
- update the .gitmodules file
- update the
NOTE Any repos that contain code that is "compile time" than it should be resolved on "yarn install" Any repos that contain complete MFEs should be optional. Not every developer needs to download each MFE.
I created a git submodule for the "my-accounts" MFE. In the webpack.config.js for the shell app, you will see it's pointing to a remote version of this MFE.
To point to the locally hosted version replace:
 plugins: [
    new ModuleFederationPlugin({
      remotes: {
    		"my-account": 'https://nxn-gw-sj-sa-wo-static-eo2tt.ondigitalocean.app/static/my-account/remoteEntry.js',
      },
with
 plugins: [
    new ModuleFederationPlugin({
      remotes: {
        "my-account": 'https:localhost:4201/remoteEntry.js"
      },
A MFE Remote Submodule is an MFE that is the remote type and is checked into a git submodule. In this project, we are using a Host MFE (it's own sub module) and a bunch of Remotes. The project itself is checked into the Root repo. The Host and the Remotes are each in a submodule of that Root repo.
NOTE Do not use the
create-mfe-remote-submodulegenerator standalone. Instead, use theCommandsunder the NX Projects window.
switch-to-public-mfe is a NX Workspace Generator configures the project to use the publicly hosted mfe out on dev.
Use switch-to-local-mfe to point back to localhost.
yarn nx workspace-generator switch-to-local-mfe --name=<name of app> <port>
switch-to-local-mfe is a NX Workspace Generator that configures the project to use the locally hosted mfe rather than what is out on dev.
yarn nx workspace-generator switch-to-public-mfe --name=<name of app>
nx run commands:create-mfe-remote-submodule --name=<name of the submodule> --port=<some port>
add nx g @nrwl/workspace:move --project my-feature-lib shared/my-feature-lib to move the e2e into the repo
CNP stands for Commit n' Push. This script will add any changes you have, commit them to your current branch, and push them.
cnp this will be my commit message! Look ma, no quotes!
PSM stands for Commit n' Push Submodules. The foreach iterates through each submodule and the "|| :" lets the foreach continue even if one of the submodules fails.
git submodule foreach "git add . || :"
psm pushing any changes to each submodule as well as updating the main repo!