-
Full documentation at https://www.doubango.org/SDKs/micr/docs/
-
Online demo at https://www.doubango.org/webapps/micr/
-
Open source Computer Vision Library: https://github.com/DoubangoTelecom/compv
This is state-of-the-art Magnetic ink character recognition (MICR) dectector and recognizer using deep learning.
Unlike other solutions you can find on the web, you don't need to adjust the camera/image to define a Region Of Interest (ROI). We also don't try to use small ROI to decrease the processing time or false-positives. The whole image (up to 4K supported) is processed and every pixel is checked. No matter if the MICR lines are small, far away, blurred, partially occluded, skewed or slanted, our implementation can accurately detect and recognize every character.
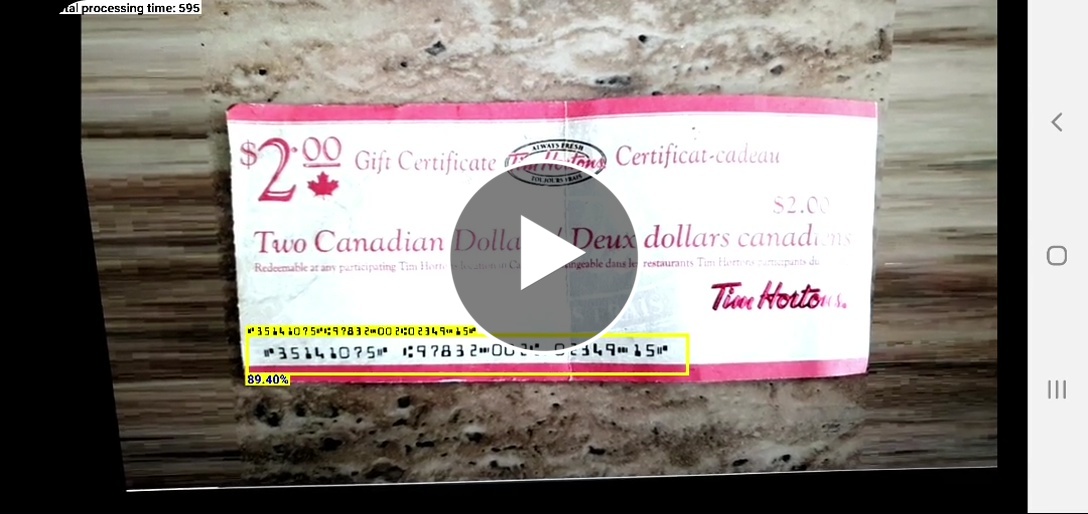
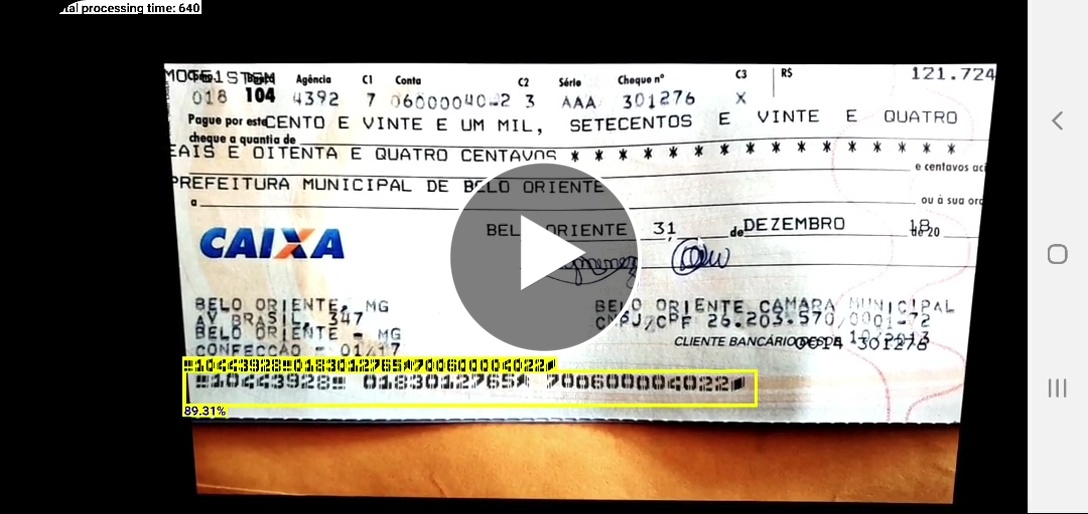
The detector is agnostic and doesn't decode (recognize/OCR) the text to check it against some pre-defined rules (regular expressions) which means we support all MICR types regardless the font, content, shape or country. Both E-13B and CMC-7 formats are supported.
Automating Bank account information extraction from MICR (Magnetic ink character recognition) zones on bank scanned checks/document above human-level accuracy is a very challenging task. Our implementation reaches such level of accuracy using latest deep learning techniques. We outperform both ABBYY and LEADTOOLS in terms of accuracy and speed (almost #30 times faster).
Using a single model we're able to accurately locate the MICR (Magnetic ink character recognition) zones, infer the type (E-13B or CMC-7) and recognize the fields: one-shot deep model. The performance gap between us and the other companies is more important for CMC-7 format which is more challenging than E-13B.
The next video shows MICRVideoRecognizer-E13B sample running on Android:
The next video shows MICRVideoRecognizer-CMC7 sample running on Android:
This technology is a key component of Remote Deposit Capture applications to process bank checks sent using mobile phones or scanners. It's a must have technology for any FinTech company.
Don't take our word for it, come check our implementation. No registration, license key or internet connection is needed, just clone the code and start coding/testing. Everything runs on the device, no data is leaving your computer. The code released here comes with many ready-to-use samples to help you get started easily. You can also check our online cloud-based implementation (no registration required) at https://www.doubango.org/webapps/micr/ to check out the accuracy and precision before starting to play with the SDK.
- Github repo: https://github.com/DoubangoTelecom/ultimateMICR-SDK
- Cloud-based implementation: https://www.doubango.org/webapps/micr/
The source code comes with #3 sample applications: MICRVideoRecognizer-E13B, MICRVideoRecognizer-CMC7 and Benchmark. All sample applications are open source and don’t require registration or license key.
The source code is at samples.
This application should be used as reference code by any developer trying to add ultimateMICR to their products. It shows how to detect and recognize MICR E-13B lines in realtime using live video stream from the camera.
This application should be used as reference code by any developer trying to add ultimateMICR to their products. It shows how to detect and recognize MICR CMC-7 lines in realtime using live video stream from the camera.
This application is used to check everything is ok and running as fast as expected. The information about the maximum frame rate on ARM devices could be checked using this application.
To try the sample applications on Android:
-
Open Android Studio and select Open an existing Android Studio project
-
Navigate to /samples, select android folder and click Open
-
Select the sample you want to try (e.g. videorecognize), the device (e.g. samsung SM-G975F) and press run


For Raspberry Pi and other Linux systems you need to build the sample applications from source. More info at samples/c++/README.md.
The SDK works on many platforms and comes with support for many programming languages.
This Github repository contains binaries for Android and Raspberry Pi. The next sections explain how to add the SDK to an existing project.
The SDK is distributed as an Android Studio module and you can add it as reference or you can also build it and add the AAR to your project. But, the easiest way to add the SDK to your project is by directly including the source. In your build.gradle file add:
android {

      # This is the block to add within "android { } " section
      sourceSets {
         main {
             jniLibs.srcDirs += ['path-to-your-ultimateMICR-SDK/binaries/android/jniLibs']
             java.srcDirs += ['path-to-your-ultimateMICR-SDK/java/android']
             assets.srcDirs += ['path-to-your-ultimateMICR-SDK/assets/models']
         }
      }
}The shared libraries are under ultimateMICR-SDK/binaries/. The header file at c++. You can use any C++ compiler/linker.
It's hard to be lost when you try to use the API as there are only 3 useful functions: init, process and deInit.
The C++ API is defined at https://www.doubango.org/SDKs/micr/docs/cpp-api.html.
	import org.doubango.ultimateMicr.Sdk.ULTMICR_SDK_IMAGE_TYPE;
	import org.doubango.ultimateMicr.Sdk.UltMicrSdkEngine;
	import org.doubango.ultimateMicr.Sdk.UltMicrSdkResult;

	// JSON configuration string
	// More info at https://www.doubango.org/SDKs/micr/docs/Configuration_options.html
	final static String CONFIG = "{" +
		"\"debug_level\": \"info\"," +
		"\"debug_write_input_image_enabled\": false," +
		"\"debug_internal_data_path\": \".\"," +
		"" +
		"\"num_threads\": -1," +
		"\"gpgpu_enabled\": true," +
		"\"gpgpu_workload_balancing_enabled\": true," +
		"" +
		"\"segmenter_accuracy\": \"high\"," +
		"\"interpolation\": \"bilinear\"," +
		"\"roi\": [0, 0, 0, 0]," +
		"\"score_type\": \"min\"," +
		"\"min_score\": 0.3" +
	"}";

	@Override
	protected void onCreate(Bundle savedInstanceState) {
		super.onCreate(savedInstanceState);


		// Initialize the engine
		assert UltMicrSdkEngine.init(
				getAssets(),
				CONFIG
		).isOK();
	}

	// Camera listener: https://developer.android.com/reference/android/media/ImageReader.OnImageAvailableListener
	final ImageReader.OnImageAvailableListener mOnImageAvailableListener = new ImageReader.OnImageAvailableListener() {

		@Override
		public void onImageAvailable(ImageReader reader) {
				try {
				    final Image image = reader.acquireLatestImage();
				    if (image == null) {
				        return;
				    }

				    // MICR recognition
				    final int exifOrientation = 1; // Normal (landscape) - no rotation
				    final Image.Plane[] planes = image.getPlanes();
				    final UltMicrSdkResult result = UltMicrSdkEngine.process(
				        ULTMICR_SDK_IMAGE_TYPE.ULTMICR_SDK_IMAGE_TYPE_YUV420P,
				        planes[0].getBuffer(),
				        planes[1].getBuffer(),
				        planes[2].getBuffer(),
				        image.getWidth(),
				        image.getHeight(),
				        planes[0].getRowStride(),
				        planes[1].getRowStride(),
				        planes[2].getRowStride(),
				        planes[1].getPixelStride(),
				        exifOrientation
				    );
				    assert result.isOK();

				    image.close();

				} catch (final Exception e) {
				   e.printStackTrace();
				}
		}
	};

	@Override
	public void onDestroy() {
		// DeInitialize the engine
		assert UltMicrSdkEngine.deInit().isOK();

		super.onDestroy();
}The C++ API is defined at https://www.doubango.org/SDKs/micr/docs/cpp-api.html.
	#include <ultimateMICR-SDK-API-PUBLIC.h> // Include the API header file

	// JSON configuration string
	// More info at https://www.doubango.org/SDKs/micr/docs/Configuration_options.html
	static const char* __jsonConfig =
	"{"
	"\"debug_level\": \"info\","
	"\"debug_write_input_image_enabled\": false,"
	"\"debug_internal_data_path\": \".\","
	""
	"\"num_threads\": -1,"
	"\"gpgpu_enabled\": true,"
	#if defined(__arm__) || defined(__thumb__) || defined(__TARGET_ARCH_ARM) || defined(__TARGET_ARCH_THUMB) || defined(_ARM) || defined(_M_ARM) || defined(_M_ARMT) || defined(__arm) || defined(__aarch64__)
	"\"gpgpu_workload_balancing_enabled\": true,"
	#else // Disable GPGPU/CPU work balancing on x86 and enable it on ARM -> https://devtalk.nvidia.com/default/topic/494659/execute-kernels-without-100-cpu-busy-wait-/
	"\"gpgpu_workload_balancing_enabled\": false,"
	#endif
	""
	"\"segmenter_accuracy\": \"high\","
	"\"interpolation\": \"bilinear\","
	"\"roi\": [0, 0, 0, 0],"
	"\"score_type\": \"min\","
	"\"min_score\": 0.3"
	"}";

	// Local variable
	UltMicrSdkResult result(0, "OK", "{}");

	// Initialize the engine (should be done once)
	ULTMICR_SDK_ASSERT((result = UltMicrSdkEngine::init(
		__jsonConfig
	)).isOK());

	// Processing (detection + recognition)
	// Call this function for every video frame
	const void* imageData = nullptr;
	ULTMICR_SDK_ASSERT((result = UltMicrSdkEngine::process(
			ULTMICR_SDK_IMAGE_TYPE_RGB24,
			imageData,
			imageWidth,
			imageHeight
		)).isOK());

	// DeInit
	// Call this function before exiting the app to free the allocate resources
	// You must not call process() after calling this function
	ULTMICR_SDK_ASSERT((result = UltMicrSdkEngine::deInit()).isOK());
Again, please check the sample applications for more information on how to use the API.
Please check our discussion group or twitter account