
Firmware for ESP8266/ESP8285 used with 3D printer using arduino core version
This firmware allows not only to have a cheap bridge between Wifi and serial, but also to have a web UI to configure wifi, to monitor 3D printer and even control it, and to make things easy,
UI is fully customizable without reflashing FW.
Firmware should work with any 3D printer firmware (repetier/marlin/etc..) if serial connection has correct setup.
I currently use it with my personnal flavor of repetier for Due based boards.
Please use ESP with at least 1M flash, for ESP with 512K there is limited version here
Stable version:
Arduino ide 1.6.5 with stable 2.0.0 from ESP8266, please use https://github.com/luc-github/ESP3D/releases/tag/v0.5.1
Arduino ide 1.6.8 with stable 2.2.0 from ESP8266, please use https://github.com/luc-github/ESP3D/releases/tag/v0.6.2
Development version:
Arduino ide 1.6.9 with git from ESP8266 :

❓Any question ?
❗Any issue ? check FAQ or submit ticket

👍Thanks
- to @disneysw for bringing this module idea
- to @lkarlslund for suggestion about independant reset using GPIO2
- to all contributors (treepleks, j0hnlittle, openhardwarecoza, TRoager, all feedbacks owners and donations)
Every support is welcome:
Especially if need to buy new modules for testing.

##Features
- Serial/Wifi bridge using configurable port 8888, here to enable/disable TCP_IP_DATA_FEATURE
- Use GPIO2 to ground to reset all settings in hard way - 2-6 sec after boot / not before!! Set GPIO2 to ground before boot change boot mode and go to special boot that do not reach FW. Currently boot take 10 sec - giving 8 seconds to connect GPIO2 to GND and do an hard recovery for settings, here to enable/disable RECOVERY_FEATURE
- Wifi configuration by web browser (Station or Access point)
- Authentication for sensitive pages, here to enable/disable AUTHENTICATION_FEATURE
- Update firmware by web browser, here to enable/disable WEB_UPDATE_FEATURE
- Control ESP module using commands on serial or data port, here to enable/disable SERIAL_COMMAND_FEATURE
- UI fully constomizable without reflashing FW using html templates, keywords and html files/images
- Captive portal in Access point mode which redirect all unknow call to main page, here to enable/disable CAPTIVE_PORTAL_FEATURE
- mDNS which allows to key the name defined in web browser and connect only with bonjour installed on computer, here to enable/disable MDNS_FEATURE
- SSDP, this feature is a discovery protocol, supported on Windows out of the box, here to enable/disable SSDP_FEATURE
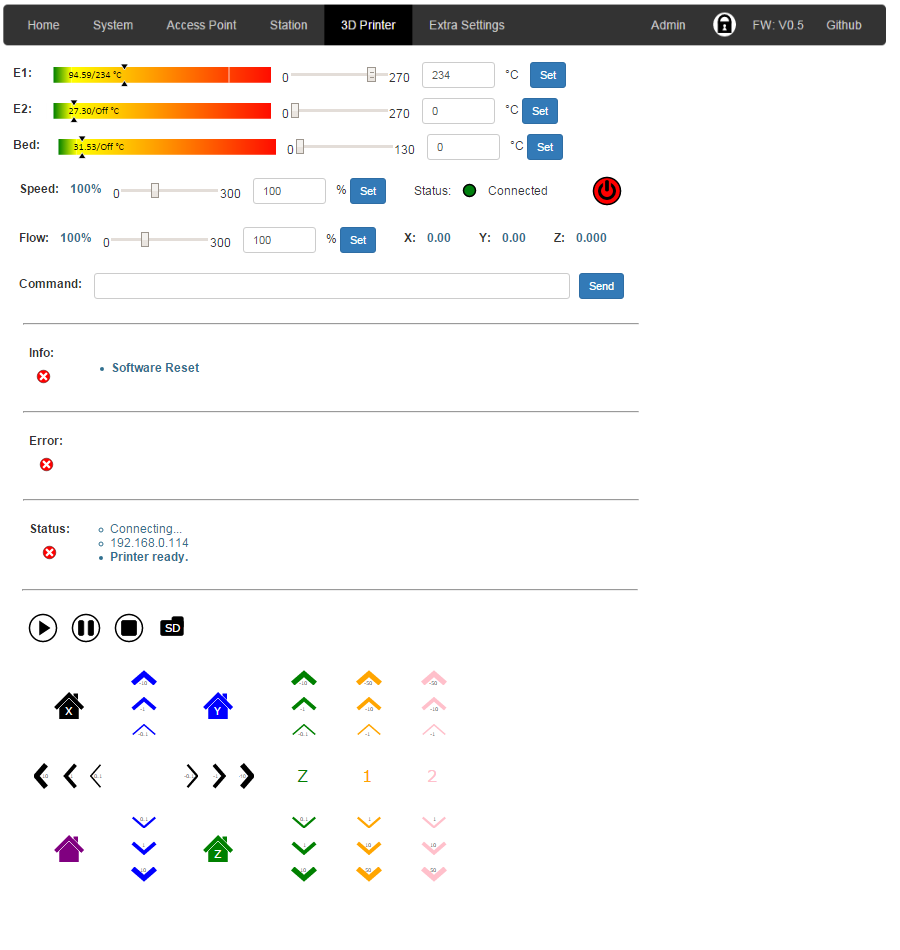
- Printer monitoring / control (temperatures/speed/jog/list SDCard content/launch,pause or stop a print/etc...), here to enable/disable MONITORING_FEATURE/INFO_MSG_FEATURE/ERROR_MSG_FEATURE/STATUS_MSG_FEATURE
- Fail safe mode (Access point)is enabled if cannot connect to defined station at boot.
##Web configuration
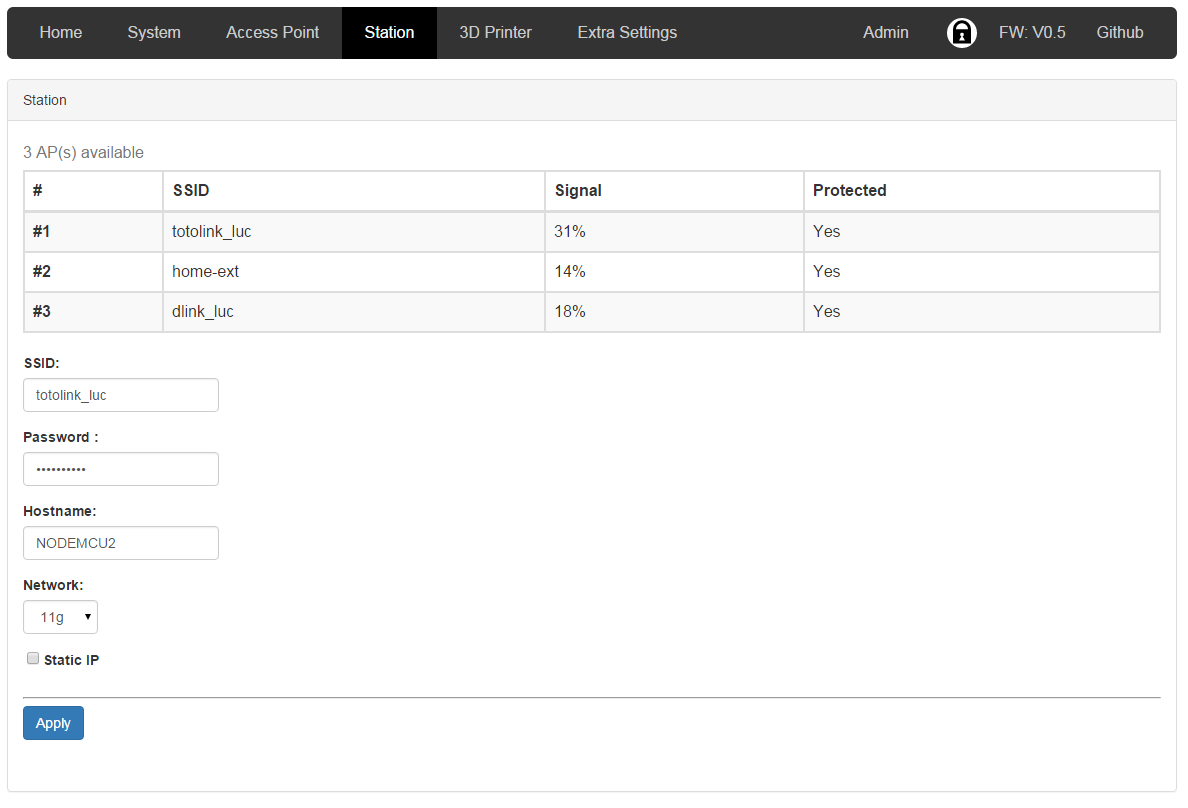
*Wifi Mode : Access point / Client station
*IP Generation: DHCP/Static IP
*IP/MASK/GATEWAY for static data
*Baud Rate for serial (supported : 9600, 19200, 38400, 57600, 115200, 230400, 250000)
*web port and data port
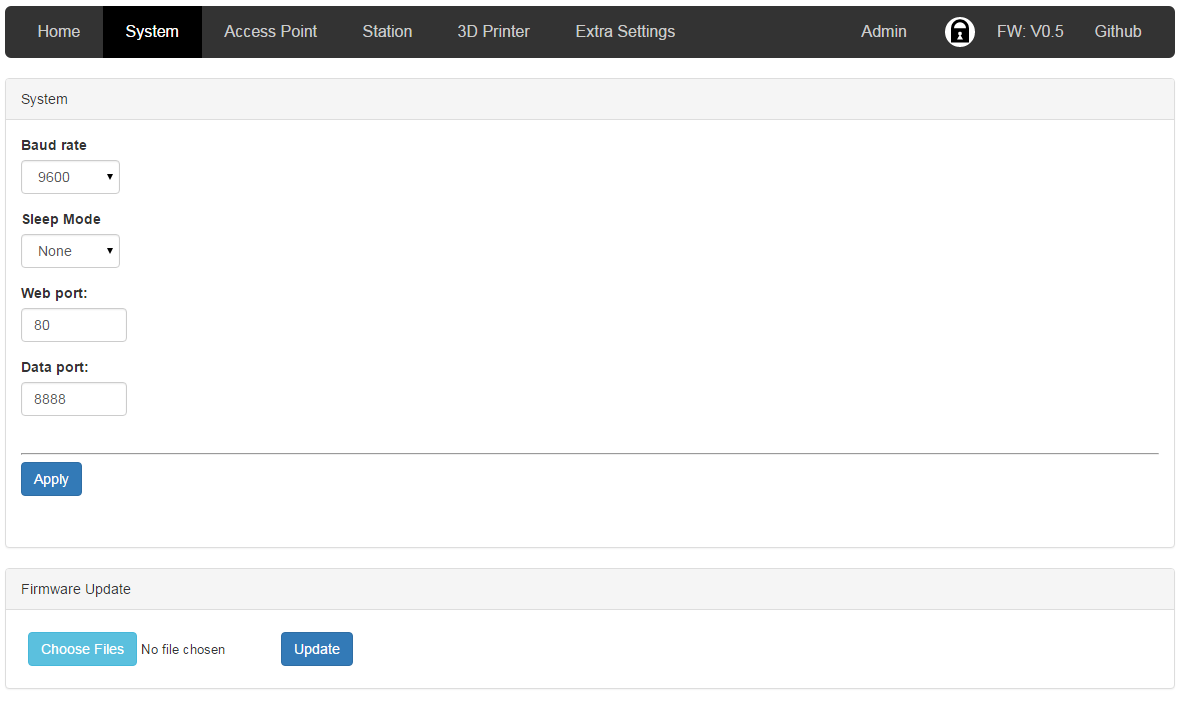
##Default Configuration
Default Settings:
AP:ESP8266
PW:12345678
Authentification: WPA
Mode: g (n is not supported by AP, just by STA)
channel: 11
AP: visible
Sleep Mode: Modem
IP Mode: Static IP
IP: 192.168.0.1
Mask: 255.255.255.0
GW:192.168.0.1
Baud rate: 9600
Web port:80
Data port: 8888
Web Page refresh: 3 secondes
User: admin
Password: admin
User:user Password: user
These are the pages defined using template:
Home page :

System Configuration Page:
Access Point Configuration Page:

Client Configuration Page:
Printer Status Page for 64K SPIFFS, due to limited space available no fancy:

Printer Status Page for more than 64K SPIFFS, fancy one:
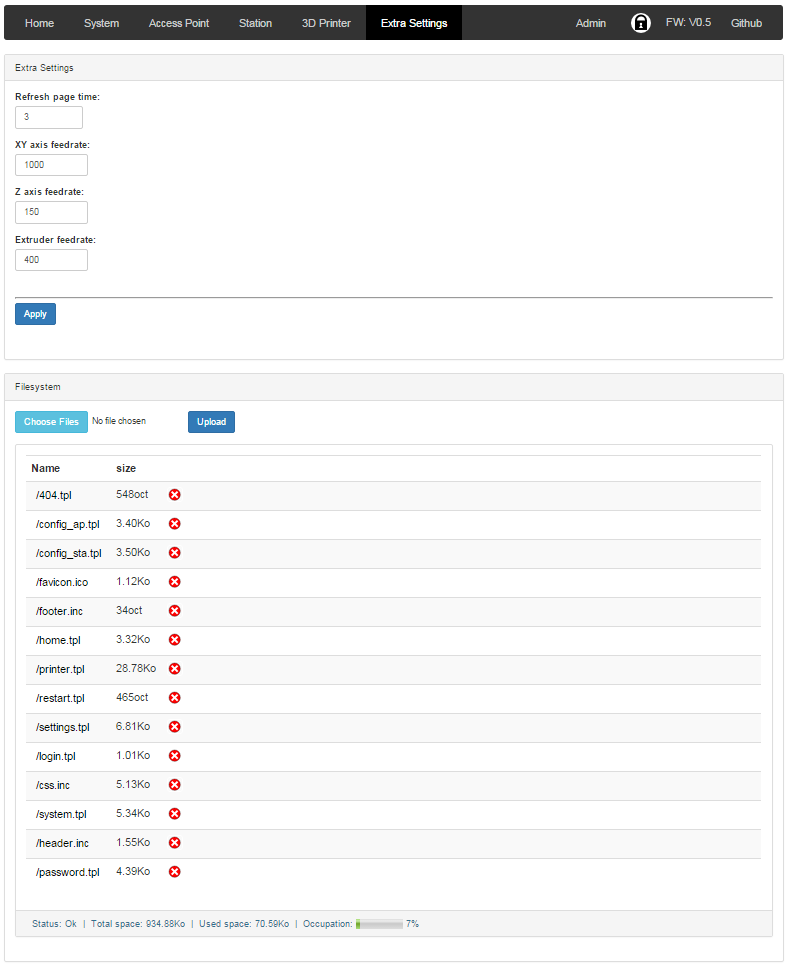
Extra Settings Page, for web UI and for printer:
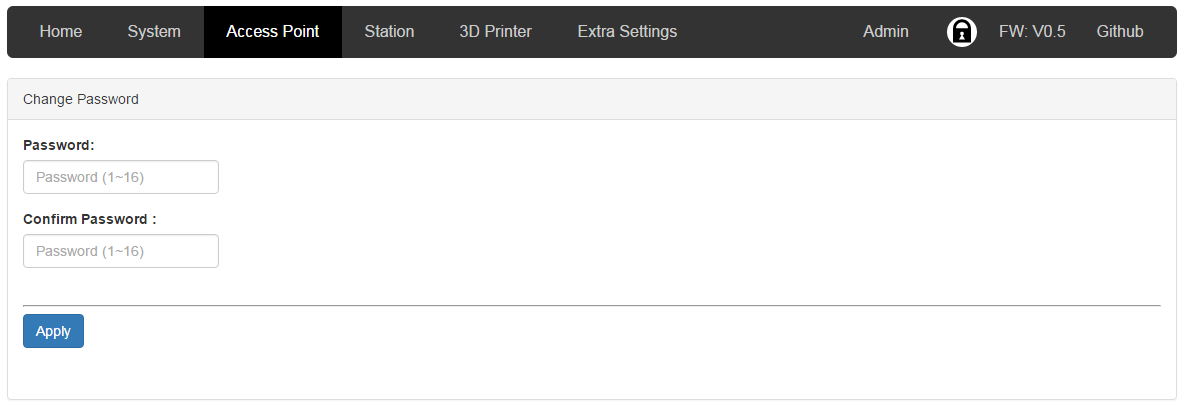
Change password Page:
Login Page:

the template files are stored on SPIFFS:
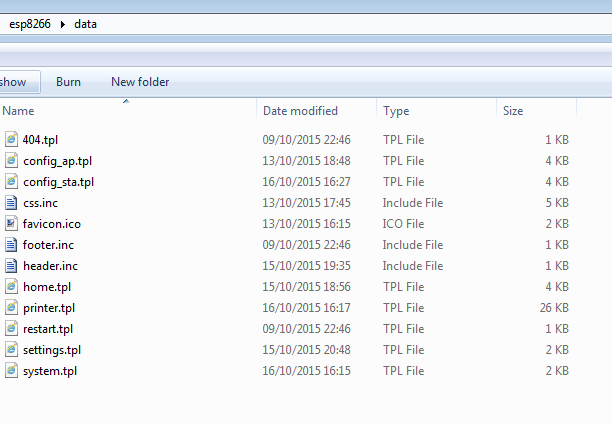
and uploaded using pluggin IDE
Any files on SPIFFS can be called on web interface without having the path hard coded, this give more flexibility, favicon.ico is a good example of it.
So UI is kind of separated from FW which allow easier modifications. For this a light file manager is available in extra settings page, it allows to upload/download/delete files.
Because SPIFFS is flat filesystem, no directory management is necessary, so it is very simple.
Additionally 404.tpl (the page not found) and restart.tpl(restart page when applying changes) are not mandatory, a fail safe version is embeded if they are not present.
##Direct commands:
* Change STA SSID
[ESP100]<SSID>
if authentication is on, need admin password
[ESP100]<SSID>pwd=<admin password>

* Change STA Password
[ESP101]<Password>
if authentication is on, need admin password
[ESP101]<Password>pwd=<admin password>

* Change Hostname
[ESP102]<hostname>
if authentication is on, need admin password
[ESP102]<hostname>pwd=<admin password>

* Change Wifi mode (STA/AP)
[ESP103]<mode>
if authentication is on, need admin password
[ESP103]<mode>pwd=<admin password>

* Change STA IP mode (DHCP/STATIC)
[ESP104]<mode>
if authentication is on, need admin password
[ESP104]<mode>pwd=<admin password>

* Change AP SSID
[ESP105]<SSID>
if authentication is on, need admin password
[ESP105]<SSID>pwd=<admin password>

* Change AP Password
[ESP106]<Password>
if authentication is on, need admin password
[ESP106]<Password>pwd=<admin password>

* Change AP IP mode (DHCP/STATIC)
[ESP107]<mode>
if authentication is on, need admin password
[ESP107]<mode>pwd=<admin password>

* Get current IP
[ESP111]<header answer>

* Get hostname
[ESP112]<header answer>

* Get/Set ESP mode
cmd can be RESET, SAFEMODE, CONFIG, RESTART
[ESP444]<cmd>
if authentication is on, need admin password for RESET, RESTART and SAFEMODE
[ESP444]<cmd>pwd=<admin password>

* Change / Reset user password
[ESP555]<password>pwd=<admin password>
if no password set it use default one

* Read SPIFFS file and send each line to serial
[ESP700]<filename>

* Get fw version
[ESP800]<header answer>

* Clear status/error/info list
cmd can be ALL, ERROR, INFO, STATUS
[ESP999]<cmd>
##Installation
-
For stable: Please use Arduino IDE 1.6.5 with the esp8266 module from board manager use 2.0.0 stable version by adding in your preferences http://arduino.esp8266.com/version/2.0.0/package_esp8266com_index.json with https://github.com/luc-github/ESP3D/releases/tag/v0.5.1 or use Arduino IDE 1.6.8 with the esp8266 module from board manager use 2.2.0 stable version by adding in your preferences http://arduino.esp8266.com/stable/package_esp8266com_index.json with https://github.com/luc-github/ESP3D/releases/tag/v0.6.2
-
For development: Please use Arduino IDE 1.6.8 and git version of esp8266 module
-
To flash the module :
You must define the targeted FW, can be REPETIER (Original Repetier)/ REPETIER4DV (Repetier for Davinci) / MARLIN (Marlin)/ SMOOTHIEWARE (Smoothieware) in config.h and enable/disable any others features
//MDNS_FEATURE: this feature allow  type the name defined
//in web browser by default: http:\\esp8266.local and connect
//#define MDNS_FEATURE

//SSDD_FEATURE: this feature is a discovery protocol, supported on Windows out of the box
#define SSDP_FEATURE

//CAPTIVE_PORTAL_FEATURE: In SoftAP redirect all unknow call to main page
#define CAPTIVE_PORTAL_FEATURE

//AUTHENTICATION_FEATURE: protect pages by login password
#define AUTHENTICATION_FEATURE

//WEB_UPDATE_FEATURE: allow to flash fw using web UI
#define WEB_UPDATE_FEATURE

//SERIAL_COMMAND_FEATURE: allow to send command by serial
#define SERIAL_COMMAND_FEATURE

//TCP_IP_DATA_FEATURE: allow to connect serial from TCP/IP
#define TCP_IP_DATA_FEATURE

//RECOVERY_FEATURE: allow to use GPIO2 pin as hardware reset for EEPROM, add 8s to boot time to let user to jump GPIO2 to GND
#define RECOVERY_FEATURE

//FIRMWARE_TARGET: the targeted FW, can be REPETIER (Original Repetier)/ REPETIER4DV (Repetier for Davinci) / MARLIN (Marlin)/ SMOOTHIEWARE (Smoothieware)
#define FIRMWARE_TARGET REPETIER4DV

//DEBUG Flag
//#define DEBUG_ESP3D
For better performance select CPU Frequency to be 160MHz instead of default 80MHz
Use IDE to upload directly (latest version of board manager module generate one binary)
- To flash the html files present in data directory you need to use another tool, installation and usage is explained here
Once flashed you also can use the web updater to flash new FW in System Configuration Page or go to settings to change html files
##Hardware connection
- Use GPIO2 to ground to reset all settings in hard way - 2-6 sec after boot / not before!! Set GPIO2 to ground before boot change boot mode and go to special boot that do not reach FW. Currently boot take 10 sec - giving 8 seconds to connect GPIO2 to GND and do an hard recovery for settings
- Use GPIO0 to ground to be in update mode
For ESP01:

For ESP12E:

For Davinci Board:

For RADDS Board:

##Contribution/customization
To modifying and Testing tpl files a local tool has been created by j0hnlittle to avoid to upload everytime your tpl files just to see the results of your modifications. It is a python script (2.7+) located in tools directory, launch it: python server.py, then open browser: http://localhost:8080
It will display the web ui and allow some navigation
To style the code before pushing PR please use astyle --style=otbs *.h *.cpp *.ino
Feedback/suggestion/discussions are always welcome
##Result of ESP12E on Davinci
I use a proto board to connect ESP12E socket, one micro switch for recovery, one jumper for normal usage/ flash, I did not put hardware switch.

Connected to Davinci:

The back cover:

The screen when connected to AP:

##Result of ESP12E on Due/RADDS
the rendering on screen when connection to AP is done:

##TODO
-- Close open topics
-- Do testing (a lot)
-- UI Improvement
-- Printer EEPROM management