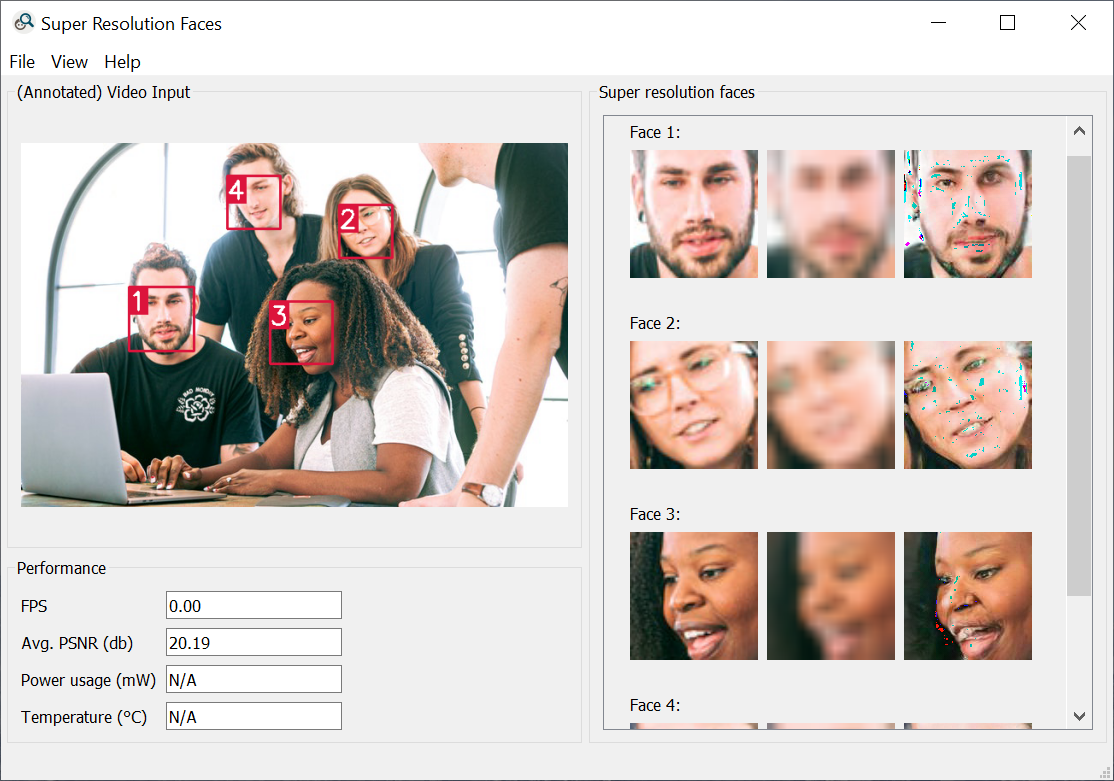
This program takes a camera feed or video/image file as input and tries to detect faces in every frame. The extracted faces (left images in right panel) are downscaled (bilinear scaling) to a 16x16 px face (middle images, upscaled in the UI) which is then used as input for the face super resolution. This net enlarges its input by the factor 8, leading to an output image of size 128x128 px. Ideally, its output (right images) is close to the original face which is indicated by a high PSNR value.
This work was done by Lukas Schätzle, Jacqueline Wegert, Benno Latermann during the IW276 Autonome Systeme Labor at the Karlsruhe University of Applied Sciences (Hochschule Karlruhe - Technik und Wirtschaft) in SS 2020.
- Requirements
- Preparations for Jetson Nano
- Running the program
- Running on a normal PC
- Known issues
- Acknowledgments
- Contact
- Python 3.6 (or above)
- Jetson Nano (additional experimental version for normal PC exists, too)
- Jetpack 4.3
- PyTorch 1.4.0 and Torchvision 0.5.0 (or above)
- opencv-python 4.2.0.34 (or above)
- Pillow 7.1.2 (or above)
- numpy 1.18.4 (or above)
- face-recognition 1.3.0 (or above)
- PyQt5 5.14.2 (or above)
- jetson-stats 2.1.0 (or above)
Note: If you want to run the program on a normal desktop PC, follow the instructions in section Running on a normal PC instead.
Go to https://github.com/dusty-nv/jetson-inference/blob/master/docs/building-repo-2.md and follow the instructions to install the necessary dependencies. The following sections are relevant:
- Cloning the Repo
- Python Development Packages
- Configuring with CMake
- Downloading Models (make sure that model "FaceNet" is selected, which is selected by default)
- Installing PyTorch (make sure to select PyTorch 1.4.0 for Python 3.6, this is not selected by default!)

- Compiling the Project
To display the current power usage and temperature you also have to install the package "jetsons-stats": sudo -H pip3 install -U jetson-stats
PyQt5 should already be installed on the Jetson. If not, run the following command: sudo pip3 install -U PyQt5
If you want to use a camera, connect it in advance. (The program has been successfully tested with a USB camera. It may also work with a MIPI camera, but we cannot guarantee it.) If you have no camera, you can also use video and image files.
From the project's root directory run: python3 src/main.py
You can pass the following parameters:
| Parameter | Effect |
|---|---|
| --cam | Immediately open the camera feed once the neural networks are loaded so you do not have to choose it from the menu manually. |
| --debug | Print debug messages in the terminal |
Once the program window is open, the neural networks are initialized. This may take quite some time. Especially, when running the program for the first time as TensorRT then optimizes one neural network for later use. After initialization, the statusbar will show the message: "Worker initialized". You can now open the camera or a video file through the menu (File -> Get camera feed / Open video file)
The left panel shows the input video with annotated faces. (You can also the annoatations through the menu: View -> Show annotations). The right panel shows from left to right:
- Extracted face
- Downscaled face to 16*16 px which is used as input for the face super resolution net
- Output from the face super resolution net
At the bottom left, you can see several performance values.
At any time, you can take a snapshot to save the current input and output images along with the according PSNR values per face. Use the spacebar or the menu (File -> Save snapshot). The status bar will tell you where the snapshot has been saved to.
Note: The Ubuntu distro which is installed on the Jetson Nano uses a global menu bar by default (like MacOS). You can access it from the panel at the very top of your screen.
To install the dependencies on a normal pc we have created a pipenv file. First, install pipenv: pip install --user pipenv
To install dependencies just run pipenv install in the project's root directory. On Windows, pipenv may not be able to install all dependencies, you likely have to build dlib by yourself (see https://stackoverflow.com/a/49538054/10264920).
We also had some trouble installing pytorch through pipenv. I suggest using pip directly to install it with the mentioned install command on pytorch's website and executing pipenv install again afterwards to make sure that everything is installed properly. E.g.
pipenv run pip install torch===1.5.0 torchvision===0.6.0 -f https://download.pytorch.org/whl/torch_stable.html
pipenv install
After successfully installing the dependencies, run pipenv run python3 src/main.py
Please note that the temperature and power usage display is not available in this version. Also, the program will use a different neural network for face detection, as the standard one (which is faster) needs a package specifically designed for the jetson.
- MIPI camera might not work correctly. If you run into problems with it, use a USB camera as a workaround.
- The face recognition neural network is different for the normal pc version.
- Some bluish green (sometimes even red pixels) may appear on the right faces in the super resolution panel. These pixels appear when using the function
torchvision.transforms.ToPILImageon the output of the super resolution net and seem to appear more often when the light is very bright in the frame. - If the bounding box of a detected face is at the very edge of the input image, the cropped face may get slightly scaled in only one direction. This is because the PSNR computation needs the compared images to have the same size and the super resolution net always outputs a 128x128 px image. If the bounding box cannot easily be enlarged around its center because it's already at the image edge, the face is scaled to 128x128 px instead.
- Sometimes opened jpg images are not correctly displayed
This repo is based on
- Progressive Face Super Resolution
- Jetson Hello AI World (Face detection with FaceNet)
- Face recognition with dlib
- Jetson Stats
Thanks to the original authors for their work!
Please email mickael.cormier AT iosb.fraunhofer.de for further questions.