DevOps 360° is an introduction to automation with Ansible. For more details about the project, please check: http://slides.com/floriandambrine/devops360
sudo yum install python-pip git
sudo pip install -U pip
pip install ansible==2.4.3.0
cd ansible/
ansible-galaxy install -r requirements.yml
1.1. Find out which vars to override from ansible-role-libvirt/defaults/vars.yml so that you can use the module on your own server
The role libvirt allows you to start VMs using KVM. You will have to override certain variables so that the role can work on your own server.
⁉️ Determine which variables you should override from defaults/vars.yml in order to make the module working on your server.
⁉️ Once you have identified the variables you need to override, create an inventory folder calledvmsunder<root>/ansible/inventories/and add an emptyhostsfile undervms. Creategroup_vars/all/libvirtand addgroup_vars/all/libvirt/vars.ymlfile with your variable overrides.
⁉️ In order to keep the command line light, we will create a bashalias(add this line the your~/.bashrc) with the following command:
alias play="ansible-playbook -i inventories/vms"
To make the alias active, either logout/login or run source ~/.bashrc.
From now, you will use play instead of ansible-playbook. Keep in mind what is happening behind the scene when you use the alias.
At this stage, you are ready to test if you did well so far 😅, Let's try to run vm-create.yml playbook:
play vm-create.yml

### If you want you can run virsh list to make sure the VM is real
virsh list
If the playbook completes successfully, try to SSH into your VM with:
ssh root@ansible-test.domXYZ.u13.or
If that works, let's destroy this ansible-test VM with:
play vm-delete.yml

### Again, you can run virsh list to make sure the VM is gone
virsh list
...and let's order appetizers!
Now that you have a configured libvirt role, we will start working on a first stage of the project BeerBattle alias devops-360-webapp.
Let's begin with a simple infrastructure for now:
- One webserver (VM name =
00.webserver| ip =172.16.XYZ.60) - One database (VM name =
00.mysql| ip =172.16.XYZ.70)
⁉️ Let's override thelibvirt_vmsvariables in ourgroup_varsto define new VMs.
Run the vm-create.yml playbook and make sure your infrastructure comes up properly.
⁉️ Start thinking about ansibleroles. How can you break the BeerBattle project into roles ? Think about DevOps best practices (monitoring tools, application users, pieces of automation shared between the database and the webserver).
Once you have your roles defined, init them with the command:
cd <root>/ansible/roles
ansible-galaxy init <rolename>
Start building the common role(s) with your peer, this role(s) will then be added to webservers.yml and databases.yml
Once you think you have the common parts, let's order the main course!
For this stage, we will split the two-person team into two. One of you will work on webservers.yml and specific web roles and the other one will work on databases.yml and the related roles.
⁉️ For now, the goal is to install and configure the versionv1.0.0of the webapp and the database.
📍 As you can see, both of you need to deploy the devops-360-webapp repository, it might be a good idea to coordinate with your peer and create a
rolefor that so that you do not do the same job twice.
-
Checkout the application requirements that the developers have left for you in 2. Web application
-
You will find all the details of the application endpoints if you need Application endpoints
⁉️ Think about what roles you should create to automate the BeerBattle webapp and implement them.
📍 Here are some useful links for you that you may need How to Serve Flask applications with UWSGI, Python Virtualenv, Quickstart for Python WSGI applications
- Checkout the database requirements that the developers have left for you in 1. Mysql Database
⁉️ Think about what roles you should create to automate the BeerBattle database and implement them.
📍 Here are some useful links for you that you may need Ansible Mysql modules, A Basic Mysql Tutorial, MySQL Utilities ~/.my.cnf.
If you can not connect to 00.webserver.domXYZ.u13.org, You will have to install Nginx and configure it as a reverse proxy to send traffic to 00.webserver on the Ansible controller, the configuration should look like:
upstream devops-360-proxy {
    server 00.webserver.domXYZ.u13.org;
}

server {
    listen *:80;
    server_name _;

    access_log /var/log/nginx/devops-360-proxy-access.log;
    error_log /var/log/nginx/devops-360-proxy-error.log;

    location / {
        proxy_set_header X-Real-IP $remote_addr;
        proxy_set_header Host $host;
        proxy_set_header X-Forwarded-For $remote_addr;
        proxy_pass http://devops-360-proxy;
    }
}
In this section we will work on scalability and redundancy. Let's add an extra webserver and a loadbalancer to the infrastructure:
- One more webserver (VM name =
01.webserver| ip =172.16.XYZ.61) - One load balancer (VM name =
00.loadbalancer| ip =172.16.XYZ.50)
⁉️ The webserver part should be really quick to do as this server is the same as00.webserver. For00.loadbalanceryou can install Nginx and use Nginx to do loadbalancing over your two webservers (Using nginx as HTTP load balancer). If you already built annginxrole, you can reuse it, otherwise it might be time to refactor some code 😏 ...
Everything is working? It's time for the desert then!
Let's do a release process.
If we sum-up, right now our infrastructure is made of:
00.loadbalancer: Clients entrypoint00.webserver: Web server part of the loadbalancer serving the webapp01.webserver: Web server part of the loadbalancer serving the webapp00.webserver: Web server part of the loadbalancer serving the webapp00.mysql: The database used by the webapp
Let's release v2.0.0 on the webserver 00.webserver. For this deployment we will adopt a Canary release process:
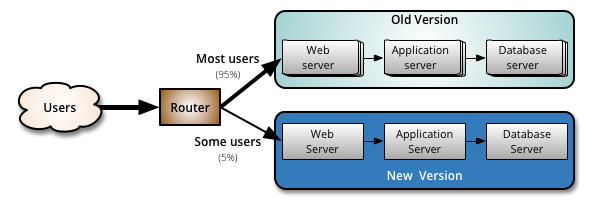
⁉️ During this deployment, the database00.mysqlwill also have to upgrade the database schemas. Make sure your automation runs on00.mysqland00.webserverbut make sure to leave01.webserverintact! Once the release is done, you should have bothv1.0.0andv2.0.0available through the loadbalancer00.loadbalancer. Update whatever variables you need to do this release process, you can also use--extra-varsargument with yourplaycommand.
If you can not connect to 00.loadbalancer.domXYZ.u13.org, You will have to install Nginx and configure it as a reverse proxy to send traffic to 00.loadbalancer on the Ansible controller, the configuration should look like:
upstream devops-360-proxy {
    server 00.loadbalancer.domXYZ.u13.org;
}

server {
    listen *:80;
    server_name _;

    access_log /var/log/nginx/devops-360-proxy-access.log;
    error_log /var/log/nginx/devops-360-proxy-error.log;

    location / {
        proxy_set_header X-Real-IP $remote_addr;
        proxy_set_header Host $host;
        proxy_set_header X-Forwarded-For $remote_addr;
        proxy_pass http://devops-360-proxy;
    }
}
⁉️ Is thev2.0.0running properly ? What should we do we do now ?
⁉️ Depending on how went the release, you should be fully running onv1.0.0or onv2.0.0.
A full-course meal is never done without a digestive...
Let's do a Blue/Green deployment on the infrastructure.
Blue/Green deployment means that you should duplicate your stack like:
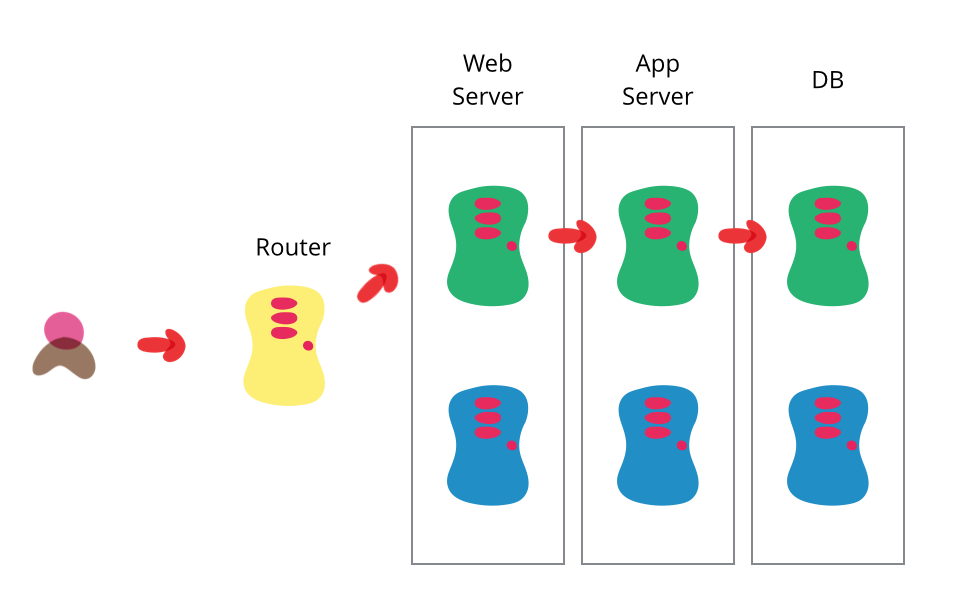
Here is how your inventory should look like:
###############################################################################
### Blue Stack
###############################################################################

[webservers-blue]
[00:01].webserver.blue.dom110.u13.org

[databases-blue]
00.mysql.blue.dom110.u13.org

[loadbalancers-blue]
00.loadbalancer.blue.dom110.u13.org

[blue:children]
webservers-blue
databases-blue
loadbalancers-blue

###############################################################################
### Green Stack
###############################################################################

[webservers-green]
[10:11].webserver.green.dom110.u13.org

[databases-green]
10.mysql.green.dom110.u13.org

[loadbalancers-green]
10.loadbalancer.green.dom110.u13.org

[green:children]
webservers-green
databases-green
loadbalancers-green

###############################################################################
### General section
###############################################################################

[webservers:children]
webservers-blue
webservers-green

[databases:children]
databases-blue
databases-green

[loadbalancers:children]
loadbalancers-blue
loadbalancers-green
Create a new inventory like inventories/blue-green and drop the above host file in there.
If needed: On the ansible controller, drop the following configuration in /etc/nginx/sites-available/proxy (Remember to create the symlink in /etc/nginx/sites-enabled/proxy and make sure the /etc/nginx/nginx.conf has the include /etc/nginx/sites-enabled/*; statement in the http block):
resolver 172.16.XYZ.254;

server {
    listen *:80;
    server_name _;

    access_log /var/log/nginx/beerbattle-loadbalancer-access.log;
    error_log /var/log/nginx/beerbattle-loadbalancer-error.log;

    set $upstream http://beerbattle.domXYZ.u13.org;

    location / {
        proxy_set_header X-Real-IP $remote_addr;
        proxy_set_header Host $host;
        proxy_set_header X-Forwarded-For $remote_addr;
        proxy_pass $upstream;
    }
}
Made with ♥ for teaching people