Application: QS99
Voluntary project in the subject IDATT2105.
Grade: A
- Introduction
- Documentation
- Technology
- Functionality
- ER-diagram
- REST-API
- Security
- CI/CD
- Dependencies
- Future Work
- Installation Manual
- Running Tests
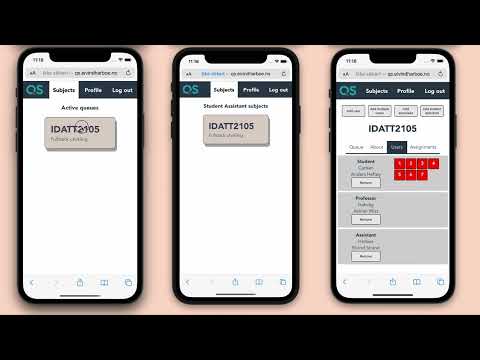
Create an alternative to QS, the queue system of subjects at NTNU. It's preferred that the queue is compatible with a mobile.
- Vue 3
- Maven
- Java
- Spring Boot
- Spring Data JPA
- H2 database
Swagger: QS99API
JavaDoc: JavaDoc
- Log in
- Change Password
- View all subjects participating in (or by ID)
- Add and delete entry from queue
- View all entries in a queue
- View all exercises in their subjects (and by specific subject)
- See if subject is passed based on exercises
- All functionality of a student
- View all users from a subject and their exercise status, from this view they can also approve/disapprove an exercise
- Set a queue active/inactive
- Approve exercise for student
- Set status of an entry (help/approve)
- Suspend or remove an entry in the queue
- All functionality of students and student assistants
- Register and delete students and professors from subject
- Create and delete subjects
- Add and remove students and professors from a subject
- Add students with a list in the form: "lastname firstname email" separated by new lines
- If a student doesnt exist a user is made and an email with password is sent.
- Add and remove student assistants from a subject
- Add and remove exercises from a subject
- Add sublists of exercises with different amounts of mandatory exercises
- All functionality of students, student assistants and professors
- Register admin users
- View all users and subjects in the database

Link to api: QS99API
Alternatively if you are running your own instance QS99API localhost
QS99 uses JWT-Tokens for authentication of users who are performing API-calls. A JWT-Token is given to a user whenever they log in. When a user logs in the backend performs a lookup to check if the email and password match an existing user. The password is salted and then hashed and store this way in the database. If the user exists and a correct password was given, we check what role this given user has. After this the backend uses a JWTSBuilder which we give email, role and sets a creation time and an expiration time. Now the user has a valid token that it can use to perform API calls.
When a user performs an API call it sends its token in the header. The backend then extracts the needed information from the token, and checks if it has the needed role to perform the specific API call. This way we ensure that only those that have a valid token with the needed roles can perform the given API call. Each endpoint has specified what roles have access to it.
Continuous integration is performed with Github Actions. On each push to the main branch a test suite is ran to ensure that new features work properly Currently we have only implemented CI on the backend. Frontend CI was deemed unnecessary.
Continuous deployment is also performed via github actions. Every time there is a push to the main branch a deploy action is run. A Github runner checksout the repository and ssh'es into our own Raspberry Pi and then copies the repository and builds the entire project with the help of a makefile and docker containers. We chose this approach because we had an available Raspberry Pi and we could save some money on server hosting. Both the backend and the frontend are hosted on the Pi. The backend is a SpringBoot Rest API and the frontend is hosted on a basic nginx server. Javadoc is also published to github pages via its a github runner.
- Maven
- Build automation tool used for building the Java backend.
- Spring Boot
- Used to create stand-alone, production grade Spring based applications with Java.
- Spring Security
- Powerful and highly customizable authentication and access-control framework.
- Spring Boot JPA
- Makes it easier to implement JPA based repositories. Deals with enhanced support for JPA based data access layers.
- JUnit
- Testing framework for Java.
- H2database
- H2 is a relational database management system written in Java. It can be embedded in Java applications or run in client-server mode.
- JWT
- JSON Web token is used for security purposes and ensuring only users with required roles can access specific endpoints
- Vue.Js
- Javascript framework for making web applications
- Babel
- Javascript trans-compiler that converts our modern ECMAScript code to older versions of JS so that older JSengines can run it
- Axios
- Promise based HTTP client, performs our XMLHttpRequests
- Core-Js
- Standard JS library, supports up to ECMAScript 2021
- EsLint/Prettier
- Used for formatting in development
- Yup
- Used for form validation
- Jest
- Used for testing frontend
- Vuex
- Used for state management
- Router
- Used for routing
- Yarn
- Our package manager of choice
There are some tests we want to implement to make life easier, especially on the frontend. Due to a lack of time, we couldn't implement as many tests as we wanted.
The admin page is currently not designed for mobile.
With refresh tokens we could save the user some hassle of login in each time a token expires. A user could be logged in indefinitely, without being timed out
If a student is always located in the same spot on the same table (Which is quite common) it is quite a chore to have to enter the same information each time. Therefore a caching of the recent choice could be a good addition to out solution.
Because of our severely limited time and resources we chose to not implement certain funcionality, the one that would have most impact especially for the Student Assistants would be to see where the student they are assisted is located. In the current implementation, an assistant can only read where they are located.
Implement the timestamps of entries in the queue to se duration waited.
The project evolved over time as we figured out what exact functionality we needed and because of our limited time. Therefore there are bound to be database lookups and server logic that is not particularly optimized. Some future work could therefore be to optimize these. We could see improvement in server-side performance
- Docker
- Maven
- Two available ports 80 and 8001
Clone the project
In the project folder:
mvn spring-boot:run
In the project folder:
cd src/frontend
yarn
yarn serve
Now the application will be accessible from
http://localhost:8080
To be able to use the application, the default admin user is:
username: admin@admin.no
password: password
To build and run the entire project you can use the make file to build two docker containers(Easiest in a linux environment)
You will need to have docker installed!
Clone the entire project:
git clone https://github.com/MadLadsTechnology/QS99.git
Run the deploy script in the makefile
sudo make -C QS99 deploy
After the commands are ran, you will have two docker containers running, frontend on port 80 and backend running on port 8001
Check that you have two running containers with this command:
sudo docker container list
If you only see one or none running, you should check the build log. Maybe you already had a service running on one of the ports
You can access the frontend by going to this address: http://localhost
You can access swagger by going to this address: http://localhost:8001/swagger-ui/index.html
Another way is to pull the two docker containers from docker hub and start them
sudo docker pull eposkk/frontend
sudo docker pull eposkk/backend
Then start the containers by running
docker run -d --name frontend -p 80:80 eposkk/frontend
docker run -d --name backend -p 8001:8001 eposkk/backend
And check that they are running
sudo docker container list
If you only see one or none running, you should check the build log. Maybe you already had a service running on one of the ports
You can access the frontend by going to this address: http://localhost
You can access swagger by going to this address: http://localhost:8001/swagger-ui/index.html
Clone the repo
git clone https://github.com/MadLadsTechnology/QS99.git
Cd into directory and run
mvn clean test
This will run all tests on the backend