Image warehouse allows upload, list, update and delete.
Build a web application in the language of your choice that allows the following:
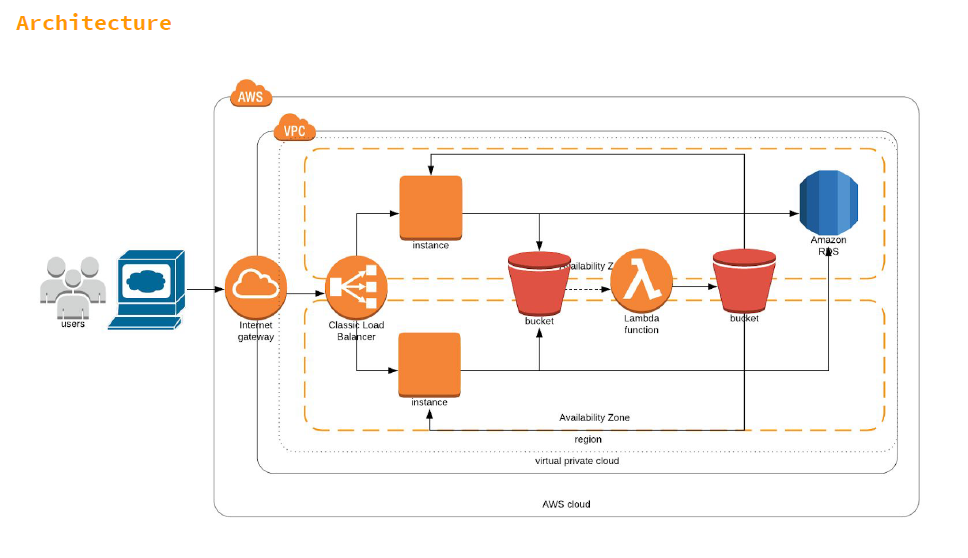
- Create a VPC with two public subnets and two private subnets.
- Build a web application in the language of your choice that allows the following:
- Create: Upload image to S3 bucket and store metadata in RDS
- Retrieve: List images stored in S3 bucket and their metadata
- Update: Update image and/or metadata
- Delete: Delete image from S3 bucket and metadata from RDS
- When the upload of the image is complete, trigger a Lambda function to create a thumbnail of that image and place it in another S3 bucket.
- [Optional] Create a Github repository (if not created already) with the contents of the web application.
- [Optional] Create all the infrastructure in CloudFormation.
AWS CloudFormation provides a common language for you to describe and provision all the infrastructure resources in your cloud environment. CloudFormation allows you to use a simple text file to model and provision, in an automated and secure manner, all the resources needed for your applications across all regions and accounts. This file serves as the single source of truth for your cloud environment. Ref. aws.amazon.com/cloudformation
- VPC (Virtual Private): This is the code for a vpc, the instance must be default to save costs. 10.0.0.0/16, Netmask: 255.255.0.0 = 16 11111111.11111111 .00000000.00000000.
- This a code for a vp
            "vpcProjectAwsCourse": {
            "Type": "AWS::EC2::VPC",
            "Properties": {
                "CidrBlock": "10.0.0.0/16",
                "InstanceTenancy": "default",
                "Tags": [
                {
                    "Key": "Name",
                    "Value": "vpcProjectAwsCourse"
                }
                ]
            }
},-
Subnets: For this case we need six subnets, 3 in one zone (us-east-2a) and 3 in another zone(us-east-2c).
 *Zona 1
 | Subnet Name        | CidrBlock        |AvailabilityZone |  Notes                                  |
 | -------------------| -----------------|-----------------|-----------------------------------------|
 | z1pubSubnet1       | 10.0.1.0/24      | us-east-2a      | Load balancer and Bastion Host          |
 | z1privSubnet1      | 10.0.2.0/24      | us-east-2a      | Ec2 Application                         |
 | z1privSubnet       | 10.0.3.0/24      | us-east-2a      | Rds                                     |

 *Zona 2
 | Subnet Name        | CidrBlock        |AvailabilityZone |  Notes                                  |
 | -------------------| -----------------|-----------------|-----------------------------------------|
 | z2pubSubnet1       | 10.0.4.0/24      | us-east-2c      | Load balancer                           |
 | z2privSubnet1      | 10.0.5.0/24      | us-east-2c      | Ec2 Application                         |
 | z2privSubnet       | 10.0.6.0/24      | us-east-2c      | Rds                                     |
            "z1pubSubnet1": {
                "DependsOn": ["vpcProjectAwsCourse"],
                "Type": "AWS::EC2::Subnet",
                "Properties": {
                    "VpcId": {
                    "Ref": "vpcProjectAwsCourse"
                    },
                    "MapPublicIpOnLaunch": false,
                    "CidrBlock": "10.0.1.0/24",
                    "AvailabilityZone": "us-east-2a",
                    "Tags": [
                    {
                        "Key": "Name",
                        "Value": "z1pubSubnet1"
                    }
                    ]
                }
}- SecurityGroups: A security group acts as a virtual firewall for your instance to control inbound and outbound traffic. When you launch an instance in a VPC, you can assign up to five security groups to the instance. Security groups act at the instance level, not the subnet level. Therefore, each instance in a subnet in your VPC could be assigned to a different set of security groups. If you don't specify a particular group at launch time, the instance is automatically assigned to the default security group for the VPC. Ref https://docs.aws.amazon.com/vpc/latest/userguide/VPC_SecurityGroups.html
We have 3 security groups
    | Group Name                | SecurityGroupIngress            |  SecurityGroupEgress            |  Notes            |
    |---------------------------|---------------------------------|---------------------------------|-------------------|
    | securityGroupVpcBastion   | All trafic (80,22)              | All trafic 80 and 22            | Bastion Host      |
    | securityGroupLoadBalancer | All trafic 80                   | All trafic 80                   | LoadBalancer      |
    | securityGroupVpcEc2       | 10.0.1.0/24,10.0.4.0/24(80,22)  | 10.0.1.0/24,10.0.4.0/24(80,22)  | Ec2 machine       |
    | securityGroupvpcRds       | 10.0.2.0/24,10.0.5.0/24(22,3306)| 10.0.2.0/24,10.0.5.0/24(22,3306)| Rds Database      |
"securityGroupVpcBastion": {
      "DependsOn": ["vpcProjectAwsCourse"],
      "Type": "AWS::EC2::SecurityGroup",
      "Properties": {
        "VpcId": { "Ref": "vpcProjectAwsCourse" },
        "Tags": [{ "Key": "Name", "Value": "securityGroupVpcBastion" }],
        "GroupName": "securityGroupVpcBastion",
        "GroupDescription": "Bastion Host",
        "SecurityGroupIngress": [
          {
            "IpProtocol": "tcp",
            "FromPort": 80,
            "ToPort": 80,
            "CidrIp": "0.0.0.0/0"
          },
          {
            "IpProtocol": "tcp",
            "FromPort": 22,
            "ToPort": 22,
            "CidrIp": "0.0.0.0/0"
          }
        ],
        "SecurityGroupEgress": [
          {
            "IpProtocol": "tcp",
            "FromPort": 80,
            "ToPort": 80,
            "CidrIp": "0.0.0.0/0"
          },
          {
            "IpProtocol": "tcp",
            "FromPort": 22,
            "ToPort": 22,
            "CidrIp": "0.0.0.0/0"
          }
        ]
      }
},- Route table and Nats It is necessary to have a routing table so that the subnets can communicate, also add a nat so that the ec2 have access to the internet to install necessary commands for our application.
"NATGateway": {
      "DependsOn": "internetGatewayAttachvpcProjectAwsCourse",
      "Type": "AWS::EC2::NatGateway",
      "Properties": {
        "AllocationId": {
          "Fn::GetAtt": ["ElasticIpEcNAT", "AllocationId"]
        },
        "SubnetId": { "Ref": "z1pubSubnet1" },
        "Tags": [{ "Key": "Name", "Value": "NATGateway" }]
      }
},- Ec2 Amazon Elastic Compute Cloud (Amazon EC2) provides scalable computing capacity in the Amazon Web Services (AWS) cloud. Using Amazon EC2 eliminates your need to invest in hardware up front, so you can develop and deploy applications faster. You can use Amazon EC2 to launch as many or as few virtual servers as you need, configure security and networking, and manage storage. Amazon EC2 enables you to scale up or down to handle changes in requirements or spikes in popularity, reducing your need to forecast traffic.
We need 3 ec2 for deploy app.
    | Ec2 Name                  | Subnets                         |  Notes                                              |
    |---------------------------|---------------------------------|-----------------------------------------------------|
    | Ec2BastionHost            | z1pubSubnet1                    | Only for connection to Instance1 and Instance2      |
    | Ec2Instance1              | z1privSubnet1                   | LoadBalancer                                        |
    | Ec2Instance1              | z2privSubnet1                   | Ec2 machine                                         |
Cloud formation example to ec2
 "Ec2BastionHost": {
      "DependsOn": ["vpcProjectAwsCourse", "z1pubSubnet1"],
      "Type": "AWS::EC2::Instance",
      "Properties": {
        "SubnetId": { "Ref": "z1pubSubnet1" },
        "ImageId": "ami-0c55b159cbfafe1f0",
        "BlockDeviceMappings": [
          {
            "DeviceName": "/dev/sdm",
            "Ebs": {
              "VolumeType": "io1",
              "Iops": "200",
              "DeleteOnTermination": "false",
              "VolumeSize": "20"
            }
          },
          {
            "DeviceName": "/dev/sdk",
            "NoDevice": {}
          }
        ],
        "KeyName": "bastion-host",
        "InstanceType": "t2.micro",
        "SecurityGroupIds": [
          { "Fn::GetAtt": ["securityGroupVpcBastion", "GroupId"] }
        ],
        "Tags": [
          {
            "Key": "name",
            "Value": "Ec2BastionHost"
          }
        ]
      }
},- RDS (Database Mysql):Amazon Relational Database Service (Amazon RDS) makes it easy to set up, operate, and scale a relational database in the cloud. It provides cost-efficient and resizable capacity while automating time-consuming administration tasks such as hardware provisioning, database setup, patching and backups. It frees you to focus on your applications so you can give them the fast performance, high availability, security and compatibility they need. ref: https://aws.amazon.com/rds/?nc1=h_ls
We need a mysql instance for app For our rds to be in our AvailabilityZone of our subnets it is necessary to make a group of subnets.
"mySubnetGroup": {
      "DependsOn": ["z2privSubnet2", "z1privSubnet2"],
      "Type": "AWS::RDS::DBSubnetGroup",
      "Properties": {
        "DBSubnetGroupDescription": "Group for rds",
        "SubnetIds": [{ "Ref": "z2privSubnet2" }, { "Ref": "z1privSubnet2" }]
      }
    },

"RDSDbProjectAwsCourse": {
      "DependsOn": ["mySubnetGroup"],
      "Type": "AWS::RDS::DBInstance",
      "Properties": {
        "DBSubnetGroupName": { "Ref": "mySubnetGroup" },
        "DBName": "fileUploadDb",
        "AllocatedStorage": "20",
        "DBInstanceClass": "db.t2.micro",
        "Engine": "MySQL",
        "MasterUsername": "********",
        "MasterUserPassword": "******",
        "DBInstanceIdentifier": "mysqlfileupload",
        "VPCSecurityGroups": [{ "Ref": "securityGroupvpcProjectAwsCourseRds" }]
      }
    },