Arduino is an open-source electronics platform based on easy-to-use hardware and software. The core of arduino lies in its easily modifiable code and hardware.
An Arduino Board is a microcontroller on a circuit board reads inputs and drives outputs from compiled code. Below are some examples of both inputs and outputs available:
- Inputs: Buttons, Switches, etc.
- Outputs: LEDs, LCD Screen, etc.
The first step is to plug in your Arduino Board to your computer using the USB it is supplied with. Once you have done that, the drivers will begin to install and you are ready to start your first project in Arduino!
First off, we will need to access the online editor Here and create a new Arduino account.
Once the editor is set up and ready to go, you should see something similar to this:
/*

*/

void setup() { // Initialization function

}

void loop() { // Main loop - continuously executes our code

}
Our Arduino program has two main functions:
- setup() - Initializes variables and other things
- loop() - Main loop which continuously executes our code
Our first project will involve us plugging an LED into our board and turning it on. To achieve this, we use the code below:
const int ledPin = 13;

void setup()
{
  pinMode(ledPin, OUTPUT);
}
void loop()
{
  digitalWrite(ledPin, HIGH);
}
In the first line, we create a variable named ledPin and assign it to pin 13 on our Arduino Board.
-
pinMode tells the compiler what type of module we are using and takes 2 parameters:
- ledPin (The pin we are writing to)
- OUTPUT (The type of module we are using. Can be OUTPUT or INPUT)
-
digitalWrite writes to our module, telling it what we want it to do. It also has 2 parameters:
- ledPin (Same as before)
- HIGH (Tells the module to switch ON, in our case lighting the LED. Can be HIGH or LOW)
Before we compile and run our code, we still need to hardwire the arduino board itself.
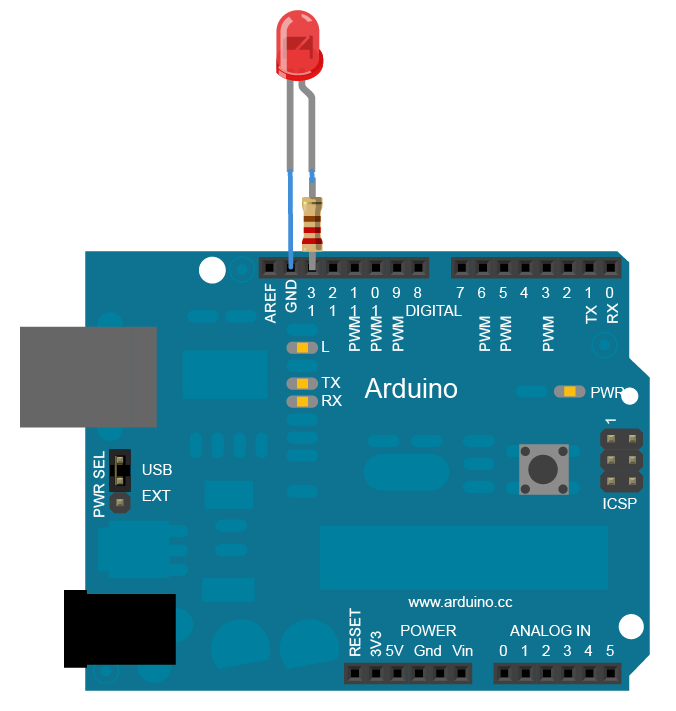
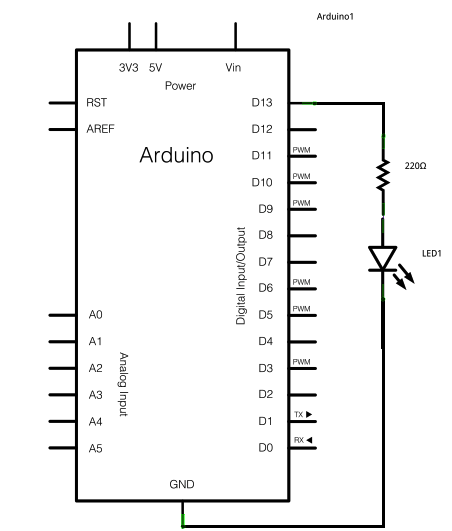
To do so, we connect the negative leg of the LED (The shorter leg) to a ground pin on the board. We then connect the other positive (longer) leg to row 10 on our board. Now we can connect our 220 Ohm resistor to the circuit. Take the end with the darker brown stripe and connect it to another slot in row 10. Now, connect the other end of the resistor to row 13.
We can now connect our breadboard to the Arduino by connecting a wire from the breadboard's ground to the Arduino's ground and from our breadboard's row 13 to the Arduino's slot 13.
Now we can compile our code in the web editor and run it...
We can also turn the LED off by changing our digitalWrite function:
const int ledPin = 13;

void setup()
{
  pinMode(ledPin, OUTPUT);
}
void loop()
{
  digitalWrite(ledPin, LOW); // Notice all we did was change the output mode to LOW
}
We now have the ability to turn our LED on and off whenever we desire, but what if we want it to blink?
delay(1000)
This will cause our code to delay by 1000ms or 1 second. Plugging this into our code we have:
const int ledPin = 13;

void setup()
{
  pinMode(ledPin, OUTPUT);
}
void loop()
{
  digitalWrite(ledPin, HIGH);
  delay(1000);
  digitalWrite(ledPin, LOW);
  delay(1000);
}
Great! We can now switch the light on and off using a timer. Next we will explore how to expand upon this by giving our module an input - say a button.
Now that we have the basics down for how to output to a module, it's time to move on to getting input from the environment.
Let's set up a button that will turn on our light when we press it.
// Assigning button and led pin values
const int buttonPin = 2;
const int ledPin = 13;

// Sets initial button state to 'Not Pressed'
int buttonState = 0;

void setup() {
  // The only setup difference being type OUTPUT or INPUT and pin number
  pinMode(ledPin, OUTPUT);
  pinMode(buttonPin, INPUT);
}

void loop() {

}
Seem familiar?
Next, we will need to set up our logic for when the button is pressed in our loop() function.
const int buttonPin = 2;
const int ledPin =  13;

int buttonState = 0;

void setup() {
  pinMode(ledPin, OUTPUT);
  pinMode(buttonPin, INPUT);
}

void loop() {

  /* Changes the buttonState when we press it
     digitalRead() takes in the button pin as input and outputs either 1 or 0 */

  buttonState = digitalRead(buttonPin);

  /* HIGH or LOW for buttonState is the same as it was for our LED
     While the button is being pressesd, the light will remain on
     The LED will shut off once we release it */

  if (buttonState == HIGH)
  {
    digitalWrite(ledPin, HIGH);
  }
  else
  {
    digitalWrite(ledPin, LOW);
  }
}

Congratulations, you have now set up a working module with inputs and everything! Let's apply some of this knowledge to something we can use.
The following code will allow us to set up a buzzer system like those seen in game shows. We have two contestants, each with their own button, and we want to know who pressed it first. Here's the setup:
// Setup 2 LEDs and 2 Buttons for input and output
const int buttonPin1 = 2;
const int buttonPin2 = 3;
const int ledPin1 =  12;
const int ledPin2 = 13;

// Stores the state of each button and buttonPressed stores which button was pressed, 1 or 2 (0 for none)
int buttonState1 = 0;
int buttonState2 = 0;
int buttonPressed = 0;

void setup() {
    /* We configure our input and outputs as normal and set ledPin1 and ledPin2 to off.
       When we begin a new round, we don't want a buzz in before starting! */

    pinMode(ledPin1, OUTPUT);
    pinMode(ledPin2, OUTPUT);
    pinMode(buttonPin1, INPUT);
    pinMode(buttonPin2, INPUT);

    digitalWrite(ledPin1, LOW);
    digitalWrite(ledPin2, LOW);
}

void loop() {
    // If we haven't pressed a button, keep checking
    if (buttonPressed == 0)
    {
        buttonState1 = digitalRead(buttonPin1);
        buttonState2 = digitalRead(buttonPin2);
    }

    /* If we haven't pressed a button before, we will check if we just did
       Otherwise we can continue the loop */

    if (!buttonPressed)
    {
        if (buttonState1 == HIGH)
        {
            buttonPressed = 1;
        }
        else if (buttonState2 == HIGH)
        {
            buttonPressed = 2;
        }
    }
    // Now we light up the LED from whichever button we pressed
    if (buttonPressed == 1)
    {
        digitalWrite(ledPin1, HIGH);
    }
    else if (buttonPressed == 2)
    {
        digitalWrite(ledPin2, HIGH);
    }
}