📌 DISCLAIMER: This notebook is used for demonstrative and illustrative purposes only and does not constitute an offering that has gone through regulatory review. It is not intended to serve as a medical application. There is no representation as to the accuracy of the output of this application and it is presented without warranty.
This notebook explores how to train a machine learning model to predict type 2 diabetes using synthesized patient health records. The use of synthesized data allows us to learn about building a model without any concern about the privacy issues surrounding the use of real patient health records.
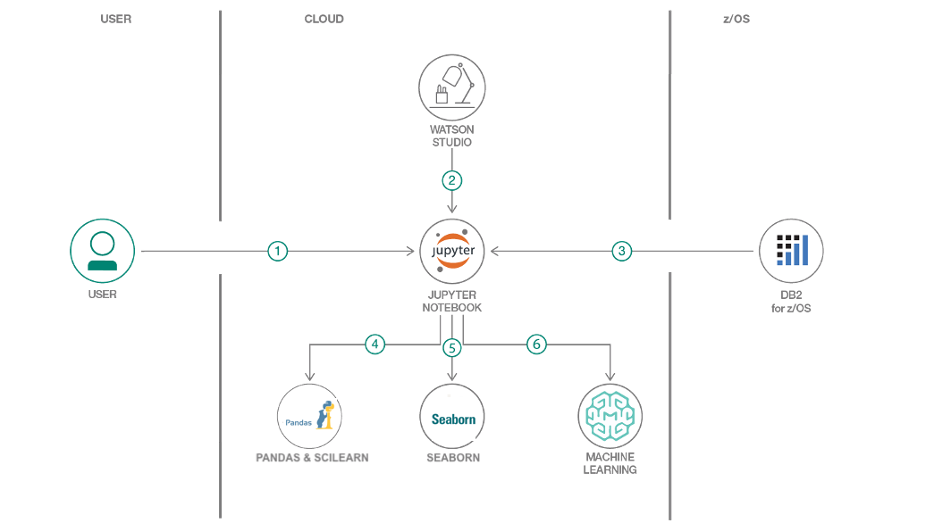
When the reader has completed this Code Pattern, they will understand how to:
- Store data on IBM DB2 database
- Prepare data using SciKit-learn and Pandas.
- Visualize data relationships using Seaborn & Matplotlib.
- Train a machine learning model and publish it in the Watson Machine Learning (WML) repository.
- Deploy the model as a web service and use it to make predictions.
- Create a Watson Studio Project on IBM Cloud.
- Create a DB2 on Cloud Database : IBM DB2 stores information that will be used for machine learning and predictions.
- Create Watson Machine Learning Service
- Create a Jupyter notebook in Watson Studio
- Publish and deploy model with Watson Machine Learning
- Clone the repo
- Create an IBM Cloud account
- Load data into IBM Db2 on Cloud
- Setup Watson studio project
- Creating and deploying a machine learning model
- Testing using UI
Before we start anything, we need to clone the repo. The repo has our dataset and python notebook which we will use when creating our model.
git clone https://github.com/ademaldemir/machine-learning-patient-records-on-db2.gitCreate a free IBM on Cloud Account if you don't already have one using the following link:
Creating this account will give us access to Db2 on Cloud and Watson Studio services.
Now that we have created our IBM Cloud account. We need to create a Db2 on Cloud service. Once we have create that, we will then we able to load our data into our database.
Go to the dashboard of your IBM Cloud account and follow the steps to create your Db2 On Cloud service.
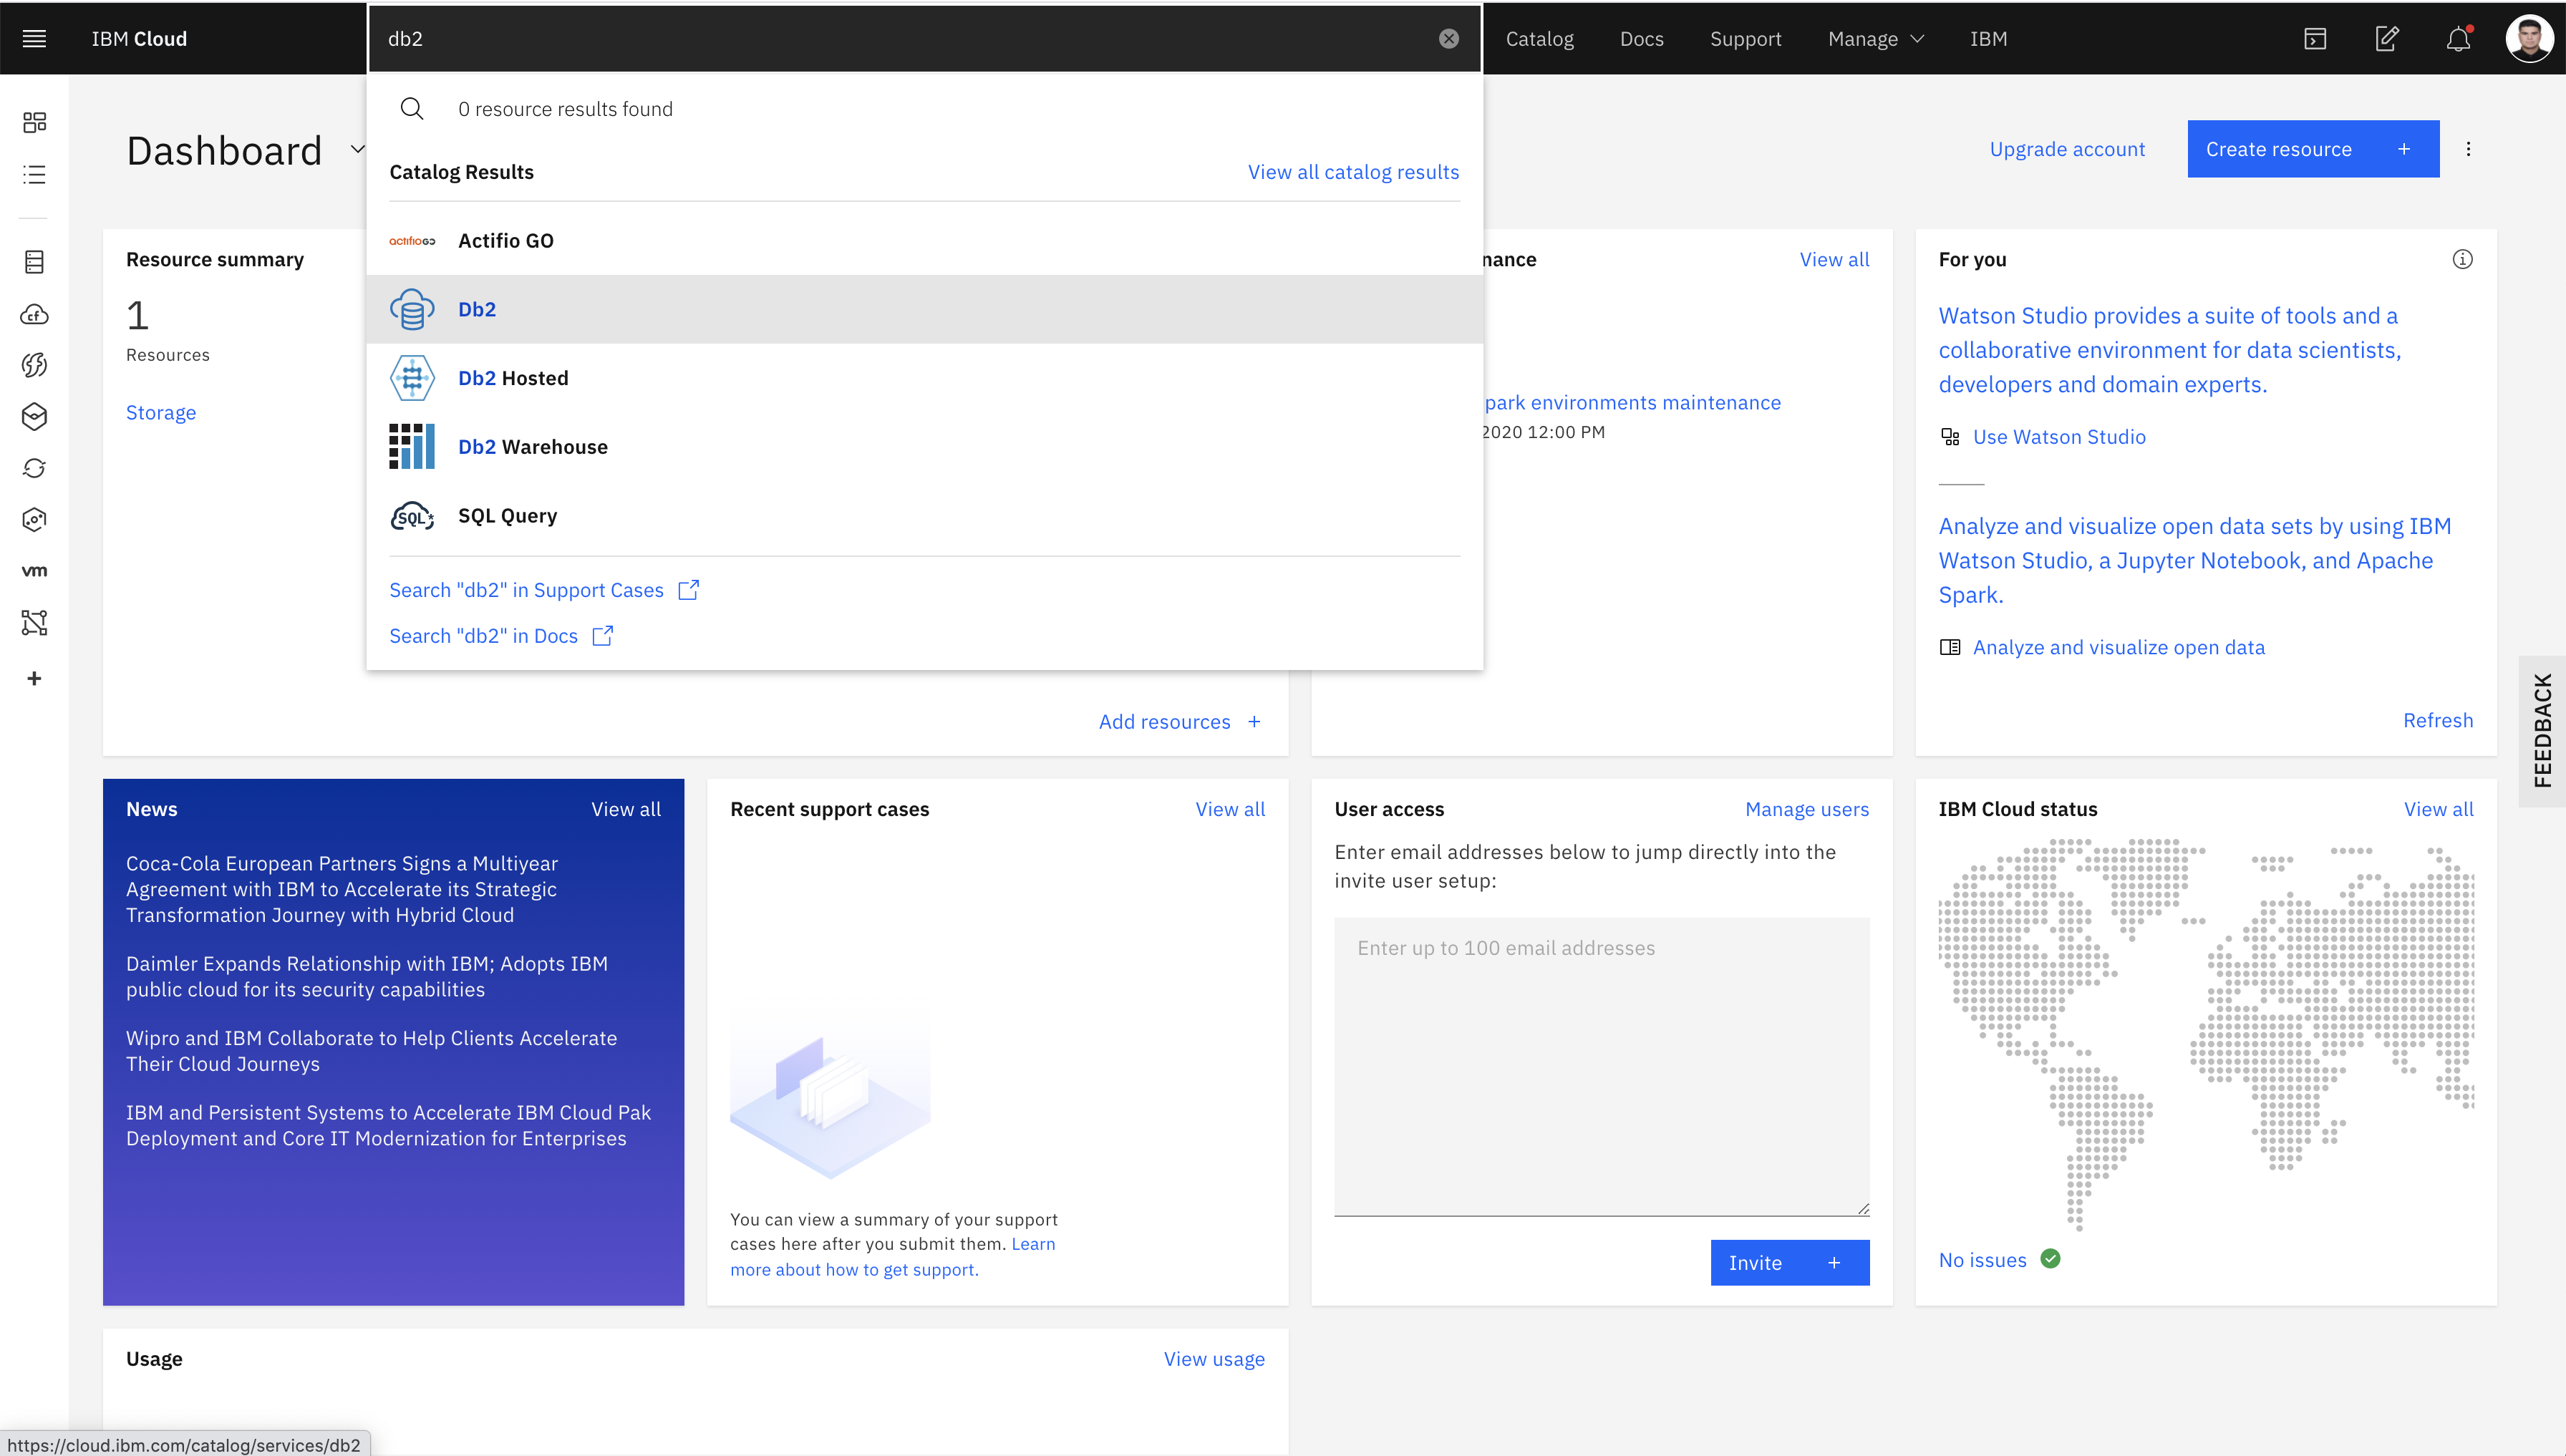
- In the search bar at the top of your dashboard, search
Db2. - Although there are different database options to choose from, for the purposes of this tutorial we will be using the
Db2option. ClickDb2when that option appears in the search bar.
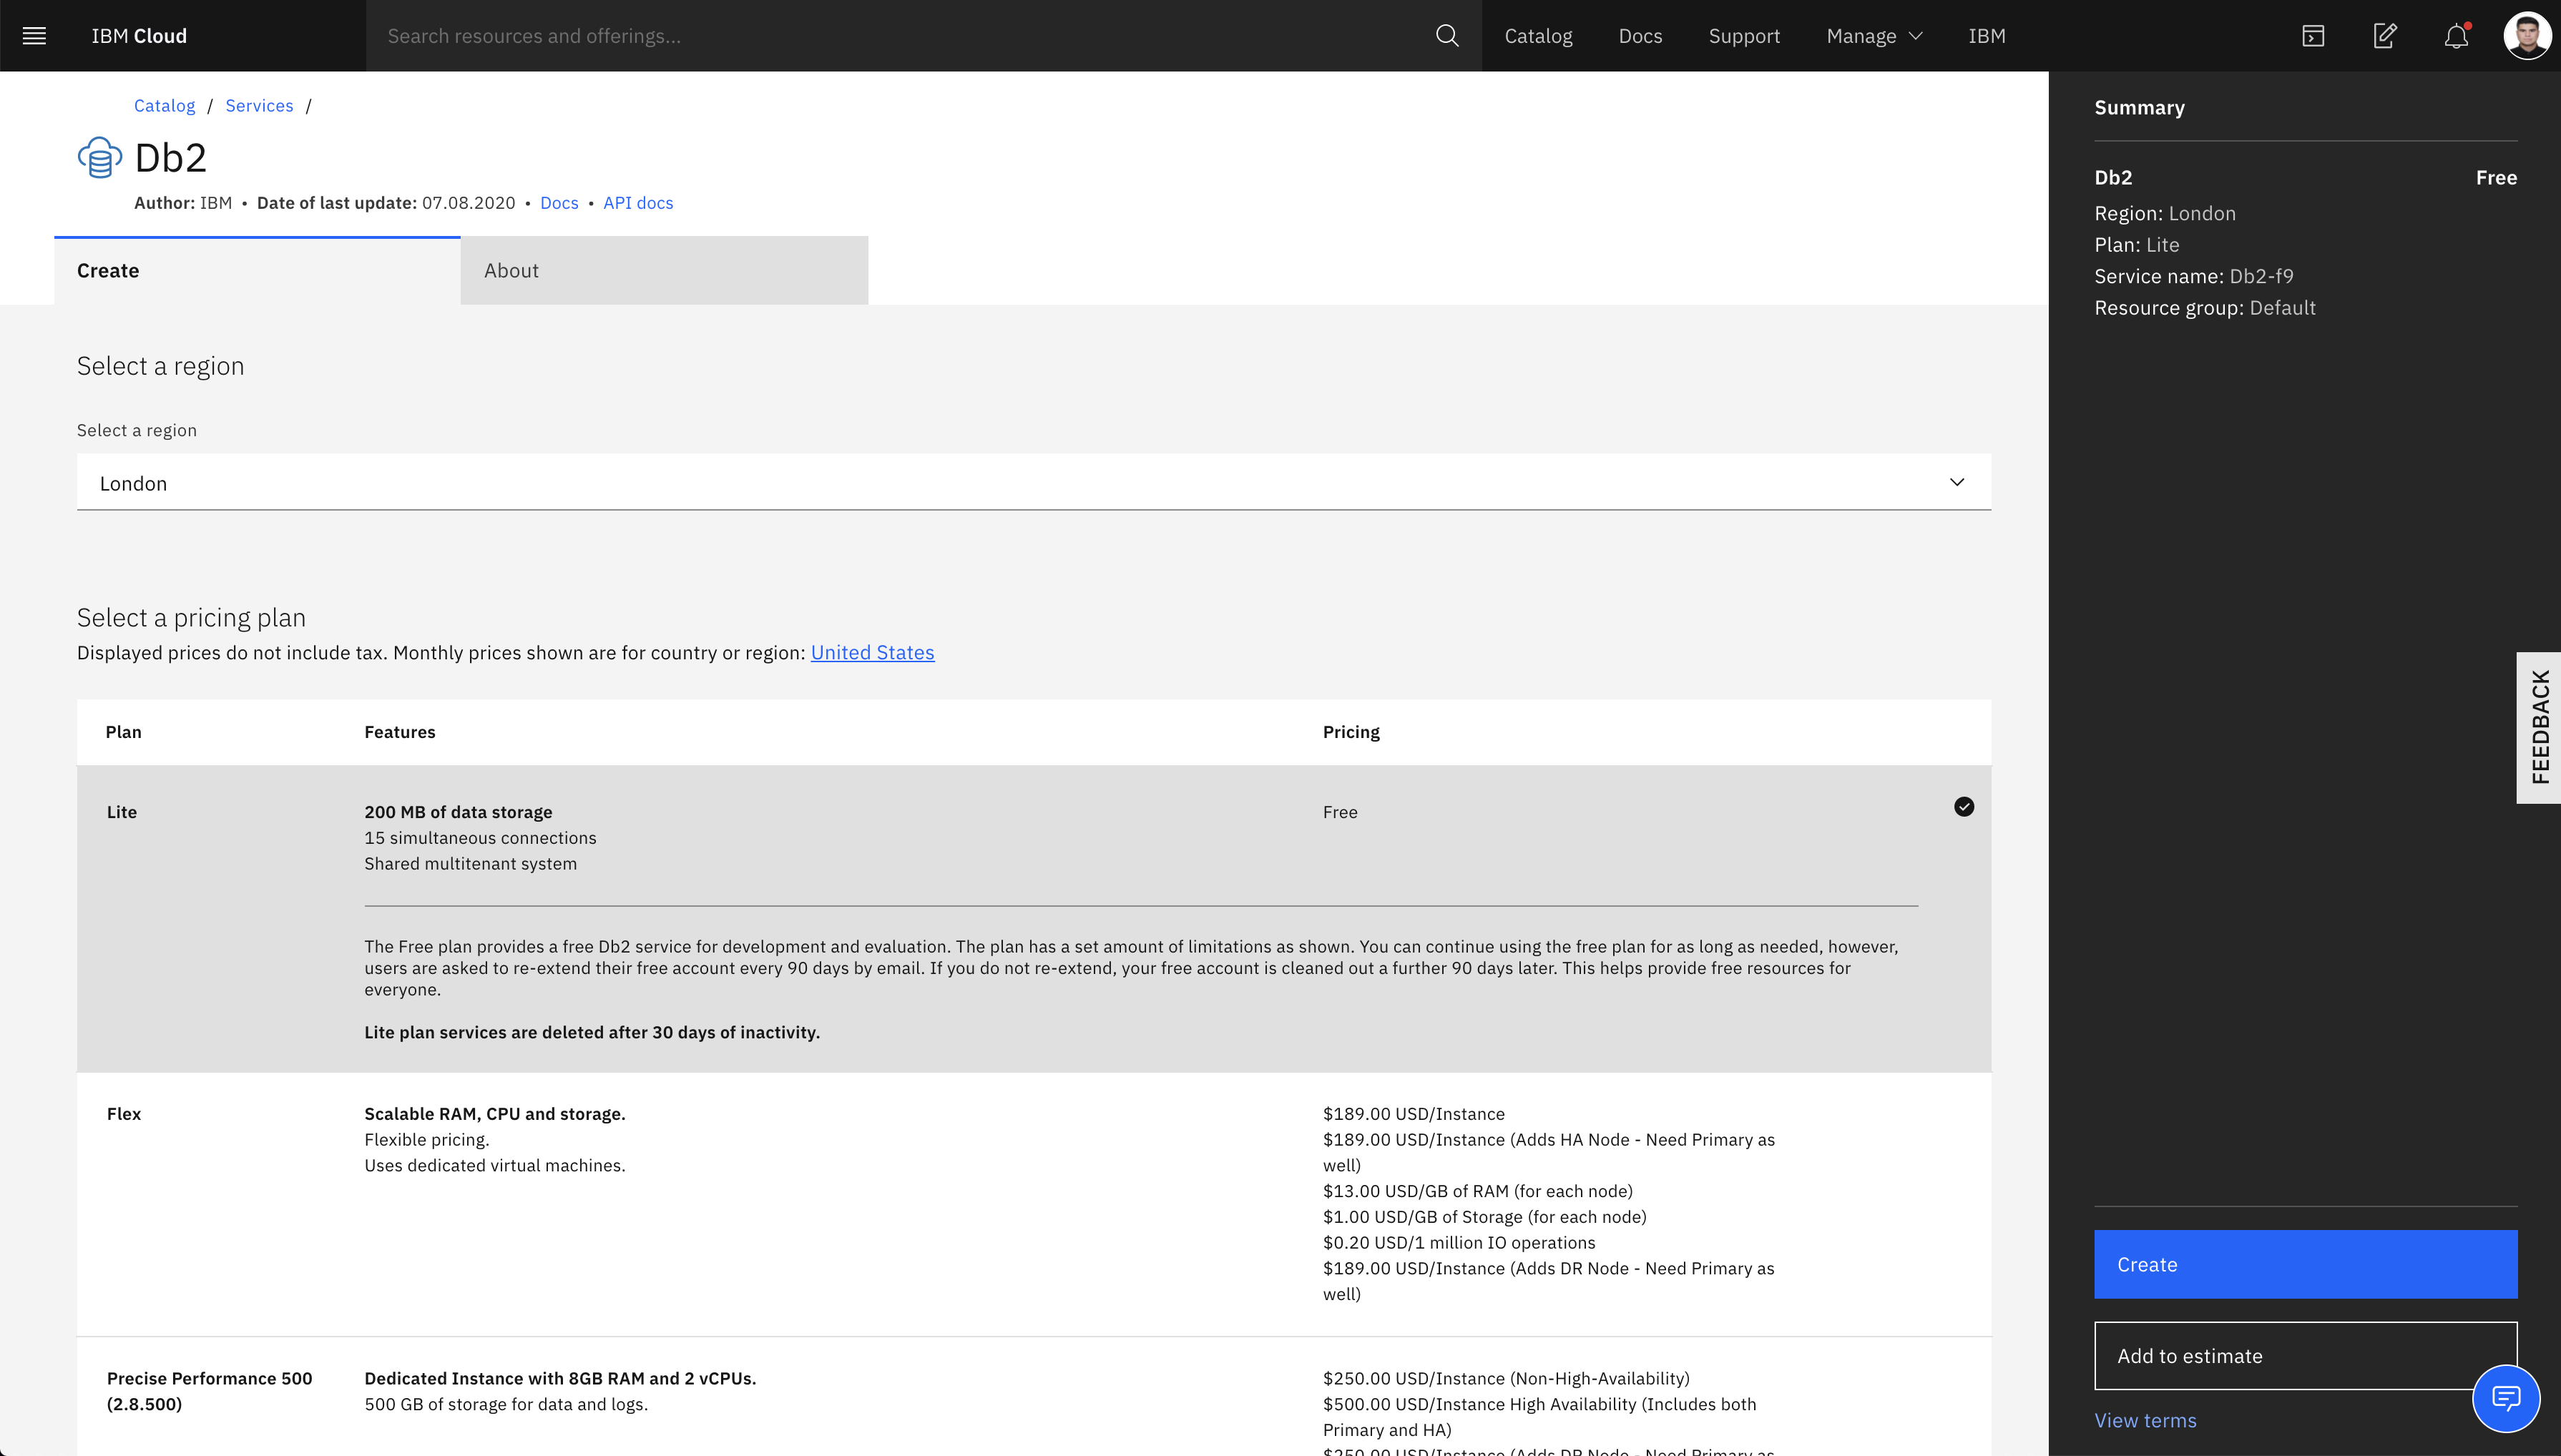
- For the service name, enter in
Data-Science-for-health. - Make sure you pick the region that is closest to where you currently reside.
- Look at the
Pricing Plansection and choose theLiteplan. - Click
Create
NOTE: You will be only able to create one instance per account.
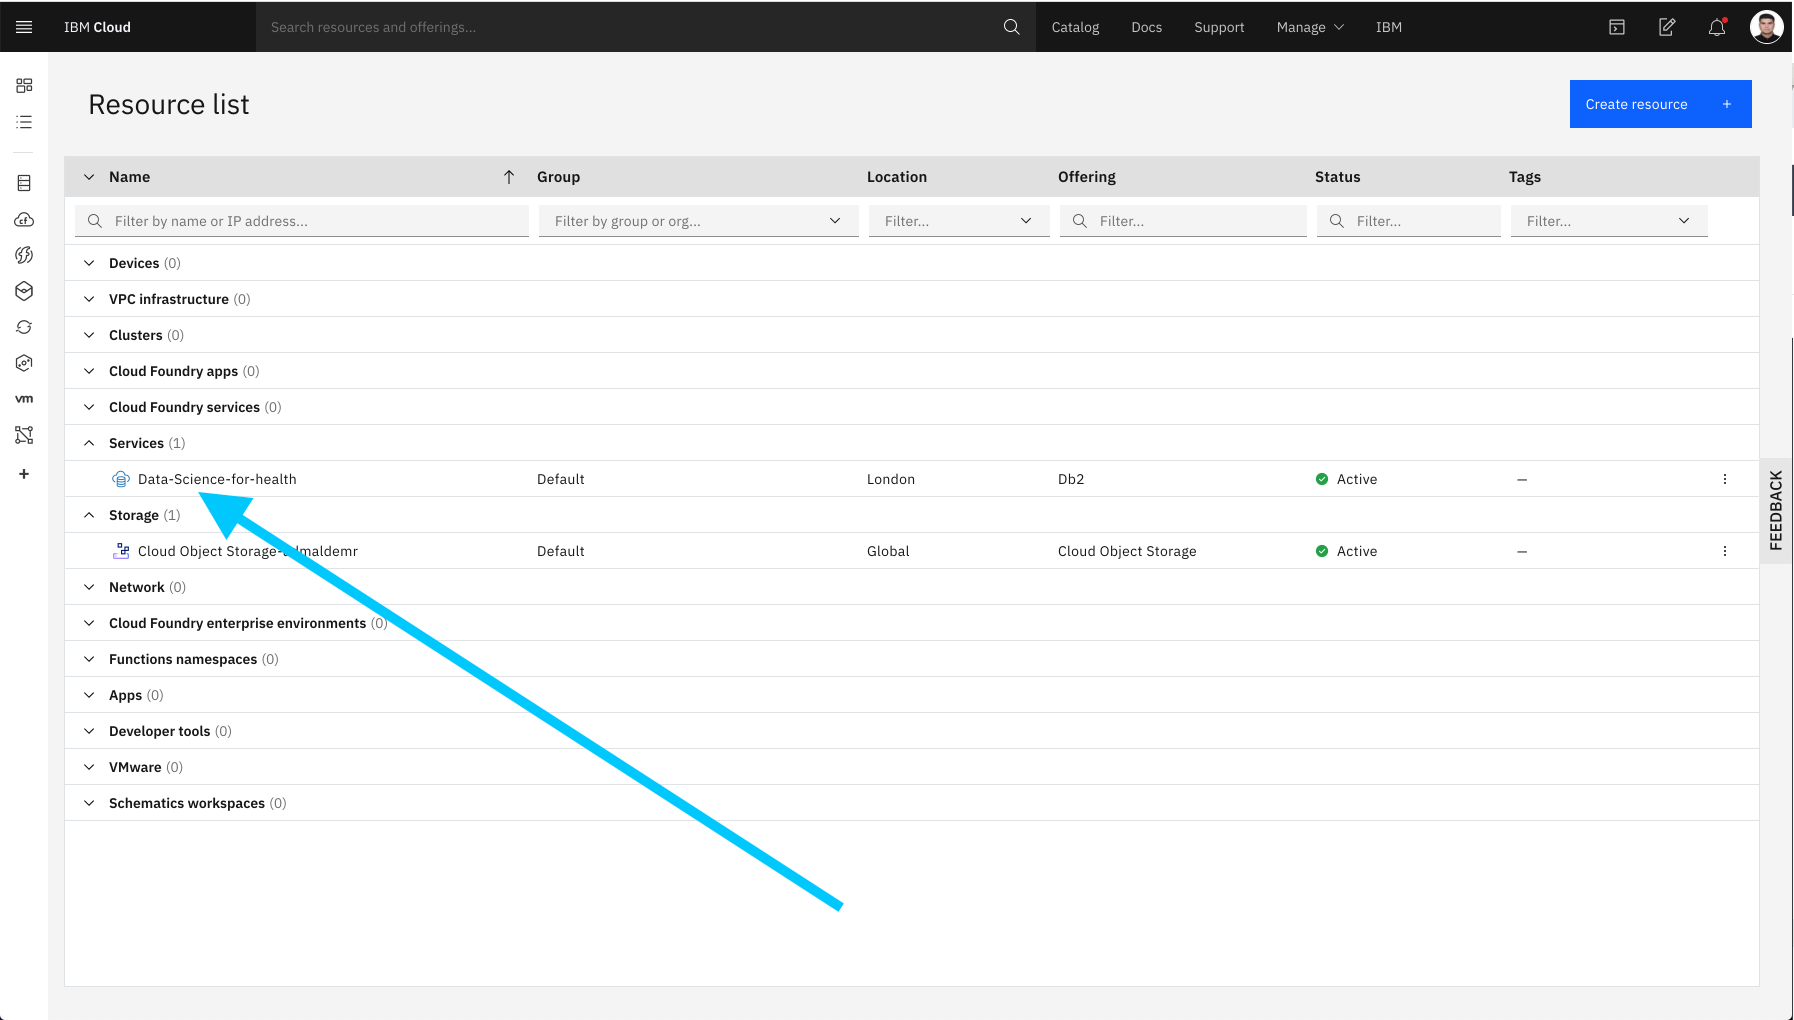
- Once you have created your database instance, we can go back to the dashboard and click on the
Resource Listlink under theNavigation Menusection. You should then be able to see and verify that your Db2 instance has been created under theServicestab.
-
Go to the dashboard of your IBM Cloud account and follow the steps to load your data onto Db2 On Cloud service.
-
In the search bar, search
Data-Science-for-healthand click on your Db2 on Cloud service.
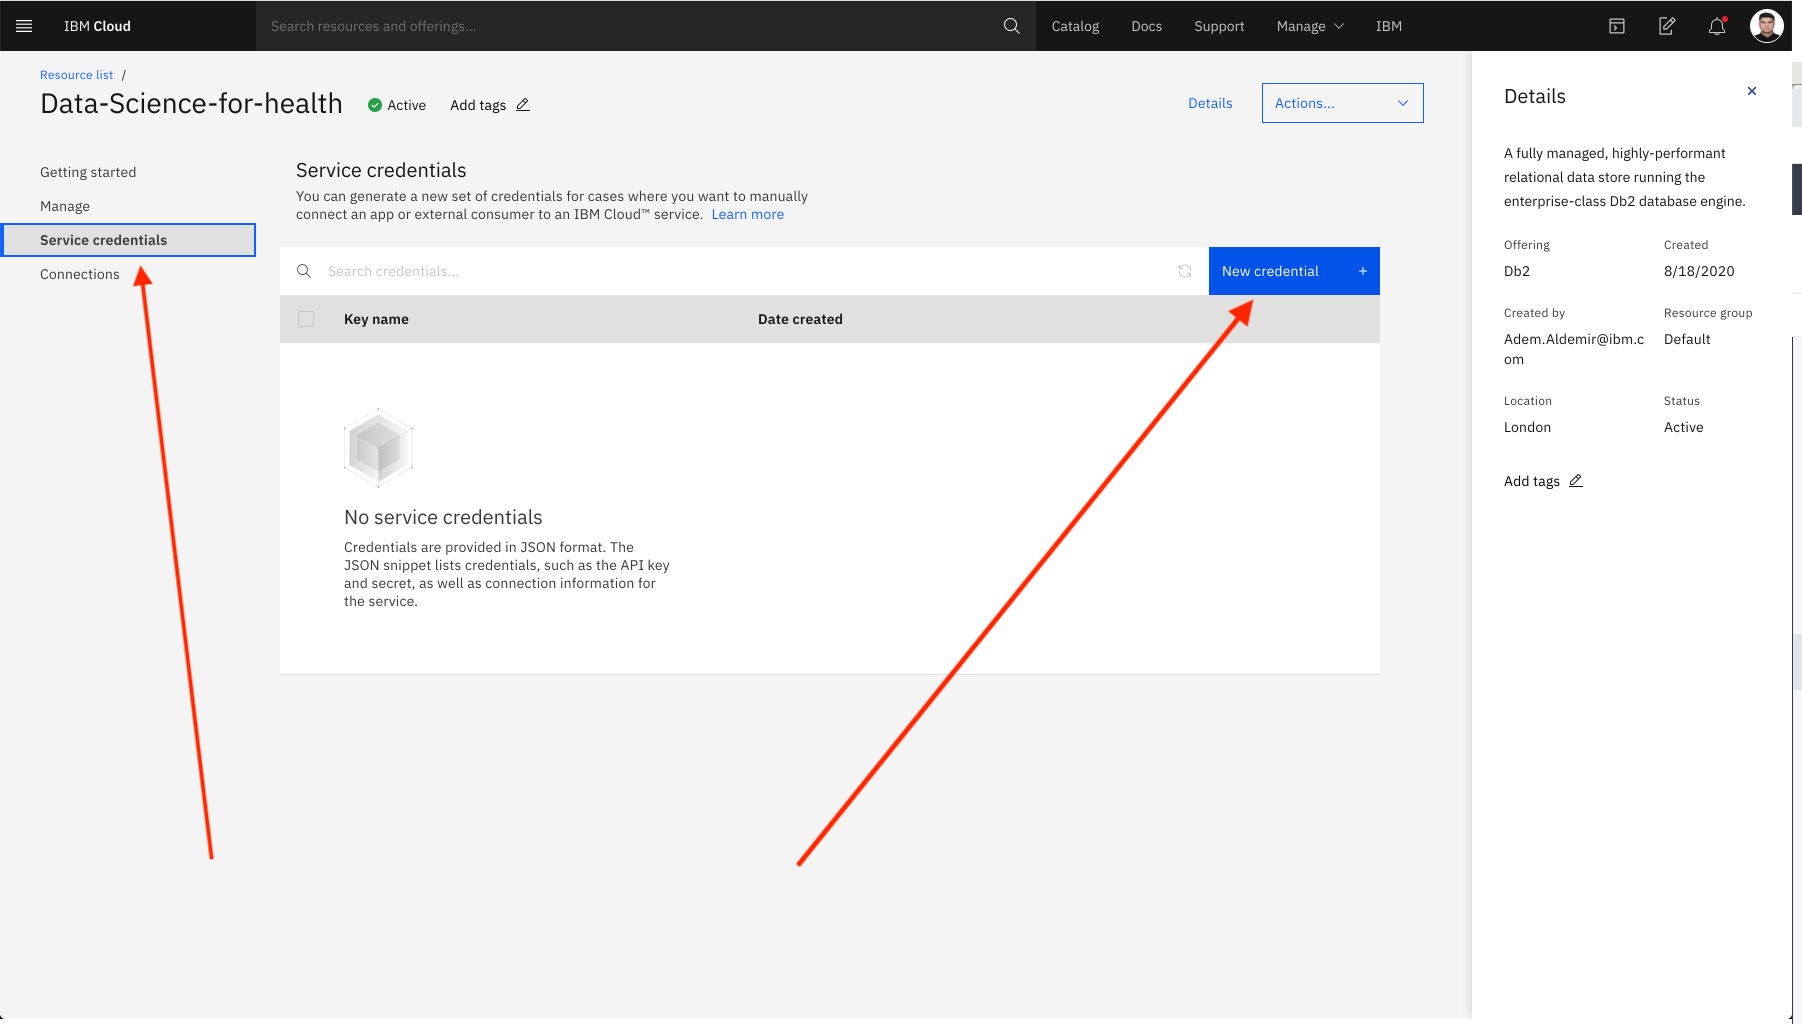
Before we load data to database, we need to first create credentials for our database so both that Watson Studio can connect to it and we can learn .
- Click on
Service Credentialson the left hand side. - Click on
New Credentialsand thenAdd. Make sure to save the credentials for later use.
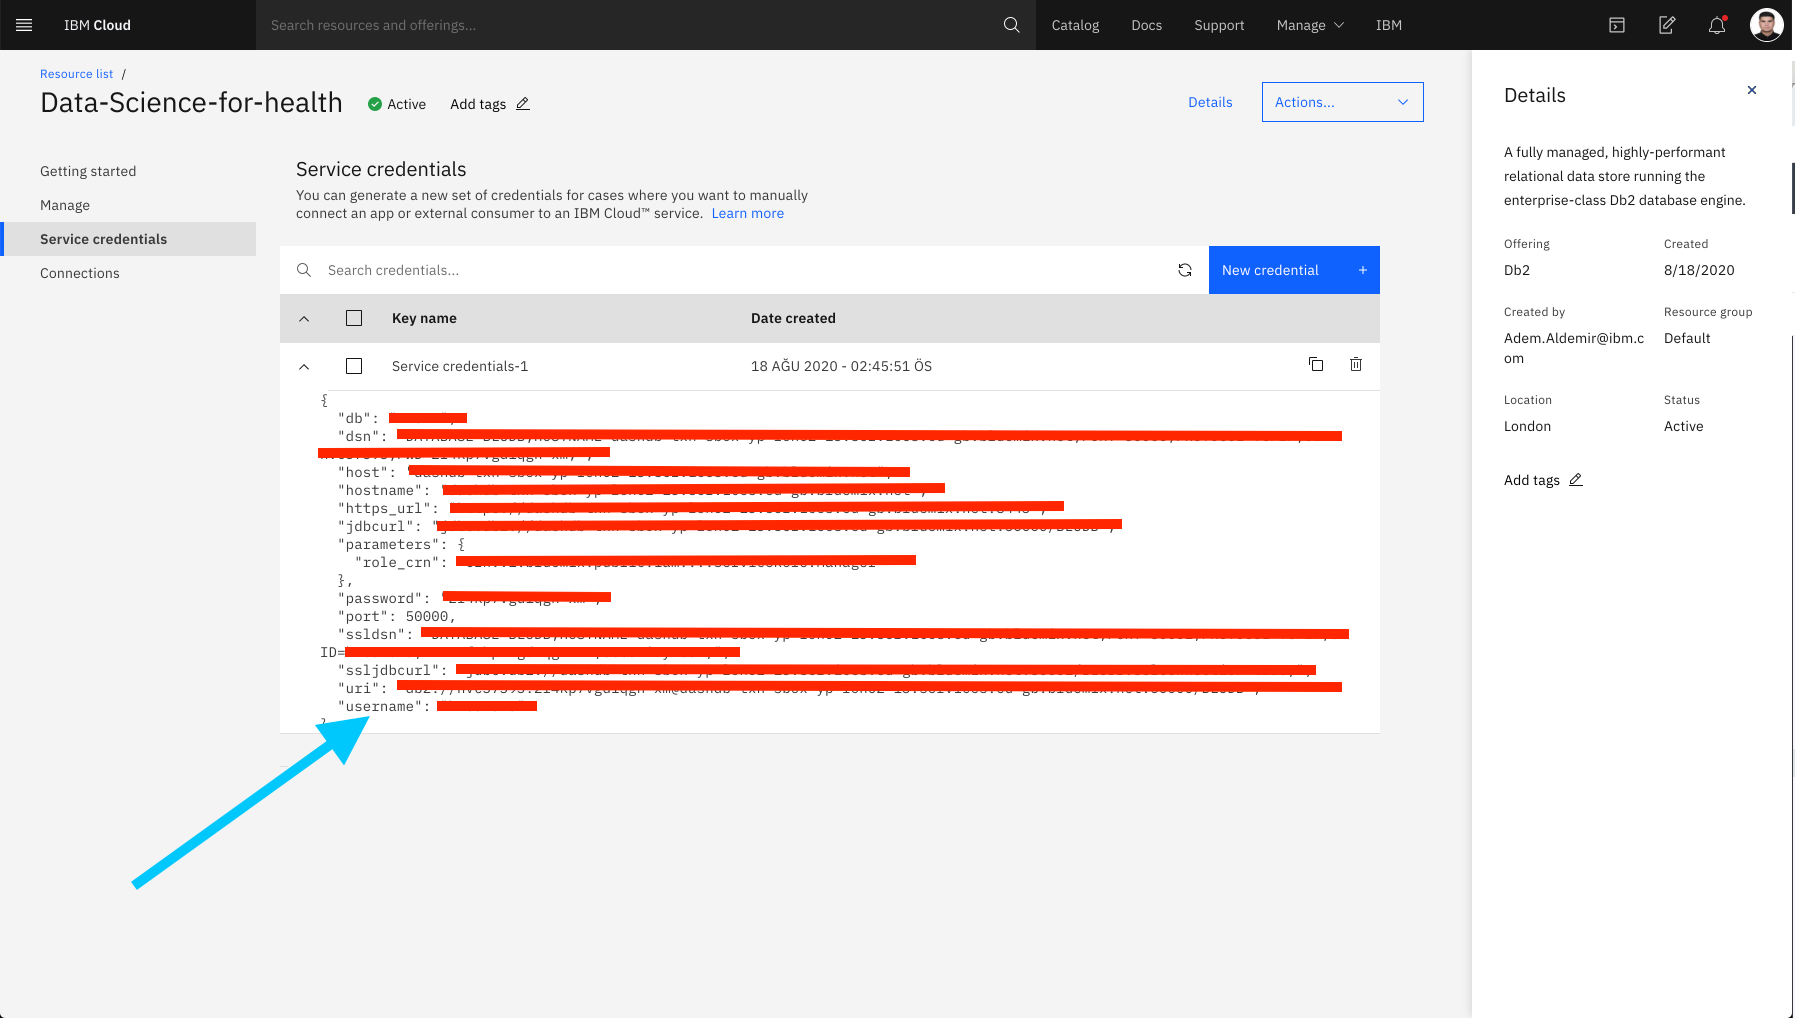
The key information that is important for us is:
HOSTNAMEUIPWDDATABASEUSERNAME⭐️
The important part here is, for now: We will use the username at the bottom of the service credentials you created when uploading data to db2. Notice ! The name of the DB2 scheme where you will install Data should be the
usernamename assigned specifically for you.
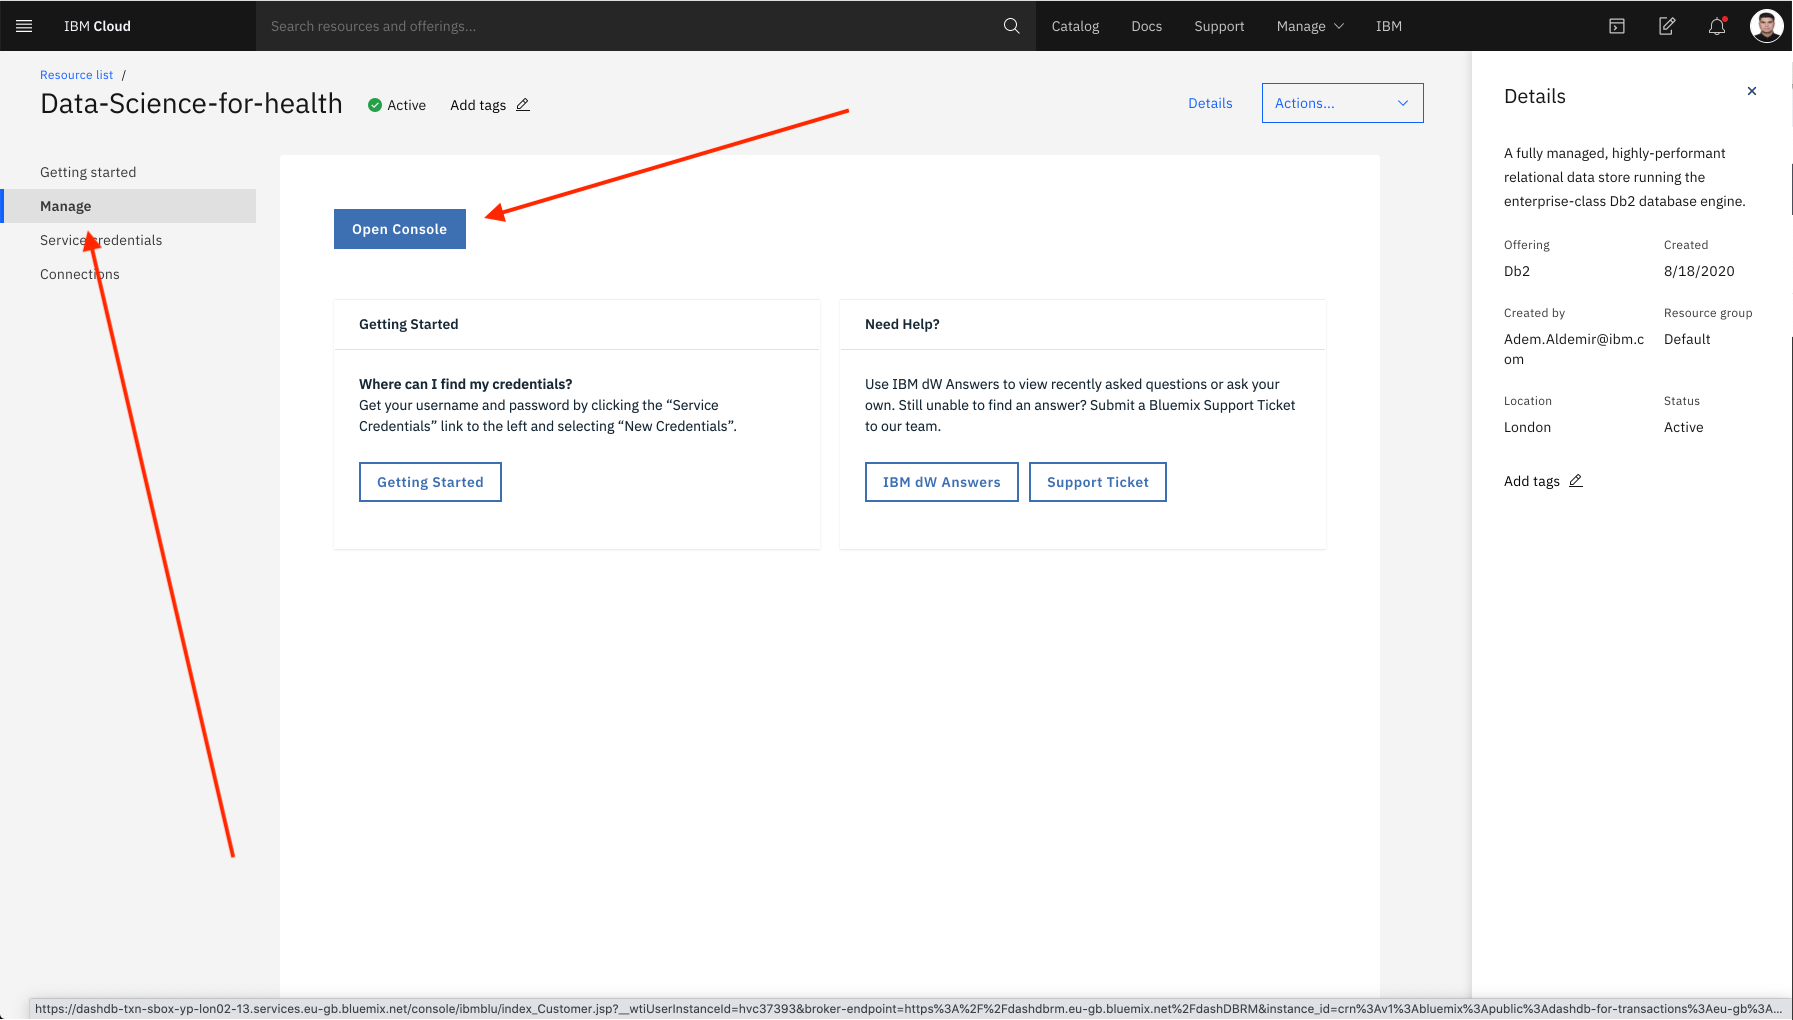
- Click on
Open Consolebutton under theManageon the left side andOpen Consolebutton will direct you to the Db2 on Cloud Console.
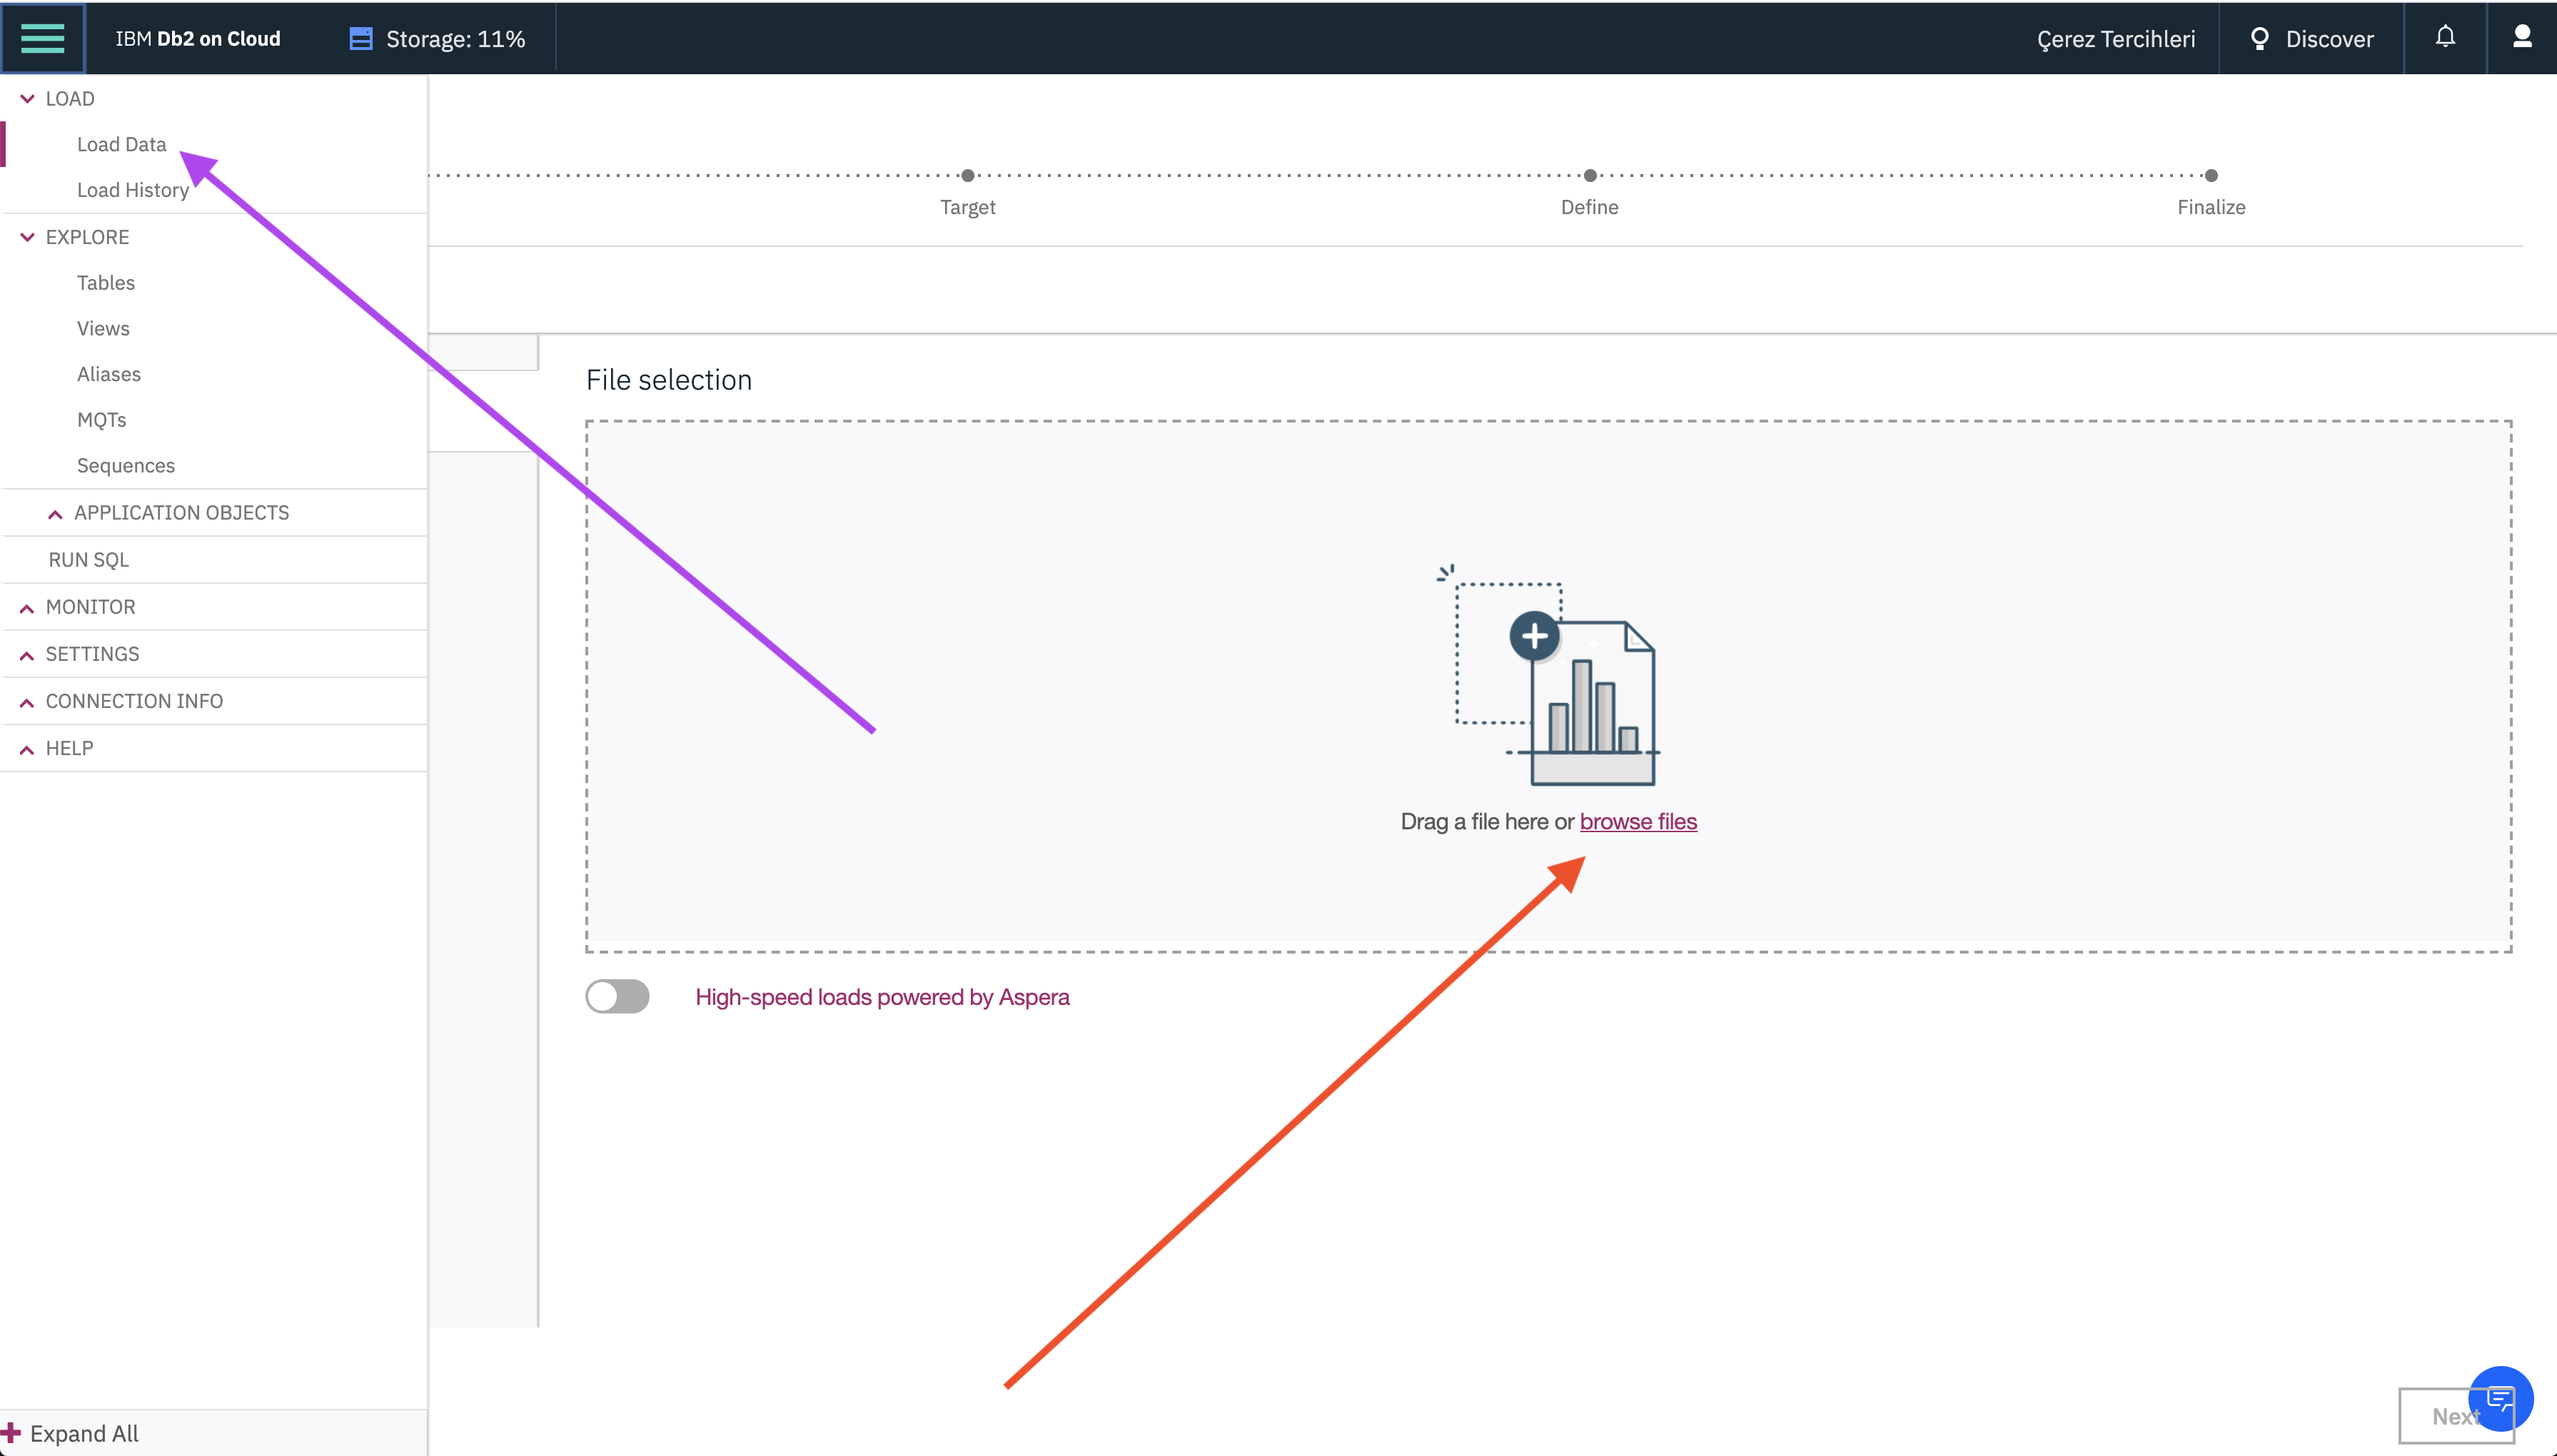
- Click on
Loadunder the Hamburger menu. - Click on
browse filesand selectdiabetes.csvfrom your computer. - Click
Next.
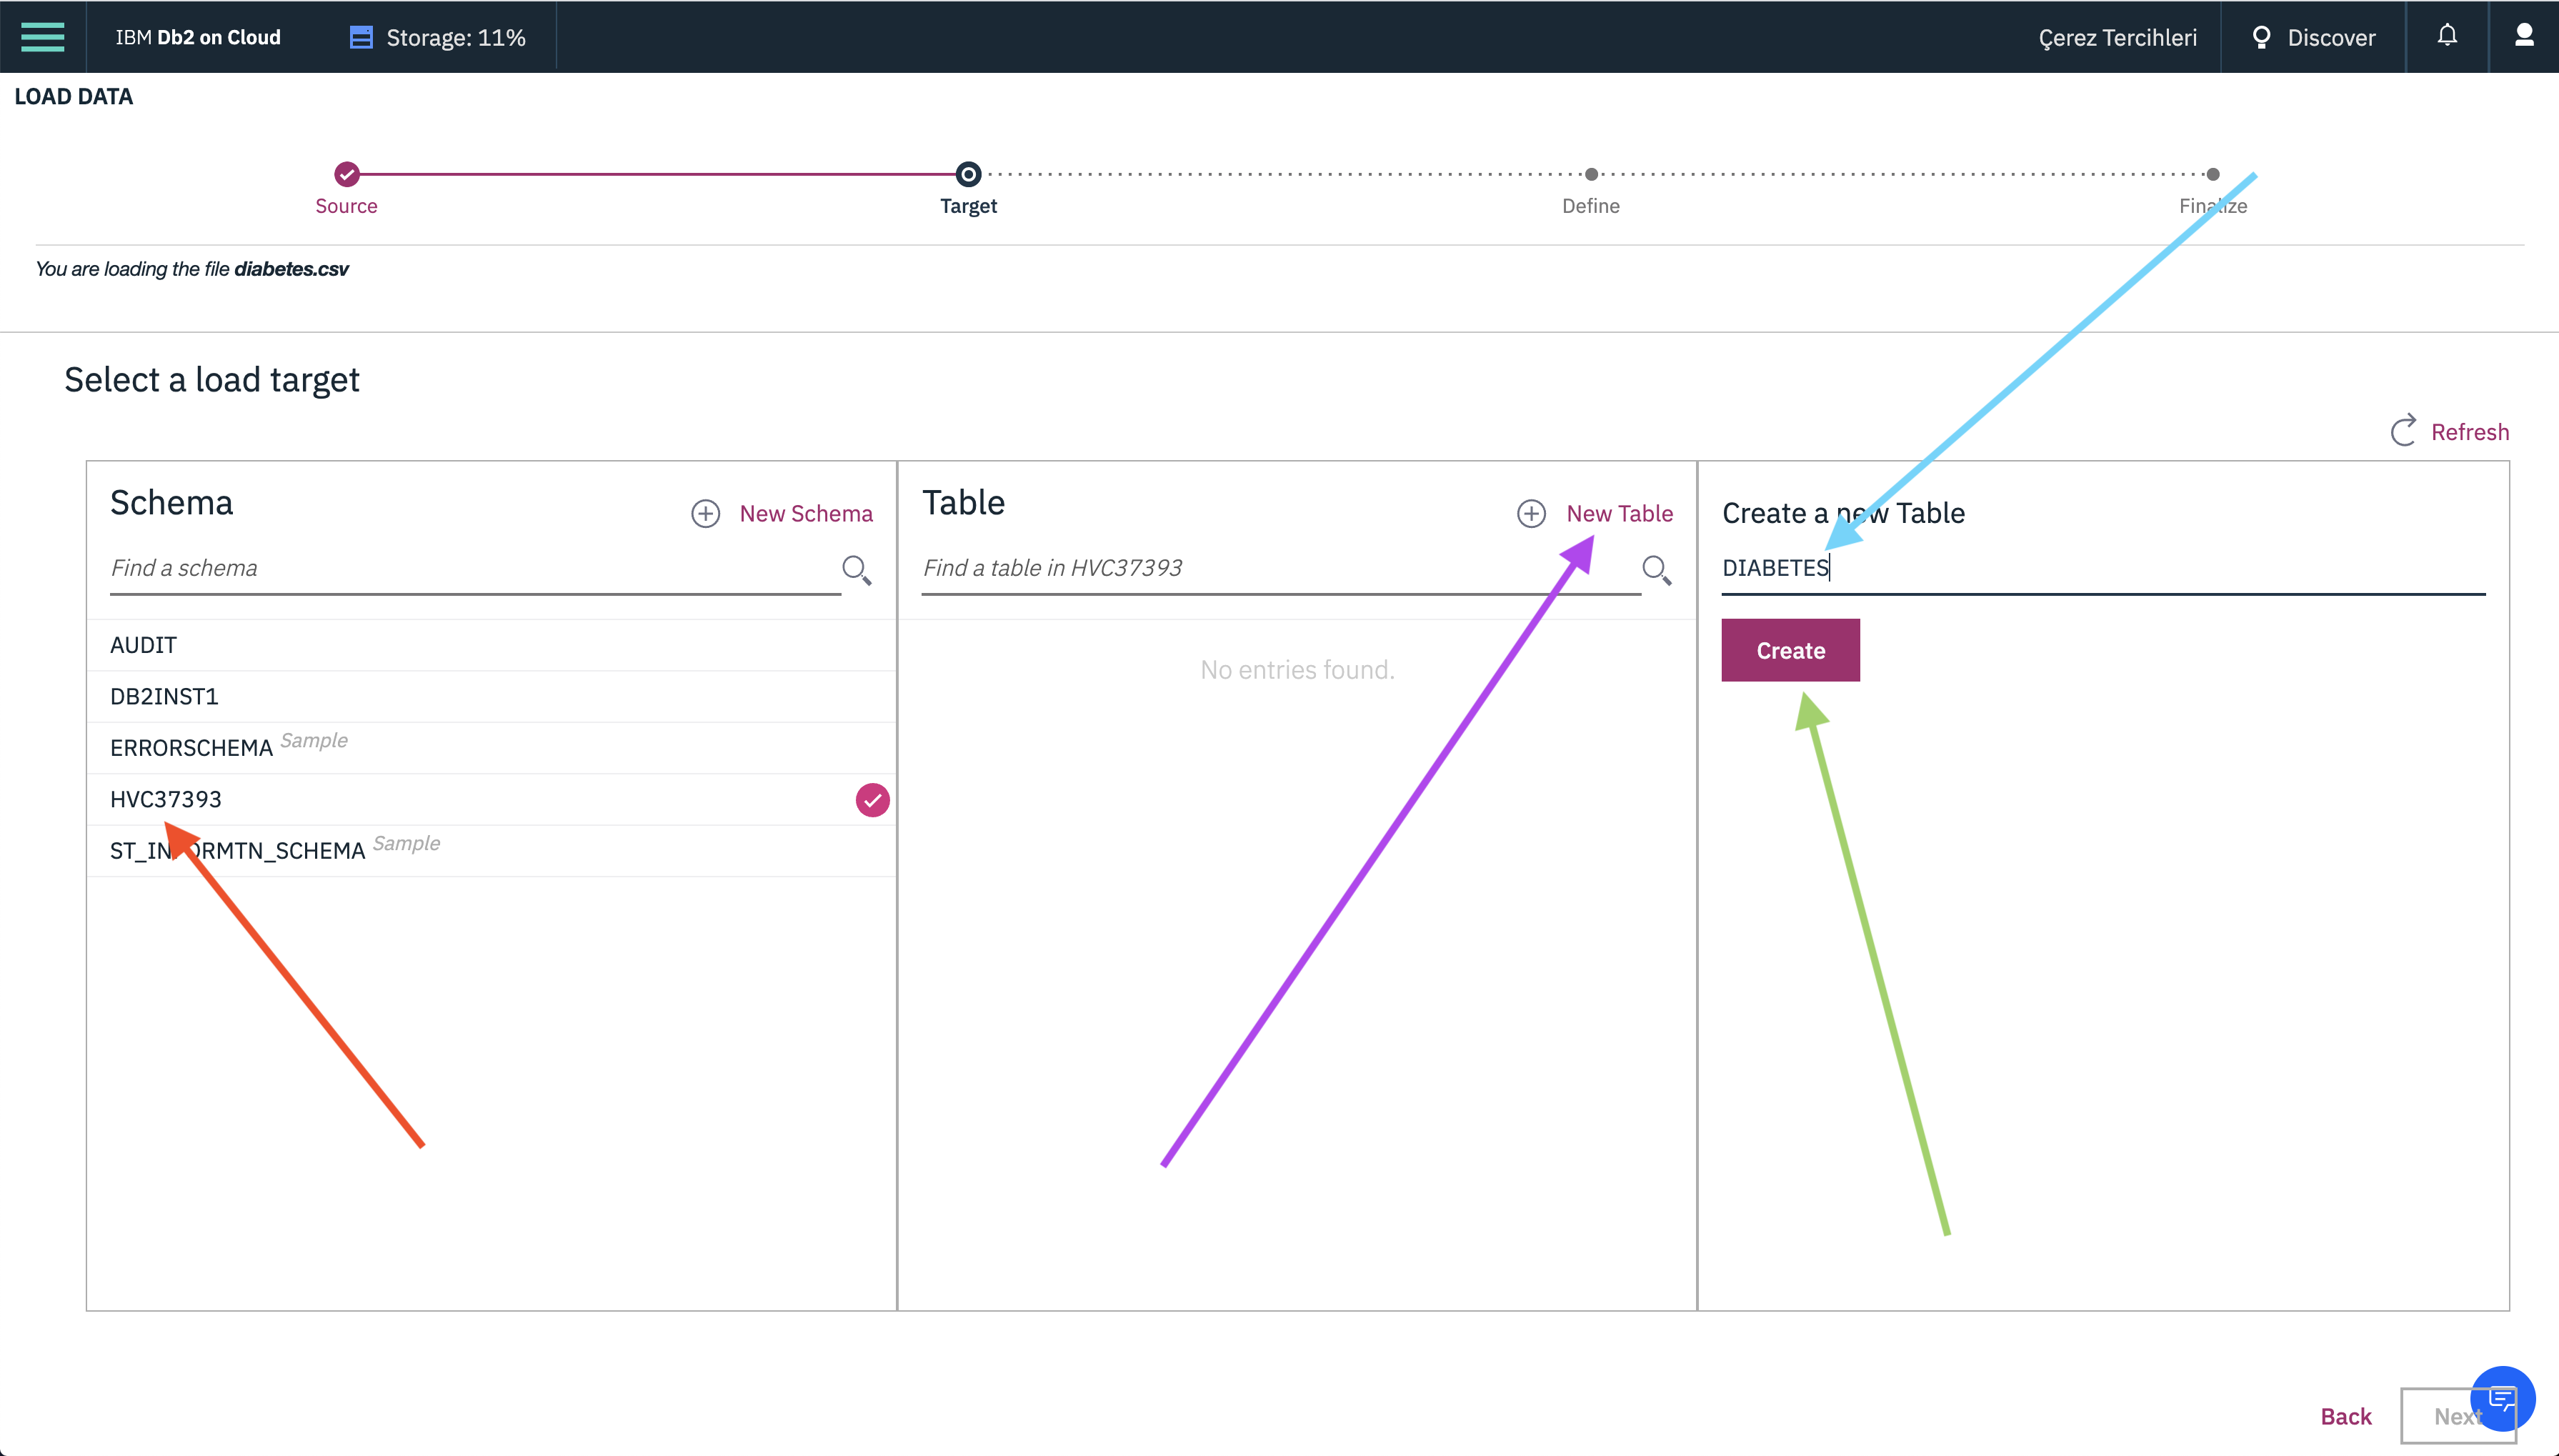
- The next step is to decide where our data will be stored. Click on the scheme with the same name as your DB2 username, then select
New Table. - Enter
DIABETESas our table name and selectCreateand finallyNext. - Make sure the column names and datatypes are correct, and click
Next. - Click
Begin Load.
Once the job has been completed, our data has finally been loaded into our database.

Setting up our project enivorment can be broken down in the follow steps.
- Creating Watson Studio service
- Creating a Watson Studio project
- Connect Db2 on Cloud with Watson Studio
- Go to Catalog and search for
Watson Studioand click on that option.
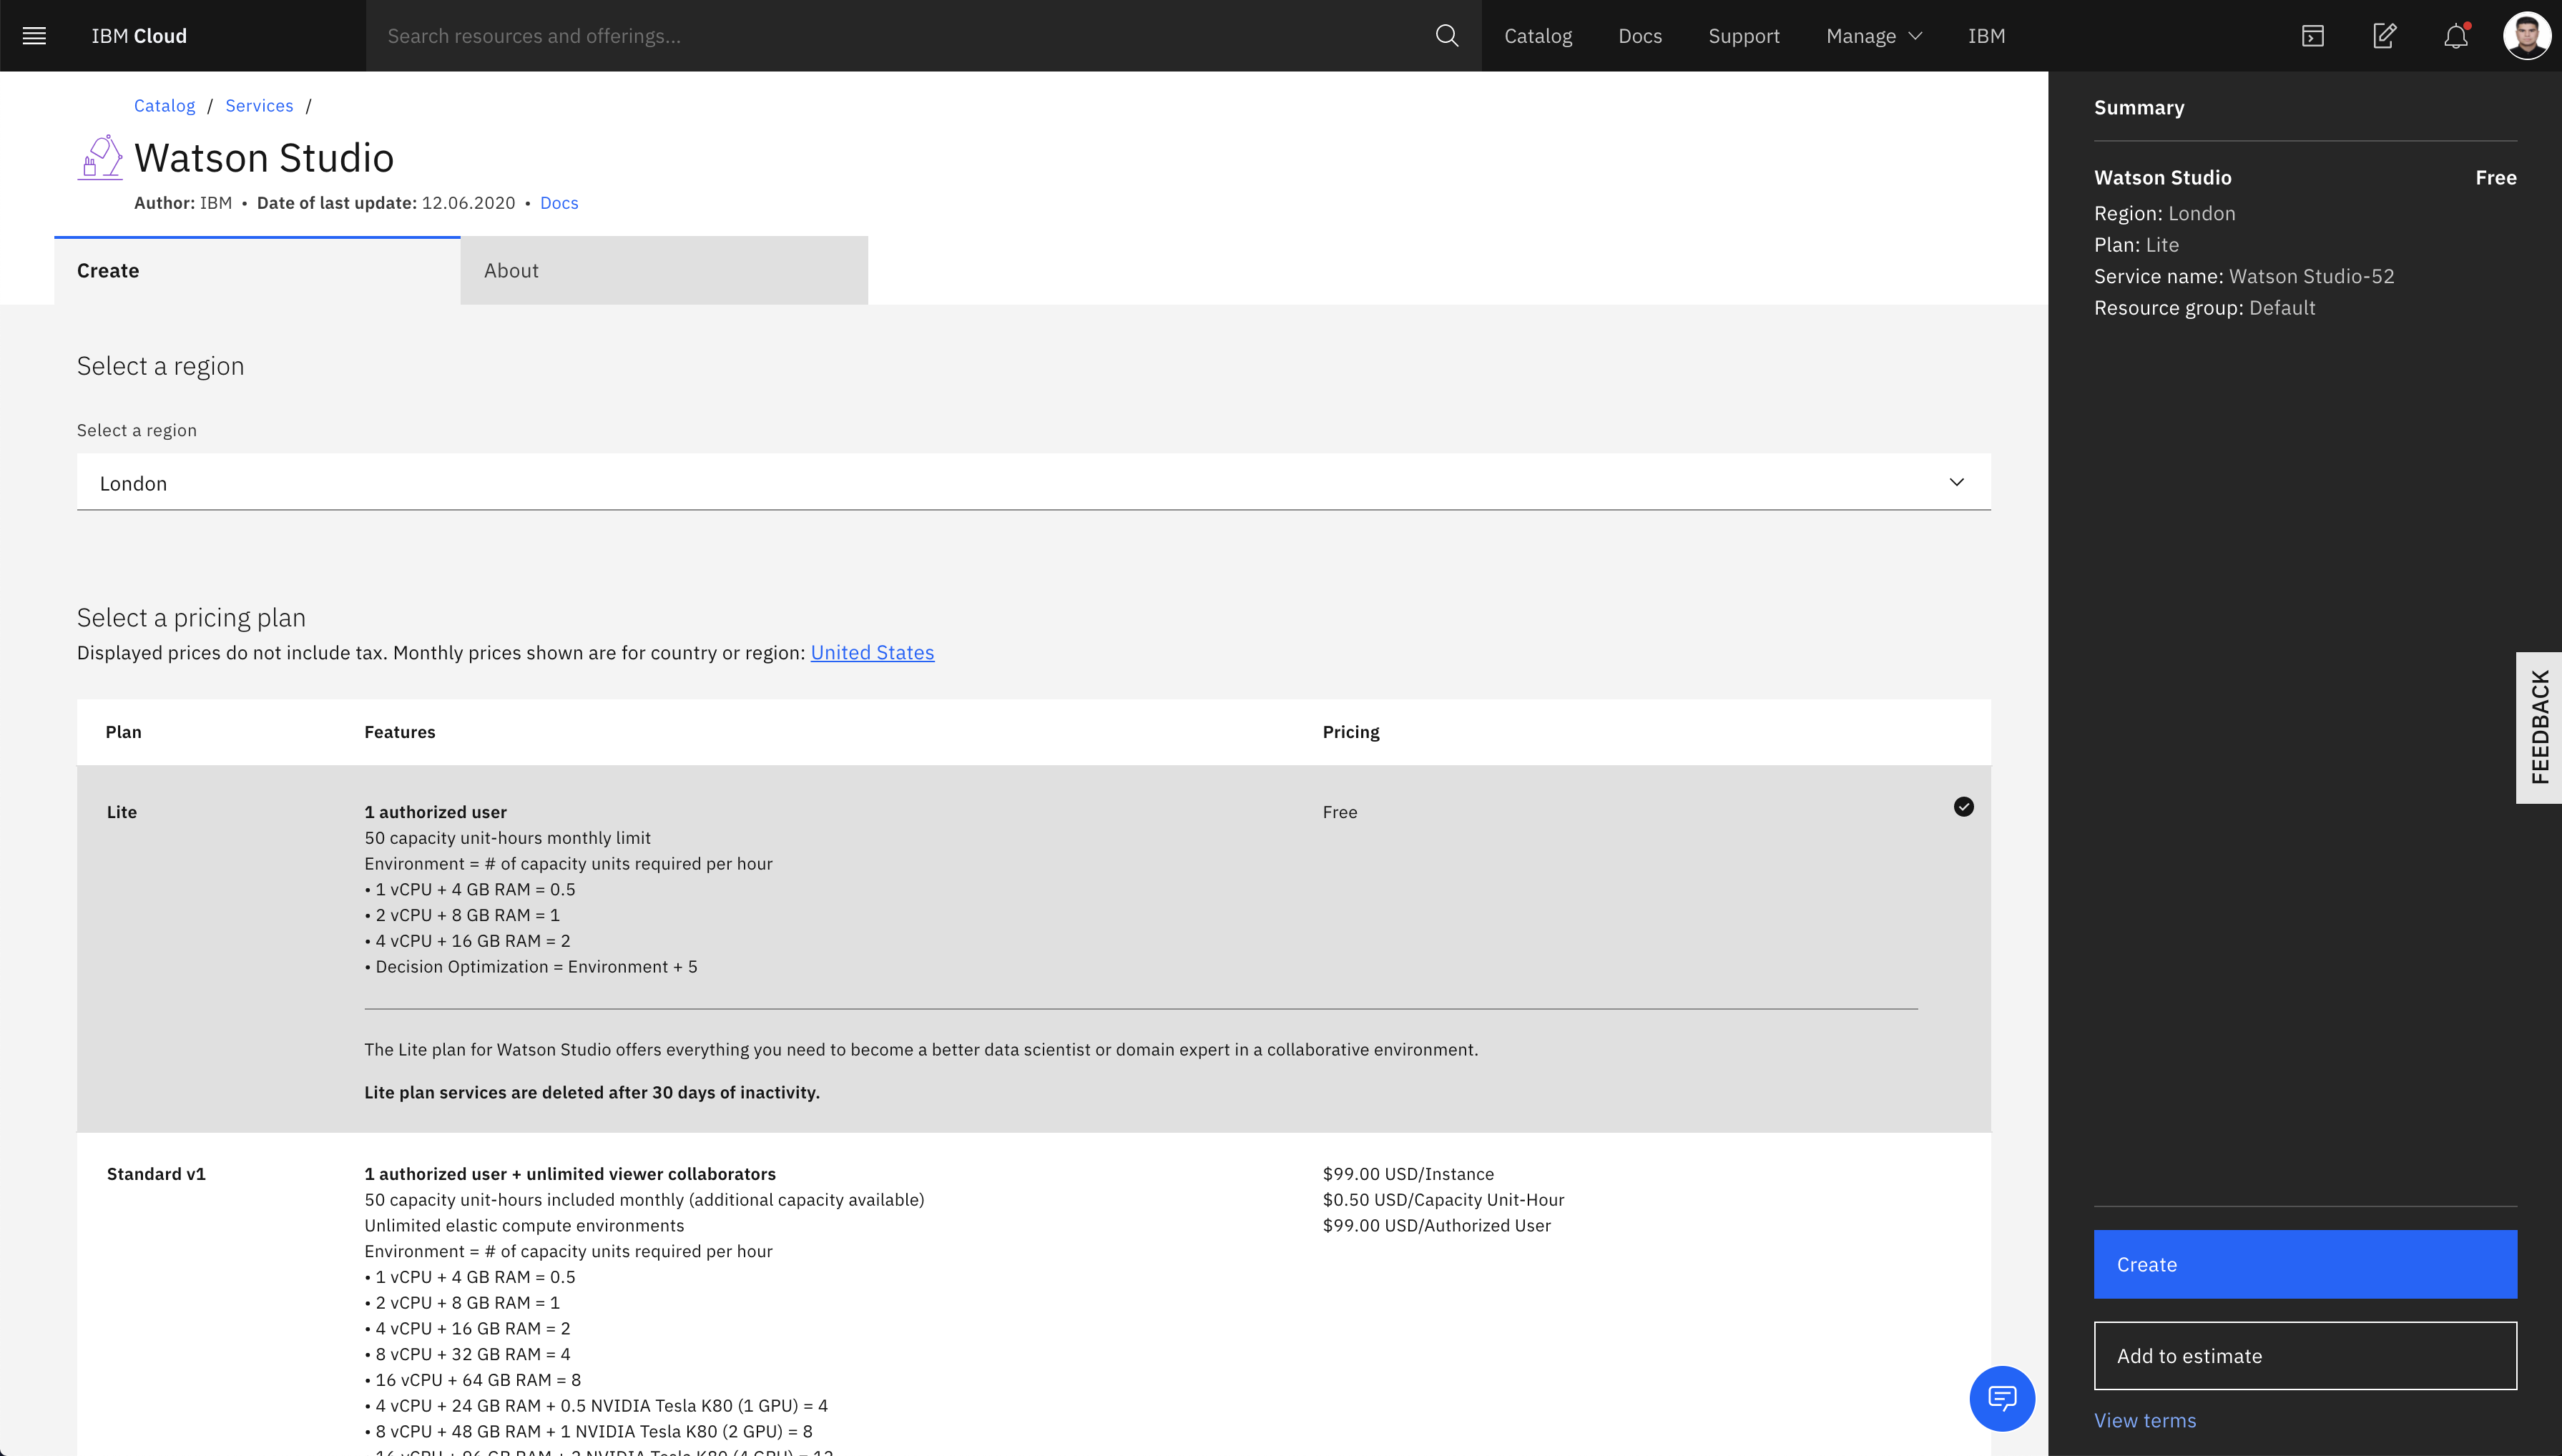
- Fill out all the fields and choose 'Lite' plan.
- Click
Createand thenGet Started.
This will redirect you to the Watson Studio homepage.
Hey! 🧞♂️ Welcome to the new interface of IBM Cloud Pak for Data. ❤️

Let's now create and setup our project.
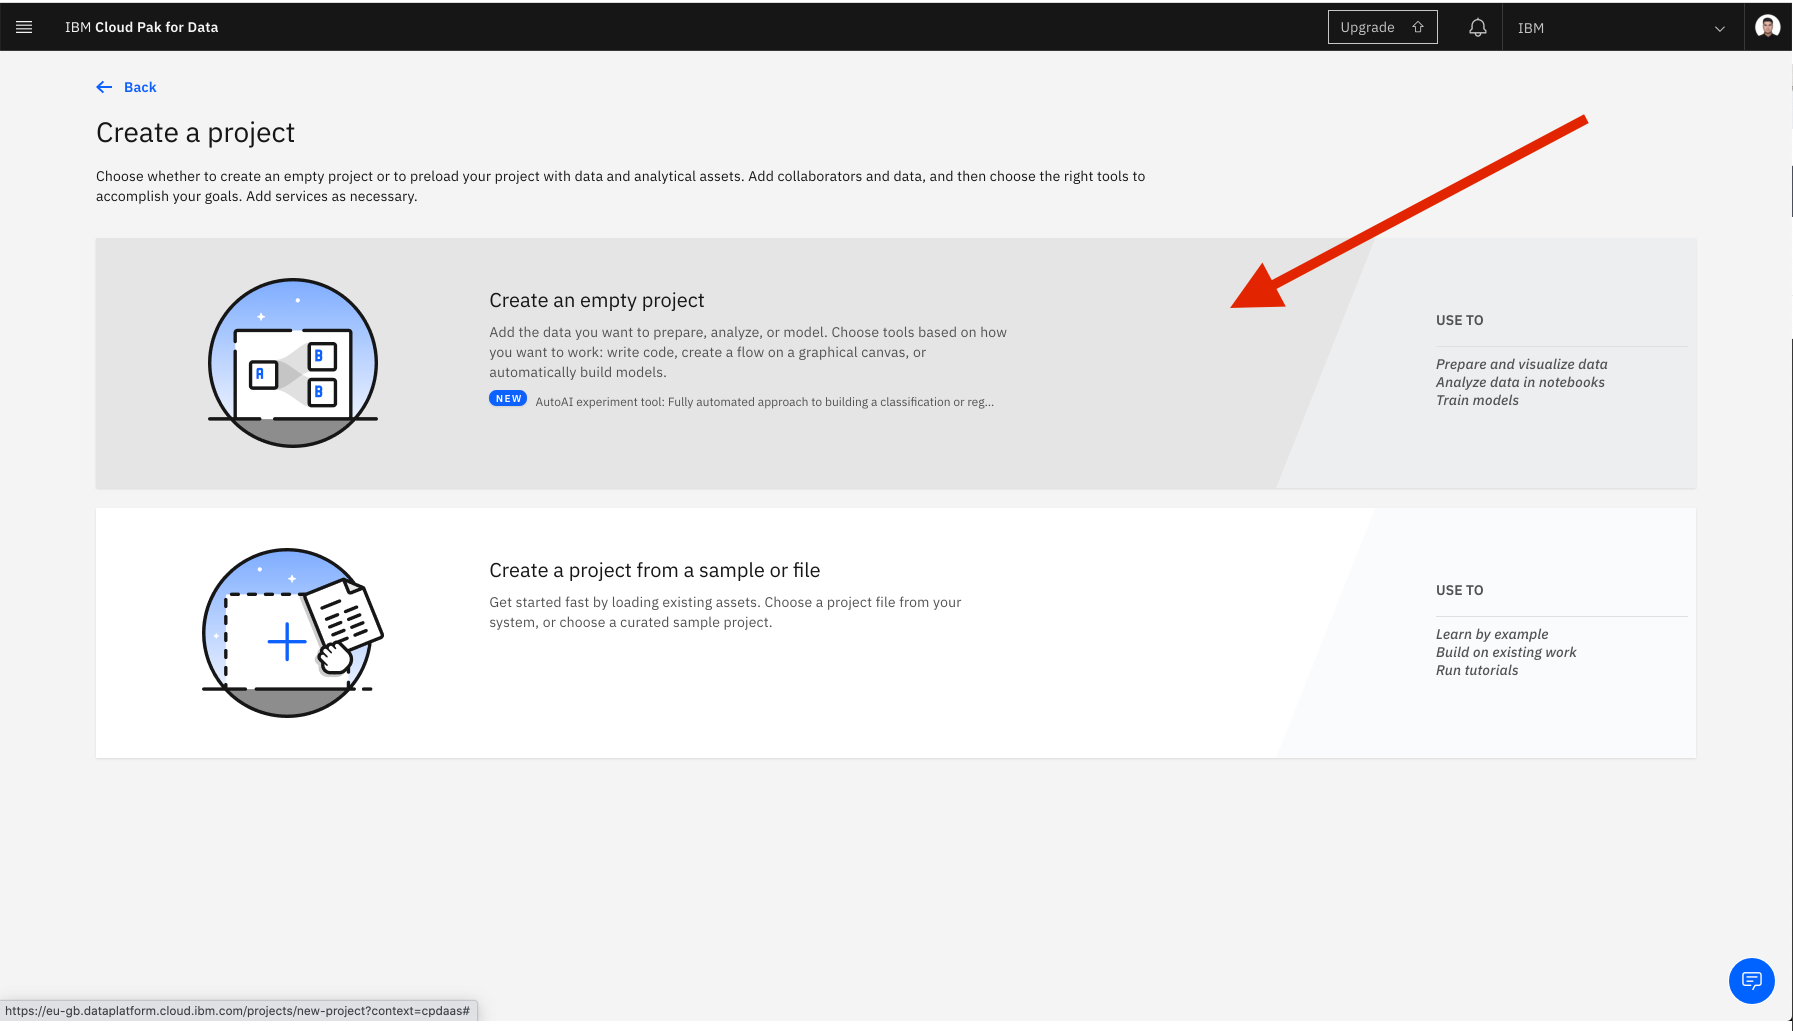
- Select
Create a Projectand then selectStandard. - If you haven't created object storage earlier, go to the bottom of the page and click the link
Cloud Object Storage. Choose theLiteplan and clickCreate. - Go back to the project page and make sure to choose the Cloud Object Storage that you have created earlier.
- Fill out the project details and click
Create.
This will take you to your project dashboard/homepage.
- On the top of the project homepage, select
Add to projectand then clickConnection. - Select
Db2connection option that you created.
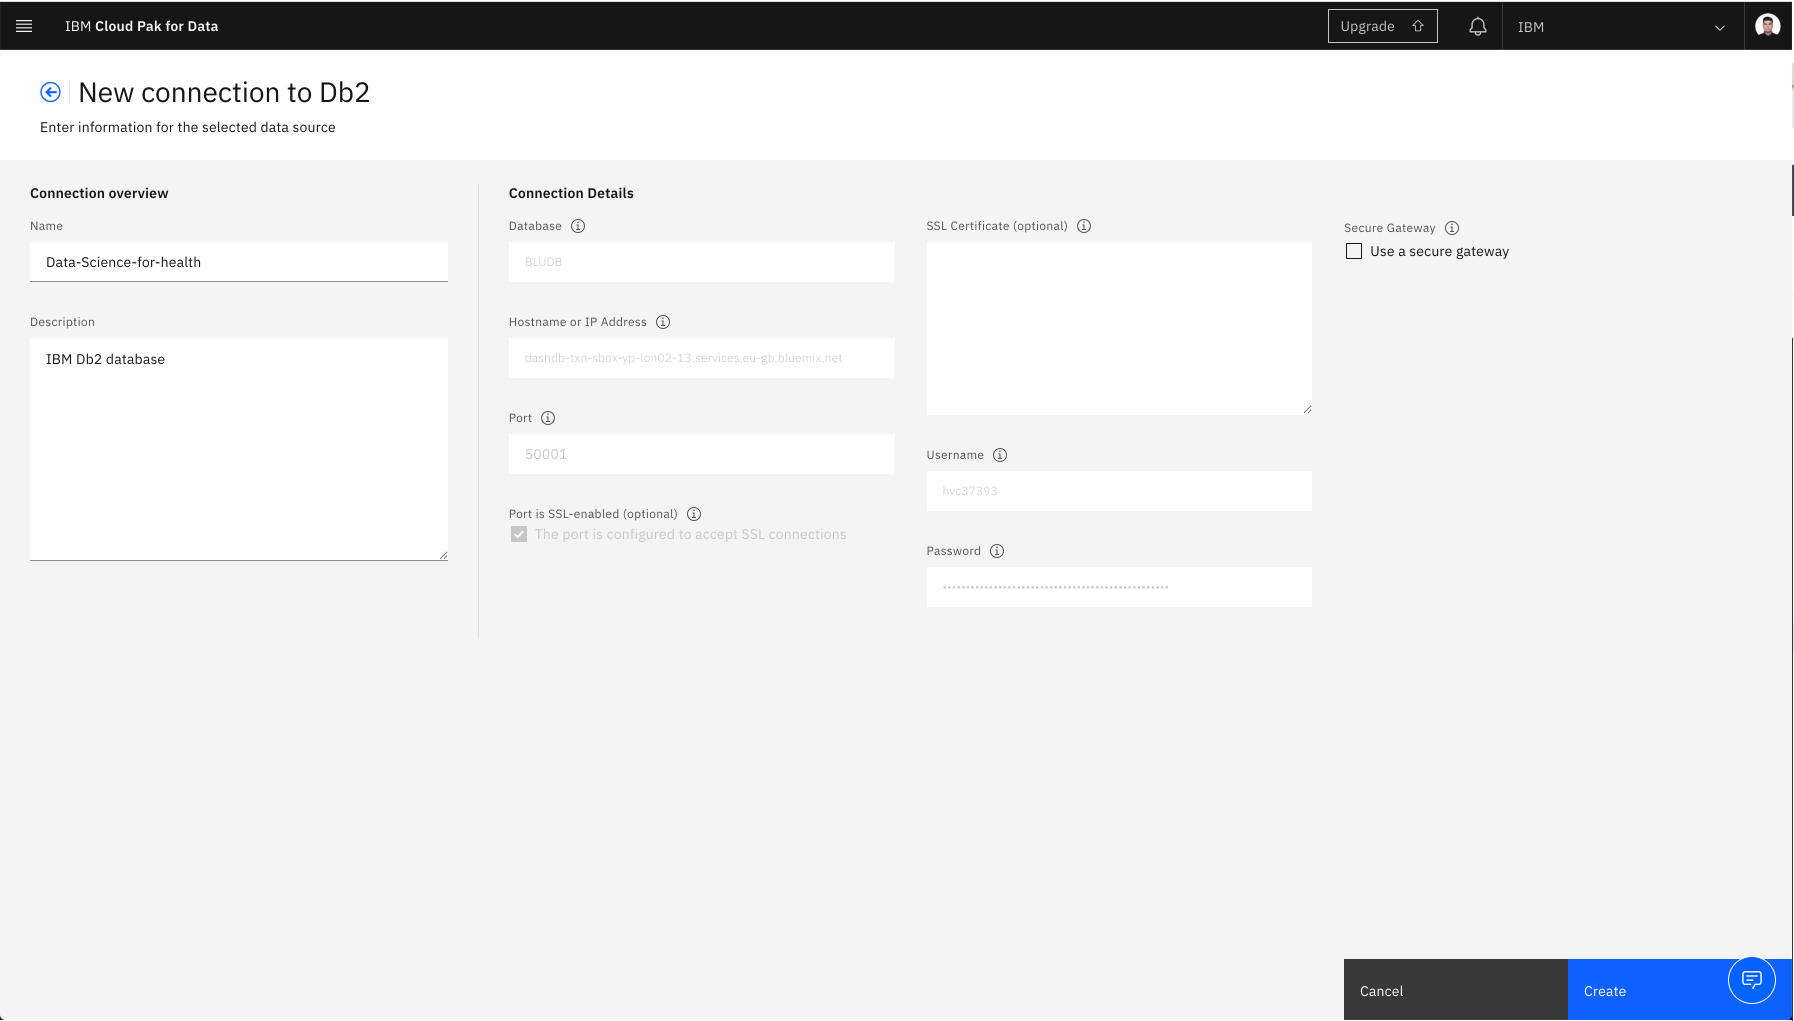
- This will take you to a connection configuration page. Here, we will enter the Db2 credentials that we got from Step 4a. Make sure to use
50000or it can be default value for thePortoption. - Click
Createonce you have entered all the required information.
This will redirect you to the asset page for this project, and you should see your new Db2 connection as one of the assets.
Now that we have our database connected to our project, we need to also connect our data that is stored in our database to the project as well.
- On the top of the project homepage, select
Add to projectand then clickConnected data. - Select
Select Source.
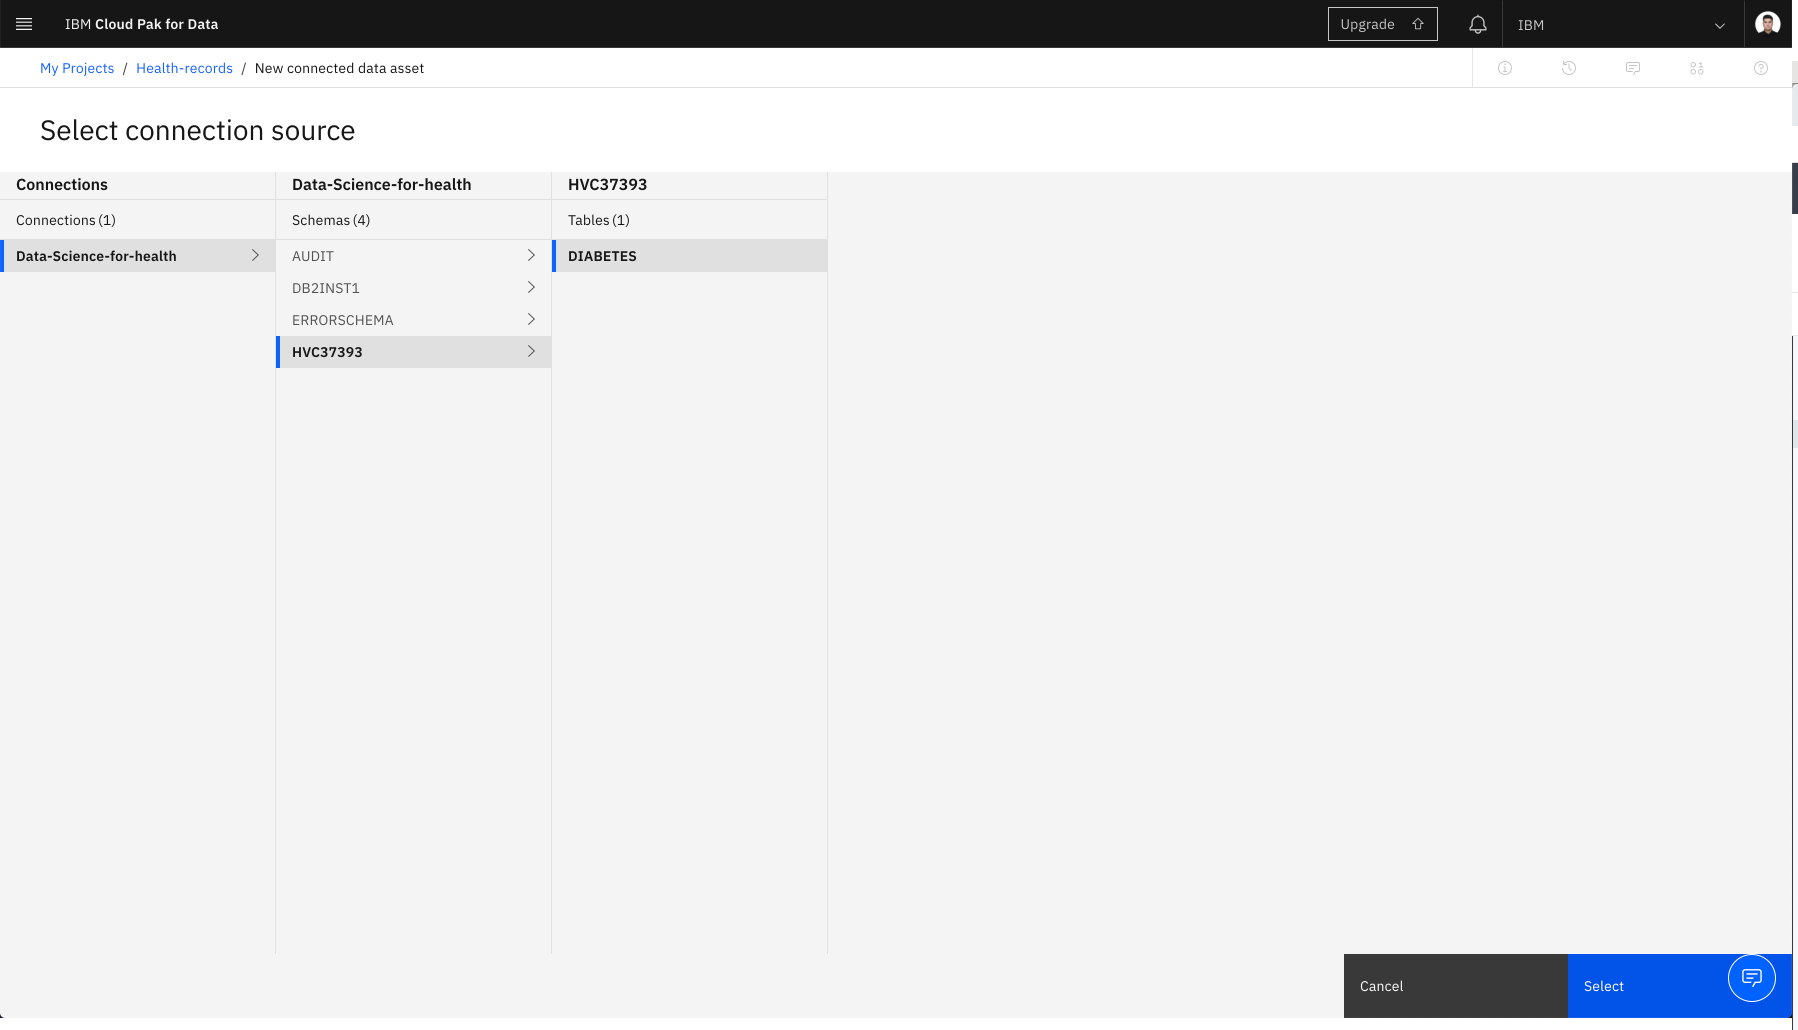
- Select our database, scheme and finally our table
DIABETES. - Click
Select. - Let's name this connected data as
DIABETESand then clickCreate.
We have finally created our Watson Studio service. Within that, created a project where our database and data are connected. We can now finally start coding and building our Machine Learning models on Jupyter Notebook!
- On the top of the project homepage, select
Add to projectand then clickNotebook.
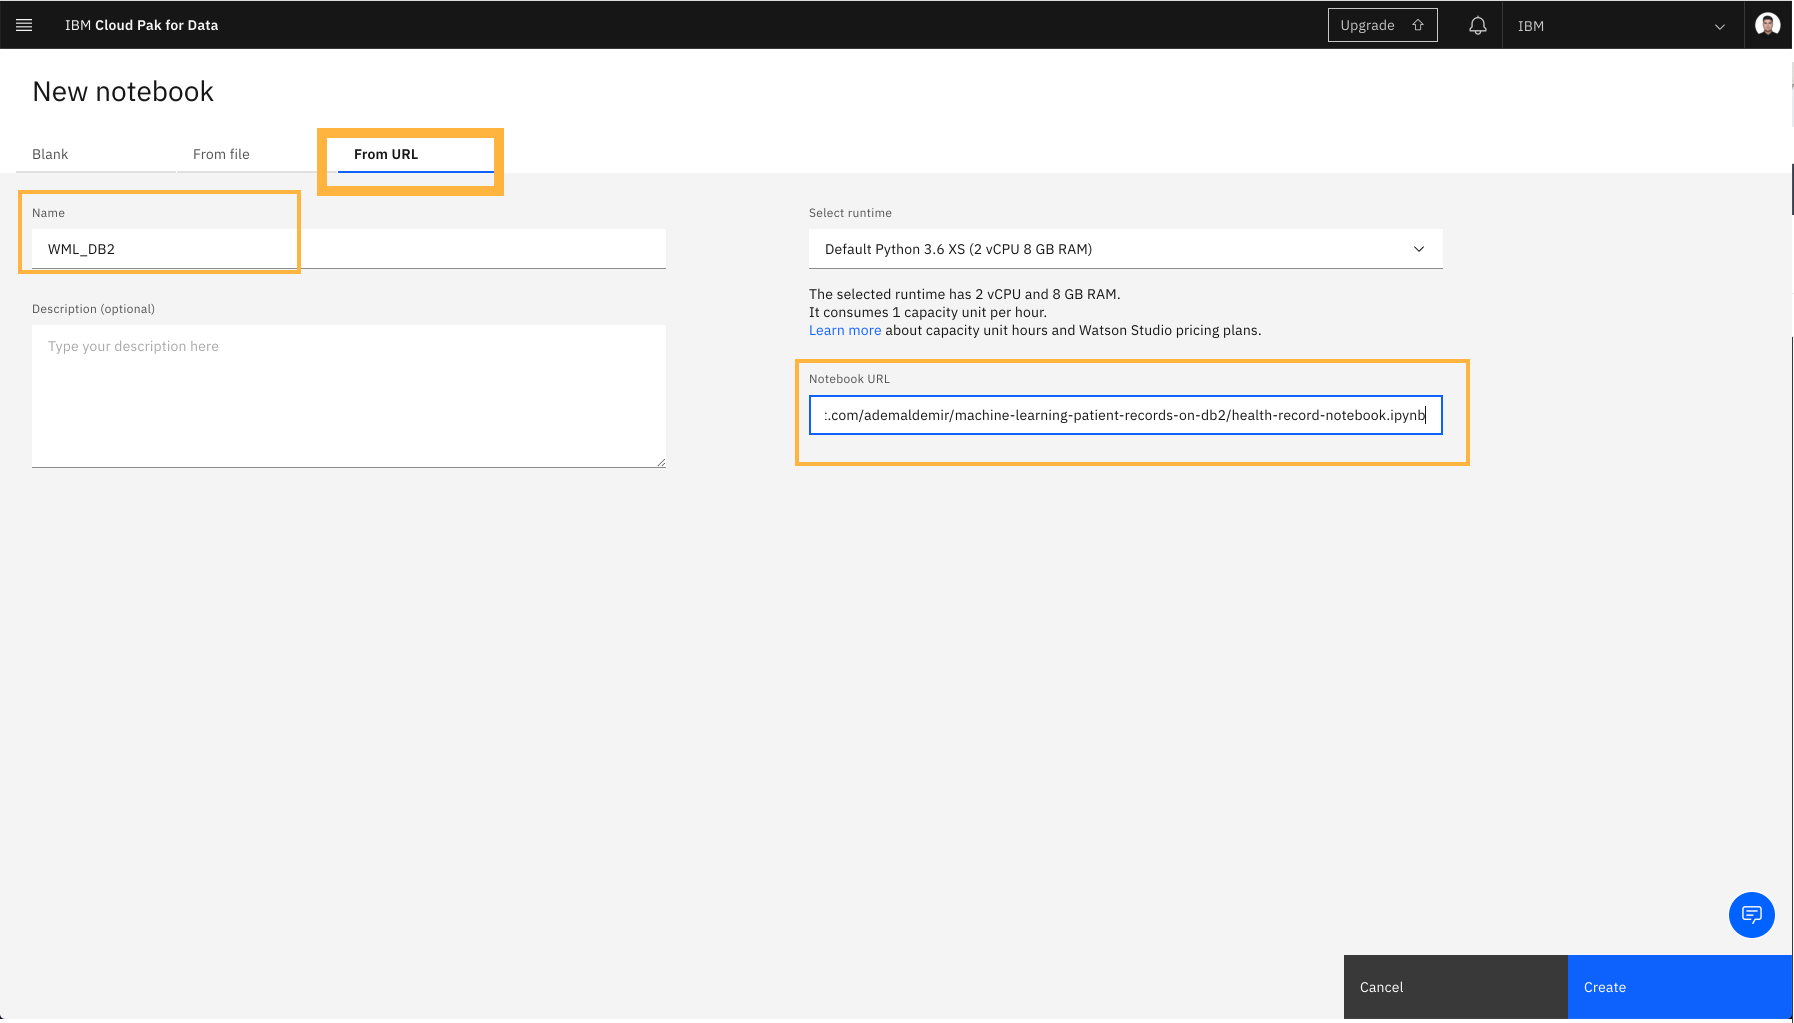
- Fill out the notebook details
- Select
From URLoption from the tab and paste the following link to Notebook URL field:https://raw.githubusercontent.com/ademaldemir/machine-learning-patient-records-on-db2/master/health_record_notebook.ipynb
Before we run the notebook, we need to create Watson Machine Learning instance so that we can deploy the model to Watson Machine Learning on IBM Cloud. Here are the steps:
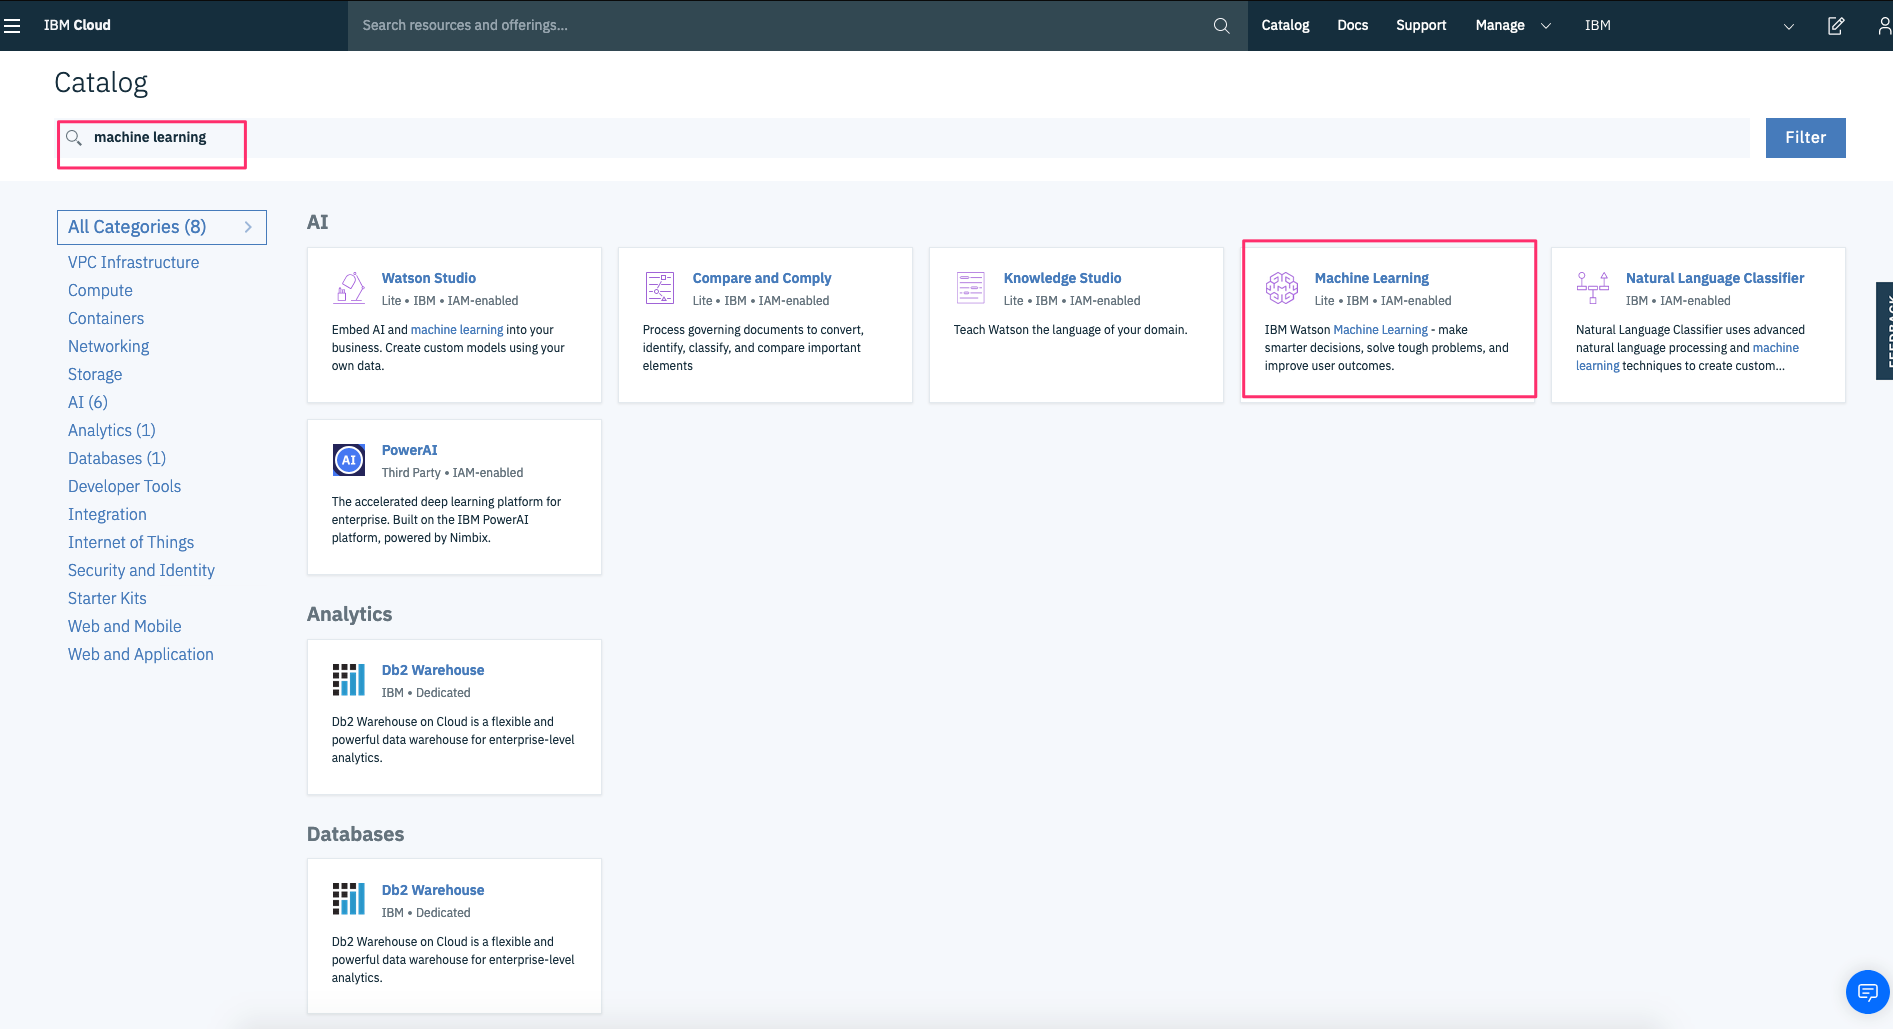
- Go to IBM cloud dashboard and click
Create Resource - Search for
machine learningand selectMachine Learningservice - Fill out the details, select
Liteplan and clickCreate.
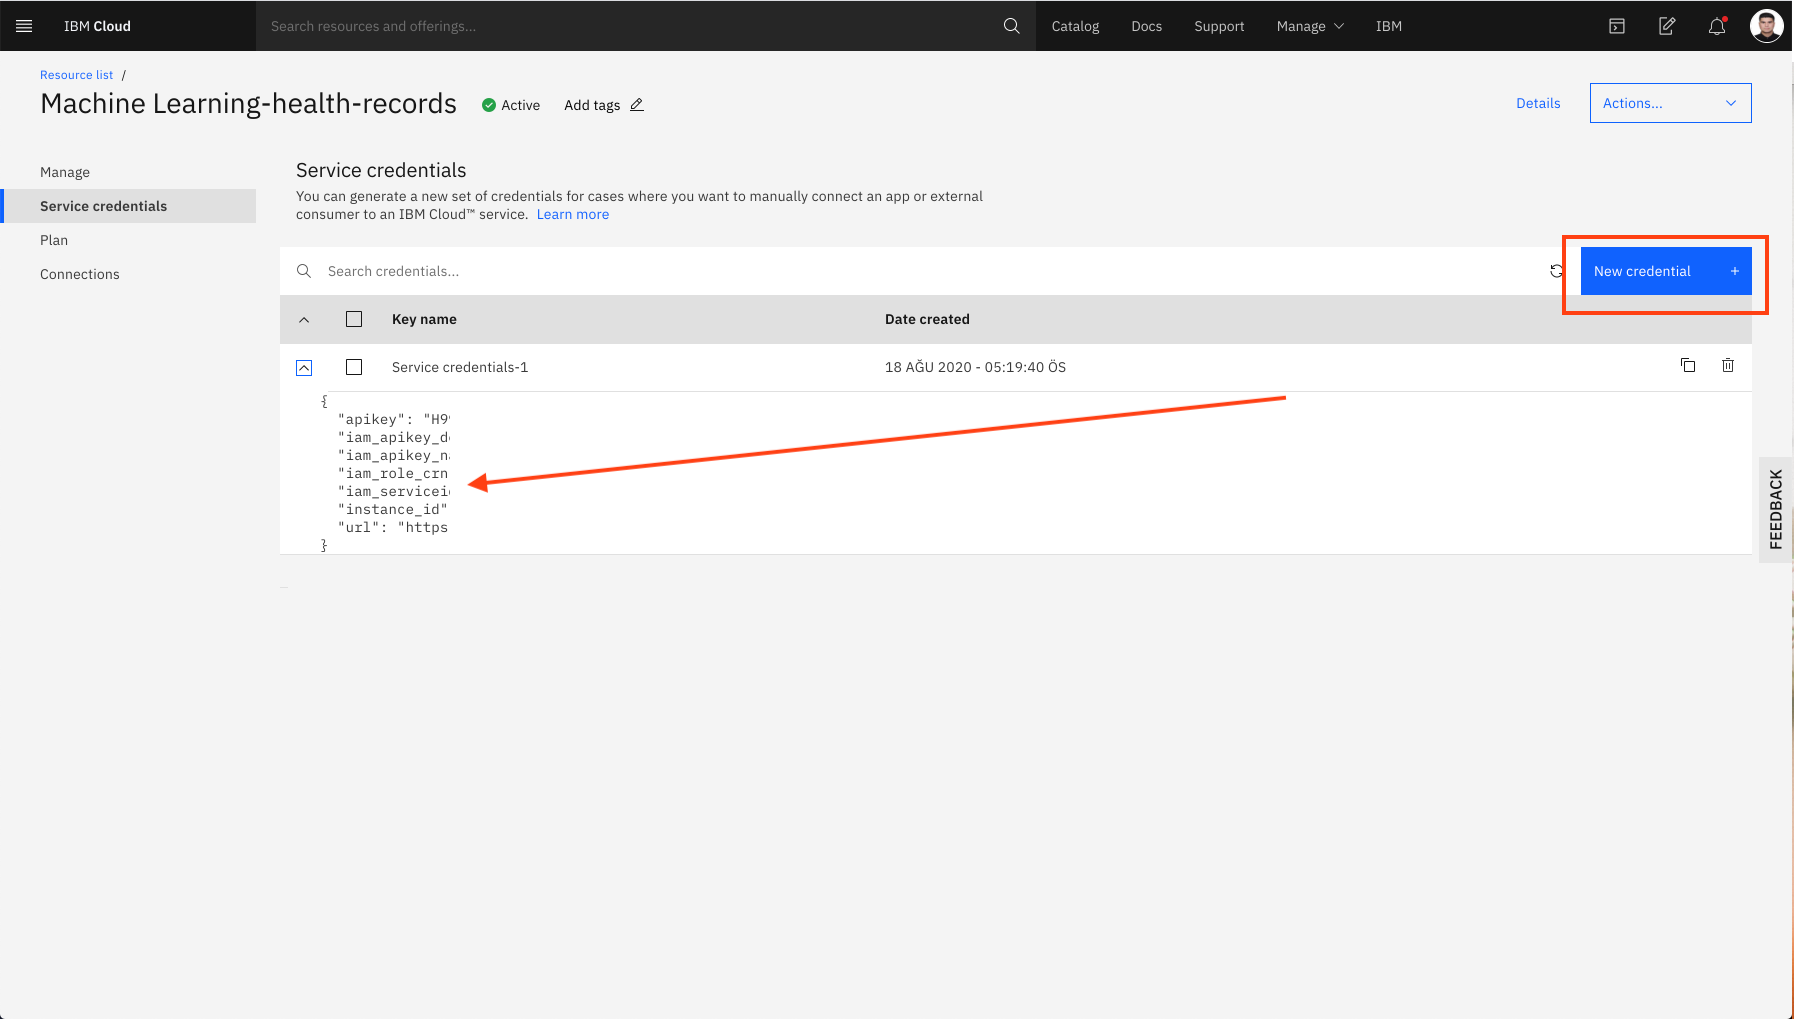
- And finally Create
Service Credentialsas shown below
In the notebook, after the import cell, add cell to create connection as shown below.
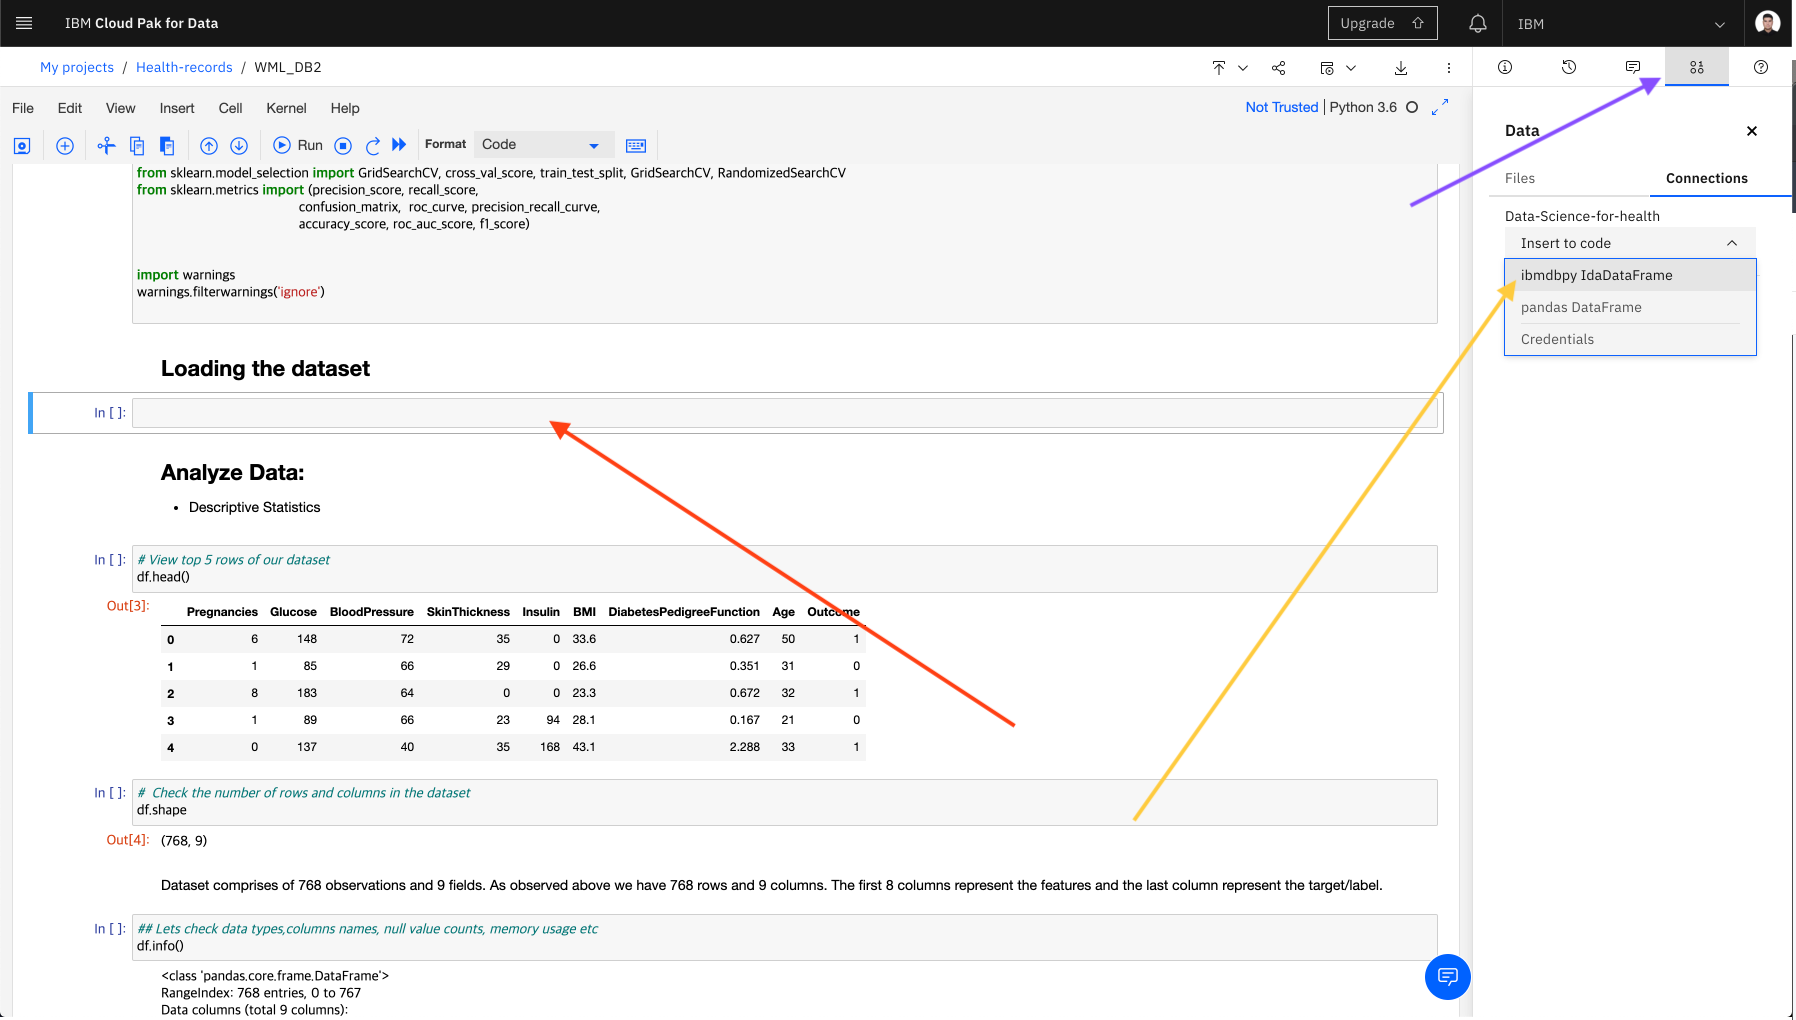
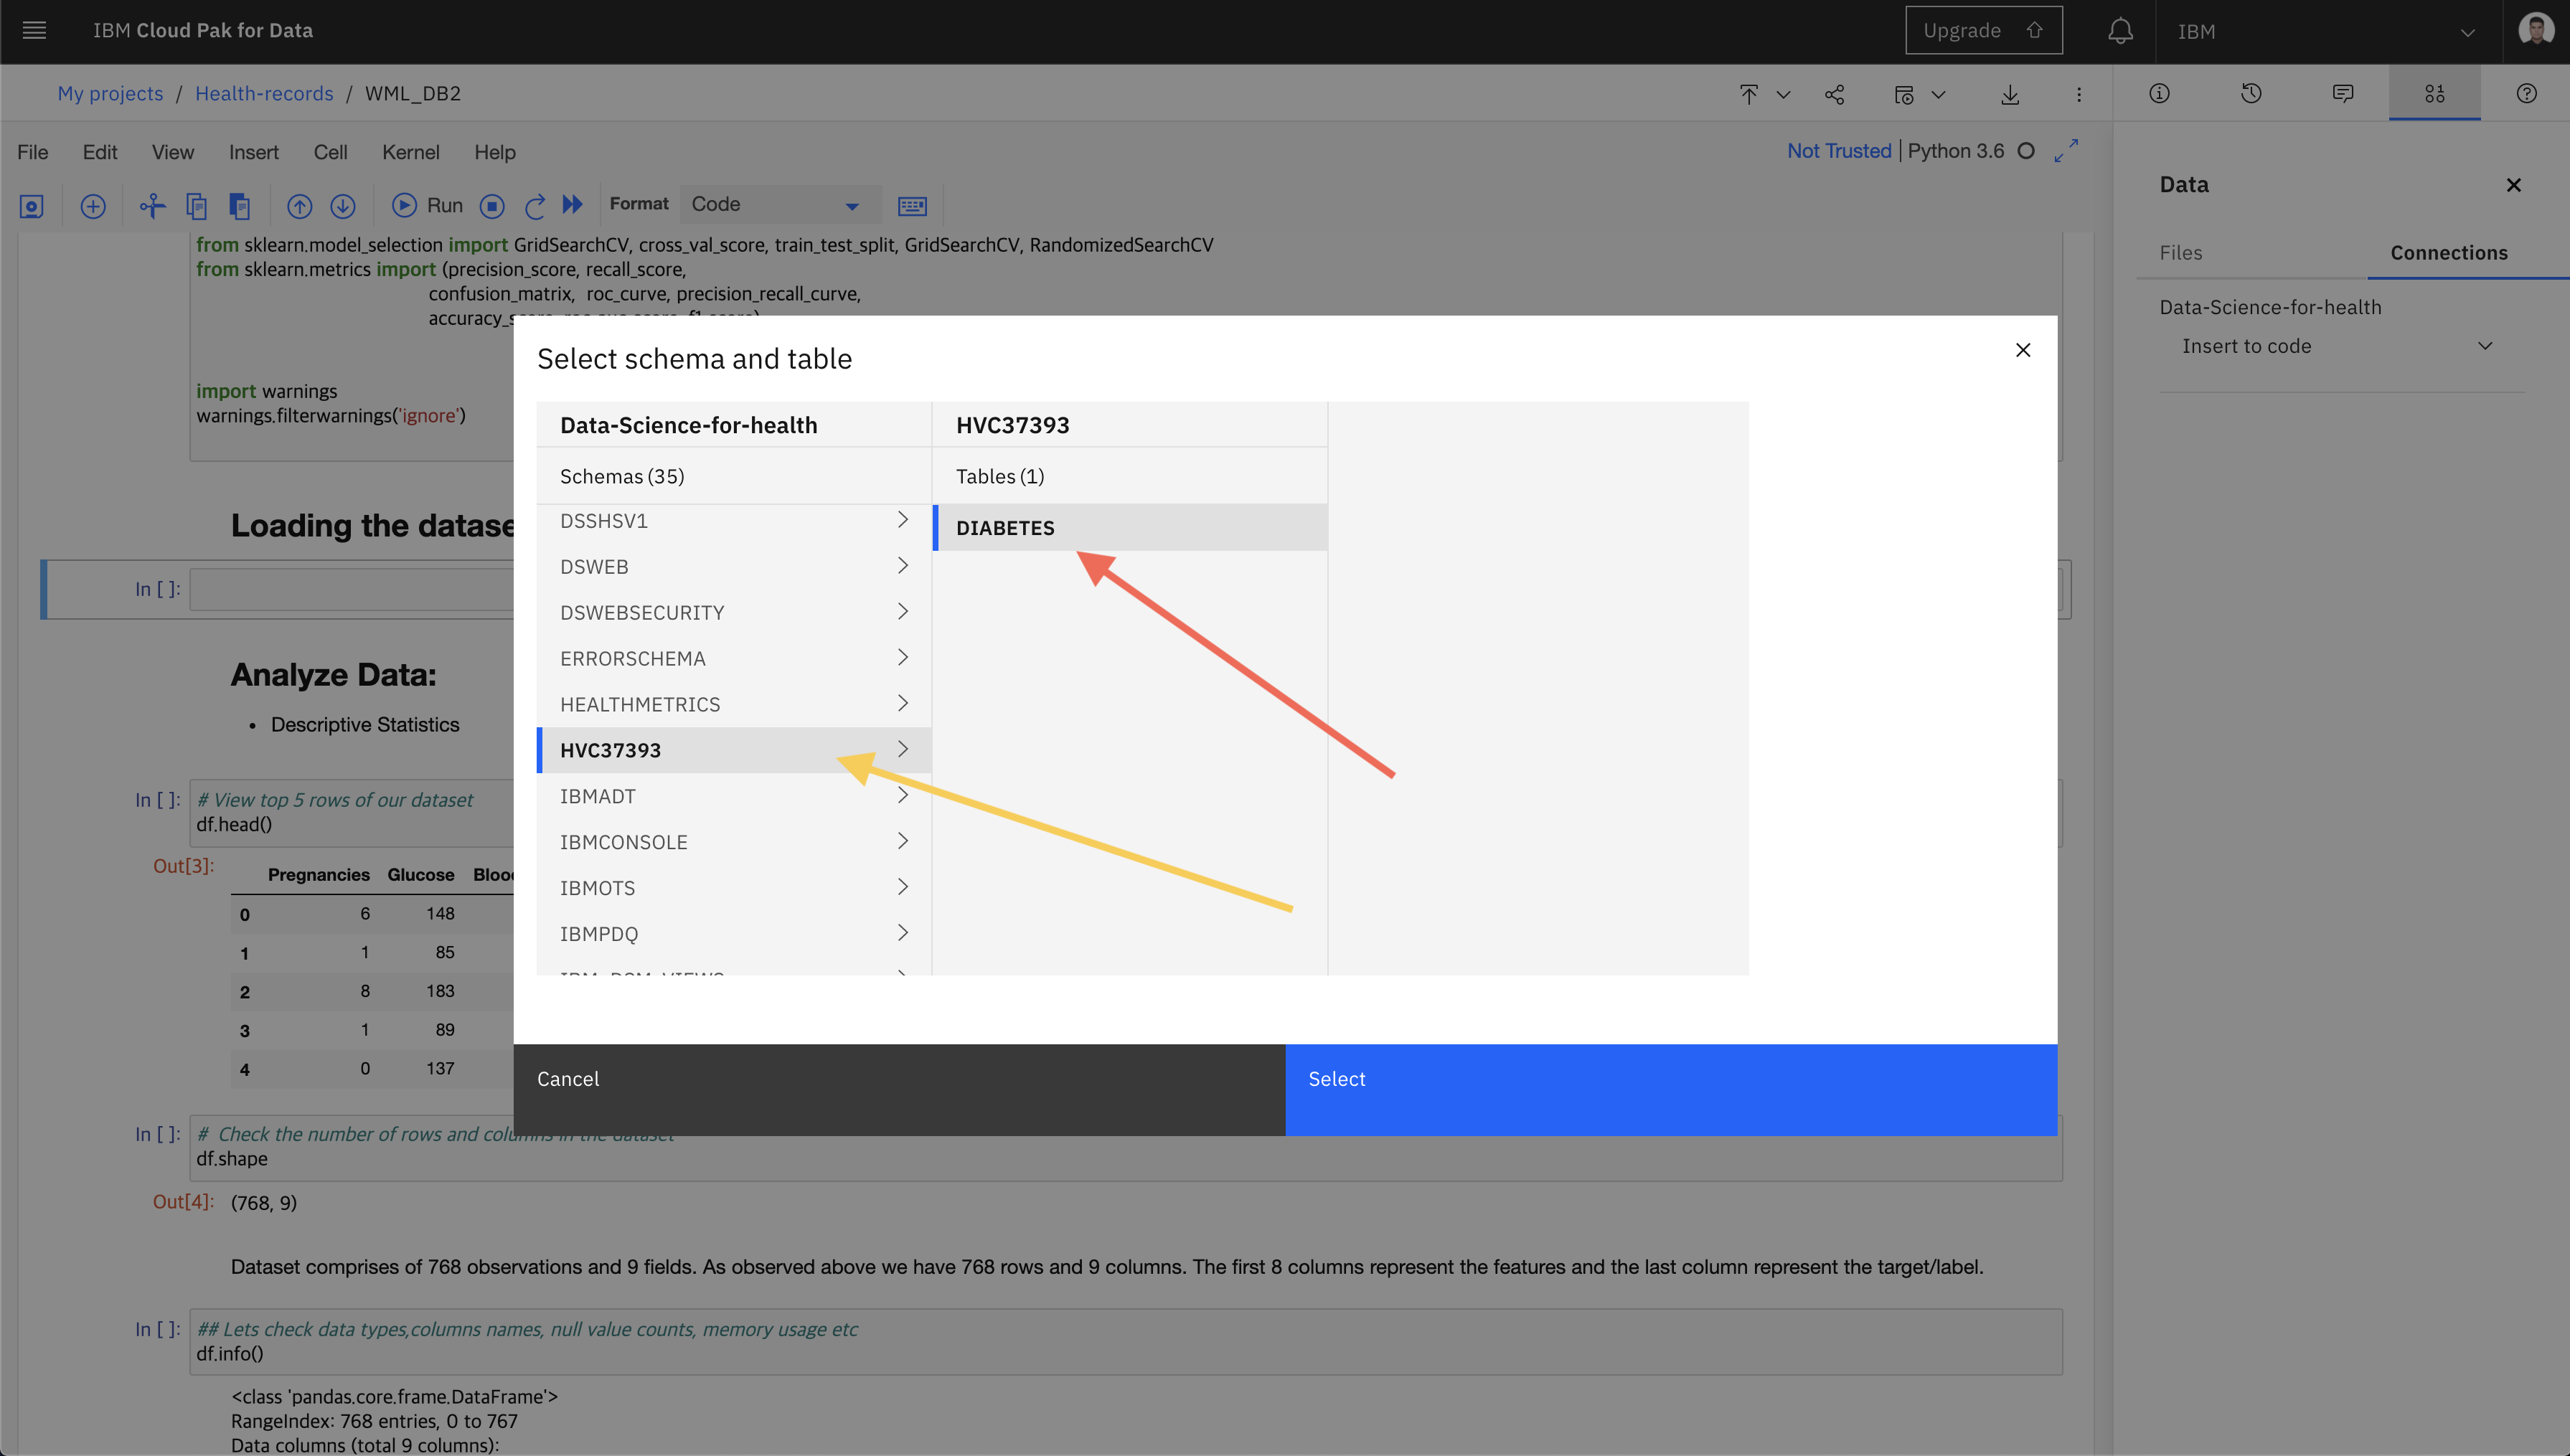
Select your DB2 username from the Schemes section. And select the table named DIABETES you loaded.
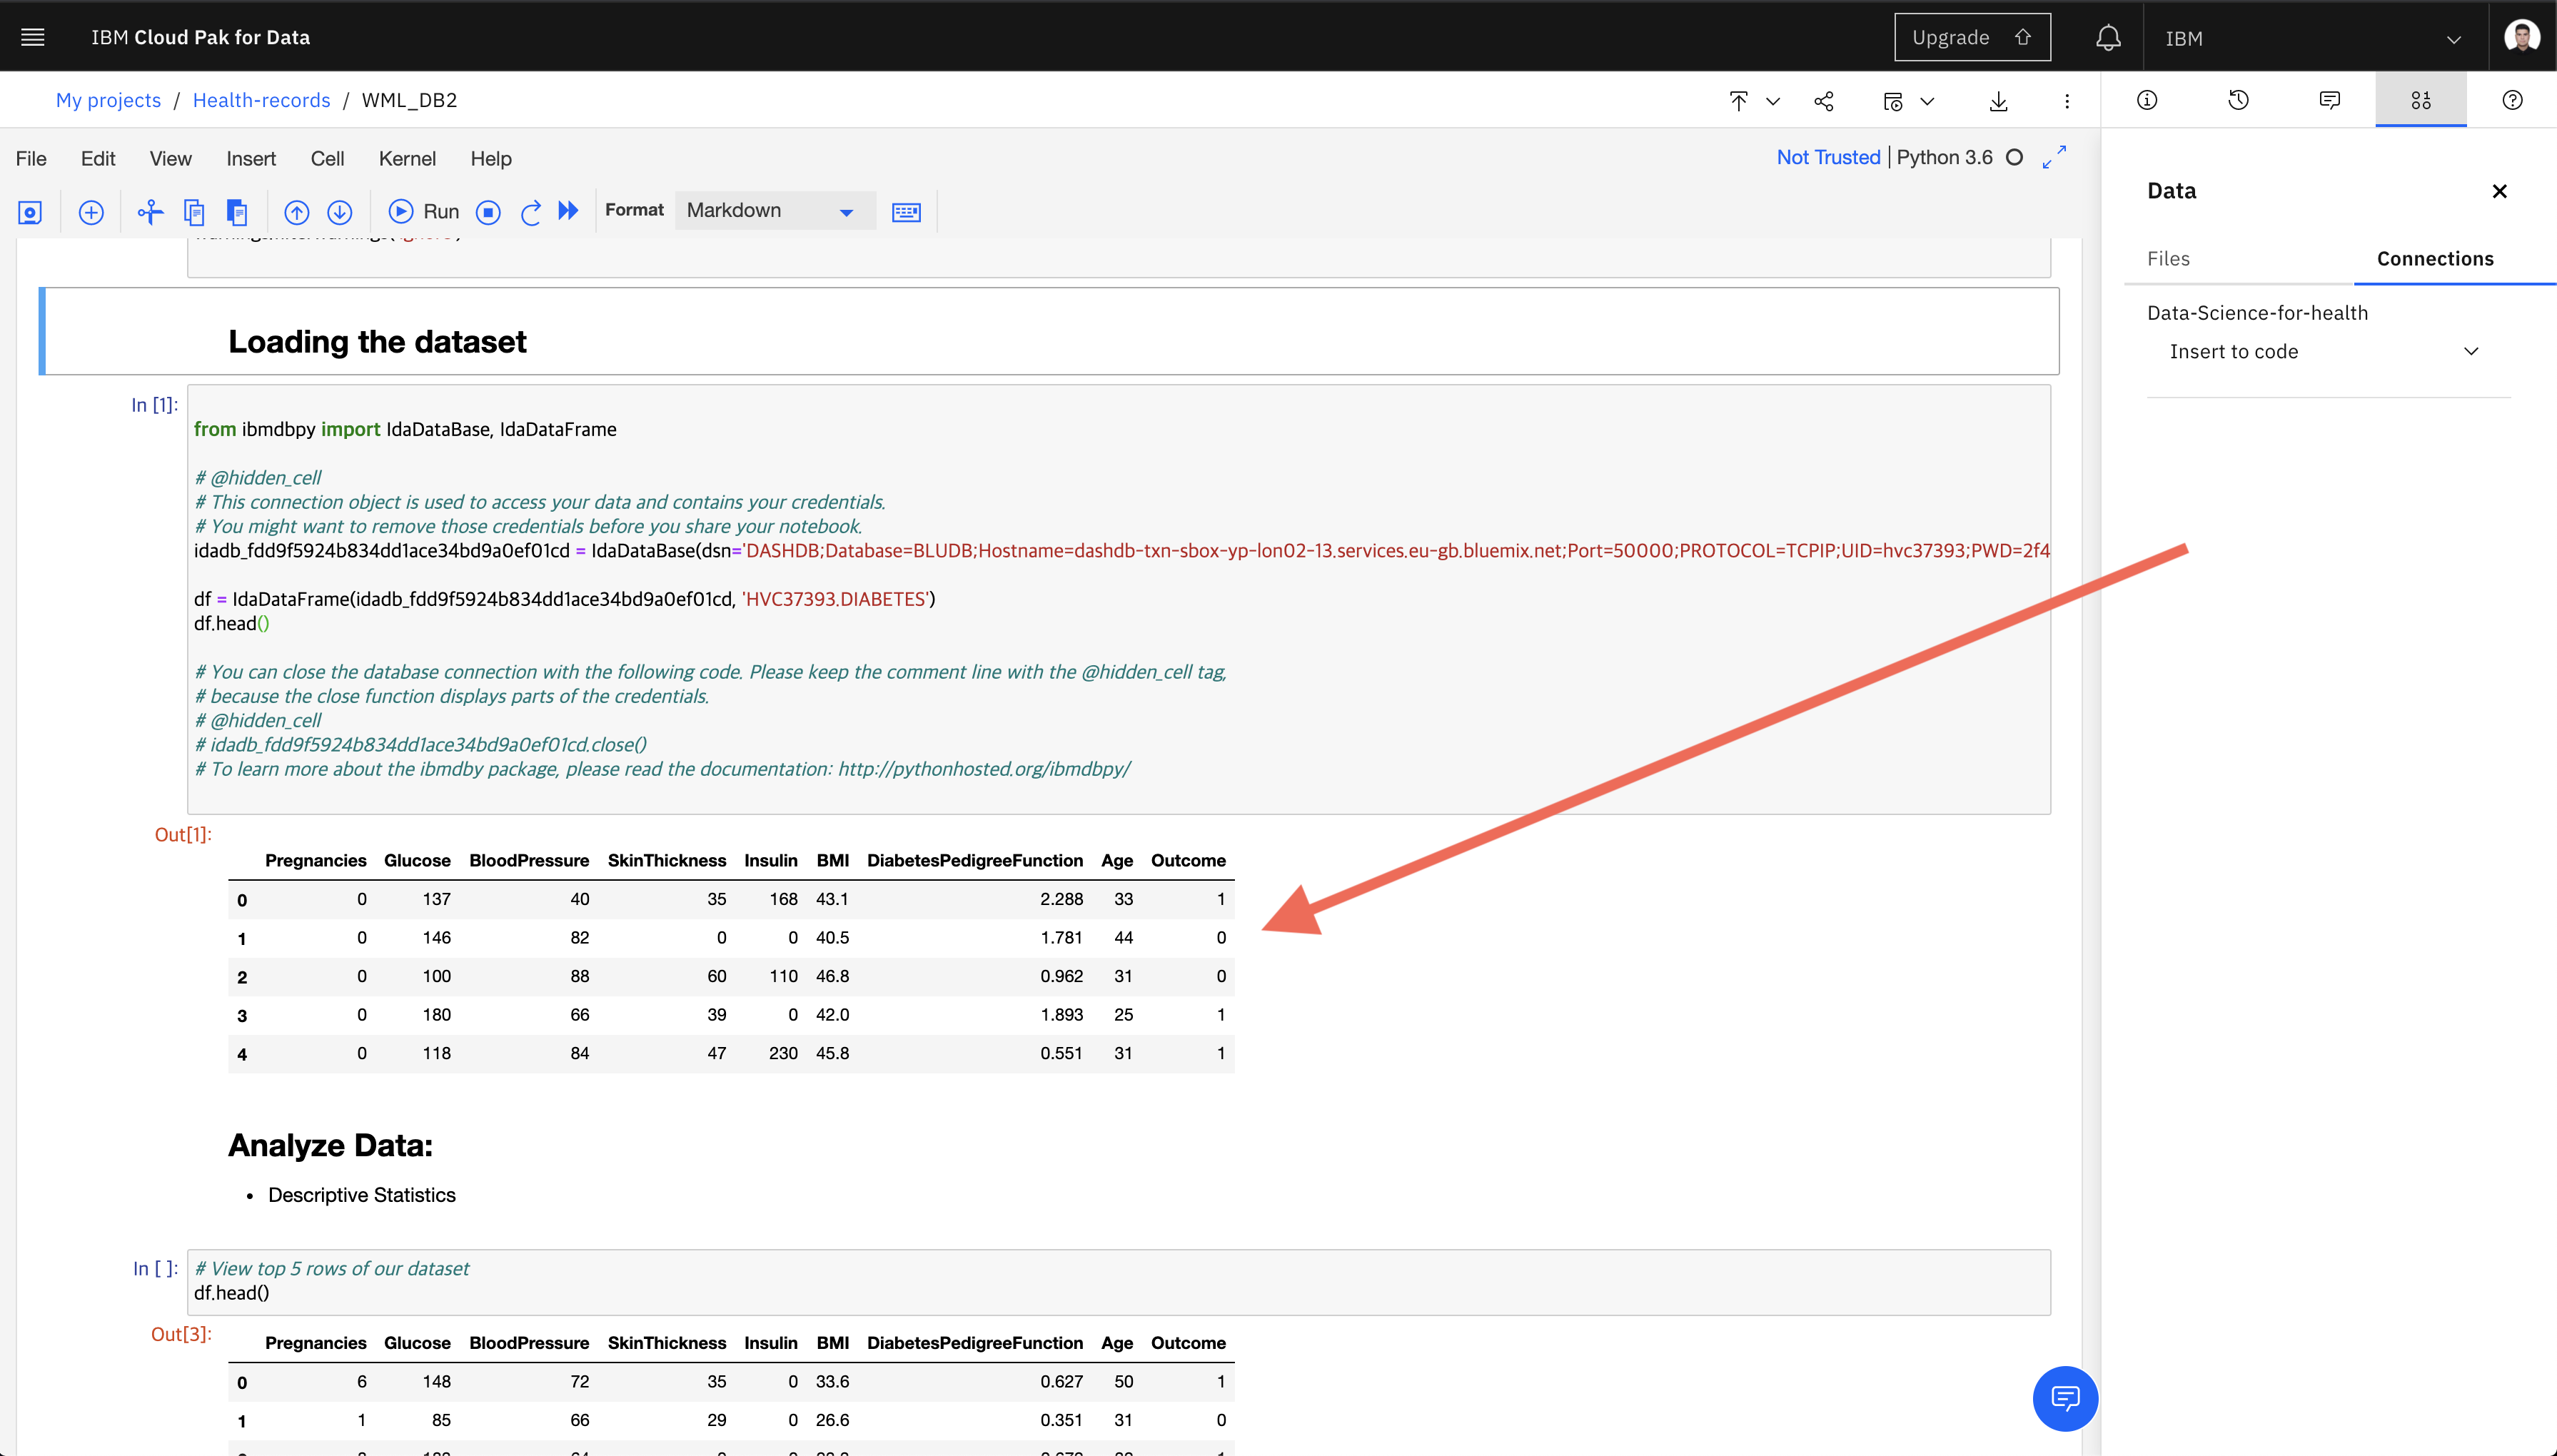
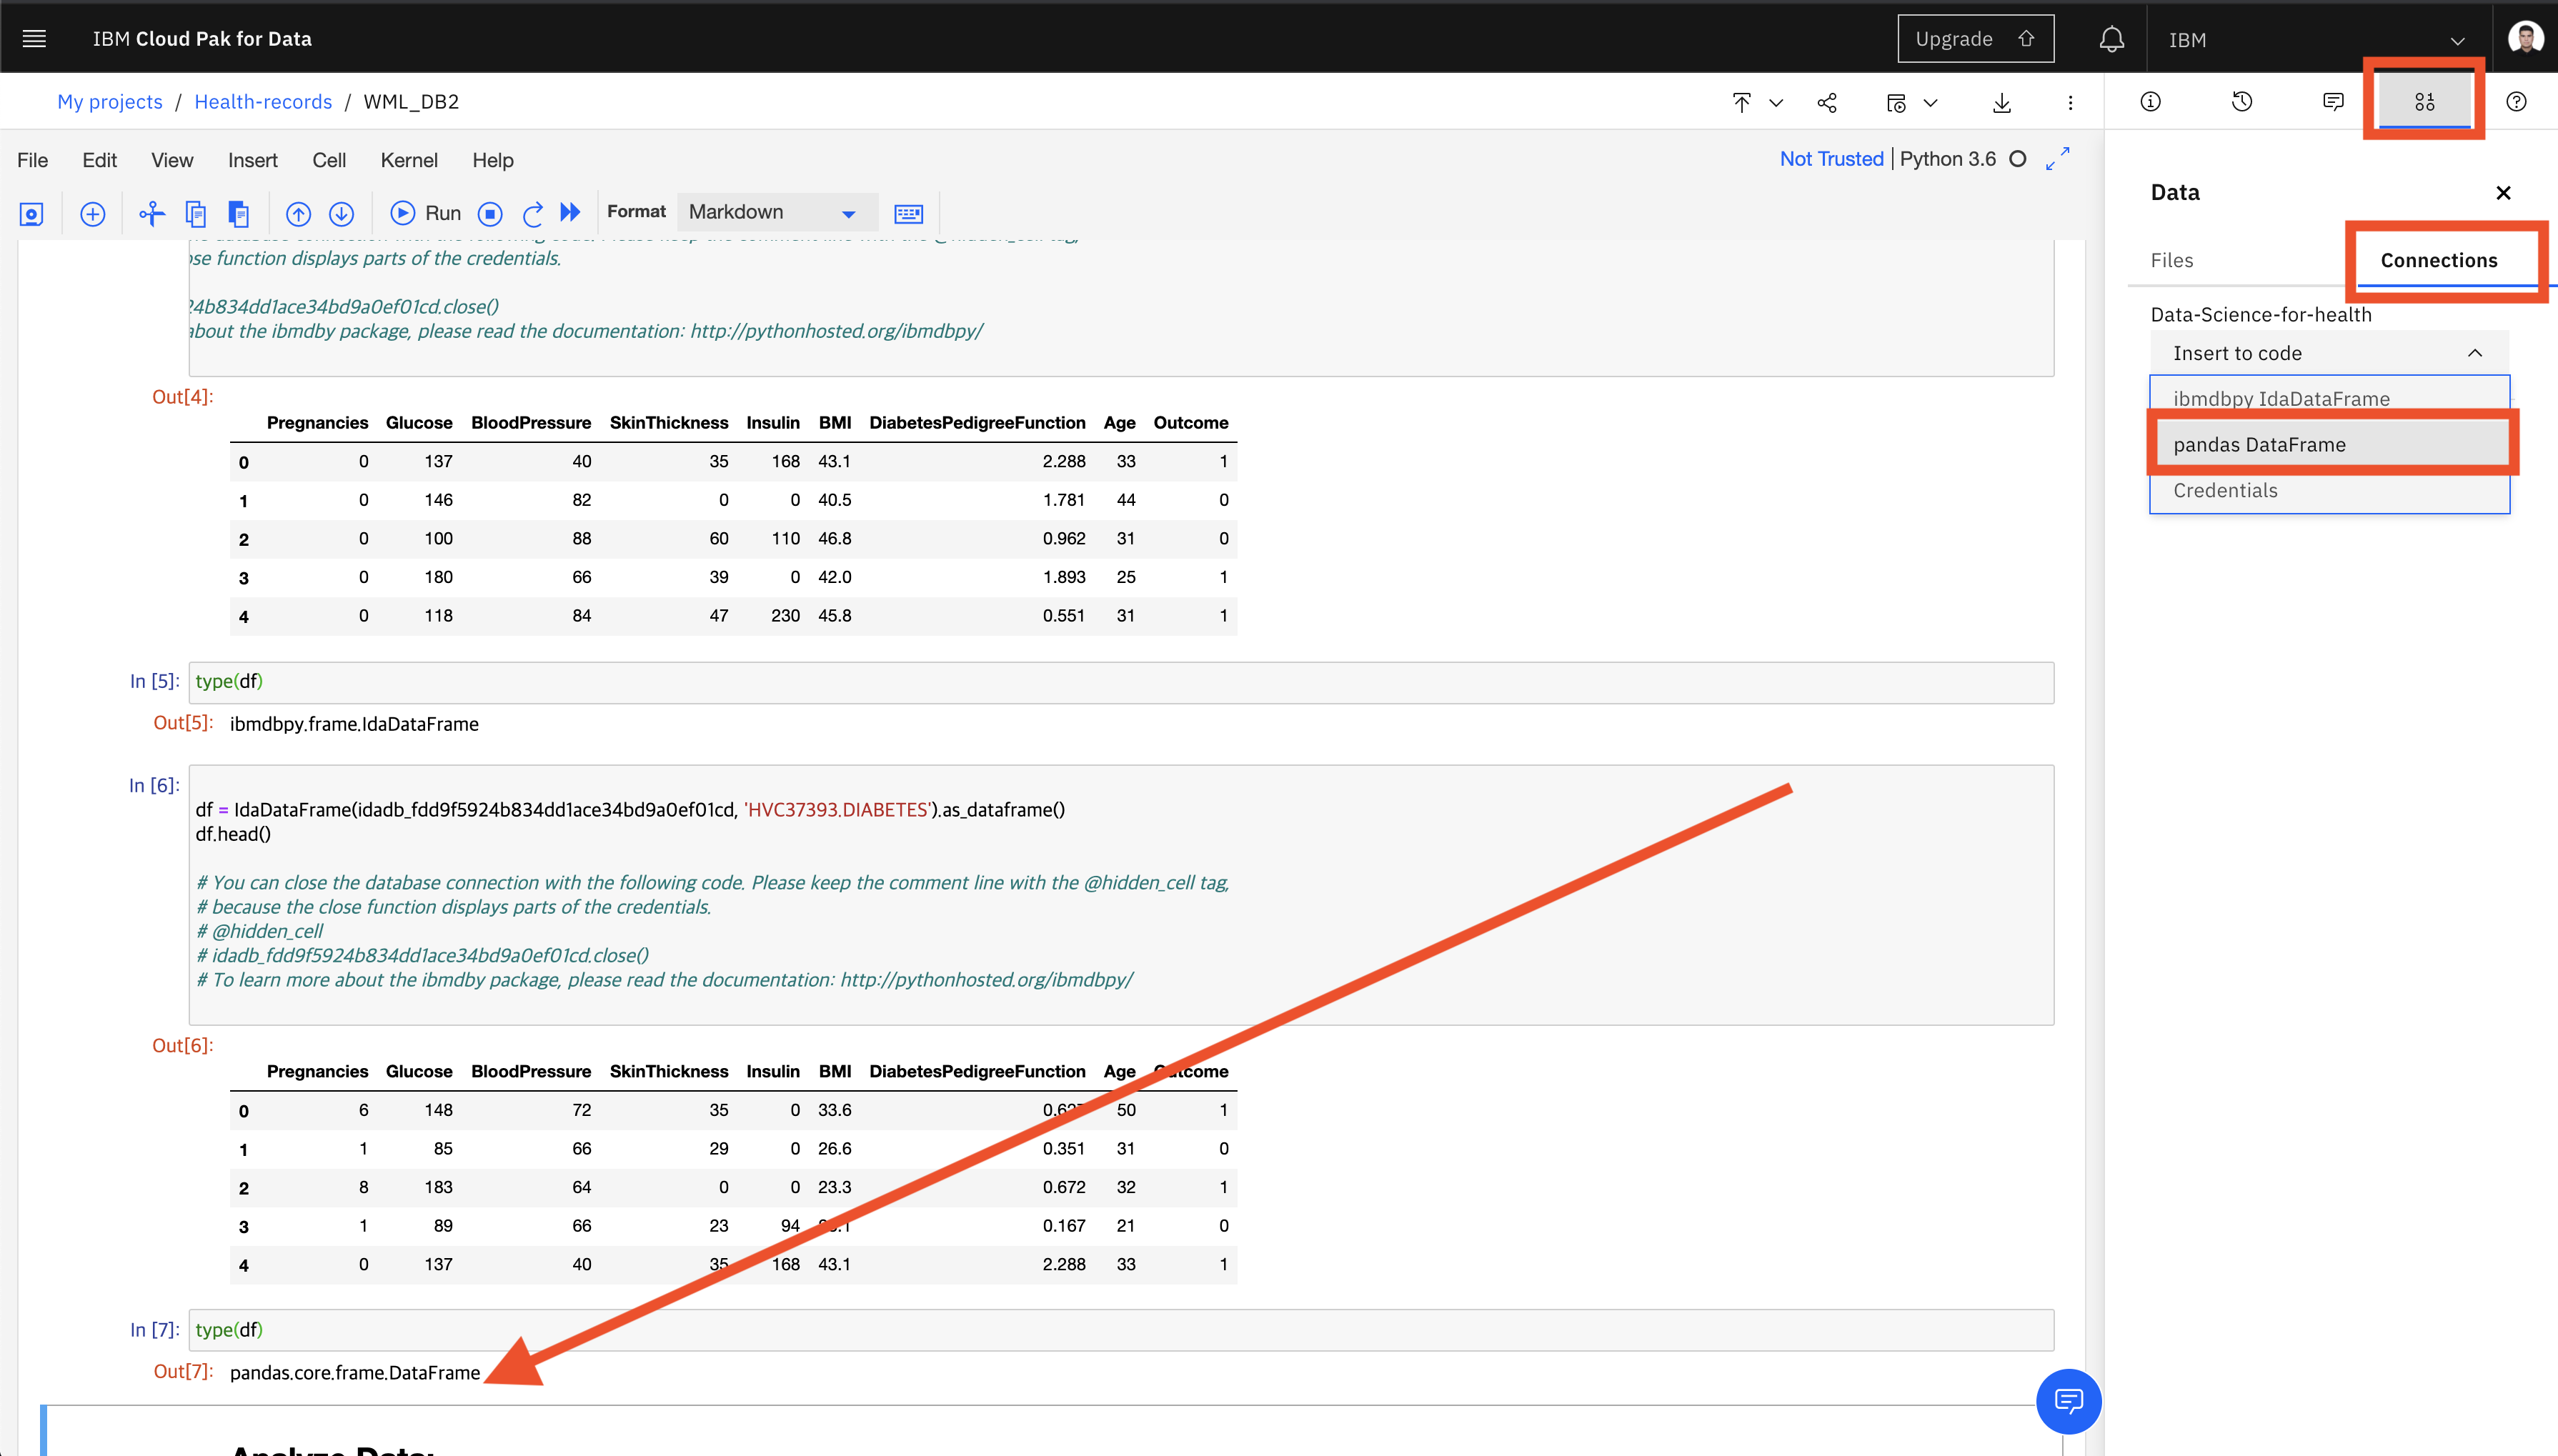
Run the cell containing the functions imported from the ibmdbpy library and your db2 informations. And observe the results. 🔎
The dataset type is ibmdbpy.frame.IdaDataFrame.
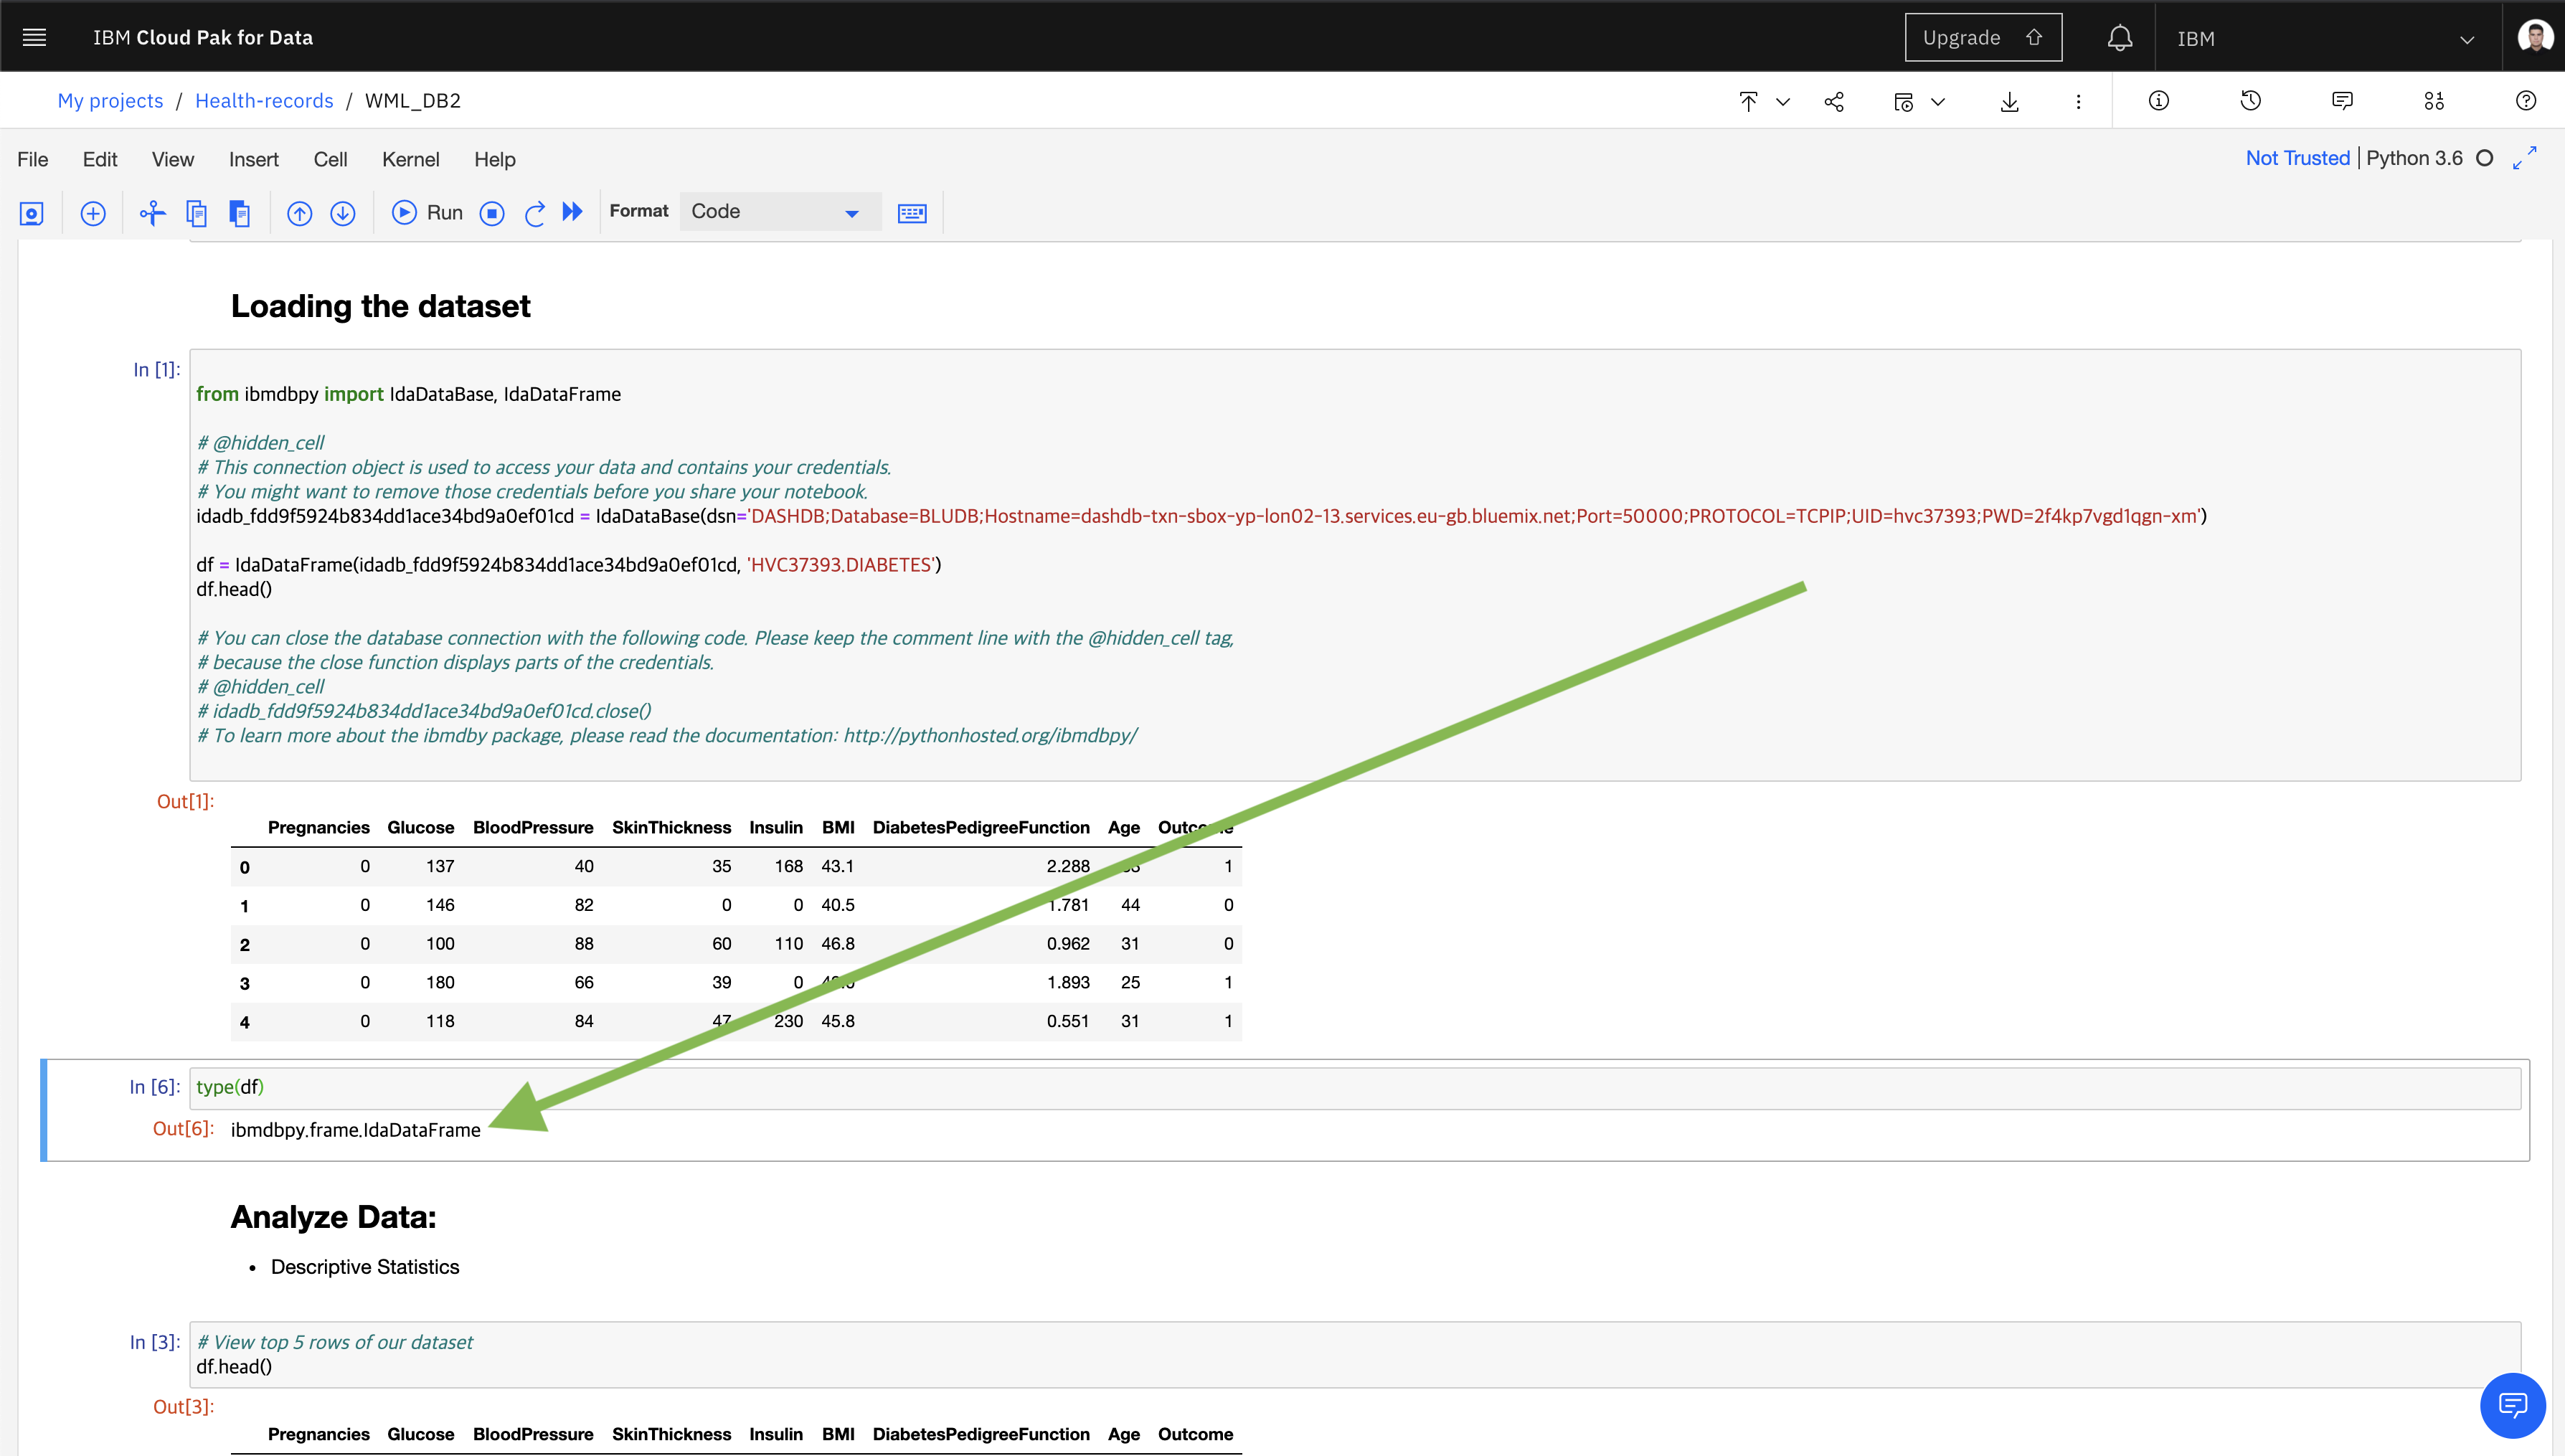
To make the dataset type pandas.core.frame.DataFrame, we click on the Find and add data button in the upper right corner and select pandas DataFrame from the Connections tab. Then, select your db2 username assigned specifically to you from the schemas. Find the DIABETES table and click Select.
Add Watson Machine Learning service credentials that you have saved from above, at step 5 of the notebook as shown below.

Then, run all the cells. At the end of the run the model will be deployed using Watson Machine Learning on IBM Cloud so that you could use the same model to predict the person's illness through Watson Machine Learning service.
- Follow the IBM Z & LinuxONE Community Turkey community.
- Check out our other events.
🚀 created by: Adem Aldemir
🌁 presented by: Adem ALDEMIR and Betül TEKNE
🧬 inspired by this code pattern
