Here is my second Power Apps Component using PowerApps Component framework!
Based on the following design : https://codepen.io/anon/pen/GbzRJv
This component displays BPFs with all process stages categories of entities from a grid/views.
You can also click on it to open the record.
Support any entities (OOB and custom) and any BPF (OOB and custom).

You can find the managed solution into ./Deployment/ folder.
Then you must follow these steps:
-
Import the solution into your target environment.
-
Open a form where you added a subgrid
-
Click to managed properties of the subgrid, and add the custom Control "BusinessProcessFlowViewer"
-
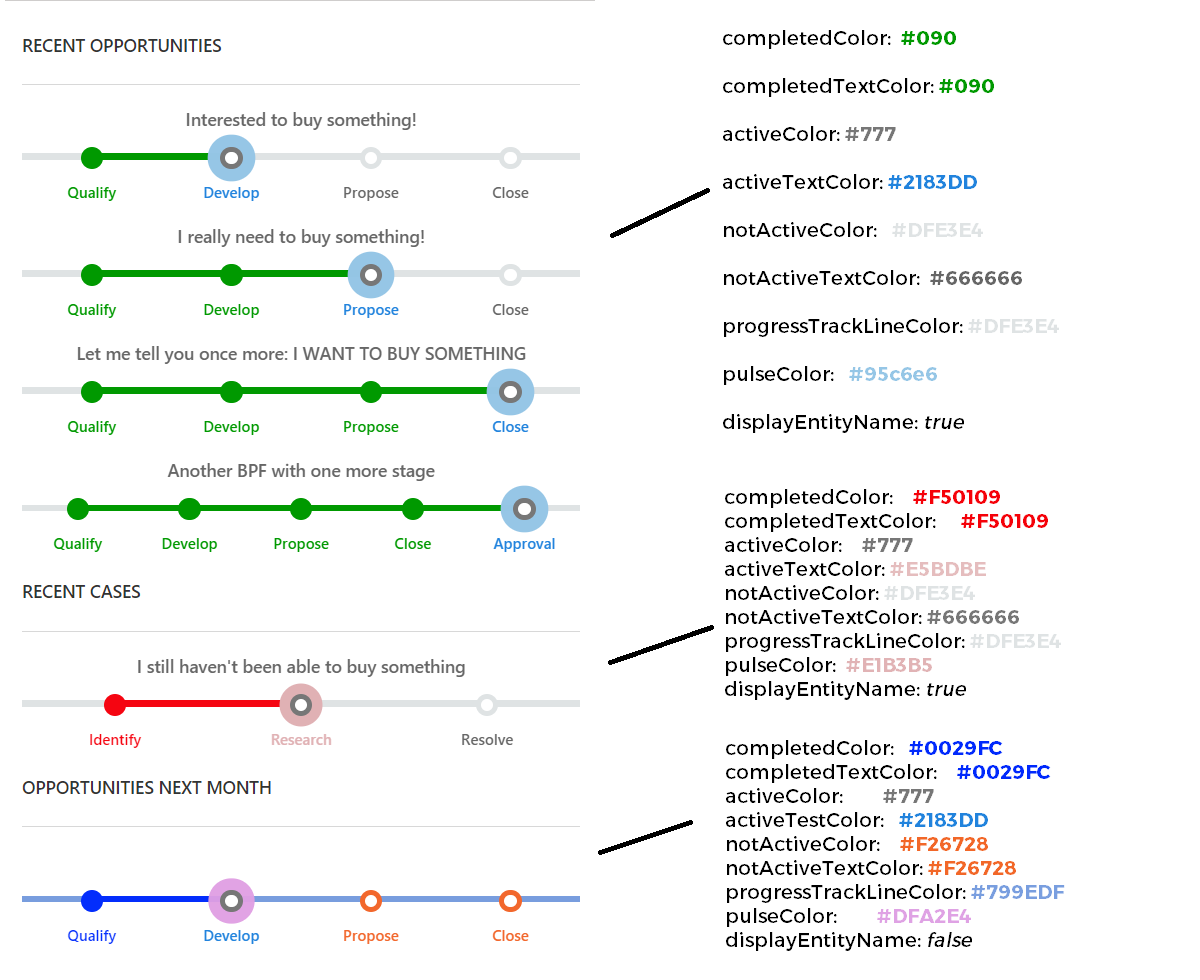
You can see that they are severals parameters (with default values), it allows you to change color and to configure the component properly. You can refer to the configuration section.
This is the list of parameters that can be set on the control
| Parameter | Description | Required | Example |
|---|---|---|---|
| parametersBPF | Attribute to use as label for the checkbox | X | {"bpfs":[{"bpfEntitySchemaName":"opportunitysalesprocess", "lookupFieldSchemaName":"_opportunityid_value"}, {"bpfEntitySchemaName":"leadtoopportunitysalesprocess", "lookupFieldSchemaName":"_opportunityid_value"}]} |
| stageOrCategory | This value is used to display the stage or category name. | X | Stage |
| completedColor | This Hex Color define the background color of the completed stages. | X | #090 |
| completedTextColor | This Hex Color define the text color of the completed stages. | X | #090 |
| activeColor | This Hex Color define the background color of the active stage. | X | #777 |
| activeTextColor | This Hex Color define the text color of the active stage. | X | #2183DD |
| notActiveColor | This Hex Color define the background color of the not active stages. | X | #DFE3E4 |
| notActiveTextColor | This Hex Color define the text color of the not active stages. | X | #666666 |
| progressTrackLineColor | This Hex Color define the background color of the progress line. | X | #DFE3E4 |
| pulseColorr | This Hex Color define the background color of the progress line. If this parameter is empty, the animation will not be displayed | #95c6e6 | |
| displayEntityName | This value is used to display or not the name of the entity. If it is not equal to "Yes" the name will not be displayed. | X | Yes |
Here are some examples with different parameters:
Imagine that we want to install this component on an opportunity grid.
The first step is to correctly fill in the parametersBPF in a JSON format. This JSON follows the following format:
{
  "bpfs": [
    {
      "bpfEntitySchemaName": "SCHEMA_NAME_BPF_ENTITY",
      "lookupFieldSchemaName": "SCHEMA_NAME_LOOKUP_FIELD"
    },
    {
      "bpfEntitySchemaName": "SCHEMA_NAME_BPF_ENTITY_2",
      "lookupFieldSchemaName": "SCHEMA_NAME_LOOKUP_FIELD_2"
    }
  ]
}
You can see that several BPFs can be managed if different BPFs are used for the same entity. The first parameter "bpfEntitySchemaName" corresponds to the technical name of the BPF entity.
The second parameter "lookupFieldSchemaName" corresponds to the technical name of the field on the BPF entity which relates to the target entity(here, the opportunity).
In case we use standard BPFs (out of the box), we will have the following parameter:
{
  "bpfs": [
    {
      "bpfEntitySchemaName": "opportunitysalesprocess",
      "lookupFieldSchemaName": "_opportunityid_value"
    },
    {
      "bpfEntitySchemaName": "leadtoopportunitysalesprocess",
      "lookupFieldSchemaName": "_opportunityid_value"
    }
  ]
}
If you have created your own BPF, you must therefore adapt this setting. For example, if you have created a solution with the prefix "adc_" and thus creates a custombpfviewer BPF. The technical name of the BPF entity will be "adc_custombpfviewer".
We can look at the name of the technical field which relates to the target entity by opening the previously created BPF entity and note its name: bpf_opportunityid. This will give _bpf_opportunityid_value.
The parameter will be composed as follows:
{
  "bpfs": [
    {
      "bpfEntitySchemaName": "adc_custombpfviewer",
      "lookupFieldSchemaName": "_bpf_opportunityid_value"
    }
  ]
}
The next parameters allow to manage the visual aspect of the component.
Note that you can therefore add this component to several grids of the form.
To use Microsoft PowerApps CLI, do the following:
-
Install Npm (comes with Node.js) or install Node.js (comes with npm). We recommend LTS (Long Term Support) version 10.15.3 LTS as it seems to be most stable.
-
Install .NET Framework 4.6.2 Developer Pack.
-
If you don’t already have Visual Studio 2017 or later, follow one of the options below:
- Option 1: Install Visual Studio 2017 or later.
- Option 2: Install .NET Core 2.2 SDK and then install Visual Studio Code.
-
Install Microsoft PowerApps CLI.
Be sure to update your Microsoft PowerApps CLI to the latest version:
pac install latest- Clone the repo/ download the zip file.
- Navigate to ./BusinessProcessFlowViewer/ folder.
- Copy the folder path and open it in visual studio code.
- Open the terminal, and run the command the following command to install the project dependencies:
npm installThen run the command:
npm run start- Create a new solution folder (eg. SolutionFolder) and open the Developer command prompt.
- Change the directory to the newly created folder in previous step.
- Init the future solution:
pac solution init --publisher-name someName --publisher-prefix someSolutionPrefix- Add the control to your future solution:
pac solution add-reference --path provide path of control project folder where the pcf.proj is available- Build 1/2:
msbuild /t:build /restore- Build 2/2:
msbuild- You will have the solution file in SolutionFolder/bin/debug folder!
If you want to change the solution type you have to edit the .cdsproj file:
Solution Packager overrides, un-comment to use: SolutionPackagerType (Managed, Unmanaged, Both)
  <PropertyGroup>
    <SolutionPackageType>Managed</SolutionPackageType>
  </PropertyGroup>