#React Native Workshop
##Setup
To setup your environment, follow the steps here.
Please submit feedback here
- Slides
- React native documentation
- Material UI for reactnative
- Image picker
- Redux documentation
- A complete guide to flexbox
##Debugging options
- Open developer menu: Cmd+d (iOS), F2(Android), Ctrl/Cmd+M(Android) or run ./android/devmenu.sh (Android)
- Enable "Debug JS Remotely" to set breakpoints, log to Chrome console, pause on caught exceptions, etc.
- "Enable Live Reload" will live reload code on save
- "Enable Hot Reloading" will immidiately reload code while also maintaining application state. NB: Recently added to RN so it might be buggy
- Run on device: iOS / Android (NB: Shake to open developer menu)
##Tips
- NB: There's a branch for our solution for each assignment. You'll find the solution to assignment 1 in branch
exercise-1, the solution to assignment 2 in branchexercise-2and so on. These can come in handy if you're stuck, or want to catch up quickly. - Redux with Thunk have already been set up and connected with the correct props in the components you have to implement.
- All components have prop types set. Proptypes ensures that components are used correctly. Use it to see what you have to work with when you are implementing a component
##1. Create a New Message View
Your first task is to create a view in which the user can input a username and a message. The screenshots below show roughly how your app should look like after completing this task. Focus on functionality in a)-c). In d) you'll improve the design.
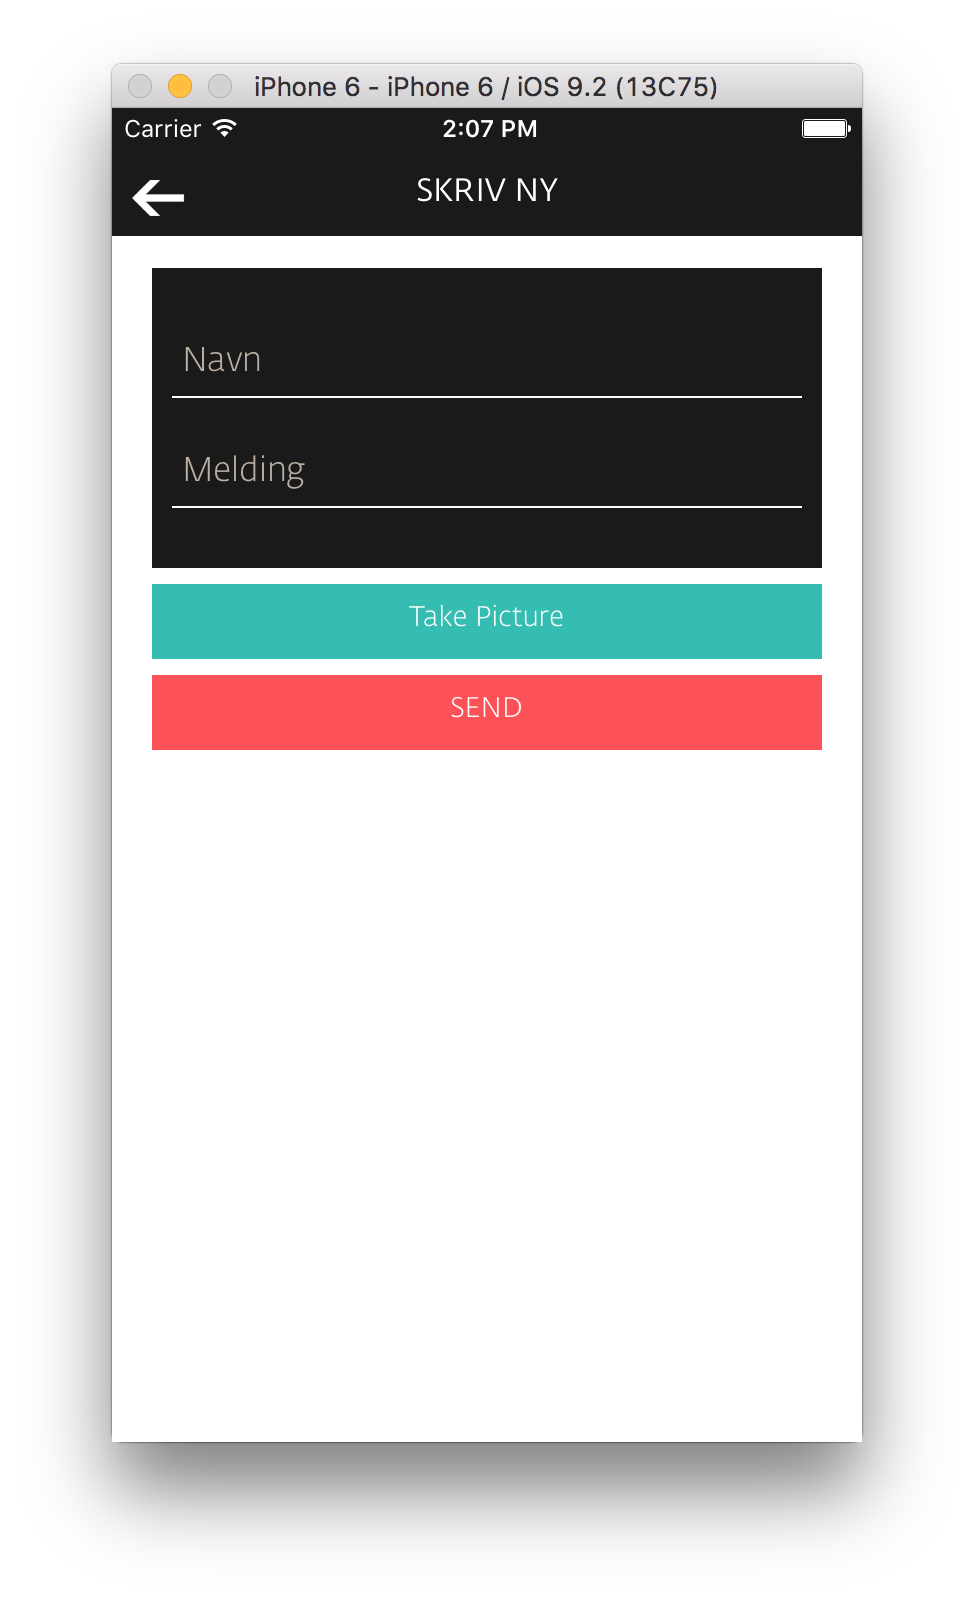
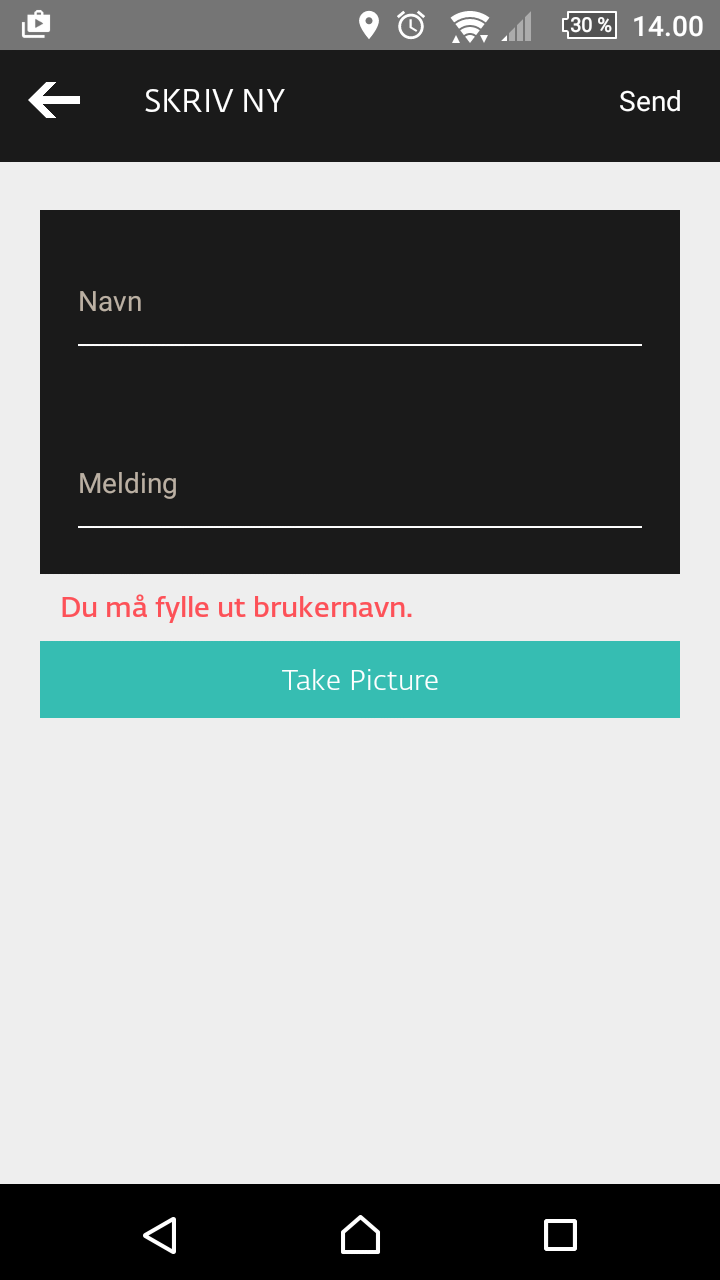
a) Input fields. You'll find a NewMessage (app/components/new-message.js) component in your project. The component is already mounted in the default view, but it renders nothing. Implement the render function of NewMessage so the resulting view contains two input fields – one for the username and one for the message.
b) Send button. Input fields without any action are of no use. Create a send button. (Hint: Buttons in React Native are implemented via the Touchable* components)
- Android: To place it in the navigation bar, you'll have to implement it in
navigationbar-buttons.android.js
c) Hook everything up. Make the send button actually post the message to the server. The NewMessage component recieves three functions as props, setNewMessageText(message), setUsername(username), and postMessage(). The first two will update the global state, and the latter will use the message and the username property from the global state and post the message to the server.
- Android: If you've implemented the send button in the navigation bar, use the
postMessagefunction innavigationbar-buttons.android.js.
If you've hooked everything up correctly, your message should appear on the big screen (or at http://mobile-course.herokuapp.com) when you hit the send button. Well done! 👊 Now, let's make it beautiful too!
d) Make it look sexy. At this point we won't kill you if your new message view looks like shit! Anyway, now you get the chance to pimp it up a bit. Experiment with different Flexbox properties. Have a look at the screenshots above for some inspiration. Also, the colors used in the screenshots are found in config/design.js.
Tip on working with styling: In the docs, the style prop of each component shows a complete list of styles supported by that component: Example: http://facebook.github.io/react-native/docs/view.html#style
##2. Show messages
The second task is to show all the messages in a scrollable list. We will for now ignore the newly created new message component and focus on displaying messages. It will all be connected in assignment 3.
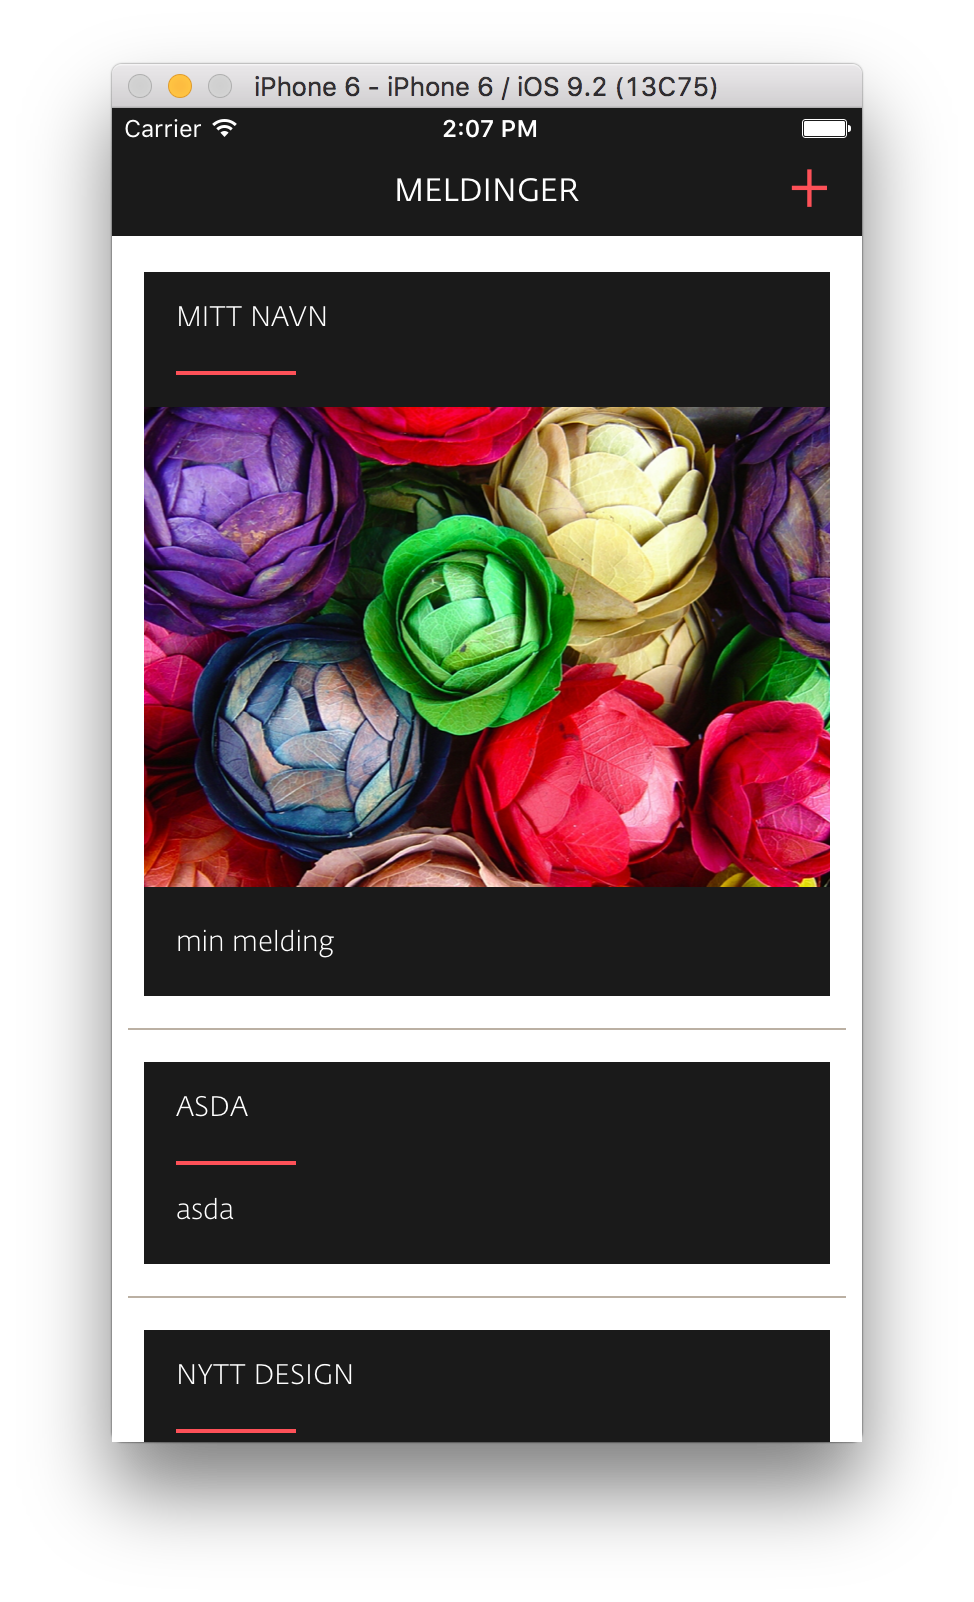
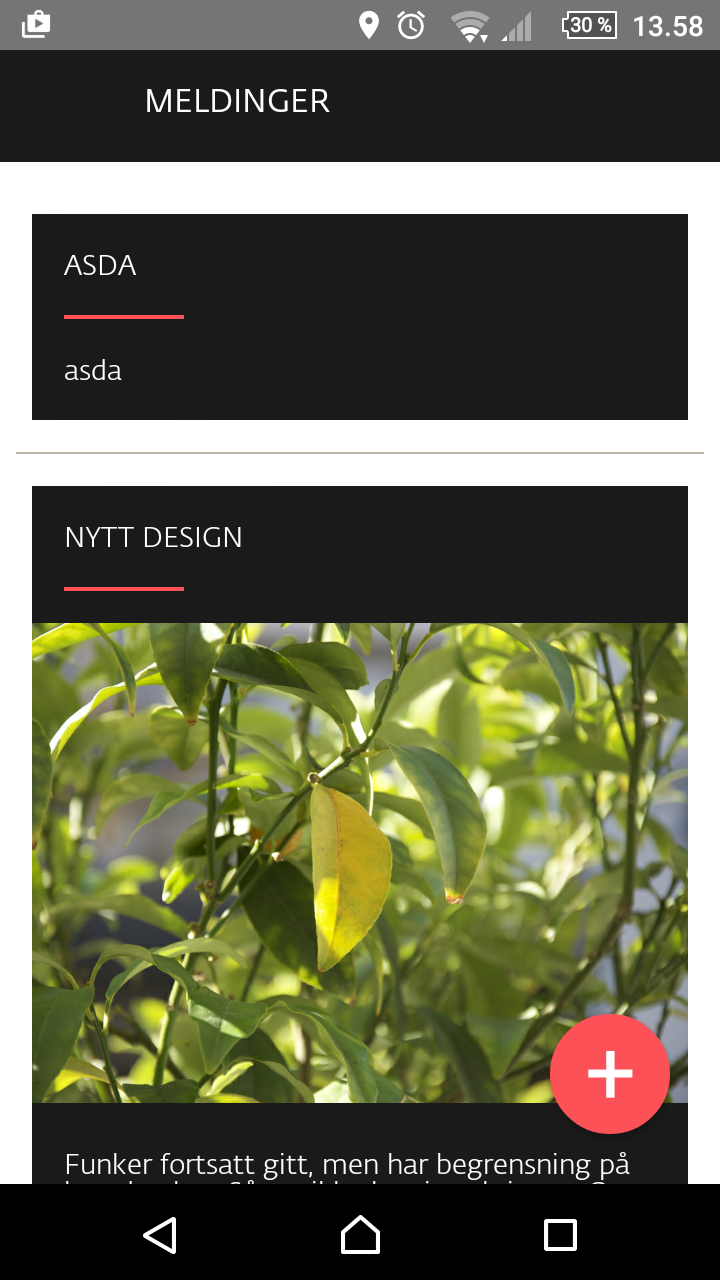
Let's have a look at the components responsible for rendering the message list:
MessageListContainer– controls the different network states (fetching, refreshing, error), and passes the data toMessageListMessageList– renders each message
a) Navigator. The MessageListContainer (message-list-container.js) component is not in use right now. Start using it by hooking it up to the navigator. Find the render method of CustomNavigator (navigation/navigator.js), and change initialRoute so that you're taken to the MessageListContainer (message-list-container.js) on startup.
b) Listing messages. Edit the MessageList (message-list.js) component to show messages. MessageList receives an array of messages as a prop. Click here to see the format of messages:
http://mobile-course.herokuapp.com/message
c) Show images. Some messages contain a link to an image. Display them.
d) Pull to refresh. Add pull to refresh. Hint: Look at what ListView can do for you
##3. Navigate to New Message
As promised in the previous task, we now shift our attention back to the NewMessage component. Right now it's unreachable for the user, so we need to implement a transition to it.
Before you dive back into your code, let's take a closer look at how navigation is set up. We use the Navigator component of React Native, wrapped in a custom component that handles some boilerplate code – like how transitions between routes are animated and how the navigation bar is configured. Navigator is basically a stack – you push a view to transition to that view, and you pop it to go back to the previous view. To abstract this away, we have added two actions, navigateTo and navigatorPop that you can use to navigate. navigateTo expects a route object as an argument. See routes.js.
a) Button. We need a button to initiate a transition to NewMessage. To ensure a great native look in our app, we'll implement a platform specific button:
- Android: Implement the button as a floating button above the list view. You should add the button in the render method of
MessageListContainer(message-list-container.js). We've added a package containing material design UI components to the project. Check out theColoredFab(colored-fab.js) component to see how it is used. If you don't feel like doing any design yourself,ColoredFabcan used directly. - iOS: Implement the button as a '+' right-aligned button contained in the navigation bar. See
navigationBarButtons(navigationbar-buttons.ios.js)
b) Push it. Ensure that a press on the button transitions to the NewMessage view.
- iOS: Only display the +-button when the message list is displayed.
c) Pop it. Implement a back button in the left side of the navigation bar. See commonRouteMapper (navigationbar-routemapper.js). We've imported a back arrow image you can use (BackArrow). We've also ensured that the user is taken back to the message list when send is pressed. See actions/actions.js and postMessage function to see how it works.
Well done! This starts to look like a complete application!
##4. Add image to new messages
A message consisting of only text is quite boring these days. Also, a picture says more than a thousand words... So, let's add functionality to allow the user to add an image to new messages.
React Native has no component or API for taking pictures on the fly or picking an image from the camera roll. That's where third-party npm modules come in handy. We'll use the react-native-image-picker module, which allows for both taking new pictures and picking from the camera roll. It's implemented by bridging to the pure native image picker and picture taking apps.
The module is already installed in the project. In NewMessage you can call the onPickImagePressed() prop to launch the image picker. When successfully picked, the image will be available on the image prop of NewMessage.
a) Button. We need a button for launching the image picker.
b) Pick it. Hook the button up to the image picker by using onPickImagePressed().
c) Show it. Display the image in the NewMessage component. Allow it to use all available space, but make sure it's good lookin' by maintaining dat aspect ratio.
d) Send it. If you've hooked everything up correctly, postMessage() should already support posting messages with images to the server. Try it out. Works? Good!
e) Clear it. Currently, navigating back and forth will not clear the state for the NewMessage component (username, message, and image). Use the clearNewMessageState() function (received as a prop) to clear the state. Hint: React has a suitable lifecycle method for calling clearNewMessageState().
##5. Bonus: Edit messages
You now enter hardcore mode. Welcome.
Reuse the NewMessage component to support editing. Trigger editing on long press.
You'll need to implement an action, reducer and network functionality. Here are some tips:
- Extend
actions/actions.jswith an edit message function that dispatches an edit action. - Extend
network/messages.jswith an edit network call. Edit API "http://mobile-course.herokuapp.com/message/:id". Remember to use HTTP PUT. - Extend
reducers/reducers.jsto handle the edit action. Remember to delete/replace the message you edit.
##6. Bonus: Even more hardcore mode ![]()
React Native is open source and has plenty of issues up for grabs: https://github.com/facebook/react-native/issues
or...
- Show images in full screen when pressed
- Support deletion of messages
- Advanced: Bidge a component from Android/iOS to React Native. We suggest Toast for Android or Alert for iOS. They're already implemented in RN, but they might be good for learning (and you can peek at the RN source code for tips).
- Or anything else you want to try out :-)