NOTE: Please don't use this. It needs major rework since the whole integration with GitHub actions is wrong.
A GitHub action that collects bundle size statistics and stores them in an S3 bucket you allowing you to compare the effect of new Pull Requests on bundle size or visualize and analyze the change over time.
Statistics gathered for each configured asset:
- Bundle size (uncompressed)
- Bundle size (brotli/gzip compressed)
Other features:
- Stores generated webpack stats file in S3 for future comparisons
- Stores generated webpack-bundle-analyzer reports too
- Comments on PRs showing the delta change with links to the above resources
Good question. You probably should check out Relative CI instead. I would never have made this if I knew about them to begin with.
That said, it does have a few advantages:
- You own your data in S3 so you can slice and dice it as you please
- For example, you can use the data in your own custom visualizations (actually this is the same as the first point)
- Can report brotli compressed size (not that it really matters -- you probably care more about the uncompressed size)
See the included cloudformation.yml file for an example configuration.
e.g.
aws cloudformation deploy --stack-name bundlesize-stack --template-file cloudformation.yml --capabilities CAPABILITY_IAM --region us-west-2Fetch the generated bucket name and AWS access keys. You'll need them in step 3.
aws cloudformation describe-stacks --stack-name bundlesize-stack(BEWARE: Having a CloudFormation template spit out secret access keys as an output parameter is an anti-pattern. Anyone who can inspect your stack can grab the keys and therefore put stuff in your bucket. It's up to you to decide if that's acceptable or not. If not, you'll want to create the same sort of stack manually.)
Note that the user credentials need to have s3:ListBucket privileges for
the bucket itself (see the CloudFormation template for an example). This is
needed to differentiate between non-existent files and incorrectly configured
access privileges. Without the s3:ListBucket privilege, trying to access a
non-existent object will return 'Access Denied'.
s3:PutObjectAcl is also needed so that we can mark the uploaded files as
public (so they can be consumed by third-party tools).
Either:
- Create a configuration file in the root of your project named
good-bundle.config.json, or - Add a
goodBundleproperty to yourpackage.json.
If both are provided, good-bundle.config.json is used.
Keys:
-
assets(required) - An object where the keys are the human-readable asset names and the values are globs specifying the file(s) to record under that asset.The glob may be a string like
bundle.jsordist/*.jsor an array of strings such as["dist/app.*.js", "dist/locales/*.js"].We could just look for a webpack stats JSON file, parse that and work out the assets automatically but we don't yet.
Also, this setting allows you to ignore assets you don't care about, assign human-readable names to individual assets (as opposed to the contenthash filenames they may end up with), or use this with projects that don't use webpack.
-
output(required) - Where to write the results to.-
bucket(required) - The S3 bucket in which to store the result. If a webpack stats file is specified (seestatsbelow), it will also be stored along with the report generated usingwebpack-bundle-analyzer. -
destDir(optional) - A destination folder to use within the bucket. -
region(required) - The AWS region of the bucket, e.g.ap-northeast-1. -
format(optional) -"csv"or"json". Defaults to"csv". An array may be specified to output to CSV and JSON. The first format listed in the array will be treated as the primary source when looking for historical results to compare the current result against. -
project(optional) - A descriptive name to use for the project. This is added to each record in the output file and is useful if you are logging multiple projects to the same file. Defaults toowner/repository.
-
-
compression(optional) -"brotli"or"gzip". Defaults to"brotli". -
stats(optional) - Path to a webpack compilation stats file.If provided, the file will be uploaded to S3, used to generate a visualization of the asset contents, and used for more fine-grained comparisons between different runs.
For example, for a very simple project you might have:
{
  "assets": { "bundle.js": "bundle.js" },
  "output": {
    "bucket": "my-bucket",
    "region": "us-west-2"
  }
}
Or even just:
{
  "assets": { "JS": "*.js" },
  "output": {
    "bucket": "my-bucket",
    "region": "us-west-2"
  }
}
While for a project with multiple assets using chunking, you might have:
{
  "assets": {
    "main.js": "dist/main.*.js",
    "worker.js": "dist/worker.*.js",
    "JS total": "dist/*.js",
    "styles.css": "dist/styles.*.css"
  },
  "output": {
    "bucket": "my-bucket",
    "format": ["csv", "json"],
    "destDir": "my-app",
    "region": "us-west-2",
    "project": "fe"
  },
  "compression": "gzip",
  "stats": "webpack-stats.json"
}Inputs:
-
AWS_ACCESS_KEY_ID(required) - The access key used to read/write from the bucket. See AWS documentation on access and secret keys. -
AWS_SECRET_ACCESS_KEY(required) - The secret access key used to read/write from the bucket. -
GITHUB_TOKEN(optional) -${{ secrets.GITHUB_TOKEN }}. If supplied this is used to add comments to PRs.
For example:
(The following in particular is very wrong. For pull_request_target it will run against the base commit, not the head of the commit.)
name: Record bundle stats
on:
  push:
    # Don't upload stats from dependabot branch pushes
    branches:
      - '*'
      - '*/*'
      - '**'
      - '!dependabot/**'
  pull_request_target:
    types: [opened, synchronize]

jobs:
  report:
    runs-on: ubuntu-latest
    steps:
      - uses: actions/checkout@v2
      - uses: actions/setup-node@v2.1.2
        with:
          node-version: '12.x'

      - name: yarn install
        run: yarn install

      - name: Build production version and generate stats too
        run: yarn build:stats

      - name: Compare and record bundle stats
        uses: birchill/good-bundle@v1
        with:
          AWS_ACCESS_KEY_ID: ${{ secrets.AWS_ACCESS_KEY_ID }}
          AWS_SECRET_ACCESS_KEY: ${{ secrets.AWS_SECRET_ACCESS_KEY }}
          GITHUB_TOKEN: ${{ secrets.GITHUB_TOKEN }}
You can set the secret environment variables as follows:
- Go to your repository on GitHub.
- Settings
- Secrets
- New Secret
Given the CSV file generated your easiest option would be just to use Excel or similar.
If you want to get fancy, however, there are other options.
If you are already doing everything on AWS and have QuickSight (starting at USD9 a month) you can easily load the data in using the generated manifest file.
The steps are roughly:
- Create an S3 data set.
- Get the public URL to the
quicksight_manifest.jsonfile generated by this action and use that to define the data set. - Make a visualization, remembering to filter on branch.
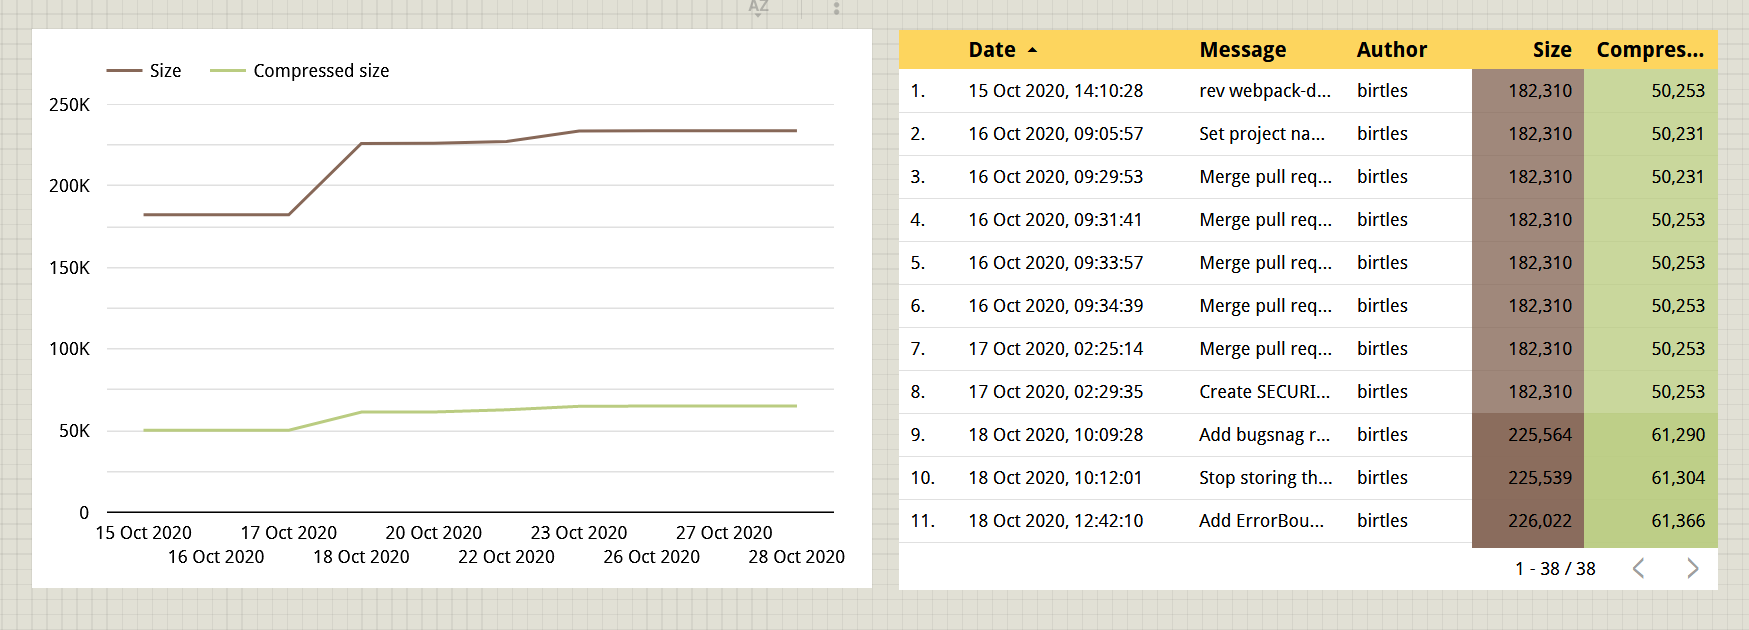
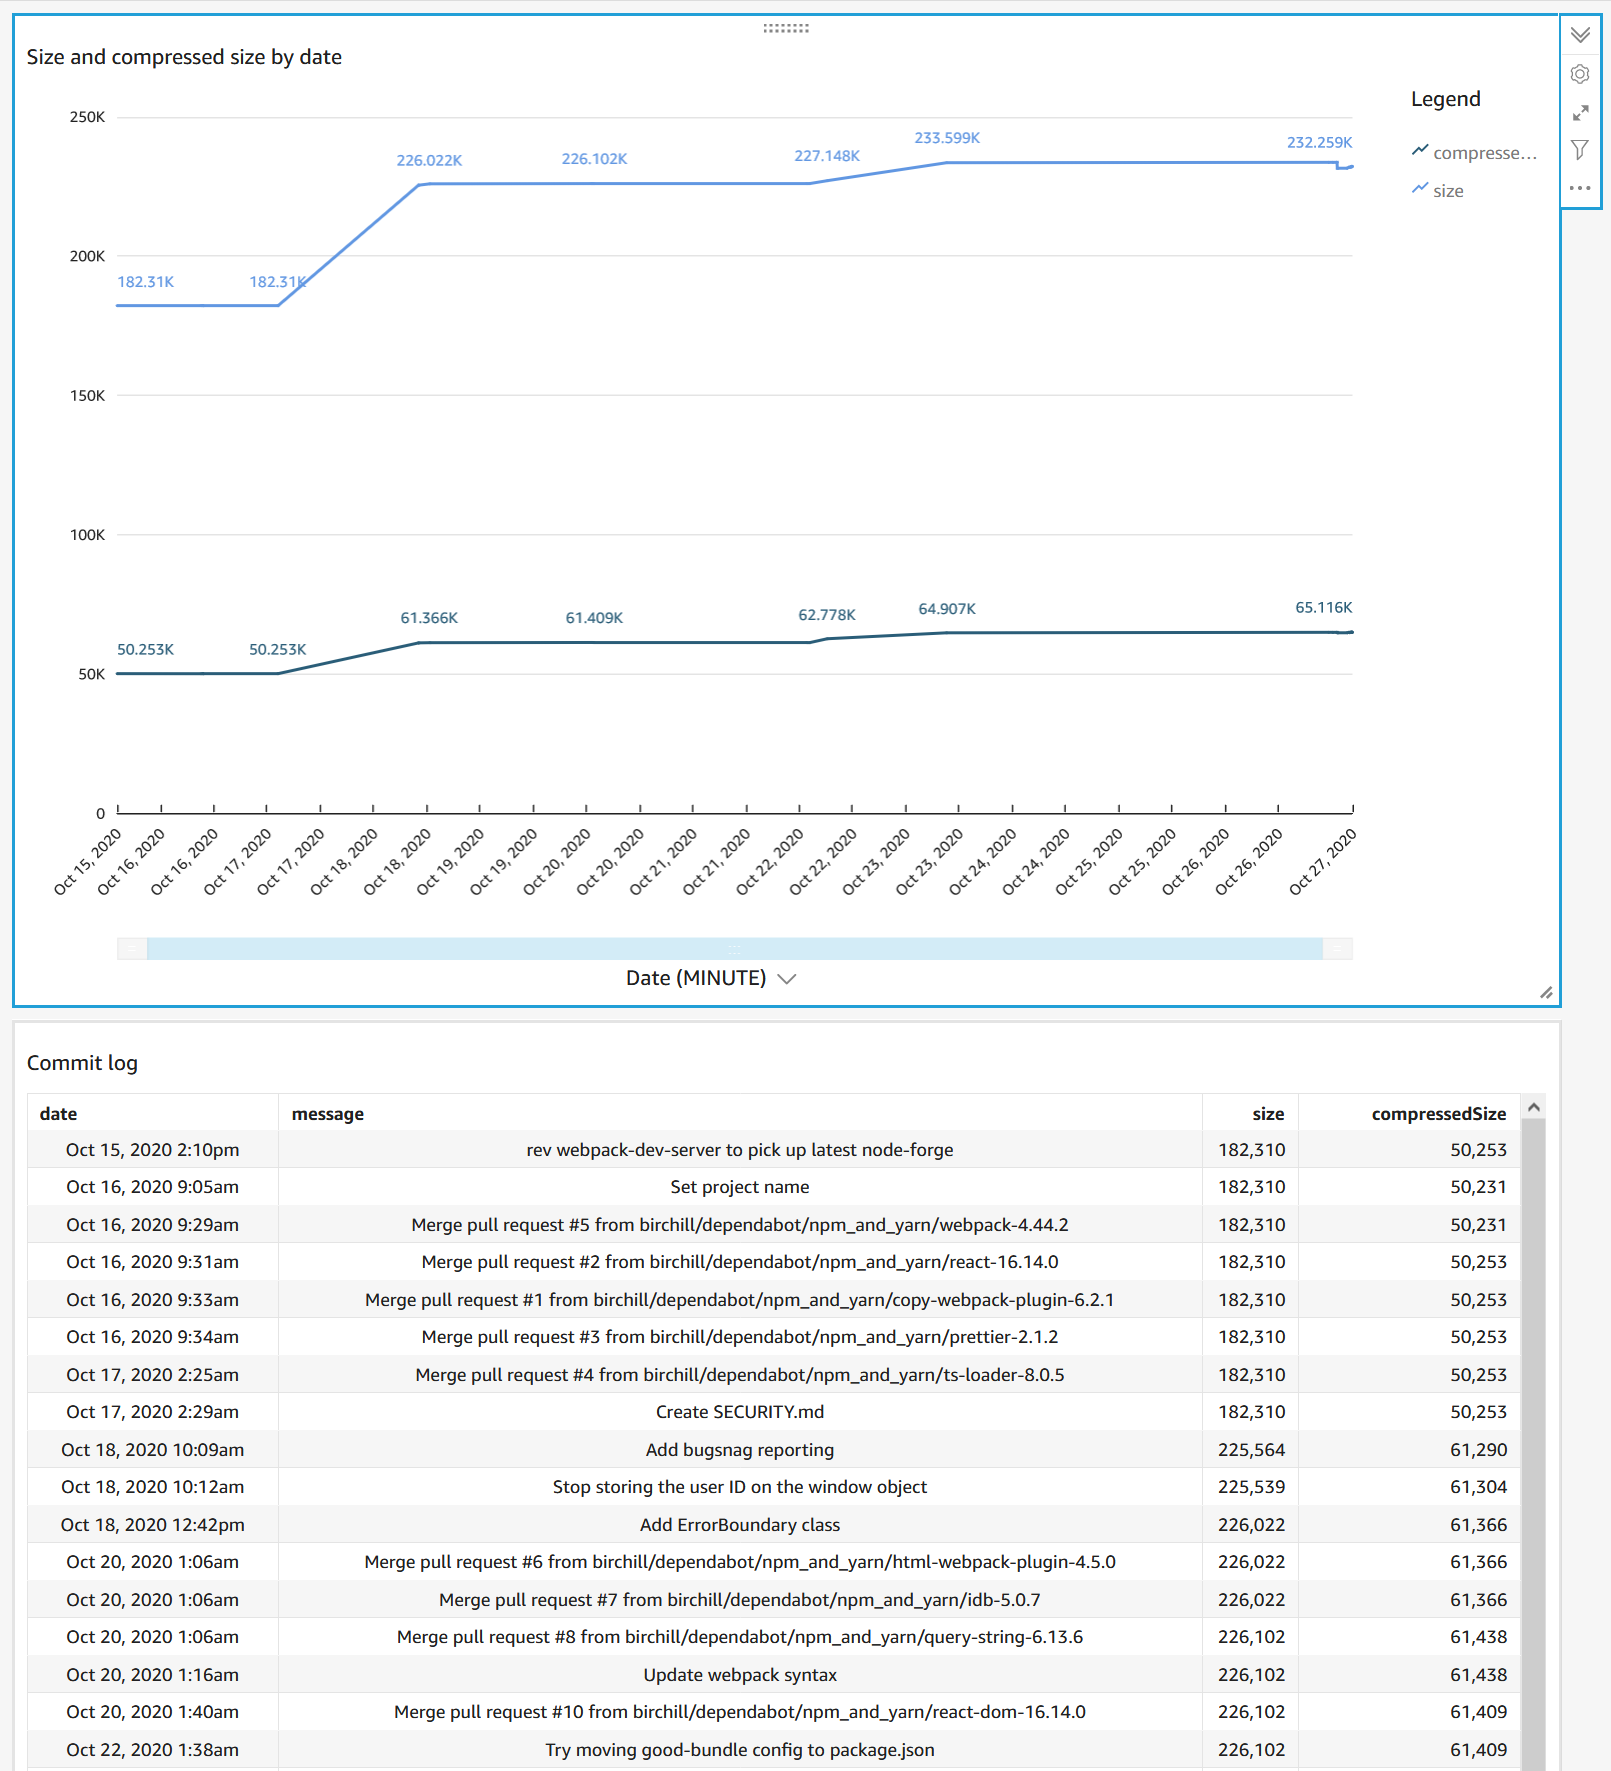
e.g.
Bonus points for:
- Creating a calculated field to display bytes as Kb etc.
- Creating a calculated field to display the date in local time.
- Making a parameter to toggle by branch and feeding that into the filter.
You can set up AWS Athena to look at your S3 bucket and then maybe the Athena data source might work?
You can always import a CSV file directly.
Alternatively, perhaps you can try the AWS Athena connector: datastudio-aws-athena-connector.
e.g.