
Say goodbye to lengthy iterations and hello to lightning-fast feedback loops. With Yaci DevKit, developers can accelerate their progress by leveraging a custom Cardano devnet that can be created and destroyed in a matter of seconds.
Powered by the user-friendly Yaci CLI, the devnet can be easily reset with a single command. This means you can iterate, experiment, and refine your code without any hassle.
Tailor your devnet to suit your specific needs using the flexible configuration options available through the CLI. While the default devnet is optimized for speed, with a 1-second block time, 1-second slot, and 500 slots per epoch, you have the freedom to customize these parameters. For instance, if you're focusing on stake registration, delegation, and reward withdrawal transactions, creating a devnet with 30-second slots allows you to test these operations within a timeframe of 120-150 seconds.
But Yaci DevKit goes beyond just providing a devnet. It equips you with a lightweight chain indexer called "Yaci Store" and a user-friendly browser-based viewer called "Yaci Viewer". Seamlessly integrated into the DevKit, these components empower you to build and submit transactions effortlessly.
Yaci DevKit also includes Ogmios and Kupo. Both Ogmios and Kupo are optional and can be activated by enabling a specific flag. Thus, if your client SDK supports either Ogmios or Kupo, you can utilize them to submit transactions to your local cluster.
Deploying Yaci DevKit is a breeze with the Docker Compose package, making setup and configuration a hassle-free experience. Manage the entire process using simple commands such as "start," "stop," and "reset," giving you full control over your development environment.
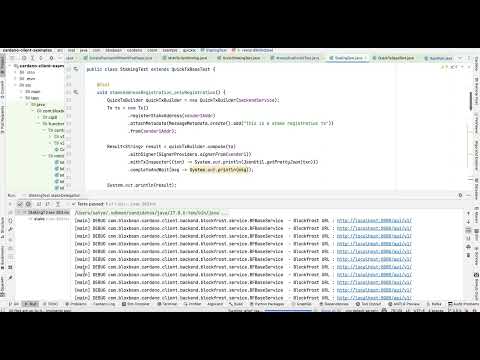
Yaci DevKit's chain indexer exposes required Blockfrost compatible API endpoints, enabling seamless integration with client SDKs like Cardano Client Lib (Java) or Lucid JS. With the ability to effortlessly build and submit transactions to the Devnet through the Blockfrost provider, your development possibilities are boundless.
Yaci DevKit docker-compose has following components
- Yaci CLI - A CLI to create/manage a local cluster and other utilities
- Yaci Store - A lightweight indexer with H2 DB
- Yaci Viewer - A minimal blockchain data viewer for developers
- Cardano Node
- Ogmios (Optional)
- Kupo (Optional)
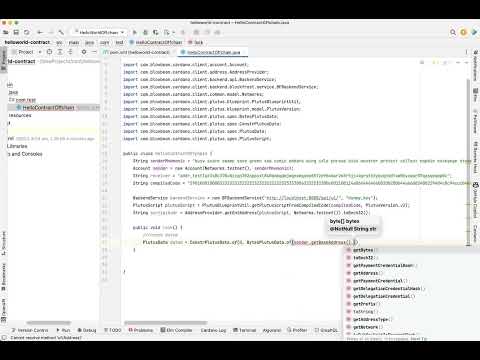
Yaci DevKit provides API endpoints that can be used in your off-chain code (e.g., a Java app, Lucid JS app) to post transactions to your local cluster.
Yaci Viewer : http://localhost:5173 (Browser)
Yaci Store Swagger UI : http://localhost:8080/swagger-ui.html (Browser)
Yaci Store Api URL : http://localhost:8080/api/v1/
(Can be used in a Java app with Cardano Client Lib's Blockfrost backend or Javascript app with Lucid JS + Blockfrost provider as it exposes required BF compatible minimum apis for tx building and submission)
Ogmios Url (Optional) : ws://localhost:1337
Kupo Url (Optional) : http://localhost:1442
n2n port : localhost:3001
n2c port for remote client (socat) : localhost:3333
- Yaci CLI
- Yaci Viewer
- Yaci Store : v0.1.0-rc2-preview1
- Cardano Node: 8.7.3
- Ogmios: v6.2.0
- Kupo: v2.8.0
Note: Includes Cardano Node binaries for both amd64 and arm64. arm64 binary is from Armada Alliance (Include both amd64 and arm64 binaries)
Check the Yaci DevKit Documentation site for more details.
- Docker Compose
Download the latest zip from release section and unzip it.
You can find devkit.sh script under the bin folder. This script is used to manage the DevKit containers and Yaci CLI.
Options:
  start   Start the DevKit containers and CLI.
  stop    Stop the DevKit containers.
  cli     Query the Cardano node in the DevKit container using cardano-cli.
  ssh     Establish an SSH connection to the DevKit container.
  info    Display information about the Dev Node.
  version Display the version of the DevKit.
  help    Display this help message.
To start the DevKit containers and yaci-cli.
./bin/devkit.sh startNote: If you have some ports already in use, please make sure the mentioned ports in config/env file are free.
You can also change the ports in config/env file. Any changes to env file will be applied when you restart the docker compose.
Update env file to include your test Cardano addresses to automatically topup Ada.
topup_addresses=<address1>:<ada_value>,<address2><ada_value>
Example
topup_addresses=addr_test1qzlwg5c3mpr0cz5td0rvr5rvcgf02al05cqgd2wzv7pud6chpzk4elx4jh2f7xtftjrdxddr88wg6sfszu8r3gktpjtqrr00q9:20000,addr_test1qqwpl7h3g84mhr36wpetk904p7fchx2vst0z696lxk8ujsjyruqwmlsm344gfux3nsj6njyzj3ppvrqtt36cp9xyydzqzumz82:10000
Important: After updating env file, you need to restart the docker compose using devkit.sh stop and devkit.sh start options.
Note: You can also use the topup command in Yaci CLI to fund your test addresses later.
Yaci DevKit bundles both Ogmios and Kupo. However, Kupo is not enabled by default. To activate both Ogmios and Kupo support,
set ogmios_enabled & kupo_enabled flag in env file to true. Alternatively, you can enable both Ogmios & Kupo support using enable-kupomios command in Yaci CLI.
Use devkit.sh script to stop the DevKit containers.
./bin/devkit.sh stopThis section explains a few key commands specific to Yaci CLI.
yaci-cli:>create-node
To overwrite data or reset the existing default devnet, use the "-o" flag. Use --start flag to start the devnet after creation.
yaci-cli:>create-node -o
or,
yaci-cli:>create-node -o --start
Known Issue: Yaci DevKit uses a share folder to store the data on host machine. In some setup, this causes issue due to permission.
If you face similar issue and not able to start the devnet, you can remove volumes section from docker-compose.yml file and restart the docker compose.
It should work fine and create the devnet data in the docker container itself. Please check this issue for more details.
By default, Yaci DevKit creates a devnet with Babbage era. If you want to create a devnet with Conway era, use the following command.
yaci-cli:>create-node -o --era conway
To create devnet with a custom slots per epoch (By default 500 slots/epoch)
For example: Create and start a devnet with 30 slots per epoch
yaci-cli> create-node -o -e 30 --start
Now, you should be in the "devnet" context. To start the devnet, use the "start" command.
devnet:default>start
Note Now, with Yaci Viewer, you can conveniently check the devnet's data right from the browser. Simply open the following URL in your browser to access the Yaci Viewer.
If your devnet gets stuck or you simply want to reset the data and restart with the same configuration, simply use the command "reset". It will restore your devnet to its initial state, allowing you to continue your development seamlessly.
devnet:default>reset
devnet:default>stop
Easily fund your test account with ADA using the "topup" command.
devnet:default> topup <address> <ada value>devnet:default> utxos <address>devnet:default> default-addressesdevnet:default> infoFor more details about Yaci CLI, please check https://yaci-cli.bloxbean.com .
If you are testing pool delegation and reward withdrawal transaction in your application, you can use the following pool id which is already registered in the devnet.
pool1wvqhvyrgwch4jq9aa84hc8q4kzvyq2z3xr6mpafkqmx9wce39zy
DevKit script has a wrapper script to query the Cardano node running in the devnet. You can use this script to query the Cardano node like you usually do with cardano-cli command line tool. You don't need to install cardano-cli in your local machine or use protocol magic number in the command.
For example:
To query protocol parameters, you can use cli option with devkit script.
./bin/devkit.sh cli query protocol-parameters
The Yaci DevKit comprises two main applications: Yaci CLI and Yaci Viewer. You can build these applications from source.
The other components such as Yaci Store, Cardano Node, Ogmios, and Kupo are downloaded from their respective sources during the Docker build.
Both Yaci CLI and Yaci Viewer are located under the applications folder.
This is the simplest way to build all components and create Docker images. You need to have Earthly installed on your machine.
- Clone the repository.
- Edit the version file to update the
tag. For a development build, you can use dev as the tag. - This tag will be used to tag the Docker images and also in the docker-compose.yml file.
- Run the following Earthly command to build the Docker images:
earthly --arg-file-path=config/version +buildThis will build the Yaci DevKit Docker image from application/cli and the Yaci Viewer Docker image from application/viewer.
Once the images are built, you can run the DevKit using bin/devkit.sh script.
For GitHub Actions, we have a workflow file that builds the Docker images and pushes them to DockerHub.
Both Yaci CLI and Yaci Viewer can also be built separately using Java and NodeJS.
- Java 21
- Gradle
Go to applications/cli folder and run the following command to build Yaci CLI.
./gradlew clean buildYaci Viewer is a Sveltejs application. Check this README for more details.
- Create a Github Discussion
- Create a Github Issue
- Discord Server