This repository allows you to run a countdown clock display for the NYC Subway from the comfort of your own apartment, home or office. You can configure it to display the times for the exact train(s)/station(s) you desire. It runs via RGB LED panels, the Raspberry Pi 2, @hzeller's great RGB LED library, and the MTA's real time API. Currently, the MTA currently only disseminates real-time data for the "A" division trains which include the 1, 2, 3, 4, 5, 6 and L trains, and as a result are the only lines supported. For avoidance of doubt, this repository is in no way connected, endorsed, or licensed by the Metropolitan Transportation Authority ("MTA").
Please note that these panels do not have built-in PWM control and therefore should be run by a real-time processor. This repository utilizes the Raspberry Pi which is not a real-time processor. With that said, there should be limited issues utilizing the Pi to drive two RGB LED matrix panels. The performance issues should be limited to slight artifacts in the image including some "static" which can be seen below. You may be interested in exploring the use of level-shifters, real-time Linux kernels, or a real-time HAT, but these are currently untested.
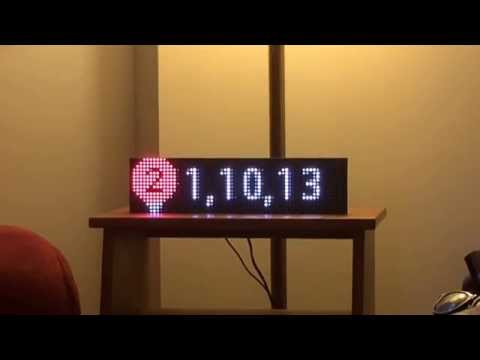
You can see a demo of the completed display on YouTube
While the cheapest option to source the hardware necessary for the project is likely Alibaba.com, it generally requires a lot of lead time. To get up and running quickly, I recommend Adafruit. I have provided links to the exact products I purchased from Adafruit.
- Raspberry Pi 2 - Model B
- Mini USB WiFi Module
- 4GB SD Card (Optionally Preinstalled with Raspbian Wheezy)
- 5V 2A Power Supply w/ MicroUSB Cable
- 2 16x32 RGB LED Matrix Panels
- Female DC Power Adapter - 2.1mm Jack to Screw Terminal Block
- 5V 4A Power Supply
- Solder/Insulated Wire (if you own a soldering iron) OR Premium Female/Female Jumper Wires
- USB or wireless mouse/keyboard, HDMI cable, and display (all for initial Raspberry Pi setup)
- Mounting hardware
- Wire Stripper/Cutter
In addition to a fresh install of Raspbian, you will need to install these libraries:
- PIL
- python gtfs-realtime-bindings
- @hzeller's RGB LED library. Make sure to install this in the empty "rpi-rgb-led-matrix" directory in this repository.
- Get the Raspberry Pi up and running.
- If you didn't get an SD card with Raspbian pre-installed, download the latest image and follow the appropriate installation guide.
- Connect the Raspberry Pi to a keyboard, mouse, and display. Insert the SD card. Insert the MicroUSB power adapter and wait for the system to boot. If the system does not boot, check this guide for troubleshooting.
- Login to the Pi if prompted using the default username "pi", and the default password "raspberry".
- Configure the Pi using the "raspi-config" configuration screen which should automatically launch. If not use
sudo raspi-configto access the menu. Make sure to change the timezone to New York and to change the default password before connecting to the internet. I also recommend using SSH to connect to the Pi remotely going forward. For more detailed information on the menu, please use this guide. - Update the packages
sudo apt-get update sudo apt-get upgrade- Safely shutdown the system with
sudo shutdown -h nowand then unplug the power. - Insert the USB WiFi adapter and boot up the system. Enter the GUI via
startxand configure the WiFi.
- With both the RGB LED matrices and Raspberry Pi disconnected from power, connect the two using the female to female wires OR solder. Either way, use following the wiring diagram, and make sure you are wiring to the input side of one of the RGB LED panels. To connect the two matrices together, simply use the IDC cable as pictured below.


-
In order to connect the panels to a power source, I had to cut one end of the AMP style power cords above the plastic piece, strip the insulation off the last 1/2" of the wires, and connect them to screw terminal DC power adapter. Make sure you have the polarity of the wires correct. The red wires on my panels went to the positive (+) side of the screw terminals and the blue wires went to the negative (-) side. Make sure to handle the connection with care and I suggest wrapping it in electrical tape for safety and stability.
-
With the matrices correctly wired to the Pi and connected to power, boot the Pi back on. Login using your new credentials, and navigate to the GUI via
startx. Make sure you are connected to the internet, and open up the command prompt. Create a directory named "subwaydisplay" viamkdir subwaydisplayand navigate to the directory viacd subwaydisplay. Clone this repository into the folder viagit clone https://github.com/chris-griffin/real-time.git. If you run into an error, make sure that you have git installed viasudo apt-get install git. Navigate to the "rpi-rgb-led-matrix" directory viacd rpi-rgb-led-matrixand clone @hzeller's RGB LED library viagit clone https://github.com/hzeller/rpi-rgb-led-matrix.git. Run themakecommand to compile the files of this repository. -
Install PIL and python gtfs-realtime-bindings via instructions from the provided links.
-
Obtain a developer key from the MTA and update the "sampleconfig.py" file with this information. Rename this file to "config.py".
-
Navigate back to the "subwaydisplay" directory in the command prompt and run the "importdata.py" program with
python importdata.py. You should see the RGB LED matrix panels come to life with the information for the uptown and downtown Wall Street 2/3 trains, and downtown 4/5 trains. You can adjust which trains are displayed by altering the config file with the appropriate station ids which can be found in the "StaticData" folder.
- Fork it!
- Create your feature branch:
git checkout -b my-new-feature - Commit your changes:
git commit -am 'Add some feature' - Push to the branch:
git push origin my-new-feature - Submit a pull request
The MIT License (MIT)
Copyright (c) 2015 Christopher Griffin
Permission is hereby granted, free of charge, to any person obtaining a copy of this software and associated documentation files (the "Software"), to deal in the Software without restriction, including without limitation the rights to use, copy, modify, merge, publish, distribute, sublicense, and/or sell copies of the Software, and to permit persons to whom the Software is furnished to do so, subject to the following conditions:
The above copyright notice and this permission notice shall be included in all copies or substantial portions of the Software.
THE SOFTWARE IS PROVIDED "AS IS", WITHOUT WARRANTY OF ANY KIND, EXPRESS OR IMPLIED, INCLUDING BUT NOT LIMITED TO THE WARRANTIES OF MERCHANTABILITY, FITNESS FOR A PARTICULAR PURPOSE AND NONINFRINGEMENT. IN NO EVENT SHALL THE AUTHORS OR COPYRIGHT HOLDERS BE LIABLE FOR ANY CLAIM, DAMAGES OR OTHER LIABILITY, WHETHER IN AN ACTION OF CONTRACT, TORT OR OTHERWISE, ARISING FROM, OUT OF OR IN CONNECTION WITH THE SOFTWARE OR THE USE OR OTHER DEALINGS IN THE SOFTWARE.