

Deep Learning AI Emotion recognition made in python with Tensorflow/Keras and OpenCV.
✨✨✨✨✨✨✨✨✨✨✨✨✨✨✨✨✨
➡️➡️➡️Try the AI directly in your Browser !!⬅️⬅️⬅️
✨✨✨✨✨✨✨✨✨✨✨✨✨✨✨✨✨
- Expression Recognition
- Videos
- Report and Jupyter Notebook
- Installation
- Databases
- GitHub Actions
- Libraries
- Documentations
- Bibliography
- Contributors
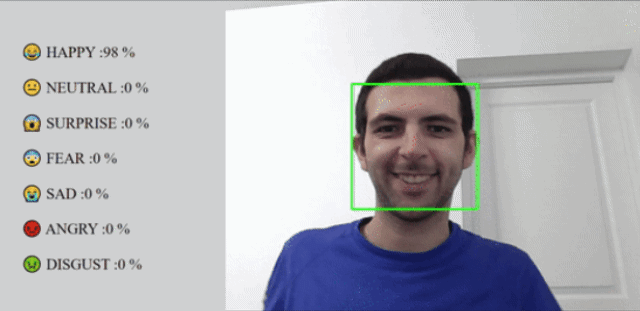
The app is able to analyse facial expressions directly by analysing one image or by analysing frame by frame a video.
It finds a visible face on an image and shows the current emotion state of it based on the 7 main facial expressions :
- Neutral/Normal
- Sadness
- Happiness
- Fear
- Anger
- Surprise
- Disgust
The app is using the CNN (Convolutional neural network) with the ResNet50 Architecture via Transfer Learning. The AI is trained with the FER-2013 and FERPLUS datasets allowing it to understand how to analyse a person's emotion from a picture.
Note The project is focused on the emotion recognition from face images. To find faces in a video, we use OpenCV that allow us to transform face in a video to croped images allowing us to predict the emotions.
The app features :
- UI
- Handle face detection
- Analyse emotions of a person


A report is available, but it is only in French.
There is also a Jupyter Notebook named demo.ipynb at the root folder of the project which shows you an example of how
we trained our AI.
There is two versions of the project. One which you can test online by going to the Quickstart Browser Version section
and the other for your computer in section Quickstart Computer Version.
Note If you juste want to test the app, go on to the browser version, you need nothing except a browser to test it.
The other version can be used if you want to test on your computer, train/change the model etc...
Follow the link below if you want to try a version with the browser of our app.
No installations nor any libs to download and install.
You can check the GitHub repository to see the code and you can try our AI direcly in your Browser by clicking on this link
Firstly you need to install python. We recommend you python 3.6 to 3.9 because certain libraries weren't available to version above 3.9.
If you just want to start the UI app, then just follow the Requirements instructions just below.
In the case you want to test the models and train them. We would advise you to follow the Requirements instructions below and the second set of instructions 2. CUDA and cuDNN installation (only if you want to train your own AI).
Note You will need a good GPU to train the models if you don't want the training to take more than 2 hours.
Once everything is installed, go to part 3. Train a model and use it to train a model and test it.
To use the program, you need to install python first (version 3.8 advised).
You can then install the required python packages. They are all listed in the requirements.txt file.
To directly install them all, type the following command: pip install -r requirements.txt
With all the packages installed you'll be able to start the app.py file at the root of the project,
it will start the HIM shown in the readme. Once the HIM is started go in your browser to this address
http://localhost:3134, wait a minute to let the backend start, and have fun !
N.B. you can run app.py by typing in the terminal the following commands : flask run or py app.py
If you don't want to use the browser UI version, you can use the
python UI version in emotion_recognition/prediction.py.
It works with open-cv and shows emotions directly in the terminal.
Before using the program, you should install CUDA and SDK to allow the program to run with the GPU and not the CPU. The app needs a lot of processing, so to speed it we use the GPU instead of the CPU.
Warning While programming we used different versions of tensorflow, CUDA etc... To know which version of Tensorflow use with your version of CUDA, cudNN etc... check this link
Follow this tutorial from Tensorflow
Visual Studio or redistributable :
Follow this video steps if you have any difficulties. If you are unable to install CUDA and cuDNN, I would advise you to use a TPU, by using Google Collab.
Once you have installed the necessary packages, app, SDK, etc... You need to download the FER-13 dataset in the 3. Download the FER-13 database section, then you'll be able to train your own AI.
Follow this tutorial from Tensorflow
Once you have installed the necessary packages, app, SDK, etc... You need to download the FER-13 dataset in the 3. Train a model and use it section, then you'll be able to train your own AI.
Once everything is installed you can run the script emotion_recognition/Models/training.py.
There you can select which model you want to train by transfer learning between :
- resnet50
- vgg16
- xception
- inception_resnet_v2
- inception_v3
- resnet50v2
- resnet101
If you want to use another model for the UIs, save your model when asked by the script training.py (it happens at
the end of a training session). Then, you can change the model in app.py or prediction.py, in the
function load_weights or load_model. By default, all saved models are stored
in emotion_recognition/Models/trained_models/ directory.
The function load_weights works only with .h5 files while load_model works by giving him the path to a directory
which contain a complete model.
You can also change the database on which you're training. By default, the AI is set to be trained on FER-2013 dataset that you need to download first.
If you want to use FERPlus for better performances, you will need to download FERPLUS and FER-2013. Extract them in the
databases' folder next to the datasets.txt file as two folder FER-2013 (containing train, test folders and
fer2013.csv)
and FERPlus folder containing all the FERPlus's Microsoft repository.
Last step is to start the remake_dataset.py that will concatenate all FERPlus images inside the FER-2013 folder.
Note All datasets can be downloaded below!!!
![]()
![]()
The project is set with a set of different scripts that do the following tasks:
- CodeQl : Evaluate the quality of the code with the CodeQl tool.
- Python application : Run the application with the Python application tool.
How to elaborate a CNN :
https://www.analyticsvidhya.com/blog/2021/11/facial-emotion-detection-using-cnn/
https://machinelearningmastery.com/how-to-develop-a-cnn-from-scratch-for-cifar-10-photo-classification/
OpenCV :
https://www.datacorner.fr/reco-faciale-opencv/
https://www.datacorner.fr/reco-faciale-opencv-2/
FERPLUS :
Barsoum, E., Zhang, C., Canton Ferrer, C., & Zhang, Z. (2016). Training Deep Networks for Facial Expression Recognition
with Crowd-Sourced Label Distribution. In ACM International Conference on Multimodal Interaction (ICMI).
Quentin MOREL :
- @Im-Rises
- https://github.com/Im-Rises
Clément REIFFERS :
- @clementreiffers
- https://github.com/clementreiffers
Yohan COHEN-SOLAL :
- @YohanCohen-Solal
- https://github.com/YohanCohen-Solal