GitOps with Flux, Github Action, Amazon ECR & Amazon EKS

GitHub Actions enables you to create custom software development life cycle (SDLC) workflows directly in your GitHub repository.
Workflows are custom automated processes that you can set up in your repository to build, test, package, release, or deploy any project on GitHub. With workflows you can automate your software development life cycle with a wide range of tools and services.
In this post, you'll learn how to use a GitHub Actions workflow to build and push a new container image to Amazon ECR upon code change.
You must store workflows in the .github/workflows directory in the root of your repository. The files are in .yml or .yaml format.
Let's create one called build.yml.
The first part is the name of your workflow. It is used to display on your repository's actions page.
name: Building and pushing a docker image to Amazon ECRThe second part is on, which is the name of the GitHub event triggering the workflow.
You can provide a single event
on: pushor a list of events
on: [push, pull_request]We can also add more configurations. For example, we can specify activity types. The below example shows it triggers the workflow on push or pull request only for the master branch and for the paths under app/**.
on:
  pull_request:
    paths:
    - app/**
    branches:
    - master
  push:
    paths:
    - app/**
    branches:
    - master
The next part is env. We'll setup environment variables to provide configuration option and credentials via Github.
env:
AWS_DEFAULT_REGION: ap-southeast-1
AWS_DEFAULT_OUTPUT: json
AWS_ACCOUNT_ID: ${{ secrets.AWS_ACCOUNT_ID }}
AWS_ACCESS_KEY_ID: ${{ secrets.AWS_ACCESS_KEY_ID }}
AWS_SECRET_ACCESS_KEY: ${{ secrets.AWS_SECRET_ACCESS_KEY }}
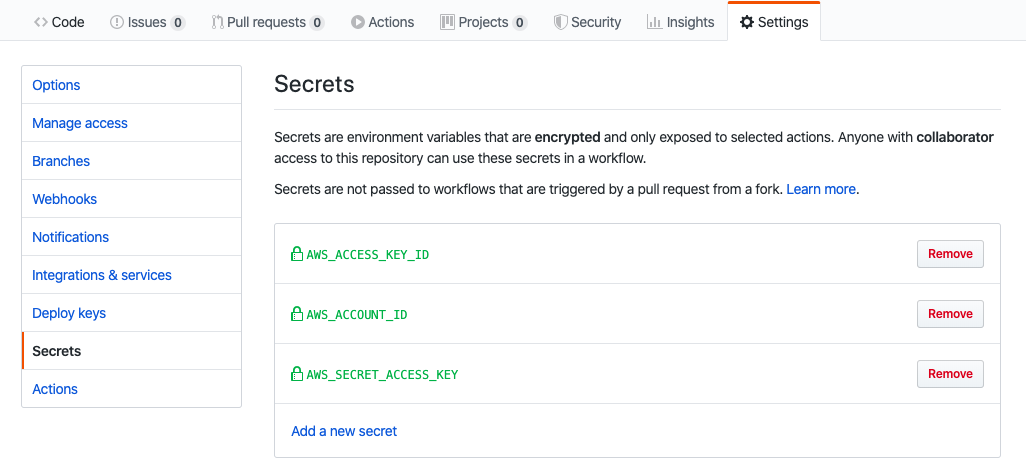
CONTAINER_IMAGE: example-container:${{ github.sha }}Go to Github, navigate to Settings in your repository. Click Secrets.
Add three new secrets namely AWS_ACCOUNT_ID, AWS_ACCESS_KEY_ID, and AWS_SECRET_ACCESS_KEY.
A workflow run is made up of one or more jobs. They run in parallel by default. Each job runs in an environment specified by runs-on.
A job contains a sequence of tasks called steps. Steps can run commands, run setup tasks, or run an action in your repository, a public repository, or an action published in a Docker registry.
jobs:
  build-and-push:
    name: Building and pushing image to AWS ECR
    runs-on: ubuntu-latest
    steps:

    - name: Checkout
      uses: actions/checkout@master

    - name: Setup ECR
      run: |
        $( aws ecr get-login --no-include-email )

    - name: Build and tag the image
      run: |
        docker build \
          -t $CONTAINER_IMAGE \
          -t $AWS_ACCOUNT_ID.dkr.ecr.$AWS_DEFAULT_REGION.amazonaws.com/$CONTAINER_IMAGE ./app

    - name: Push
      if: github.ref == 'refs/heads/master'
      run: |
        docker push $AWS_ACCOUNT_ID.dkr.ecr.$AWS_DEFAULT_REGION.amazonaws.com/$CONTAINER_IMAGE
Let's break it out. There is a job called build-and-push. There are four steps running on a virtual environment which is Ubuntu 18.04.
The first step is to check out the master.
- name: Checkout
    uses: actions/checkout@master
Then, we need to setup our Amazon ECR in order to push our image to it.
    run: |
    $( aws ecr get-login --no-include-email )
The third step is to build and tag the docker image. Notice that we are using the environment variables defined in env.
- name: Build and tag the image
    run: |
    docker build \
        -t $CONTAINER_IMAGE \
        -t $AWS_ACCOUNT_ID.dkr.ecr.$AWS_DEFAULT_REGION.amazonaws.com/$CONTAINER_IMAGE ./app
The last step is to run docker push to push the image built in the previous step to Amazon ECR.
- name: Push
    if: github.ref == 'refs/heads/master'
    run: |
    docker push $AWS_ACCOUNT_ID.dkr.ecr.$AWS_DEFAULT_REGION.amazonaws.com/$CONTAINER_IMAGE
Commit something under app directory and push the changes to master.
Navigate to Actions. You should see a workflow is being processed.

You can see the status or check the log for each step.
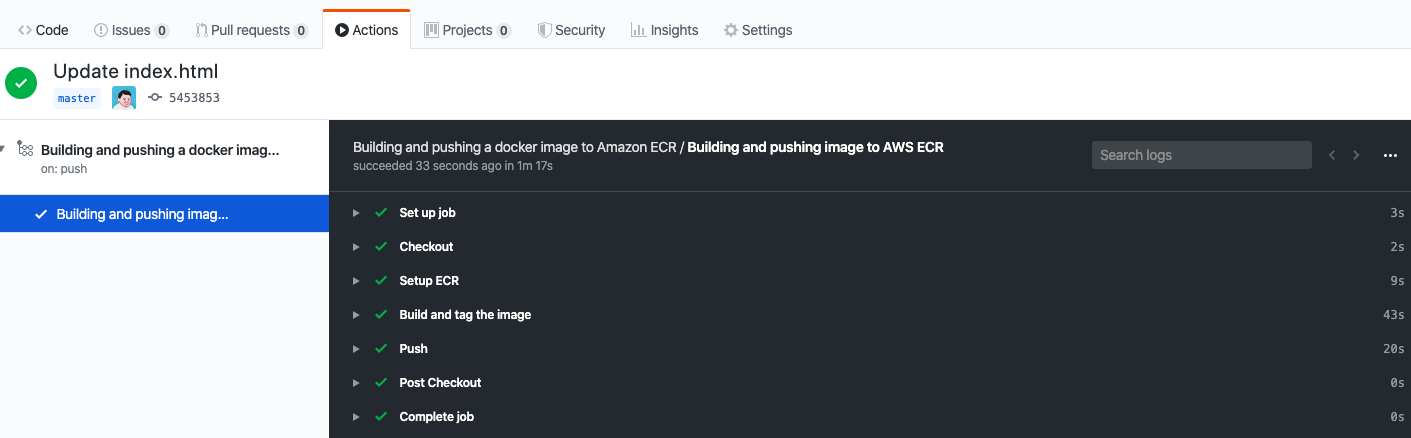
You can see the latest tag name when you expand Build and tag the image.
Successfully built a1ffb1e3955b
Successfully tagged example-container:545385325b99e079cb7ee69d3809efd90cbffba9
Successfully tagged ***.dkr.ecr.ap-southeast-1.amazonaws.com/example-container:545385325b99e079cb7ee69d3809efd90cbffba9
Go to AWS ECR Console, you should see the image there.
That's it. Here's the complete build yaml file.
name: Building and pushing a docker image to Amazon ECR

on:
  pull_request:
    paths:
    - app/**
    branches:
    - master
  push:
    paths:
    - app/**
    branches:
    - master

env:
  AWS_DEFAULT_REGION: ap-southeast-1
  AWS_DEFAULT_OUTPUT: json
  AWS_ACCOUNT_ID: ${{ secrets.AWS_ACCOUNT_ID }}
  AWS_ACCESS_KEY_ID: ${{ secrets.AWS_ACCESS_KEY_ID }}
  AWS_SECRET_ACCESS_KEY: ${{ secrets.AWS_SECRET_ACCESS_KEY }}
  CONTAINER_IMAGE: example-container:${{ github.sha }}

jobs:
  build-and-push:
    name: Building and pushing image to AWS ECR
    runs-on: ubuntu-latest
    steps:

    - name: Checkout
      uses: actions/checkout@master

    - name: Setup ECR
      run: |
        $( aws ecr get-login --no-include-email )

    - name: Build and tag the image
      run: |
        docker build \
          -t $CONTAINER_IMAGE \
          -t $AWS_ACCOUNT_ID.dkr.ecr.$AWS_DEFAULT_REGION.amazonaws.com/$CONTAINER_IMAGE ./app

    - name: Push
      if: github.ref == 'refs/heads/master'
      run: |
        docker push $AWS_ACCOUNT_ID.dkr.ecr.$AWS_DEFAULT_REGION.amazonaws.com/$CONTAINER_IMAGE
For more, please check out GitHub Actions Documentation
However, if you are using Amazon EKS, you may need to manually update the image URI every time you have a new release. is there a way to automate the whole process that the image URI can be updated automatically? Yes. Here's the solution for you.
Flux is the operator that makes GitOps happen in your cluster. It ensures that the cluster config matches the one in git and automates your deployments.
Configure your kubectl so that you can connect to an Amazon EKS cluster by running
export AWS_REGION="ap-southeast-1"
export CLUSTER_NAME="your-cluster-name"

aws eks --region ${AWS_REGION} update-kubeconfig --name ${CLUSTER_NAME}
If you enable load balancer ingress access, make sure that you have the corresponding IAM role.
aws iam get-role --role-name "AWSServiceRoleForElasticLoadBalancing" || aws iam create-service-linked-role --aws-service-name "elasticloadbalancing.amazonaws.com"Run your manifest files
kubectl apply -f manifests/deployment.yaml
kubectl apply -f manifests/service.yaml
kubectl apply -f manifests/ingress.yaml
A sample deployment can be found here. Make sure you have fluxcd.io/automated: "true" under annotations.
The next step is to run Flux on our EKS cluster. Let's create a new namespace flux in where flux objects will be installed.
kubectl create ns fluxInstall flux objects under flux namespace. By doing so, flux is monitoring the manifests folder for the changes.
export GHUSER=your-github-user
export GHREPO=your-github-repo

fluxctl install \
    --git-user=${GHUSER} \
    --git-email=${GHUSER}@users.noreply.github.com \
    --git-url=git@github.com:${GHUSER}/${GHREPO} \
    --git-path=manifests \
    --namespace=flux | kubectl apply -f -
You should see the following
serviceaccount/flux created
clusterrole.rbac.authorization.k8s.io/flux unchanged
clusterrolebinding.rbac.authorization.k8s.io/flux configured
deployment.apps/flux created
secret/flux-git-deploy created
deployment.apps/memcached created
service/memcached created
Let's verify if they are running or not
kubectl get all -n fluxNAME READY STATUS RESTARTS AGE
pod/flux-6449c6bd94-7gz88 1/1 Running 0 5m
pod/memcached-86869f57fd-52cwn 1/1 Running 0 5m
NAME TYPE CLUSTER-IP EXTERNAL-IP PORT(S) AGE
service/memcached ClusterIP 10.100.152.74 <none> 11211/TCP 5m
NAME READY UP-TO-DATE AVAILABLE AGE
deployment.apps/flux 1/1 1 1 5m
deployment.apps/memcached 1/1 1 1 5m
NAME DESIRED CURRENT READY AGE
replicaset.apps/flux-6449c6bd94 1 1 0 5m
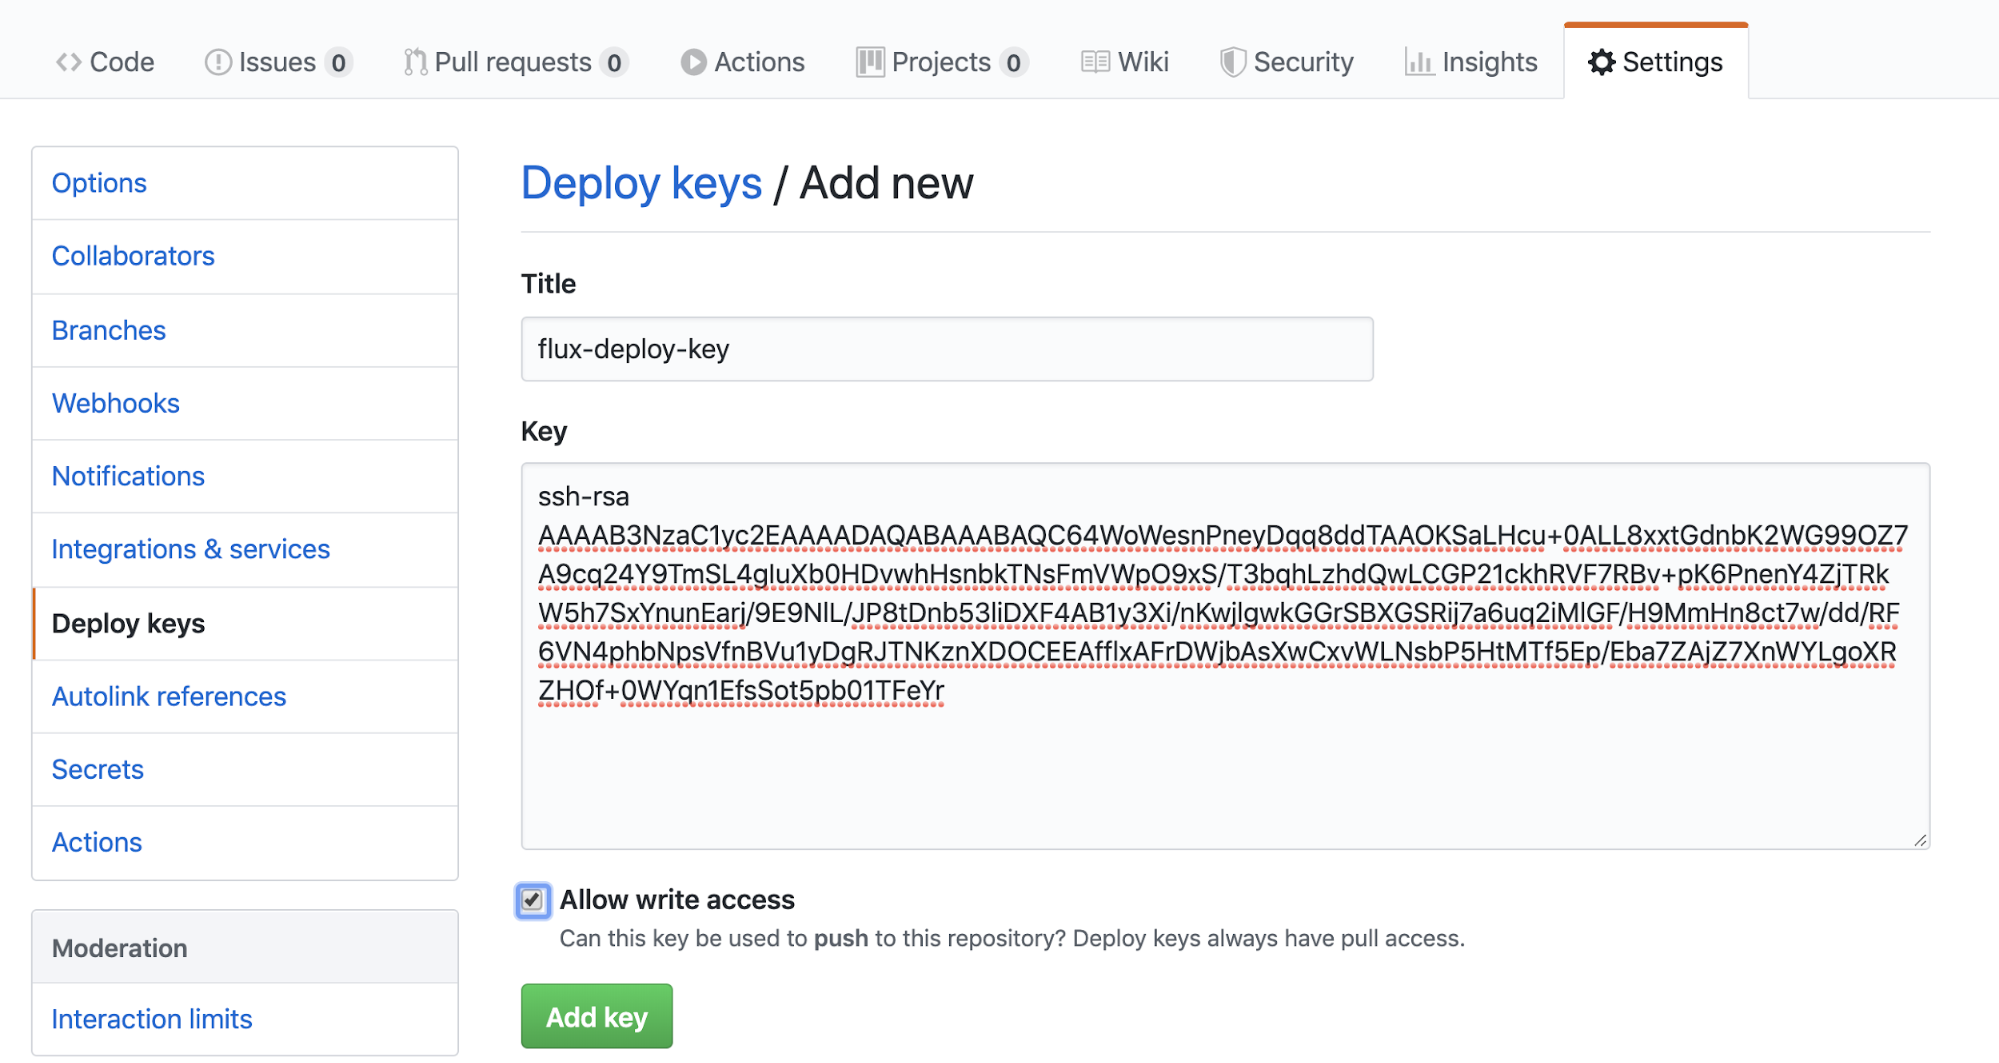
replicaset.apps/memcached-86869f57fd 1 1 1 5mUpon the completion of deployment, the docker image URI in deployment.yaml should be updated. To do so, we need to grand read/write access to the repository with a deploy key so that Flux can be able to write it back every time it deploys.
By running
fluxctl identity --k8s-fwd-ns fluxYou should get a deploy key.
ssh-rsa
AAAAB3NzaC1yc2EAAAADAQABAAABAQC64WoWesnPneyDqq8ddTAAOKSaLHcu+0ALL8xxtGdnbK2WG99OZ7A9cq24Y9TmSL4gIuXb0HDvwhHsnbkTNsFmVWpO9xS/T3bqhLzhdQwLCGP21ckhRVF7RBv+pK6PnenY4ZjTRkW5h7SxYnunEarj/9E9NlL/JP8tDnb53liDXF4AB1y3Xi/nKwjlgwkGGrSBXGSRij7a6uq2iMlGF/H9MmHn8ct7w/dd/RF6VN4phbNpsVfnBVu1yDgRJTNKznXDOCEEAfflxAFrDWjbAsXwCxvWLNsbP5HtMTf5Ep/Eba7ZAjZ7XnWYLgoXRZHOf+0WYqn1EfsSot5pb01TFeYr
Go to Settings > Deploy keys and click 'Add deploy key'
Enter the title and the key you just generated. Make sure you tick 'Allow write access'
Then we can go back to the console and run the following command to sync Flux and Github.
fluxctl sync --k8s-fwd-ns fluxFor the first time, you should see
Synchronizing with git@github.com:wingkwong/eks-flux-playground
Revision of master to apply is a8e3b45
Waiting for a8e3b45 to be applied ...
Done.
If you make a change and push to master, Github Actions helps to build and push the docker image to Amazon ECR, and Flux helps to deploy the latest image to Amazon EKS.
Go back to the repository, you should see there is a new commit on your deployment.yaml while the change is only updating the image URI.
Auto-release xxxxxxxxxxxx.dkr.ecr.ap-southeast-1.amazonaws.com/eks-flux…Flux is the GitOps Kubernetes operator, which is most useful when used as a deployment tool at the end of a Continuous Delivery pipeline. Flux will make sure that your new container images and config changes are propagated to the cluster.
However, at this moment, flux only works with a single git repository containing Kubernetes manifests.
Let's say you have three applications from three different repositories. If you run fluxctl install for each application on different namespace, and list the controllers with the last namespace you created.
fluxctl list-controllers --k8s-fwd-ns=app3WORKLOAD CONTAINER IMAGE RELEASE POLICY
default:deployment/app1 app1 123456789123.dkr.ecr.ap-southeast-1.amazonaws.com/app1:f8ebcf87b02cd334b4228c1d22fe001dafff9ca6 ready
default:deployment/app2 app2 123456789123.dkr.ecr.ap-southeast-1.amazonaws.com/app2:92218e4aeefa8f19f5e9a900bc7d07f38b8622c6 ready
default:deployment/app3 app3 123456789123.dkr.ecr.ap-southeast-1.amazonaws.com/app3:a1a8231ff2ac89eb70fc353eeceb2470ee2d0ec3 ready automated If you list the controllers with namespace app1
fluxctl list-controllers --k8s-fwd-ns=app1There is no workload for it
WORKLOAD CONTAINER IMAGE Same as app1
fluxctl list-controllers --k8s-fwd-ns=app2No workload is expected
WORKLOAD CONTAINER IMAGE Therefore, even you make a commit to repo app1 or app2, it never triggers the controller to sync and update the repo. Your deployment would remain unchanged.
To fix it, run
kubectl edit clusterrolebinding.rbac.authorization.k8s.io/fluxYou should see
apiVersion: rbac.authorization.k8s.io/v1
kind: ClusterRoleBinding
metadata:
  annotations:
    kubectl.kubernetes.io/last-applied-configuration: |
      {"apiVersion":"rbac.authorization.k8s.io/v1beta1","kind":"ClusterRoleBinding","metadata":{"annotations":{},"labels":{"name":"flux"},"name":"flux"},"roleRef":{"apiGroup":"rbac.authorization.k8s.io","kind":"ClusterRole","name":"flux"},"subjects":[{"kind":"ServiceAccount","name":"flux","namespace":"app3"}]}
  creationTimestamp: "2020-03-13T16:31:43Z"
  labels:
    name: flux
  name: flux
  resourceVersion: "85027"
  selfLink: /apis/rbac.authorization.k8s.io/v1/clusterrolebindings/flux
  uid: 202463ba-6548-11ea-a8a2-025c790809a6
roleRef:
  apiGroup: rbac.authorization.k8s.io
  kind: ClusterRole
  name: flux
subjects:
- kind: ServiceAccount
  name: flux
  namespace: app3
Since you create app3 at the end, the cluster role binding config is modified when you run fluxctl install.
clusterrolebinding.rbac.authorization.k8s.io/flux configured
If you check out flux RBAC template, you can see there is only one subject.
apiVersion: rbac.authorization.k8s.io/v1beta1
kind: ClusterRoleBinding
metadata:
  name: {{ template "flux.clusterRoleName" . }}
  labels:
    app: {{ template "flux.name" . }}
    chart: {{ template "flux.chart" . }}
    release: {{ .Release.Name }}
    heritage: {{ .Release.Service }}
roleRef:
  apiGroup: rbac.authorization.k8s.io
  kind: ClusterRole
  name: {{ template "flux.clusterRoleName" . }}
subjects:
  - name: {{ template "flux.serviceAccountName" . }}
    namespace: {{ .Release.Namespace | quote }}
    kind: ServiceAccount
{{- end -}}
{{- end -}}
Therefore, to allow three applications at the same time, we need to add the missing two.
apiVersion: rbac.authorization.k8s.io/v1
kind: ClusterRoleBinding
metadata:
  annotations:
    kubectl.kubernetes.io/last-applied-configuration: |
      {"apiVersion":"rbac.authorization.k8s.io/v1beta1","kind":"ClusterRoleBinding","metadata":{"annotations":{},"labels":{"name":"flux"},"name":"flux"},"roleRef":{"apiGroup":"rbac.authorization.k8s.io","kind":"ClusterRole","name":"flux"},"subjects":[{"kind":"ServiceAccount","name":"flux","namespace":"app1"}]}
  creationTimestamp: "2020-03-13T16:31:43Z"
  labels:
    name: flux
  name: flux
  resourceVersion: "85027"
  selfLink: /apis/rbac.authorization.k8s.io/v1/clusterrolebindings/flux
  uid: 202463ba-6548-11ea-a8a2-025c790809a6
roleRef:
  apiGroup: rbac.authorization.k8s.io
  kind: ClusterRole
  name: flux
subjects:
- kind: ServiceAccount
  name: flux
  namespace: app1
- kind: ServiceAccount
  name: flux
  namespace: app2
- kind: ServiceAccount
  name: flux
  namespace: app3
Once you save the file, it will update the config in the background. Now we can verify the result.
fluxctl list-controllers --k8s-fwd-ns=app1WORKLOAD CONTAINER IMAGE RELEASE POLICY
default:deployment/app1 app1 123456789123.dkr.ecr.ap-southeast-1.amazonaws.com/app1:f8ebcf87b02cd334b4228c1d22fe001dafff9ca6 ready automated
default:deployment/app2 app2 123456789123.dkr.ecr.ap-southeast-1.amazonaws.com/app2:92218e4aeefa8f19f5e9a900bc7d07f38b8622c6 ready
default:deployment/app3 app3 123456789123.dkr.ecr.ap-southeast-1.amazonaws.com/app3:a1a8231ff2ac89eb70fc353eeceb2470ee2d0ec3 ready fluxctl list-controllers --k8s-fwd-ns=app2WORKLOAD CONTAINER IMAGE RELEASE POLICY
default:deployment/app1 app1 123456789123.dkr.ecr.ap-southeast-1.amazonaws.com/app1:f8ebcf87b02cd334b4228c1d22fe001dafff9ca6 ready
default:deployment/app2 app2 123456789123.dkr.ecr.ap-southeast-1.amazonaws.com/app2:92218e4aeefa8f19f5e9a900bc7d07f38b8622c6 ready automated
default:deployment/app3 app3 123456789123.dkr.ecr.ap-southeast-1.amazonaws.com/app3:a1a8231ff2ac89eb70fc353eeceb2470ee2d0ec3 ready fluxctl list-controllers --k8s-fwd-ns=app3WORKLOAD CONTAINER IMAGE RELEASE POLICY
default:deployment/app1 app1 123456789123.dkr.ecr.ap-southeast-1.amazonaws.com/app1:f8ebcf87b02cd334b4228c1d22fe001dafff9ca6 ready
default:deployment/app2 app2 123456789123.dkr.ecr.ap-southeast-1.amazonaws.com/app2:92218e4aeefa8f19f5e9a900bc7d07f38b8622c6 ready
default:deployment/app3 app3 123456789123.dkr.ecr.ap-southeast-1.amazonaws.com/app3:a1a8231ff2ac89eb70fc353eeceb2470ee2d0ec3 ready automated Then when you make a commit to your repo app1, app2 and app3, it should auto release your application and your deployment.yml should be updated by flux with a latest docker image URI.