![]()
This module will enhance your ColdBox applications by providing out-of-the-box security in the form of:
- A security rule engine for incoming requests allowing blocking, authentication, and authorization checks
- Annotation-driven security for handlers and actions
- JWT (JSON Web Tokens) generator, decoder, rotation, invalidation and authentication services
- JWT Token Storage in a cache or database
- Refresh and access tokens
- Ip Blocking, Host Blocking, and much more
- CSRF protection
- Security Headers for protection against ip spoofing, host spoofing, click jacking, ssl attacks, hsts, and much more
- Pluggable with any Authentication service or can leverage cbauth by default
- Basic auth capabilities with an internal user storage
- Capability to distinguish between invalid authentication and authorization and determine the process's outcome
- Ability to load/unload security rules from contributing modules. So you can create a nice HMVC hierarchy of security
- Ability for each module to define its own
validator
Welcome to SecureLand!
Apache License, Version 2.0.
- https://github.com/coldbox-modules/cbsecurity
- https://forgebox.io/view/cbsecurity
- https://coldbox-security.ortusbooks.com/
- Lucee 5+
- ColdFusion 2018+
- ColdBox 6+
- ColdBox 7+ for delegates and basic auth support only
Use CommandBox to install
box install cbsecurity
You can then continue to configure the firewall in your config/Coldbox.cfc.
Below are the security settings you can use for this module. Remember you must create the cbsecurity and cbauth structs in your ColdBox.cfc or you can create a config/modules/cbsecurity.cfc if you are on ColdBox 7.
moduleSettings = {

	cbauth = {
		// This is the path to your user object that contains the credential validation methods
		userServiceClass = "entities.user"
	},

	cbsecurity = {
		/**
		 * --------------------------------------------------------------------------
		 * Authentication Services
		 * --------------------------------------------------------------------------
		 * Here you will configure which service is in charge of providing authentication for your application.
		 * By default we leverage the cbauth module which expects you to connect it to a database via your own User Service.
		 *
		 * Available authentication providers:
		 * - cbauth : Leverages your own UserService that determines authentication and user retrieval
		 * - basicAuth : Leverages basic authentication and basic in-memory user registration in our configuration
		 * - custom : Any other service that adheres to our IAuthService interface
		 */
		authentication : {
			// The WireBox ID of the authentication service to use which must adhere to the cbsecurity.interfaces.IAuthService interface.
			"provider"        : "authenticationService@cbauth",
			// WireBox ID of the user service to use when leveraging user authentication, we default this to whatever is set
			// by cbauth or basic authentication. (Optional)
			"userService"     : "",
			// The name of the variable to use to store an authenticated user in prc scope on all incoming authenticated requests
			"prcUserVariable" : "oCurrentUser"
		},

		/**
		 * --------------------------------------------------------------------------
		 * Basic Auth
		 * --------------------------------------------------------------------------
		 * These settings are used so you can configure the hashing patterns of the user storage
		 * included with cbsecurity.  These are only used if you are using the `BasicAuthUserService` as
		 * your service of choice alongside the `BasicAuthValidator`
		 */
		basicAuth : {
			// Hashing algorithm to use
			hashAlgorithm  : "SHA-512",
			// Iterates the number of times the hash is computed to create a more computationally intensive hash.
			hashIterations : 5,
			// User storage: The `key` is the username. The value is the user credentials that can include
			// { roles: "", permissions : "", firstName : "", lastName : "", password : "" }
			users          : {}
		},

		/**
		 * --------------------------------------------------------------------------
		 * CSRF - Cross Site Request Forgery Settings
		 * --------------------------------------------------------------------------
		 * These settings configures the cbcsrf module. Look at the module configuration for more information
		 */
		csrf : {
			// By default we load up an interceptor that verifies all non-GET incoming requests against the token validations
			enableAutoVerifier     : false,
			// A list of events to exclude from csrf verification, regex allowed: e.g. stripe\..*
			verifyExcludes         : [],
			// By default, all csrf tokens have a life-span of 30 minutes. After 30 minutes, they expire and we aut-generate new ones.
			// If you do not want expiring tokens, then set this value to 0
			rotationTimeout        : 30,
			// Enable the /cbcsrf/generate endpoint to generate cbcsrf tokens for secured users.
			enableEndpoint         : false,
			// The WireBox mapping to use for the CacheStorage
			cacheStorage           : "CacheStorage@cbstorages",
			// Enable/Disable the cbAuth login/logout listener in order to rotate keys
			enableAuthTokenRotator : true
		},
		/**
		 * --------------------------------------------------------------------------
		 * Firewall Settings
		 * --------------------------------------------------------------------------
		 * The firewall is used to block/check access on incoming requests via security rules or via annotation on handler actions.
		 * Here you can configure the operation of the firewall and especially what Validator will be in charge of verifying authentication/authorization
		 * during a matched request.
		 */
		firewall : {
			// Auto load the global security firewall automatically, else you can load it a-la-carte via the `Security` interceptor
			"autoLoadFirewall"            : true,
			// The Global validator is an object that will validate the firewall rules and annotations and provide feedback on either authentication or authorization issues.
			"validator"                   : "AuthValidator@cbsecurity",
			// Activate handler/action based annotation security
			"handlerAnnotationSecurity"   : true,
			// The global invalid authentication event or URI or URL to go if an invalid authentication occurs
			"invalidAuthenticationEvent"  : "",
			// Default Auhtentication Action: override or redirect when a user has not logged in
			"defaultAuthenticationAction" : "redirect",
			// The global invalid authorization event or URI or URL to go if an invalid authorization occurs
			"invalidAuthorizationEvent"   : "",
			// Default Authorization Action: override or redirect when a user does not have enough permissions to access something
			"defaultAuthorizationAction"  : "redirect",
			// Firewall database event logs.
			"logs" : {
				"enabled"    : false,
				"dsn"        : "",
				"schema"     : "",
				"table"      : "cbsecurity_logs",
				"autoCreate" : true
			},
			// Firewall Rules, this can be a struct of detailed configuration
			// or a simple array of inline rules
			"rules"                       : {
				// Use regular expression matching on the rule match types
				"useRegex" : true,
				// Force SSL for all relocations
				"useSSL"   : false,
				// A collection of default name-value pairs to add to ALL rules
				// This way you can add global roles, permissions, redirects, etc
				"defaults" : {},
				// You can store all your rules in this inline array
				"inline"   : [],
				// If you don't store the rules inline, then you can use a provider to load the rules
				// The source can be a json file, an xml file, model, db
				// Each provider can have it's appropriate properties as well. Please see the documentation for each provider.
				"provider" : { "source" : "", "properties" : {} }
			}
		},

		/**
		 * --------------------------------------------------------------------------
		 * Security Visualizer
		 * --------------------------------------------------------------------------
		 * This is a debugging panel that when active, a developer can visualize security settings and more.
		 * You can use the `securityRule` to define what rule you want to use to secure the visualizer but make sure the `secured` flag is turned to true.
		 * You don't have to specify the `secureList` key, we will do that for you.
		 */
		visualizer : {
			"enabled"      : false,
			"secured"      : false,
			"securityRule" : {}
		},

		/**
		 * --------------------------------------------------------------------------
		 * Security Headers
		 * --------------------------------------------------------------------------
		 * This section is the way to configure cbsecurity for header detection, inspection and setting for common
		 * security exploits like XSS, ClickJacking, Host Spoofing, IP Spoofing, Non SSL usage, HSTS and much more.
		 */
		securityHeaders                     : {
			// Master switch for security headers
			"enabled" : true,
			// If you trust the upstream then we will check the upstream first for specific headers
			"trustUpstream"         : false,
			// Content Security Policy
			// Content Security Policy (CSP) is an added layer of security that helps to detect and mitigate certain types of attacks,
			// including Cross-Site Scripting (XSS) and data injection attacks. These attacks are used for everything from data theft, to
			// site defacement, to malware distribution.
			// https://developer.mozilla.org/en-US/docs/Web/HTTP/CSP
			"contentSecurityPolicy" : {
				// Disabled by defautl as it is totally customizable
				"enabled" : false,
				// The custom policy to use, by default we don't include any
				"policy"  : ""
			},
			// The X-Content-Type-Options response HTTP header is a marker used by the server to indicate that the MIME types advertised in
			// the Content-Type headers should be followed and not be changed => X-Content-Type-Options: nosniff
			// https://developer.mozilla.org/en-US/docs/Web/HTTP/Headers/X-Content-Type-Options
			"contentTypeOptions" : { "enabled" : true },
			"customHeaders"      : {
				// Name : value pairs as you see fit.
			},
			// Disable Click jacking: X-Frame-Options: DENY OR SAMEORIGIN
			// https://developer.mozilla.org/en-US/docs/Web/HTTP/Headers/X-Frame-Options
			"frameOptions" : { "enabled" : true, "value" : "SAMEORIGIN" },
			// HTTP Strict Transport Security (HSTS)
			// The HTTP Strict-Transport-Security response header (often abbreviated as HSTS)
			// informs browsers that the site should only be accessed using HTTPS, and that any future attempts to access it
			// using HTTP should automatically be converted to HTTPS.
			// https://developer.mozilla.org/en-US/docs/Web/HTTP/Headers/Strict-Transport-Security,
			"hsts"         : {
				"enabled"           : true,
				// The time, in seconds, that the browser should remember that a site is only to be accessed using HTTPS, 1 year is the default
				"max-age"           : "31536000",
				// See Preloading Strict Transport Security for details. Not part of the specification.
				"preload"           : false,
				// If this optional parameter is specified, this rule applies to all of the site's subdomains as well.
				"includeSubDomains" : false
			},
			// Validates the host or x-forwarded-host to an allowed list of valid hosts
			"hostHeaderValidation" : {
				"enabled"      : false,
				// Allowed hosts list
				"allowedHosts" : ""
			},
			// Validates the ip address of the incoming request
			"ipValidation" : {
				"enabled"    : false,
				// Allowed IP list
				"allowedIPs" : ""
			},
			// The Referrer-Policy HTTP header controls how much referrer information (sent with the Referer header) should be included with requests.
			// Aside from the HTTP header, you can set this policy in HTML.
			// https://developer.mozilla.org/en-US/docs/Web/HTTP/Headers/Referrer-Policy
			"referrerPolicy"     : { "enabled" : true, "policy" : "same-origin" },
			// Detect if the incoming requests are NON-SSL and if enabled, redirect with SSL
			"secureSSLRedirects" : { "enabled" : false },
			// Some browsers have built in support for filtering out reflected XSS attacks. Not foolproof, but it assists in XSS protection.
			// https://developer.mozilla.org/en-US/docs/Web/HTTP/Headers/X-XSS-Protection,
			// X-XSS-Protection: 1; mode=block
			"xssProtection"      : { "enabled" : true, "mode" : "block" }
		},

		/**
		 * --------------------------------------------------------------------------
		 * Json Web Tokens Settings
		 * --------------------------------------------------------------------------
		 * Here you can configure the JWT services for operation and storage.  In order for your firewall
		 * to leverage JWT authentication/authorization you must make sure you use the `JwtAuthValidator` as your
		 * validator of choice; either globally or at the module level.
		 */
		jwt                          : {
			// The issuer authority for the tokens, placed in the `iss` claim
			"issuer"                  : "",
			// The jwt secret encoding key, defaults to getSystemEnv( "JWT_SECRET", "" )
			"secretKey"               : getSystemSetting( "JWT_SECRET", "" ),
			// by default it uses the authorization bearer header, but you can also pass a custom one as well.
			"customAuthHeader"        : "x-auth-token",
			// The expiration in minutes for the jwt tokens
			"expiration"              : 60,
			// If true, enables refresh tokens, longer lived tokens (not implemented yet)
			"enableRefreshTokens"     : false,
			// The default expiration for refresh tokens, defaults to 30 days
			"refreshExpiration"          : 10080,
			// The Custom header to inspect for refresh tokens
			"customRefreshHeader"        : "x-refresh-token",
			// If enabled, the JWT validator will inspect the request for refresh tokens and expired access tokens
			// It will then automatically refresh them for you and return them back as
			// response headers in the same request according to the customRefreshHeader and customAuthHeader
			"enableAutoRefreshValidator" : false,
			// Enable the POST > /cbsecurity/refreshtoken API endpoint
			"enableRefreshEndpoint"      : true,
			// encryption algorithm to use, valid algorithms are: HS256, HS384, and HS512
			"algorithm"               : "HS512",
			// Which claims neds to be present on the jwt token or `TokenInvalidException` upon verification and decoding
			"requiredClaims"          : [] ,
			// The token storage settings
			"tokenStorage"            : {
				// enable or not, default is true
				"enabled"       : true,
				// A cache key prefix to use when storing the tokens
				"keyPrefix"     : "cbjwt_",
				// The driver to use: db, cachebox or a WireBox ID
				"driver"        : "cachebox",
				// Driver specific properties
				"properties"    : {
					"cacheName" : "default"
				}
			}
		}
	}

};This module will automatically register the Security firewall interceptor for you according to the settings shown above and using the interceptor => (cbsecurity.interceptor.Security).
Info You can deactivate this and load it as a manual interceptor via the
autoLoadFirewallsetting.
The interceptor will intercept all calls to your application via the preProcess() interception point. Each request will then be validated against registered security rules and against any active handler/action security annotations (if active) via a Security Validator. Also, if the request is made to a module, each module can have its own separate validator apart from the global one.
Info You can deactivate annotation driven security via the
handlerAnnotationSecuritysetting.
How does the interceptor know a user doesn't have access? Well, here is where you register a Validator CFC (validator setting) with cbsecurity that implements two validation functions: ruleValidator() and annotationValidator().
Info You can find an interface for these methods in
cbsecurity.interfaces.ISecurityValidator
The validator's job is to tell back to the firewall if they are allowed access and if they don't, what type of validation they broke: authentication or authorization or just plainly block the request.
Authenticationis when a user is NOT logged in
Authorizationis when a user does not have the proper permissions to access an event/handler or action.
Once the firewall has the results, and the user is NOT allowed access. Then the following will occur:
- The request will be logged via LogBox
- If the firewall database logs are enabled, then we will log it in our database logs
- The current URL will be flashed as
_securedURLso it can be used in relocations - If using a rule, the rule will be stored in
prcascbsecurity_matchedRule - The validator results will be stored in
prcascbsecurity_validatorResults - If the type of invalidation is
authenticationthecbSecurity_onInvalidAuthenticationinterception will be announced - If the type of invalidation is
authorizationthecbSecurity_onInvalidAuthorizationinterception will be announced - If the type is
authenticationthe default action for that type will be executed (An override or a relocation)invalidAuthenticationEvent - If the type is
authorizationthe default action for that type will be executed (An override or a relocation)invalidAuthorizationEvent - If the action is
blockthen the firewall will block the request.
If you are securing a module, then the module has the capability to override the global settings if it declares them in its ModuleConfig.cfc
Rules can be declared in your config/ColdBox.cfc or in any module's ModuleConfig.cfc inline, or they can come from the following sources:
- A JSON file
- An XML file
- The database by adding the configuration settings for it
- A model by executing the
getSecurityRules()method from it
A rule is a struct that can be composed of the following elements. All of them are optional except the secureList.
rules = [
    {
        "whitelist"     : "", // A list of white list events or Uri's
        "securelist"    : "", // A list of secured list events or Uri's
        "match"         : "event", // Match the event or a url
        "roles"         : "", // Attach a list of roles to the rule
        "permissions"   : "", // Attach a list of permissions to the rule
        "redirect"      : "", // If rule breaks, and you have a redirect it will redirect here
        "overrideEvent" : "", // If rule breaks, and you have an event, it will override it
        "useSSL"        : false, // Force SSL,
        "action"        : "", // The action to use (redirect|override|block) when no redirect or overrideEvent is defined in the rule.
        "module"        : "", // metadata we can add so mark rules that come from modules
		"httpMethods"   : "*", // Match all HTTP methods or particular ones as a list
		"allowedIPs"    : "*" // The rule only matches if the IP list matches. It can be a list of IPs to match.
    };
]The global rules come from the config/Coldbox.cfc and they are defined within the cbsecurity module setting.
// Module Settings
moduleSettings = {
    // CB Security
    cbSecurity : {
       firewall : {
			// Global Relocation when invalid access is detected, instead of each rule declaring one.
			"invalidAuthenticationEvent"    : "main.index",
			// Global override event when invalid access is detected, instead of each rule declaring one.
			"invalidAuthorizationEvent"     : "main.index",
			// Default invalid action: override or redirect or block when invalid access is detected, default is to redirect
			"defaultAuthenticationAction"    : "block",
			// Default invalid action: override or redirect or block when invalid access is detected, default is to redirect
			"defaultAuthorizationAction"    : "redirect",
			// The global security rules as inline
        	"rules"                         : [
				// should use direct action and do a global redirect
				{
					"whitelist": "",
					"securelist": "admin",
					"match": "event",
					"roles": "admin",
					"permissions": "",
					"action" : "redirect"
				},
				// no action, use global default action
				{
					"whitelist": "",
					"securelist": "noAction",
					"match": "url",
					"roles": "admin",
					"permissions": ""
				},
				// Using overrideEvent only, so use an explicit override
				{
					"securelist": "ruleActionOverride",
					"match": "url",
					"overrideEvent": "main.login"
				},
				// direct action, use global override
				{
					"whitelist": "",
					"securelist": "override",
					"match": "url",
					"roles": "",
					"permissions": "",
					"action" : "override"
				},
				// Using redirect only, so use an explicit redirect
				{
					"securelist": "ruleActionRedirect",
					"match": "url",
					"redirect": "main.login"
				}
			]
	   }
    }
};
Module rules come from the ModuleConfig.cfc by creating a cbSecurity key in the module's settings struct:
// module settings - stored in modules.name.settings
settings = {

    // CB Security Rules to append to global rules
    cbsecurity = {
        firewall : {
			// Module Relocation when an invalid access is detected, instead of each rule declaring one.
			"invalidAuthenticationEvent"    : "mod1:secure.index",
			// Default Authentication Action: override or redirect or block when a user has not logged in
			"defaultAuthenticationAction"   : "override",
			// Module override event when an invalid access is detected, instead of each rule declaring one.
			"invalidAuthorizationEvent"     : "mod1:secure.auth",
			// Default Authorization Action: override or redirect or block when a user does not have enough permissions to access something
			"defaultAuthorizationAction"    : "override",
			// Custom validator for the module.
			"validator"                     : "JwtAuthValidator@cbsecurity"
			// You can define your security rules here or externally via a source
			"rules"                         : [
				{
					"secureList"    : "mod1:home"
				},
				{
					"secureList"    : "mod1/modOverride",
					"match"         : "url",
					"action"        : "override"
				}
			]
		}
    }

};The firewall will inspect handlers for the secured annotation. This annotation can be added to the entire handler, an action, or both. The default value of the secured annotation is a boolean true. This means we need a user to be authenticated to access it.
// Secure this handler
component secured{

    function index(event,rc,prc){}
    function list(event,rc,prc){}

}

// Same as this
component secured=true{
}

// Not the same as this
component secured=false{
}
// Or this
component{

    function index(event,rc,prc) secured{

    }

    function list(event,rc,prc) secured="list"{

    }

}You can also give the annotation some value, which can be anything you like: A list of roles, a role, a list of permissions, metadata, etc. Whatever it is, this is the authorization context, and the security validator must be able to not only authenticate but authorize the context, or an invalid authorization will occur.
// Secure this handler
component secured="admin,users"{

    function index(event,rc,prc) secured="list"{

    }

    function save(event,rc,prc) secured="write"{

    }

}By annotating the handler and the action, you create a cascading security model where they need to be able to access the handler first, and only then will the action be evaluated for access.
Now that we have seen security rules and annotations let's see how to validate them. Create a CFC or use any CFC in your models and add the following functions: ruleValidator() and annotationValidator()
/**
 * This function is called once an incoming event matches a security rule.
 * You will receive the security rule that matches and an instance of the ColdBox controller.
 *
 * You must return a struct with the following keys:
 * - allow:boolean True, user can continue access, false, invalid access actions will ensue
 * - type:string(authentication|authorization) The type of block that ocurred.  Either an authentication or an authorization issue.
 * - messages:string Any messages for debugging
 *
 * @return { allow:boolean, type:string(authentication|authorization), messages:string }
 */
struct function ruleValidator( required rule, required controller );

/**
 * This function is called once access to a handler/action is detected.
 * You will receive the secured annotation value and an instance of the ColdBox Controller
 *
 * You must return a struct with the following keys:
 * - allow:boolean True, user can continue access, false, invalid access actions will ensue
 * - type:string(authentication|authorization) The type of block that ocurred.  Either an authentication or an authorization issue.
 * - messages:string Any messages for debugging
 *
 * @return { allow:boolean, type:string(authentication|authorization), messages:string }
 */
struct function annotationValidator( required securedValue, required controller );
Each validator must return a struct with the following keys:
allow:booleanA boolean indicator if authentication or authorization was violatedtype:stringOf(authentication|authorization)A string that indicates the type of violation: authentication or authorization.messages:stringA string of messages used for debugging
Here is a sample validator using permission-based security in both rules and annotation context
struct function ruleValidator( required rule, required controller ){
    return permissionValidator( rule.permissions, controller, rule );
}
struct function annotationValidator( required securedValue, required controller ){
    return permissionValidator( securedValue, controller );
}
private function permissionValidator( permissions, controller, rule ){
    var results = { "allow" : false, "type" : "authentication", "messages" : "" };
    var user    = security.getCurrentUser();

    // First check if user has been authenticated.
    if( user.isLoaded() AND user.isLoggedIn() ){
        // Do we have the right permissions
        if( len( arguments.permissions ) ){
            results.allow   = user.checkPermission( arguments.permission );
            results.type    = "authorization";
        } else {
            results.allow = true;
        }
    }

    return results;
}When invalid access or authorizations occur, the interceptor will announce the following events:
cbSecurity_onInvalidAuthentication- When an invalid authentication is detectedcbSecurity_onInvalidAuthorization- When an invalid authorization is detected
You will receive the following data in the interceptData struct:
ip: The offending Ip addressrule: The security rule intercepted or empty if annotationssettings: The firewall settingsvalidatorResults: The validator resultsannotationType: The annotation type intercepted,handleroractionor empty if rule drivenprocessActions: A boolean indicator that defaults to true. If you change this to false, then the interceptor won't fire the invalid actions. Usually this means, you manually will do them.
cbSecurity_onFirewallBlock- When the firewall blocks an incoming request with a 403
You will receive the following data in the interceptData struct:
type: The type of block:hostheaderoripvalidationconfig: The configuration structure of the ruleincomingIP: The incoming ip if the type isipValiationincomingHost: The incoming host if the type ishostHeader
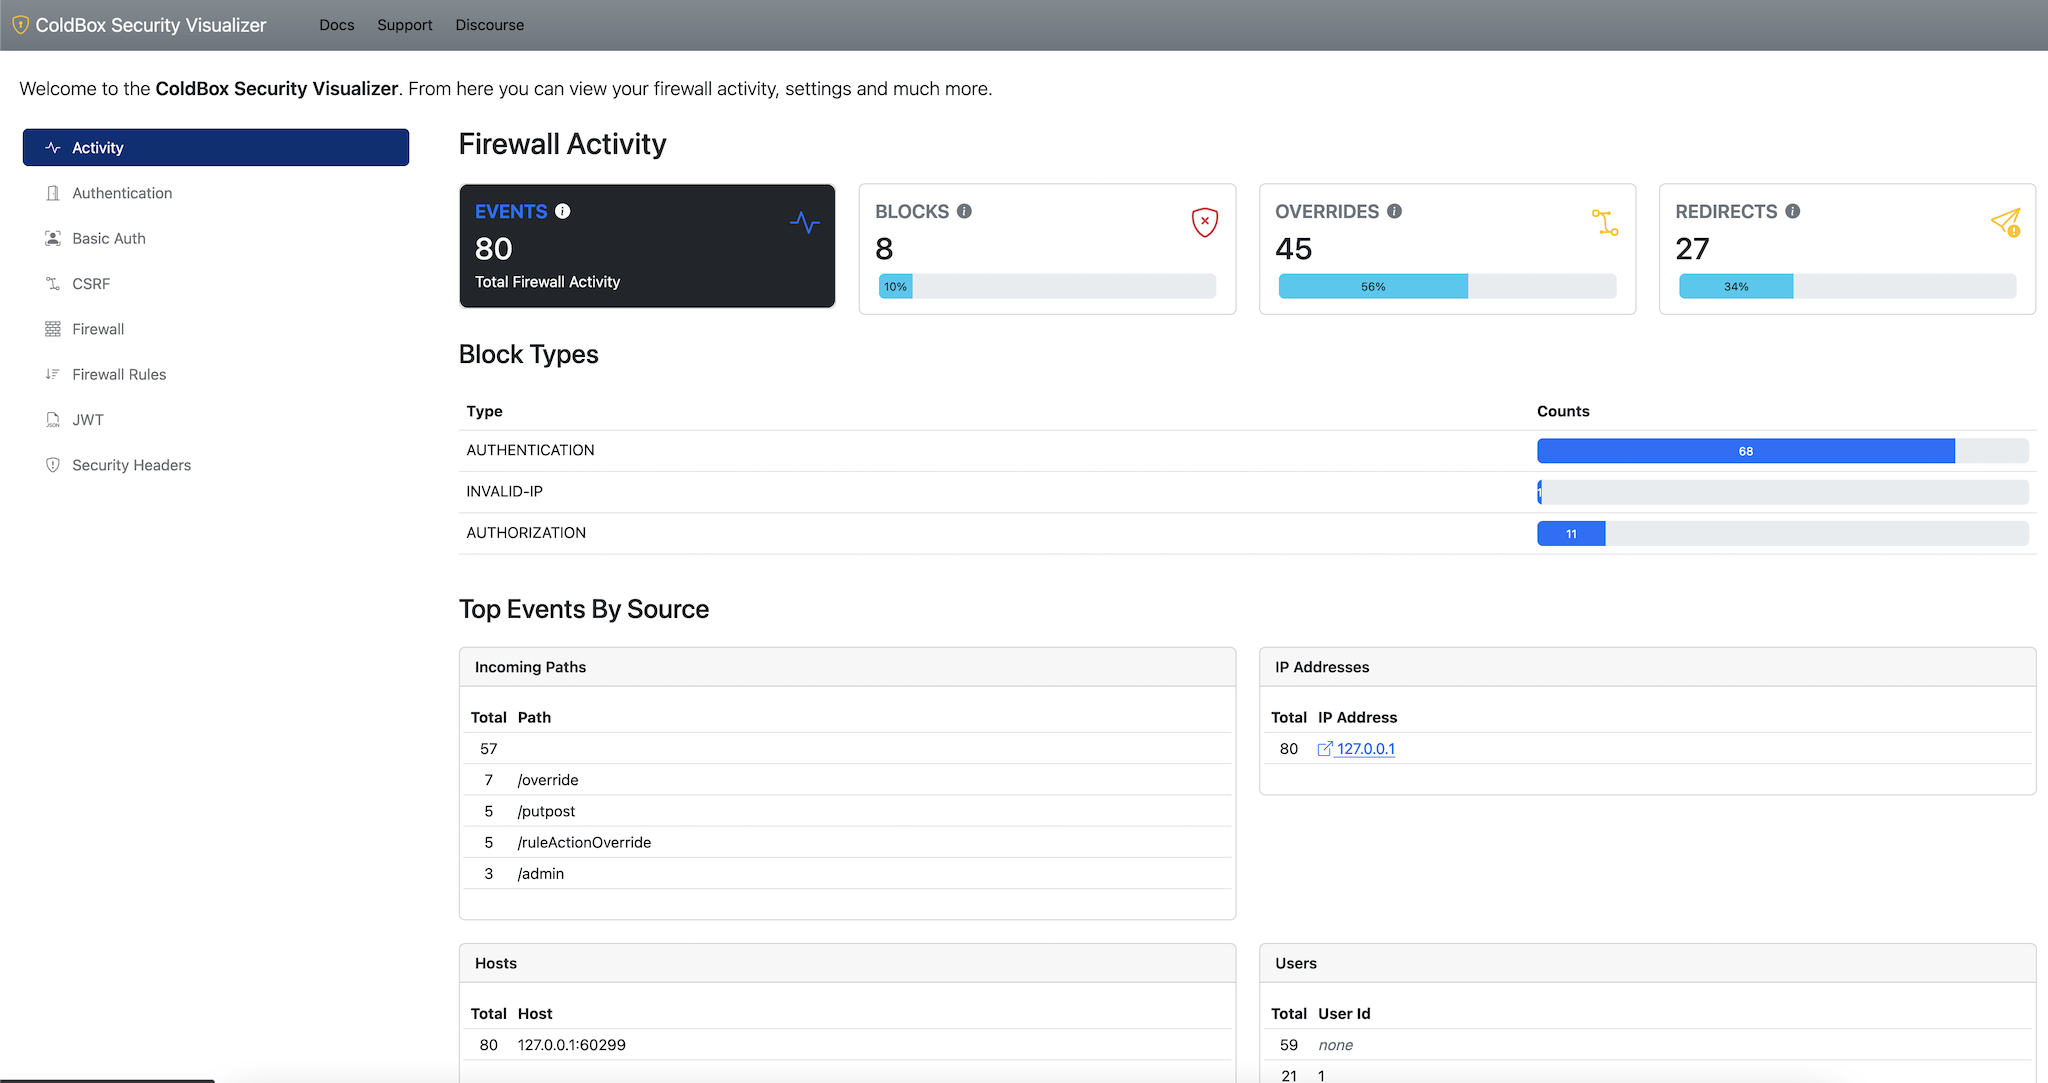
This module also ships with a security visualizer that will document all your security rules and settings in a nice panel. In order to activate it you must add the visualizer setting to your config and mark it as enabled. Once enabled you can navigate to: /cbsecurity, and you will be presented with the visualizer.
Important The visualizer is disabled by default

Please read our Contributing guide first.
To run the tests, start one of the servers from the /test-harness directory.
You will also need a MySQL database seeded with the /test-harness/tests/resources/cbsecurity.sql file.
Docker makes this a cinch:
docker run -d \
  --name=cbsecurity \
  -p 3306:3306 \
  -e MYSQL_ROOT_PASSWORD=mysql \
  -e MYSQL_DATABASE=cbsecurity \
  -v $(pwd)/test-harness/tests/resources/cbsecurity.sql:/docker-entrypoint-initdb.d/cbsecurity.sql \
  mysql:5
Finally, run the tests by visiting your server's /tests/runner.cfm file.
Copyright Since 2005 ColdBox Framework by Luis Majano and Ortus Solutions, Corp www.coldbox.org | www.luismajano.com | www.ortussolutions.com
Because of His grace, this project exists. If you don't like this, then don't read it, it's not for you.
"Therefore being justified by faith, we have peace with God through our Lord Jesus Christ: By whom also we have access by faith into this grace wherein we stand, and rejoice in hope of the glory of God. And not only so, but we glory in tribulations also: knowing that tribulation worketh patience; And patience, experience; and experience, hope: And hope maketh not ashamed; because the love of God is shed abroad in our hearts by the Holy Ghost which is given unto us. ." Romans 5:5
"I am the way, and the truth, and the life; no one comes to the Father, but by me (JESUS)" Jn 14:1-12