This project gives a simple way to deploy temperature and humidity sensors around your house using cheap components and the MQTT protocol. I use it with Home Assistant, an amazing, extensible, open-source home automation system, but this project could be used standalone or with any platform.
The sensor publishes to 2 MQTT topics:
- Temperature topic (example:
home/livingroom/temperature): The sensor publishes the temperature in Fahrenheit (example:67.10). - Humidity topic (example:
home/livingroom/humidity): The sensor publishes the relative humidity in percent (example:37.40).
In the sample configuration, the values are published every 30 seconds, but that is configurable.
I'll explain how to set the sensor up as an MQTT sensor in Home Assistant. This guide assumes that you already have Home Assistant set up and running. If not, see the installation guides here.
-
In your
configuration.yaml, add the following:sensor: - platform: mqtt name: "Living Room Temperature" state_topic: "home/livingroom/temperature" qos: 0 unit_of_measurement: "°F" - platform: mqtt name: "Living Room Humidity" state_topic: "home/livingroom/humidity" qos: 0 unit_of_measurement: "%"
-
Set the
nameandstate_topicto values that make sense for you. -
Restart Home Assistant. Depending on how you installed it, the process differs. For a Raspberry Pi All-in-One install, use
sudo systemctl restart home-assistant.service(or just restart the Pi).
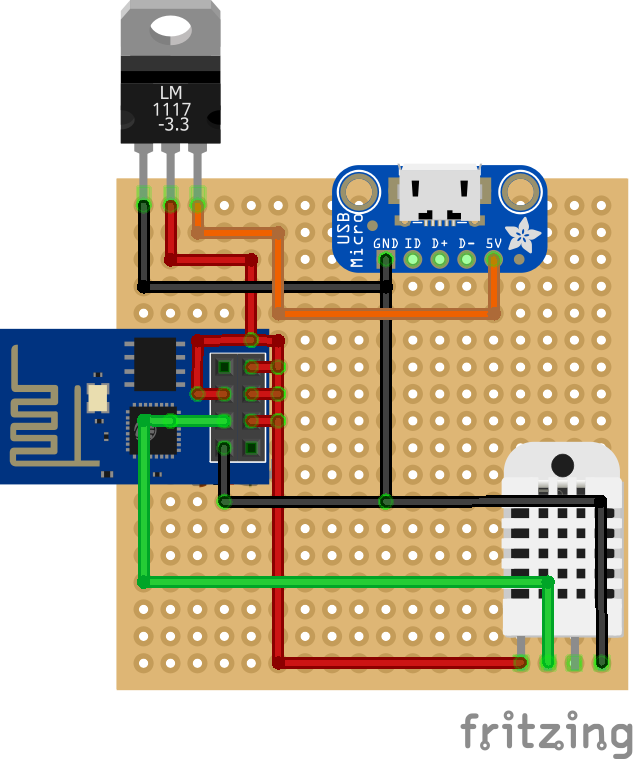
I'm using ESP8266-01 microcontrollers for my sensors because they are so cheap and small. The downside of the size and price is that programming them can be a bit of a hassle. There are many sites that go into detail, so I won't do it here. You'll need an ESP set up to work with the Arduino IDE. See the readme here for instructions.
- Using the Library Manager in the Arduino IDE, install the Adafruit Unified Sensor Library and the DHT Sensor Library. You can find the Library Manager in the "Sketch" menu under "Include Library" -> "Manage Libraries..."
- In the
mqtt-esp8266_dht22folder, update theconfig-sample.hfile with your WiFi, MQTT, and DHT settings. - Ensure that the
CONFIG_MQTT_CLIENT_IDsetting is a unique value for your network. - Set
CONFIG_MQTT_TOPIC_TEMPandCONFIG_MQTT_TOPIC_HUMIDto match the values you put in yourconfiguration.yaml. - Save the configuration file as
config.h. - Open the
.inofile in the Arduino IDE and upload to an ESP with the correct connections.
For my sensors, I've soldered a simple proto-board. They aren't very pretty, but here is the basic wiring.