Checks the level of your cistern using an ESP8266 with various possible distance sensors (Ultrasound, ToF). There is a selection of different cistern shapes (cylinder, square, horizontal, standing) with calculation of the volume. The measured values are output on a separate website (without Homeautomation central), data can be send via MQTT to your own MQTT broker or via HTTP to an own interface. In addition, it is possible to let prepare the data on www.bubux.de
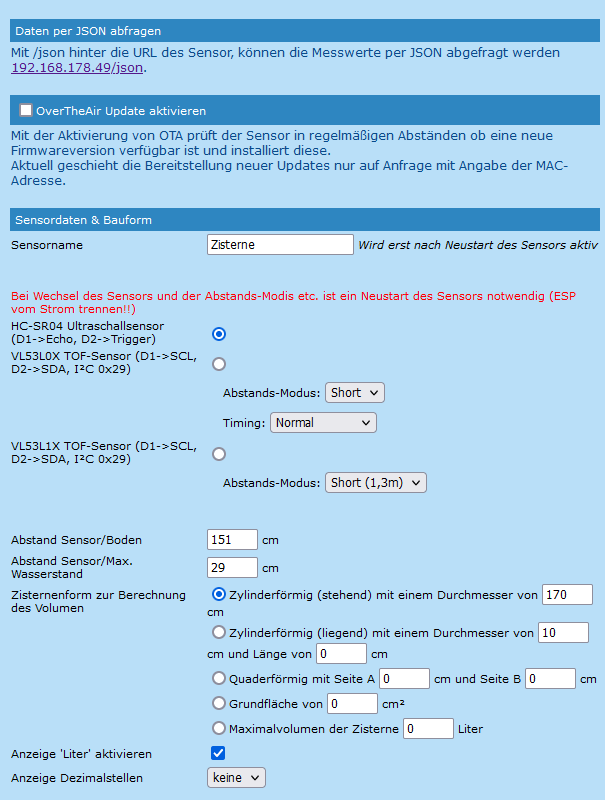
- HC-SR04
- VL53L0X
- VL53L1X
- DHT22-Sensor
Planned:
- BME280
- DS18B20
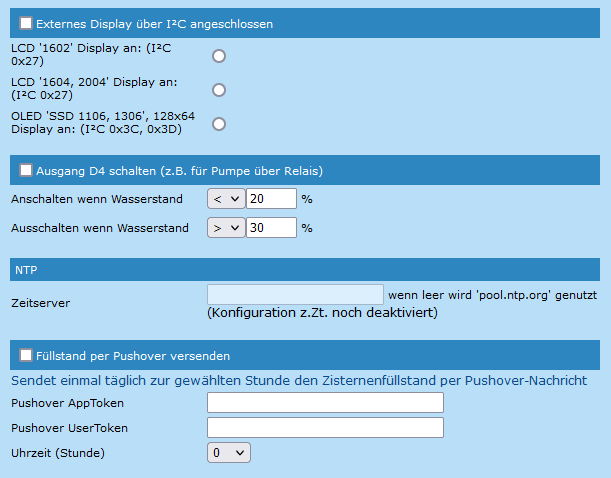
- LCD '1602'
- LCD '1604, 2004'
- OLED 'SSD 1106, 1306'
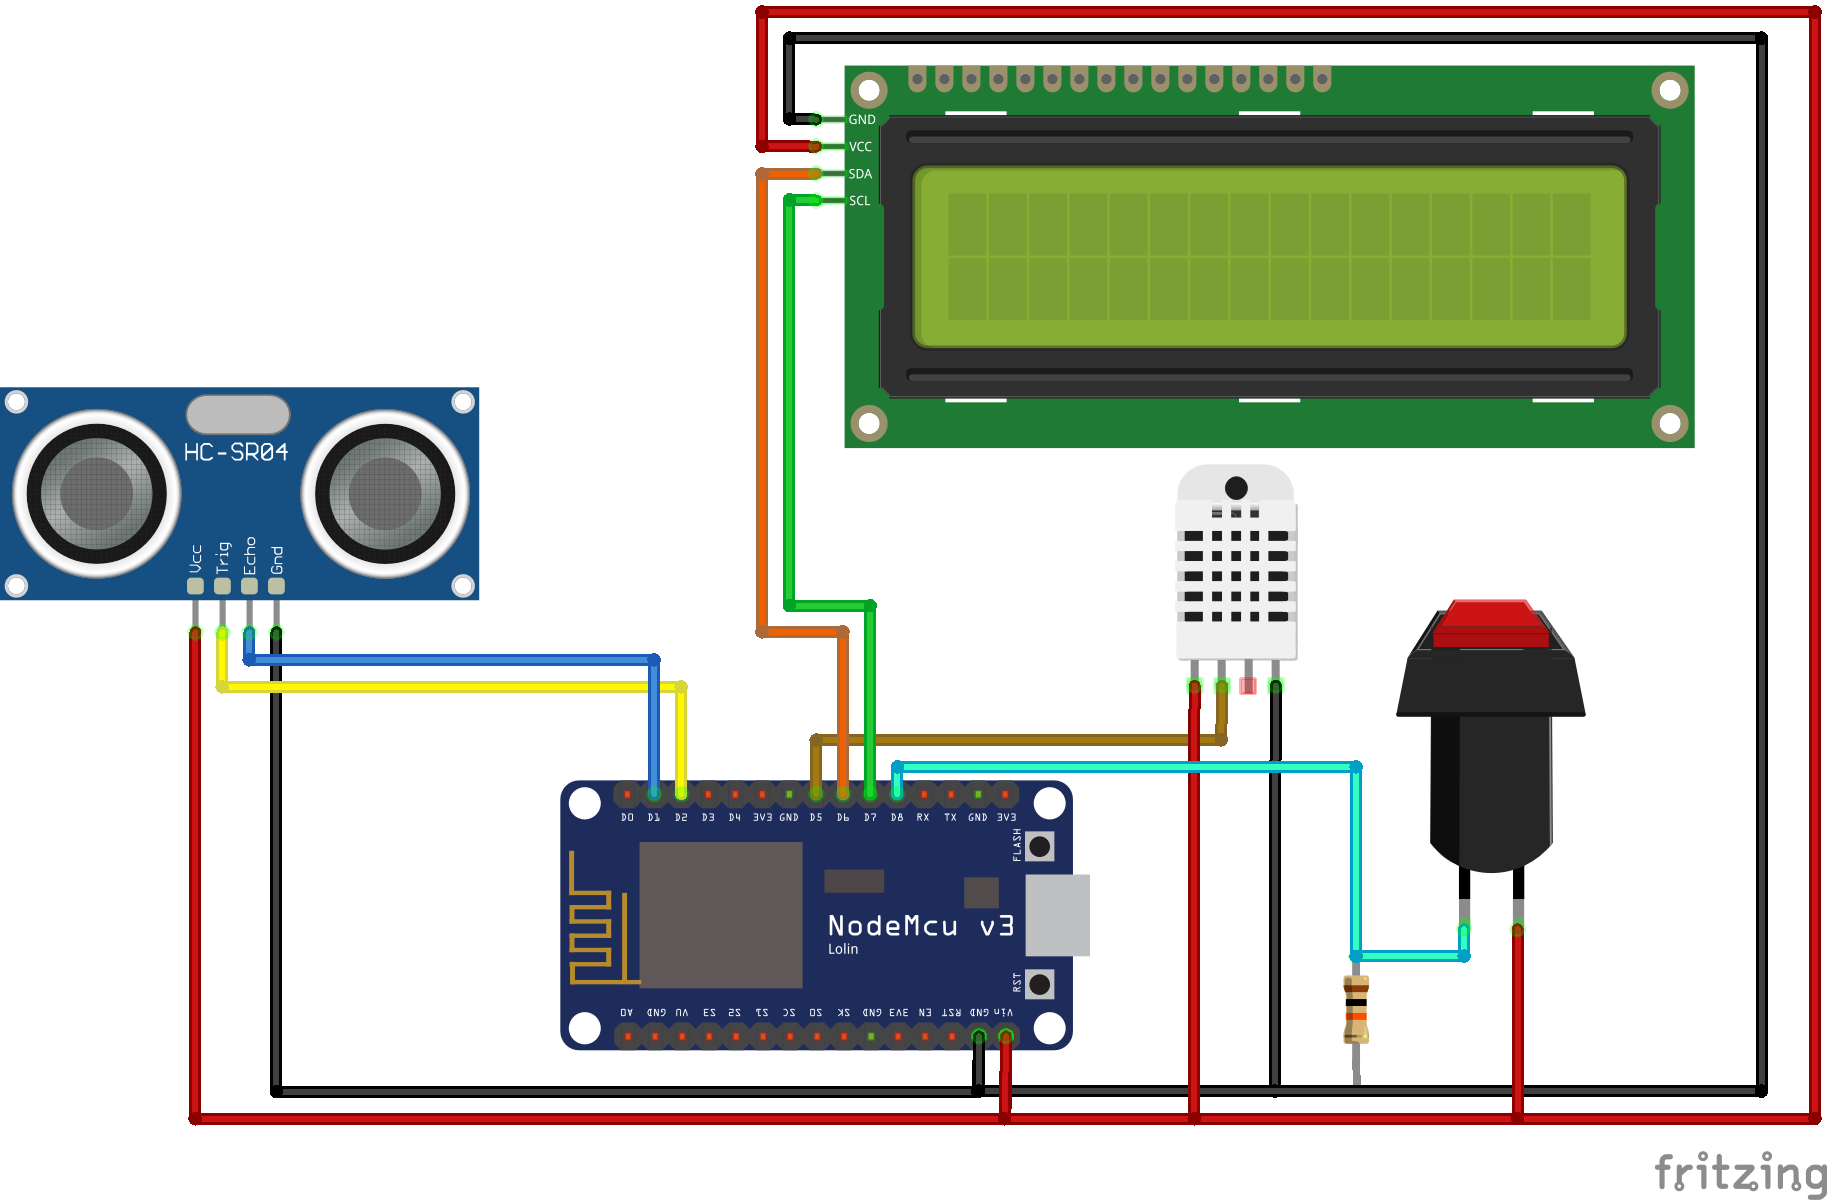
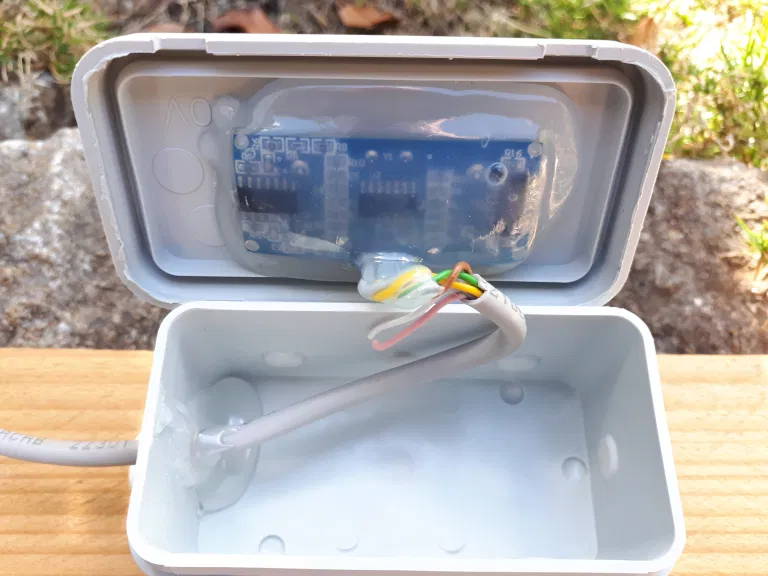
The ToF sensors are also connected to D1/D2 as an alternative to the ultrasonic sensor. On the picture the pin D4 for the switchable output e.g. for a relay is missing.
Find here a already compiled version tested with NodeMCU and Wemos D1 mini
Once the firmware has been flashed to the NodeMCU and everything is correctly wired, the sensor can be commissioned.
The sensor tries to connect to a configured WLAN. If this does not work (which is the case during the first start-up), the sensor creates a WLAN access point with the name "WLAN cistern" which should be found in the smartphone, for example. Connect to this WLAN.
Now call up the address http://192.168.4.1 in the browser of the connected device. This address is usually also displayed and linked in the connection settings of the connected WLAN. The configuration page of the sensor now opens.
Enter the SSID and the password of the home WLAN and click on "Save configuration". The other settings (cistern form, etc.) can be made later.
The sensor then restarts and attempts to connect to the home WLAN. If this was successful, the access point is no longer accessible and the sensor should have been assigned an IP address in the network. This can be looked up in the router (e.g. in the Friztbox under "Home network -> Network").
If the "WLAN cistern" access point is still visible, the connection to the home WLAN was not successful. Then carry out the above steps again.
More information about installation etc. can be found on http://blog.bubux.de/fuellstandmessung-der-zisterne-mittels-esp8266-nodemcu-und-ultraschallsensor/. There are several articles that deal with the topic.
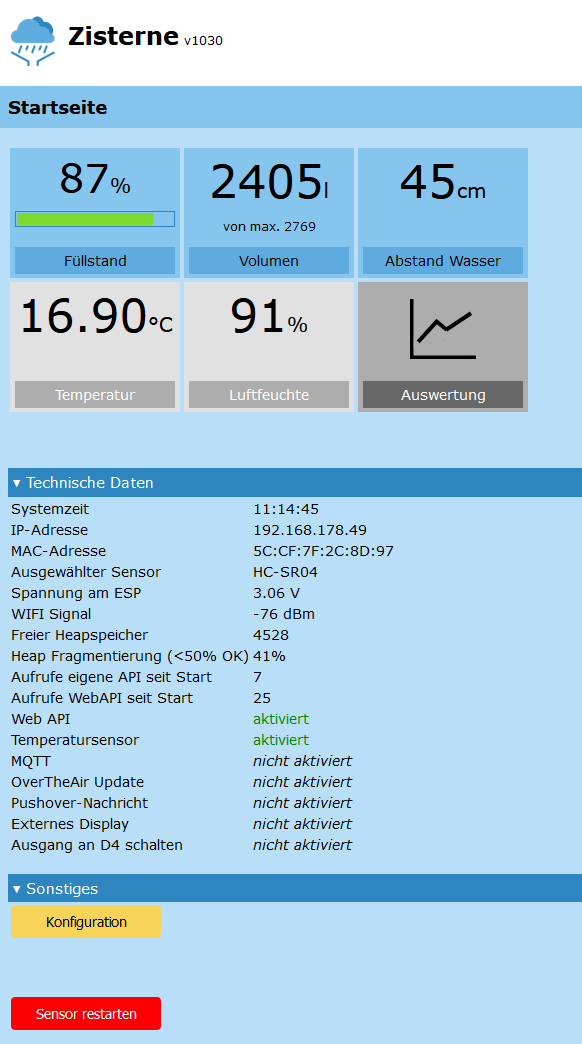
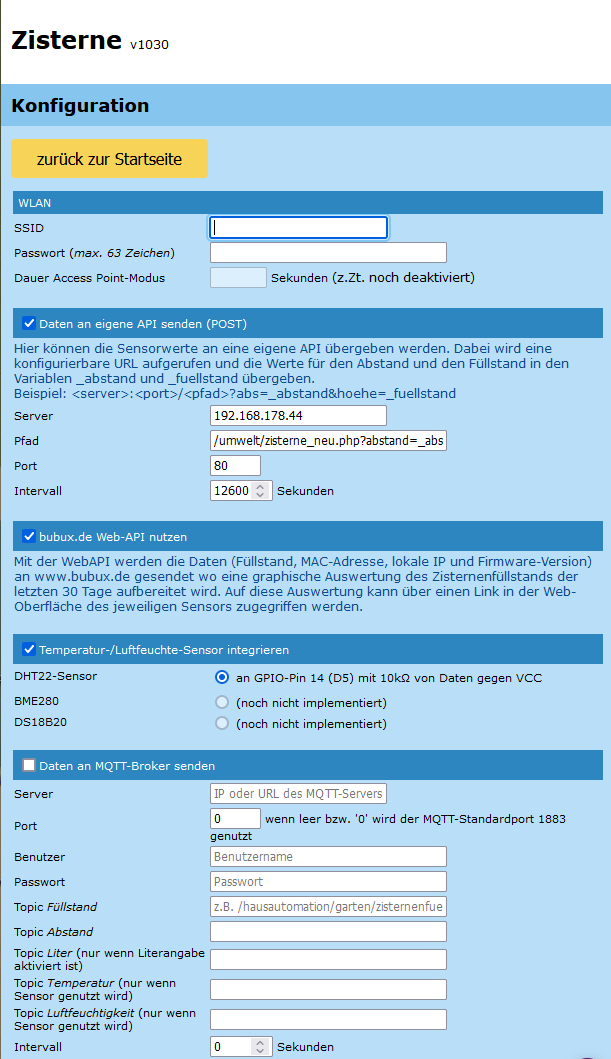
The measured data can be sent to your own interface via http post. A configurable URL is called and the values for the distance and the level in the variables are _abstand and _fuellstand transferred. Example: http://server:port/path_to_own_api?abs=_abstand&hoehe=_fuellstand
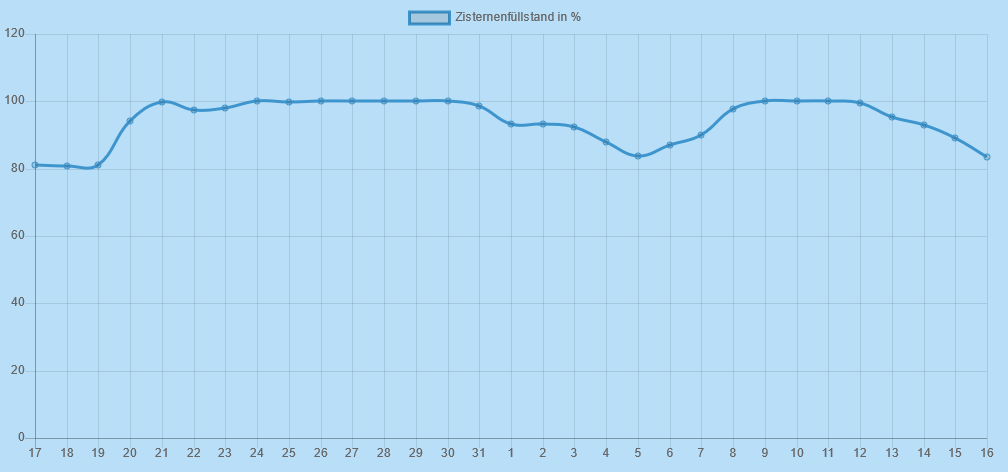
With the WebAPI, the data (level, MAC address, local IP and firmware version) is sent to www.bubux.de where a graphical evaluation of the cistern level of the last 30 days is prepared. This evaluation can be accessed via a link in the web interface of the respective sensor. No central home automation is necessary here.
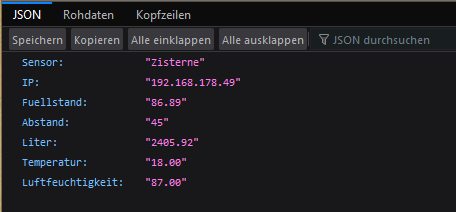
With /json behind the URL of the sensor, the measured values can be queried via JSON. For example, 192.168.178.49/json.
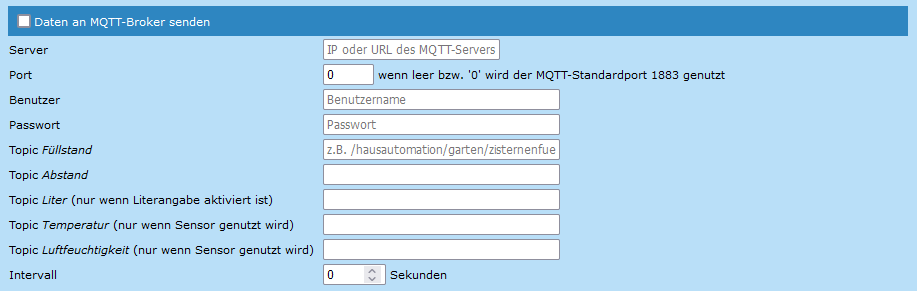
Send the measured data to an MQTT broker
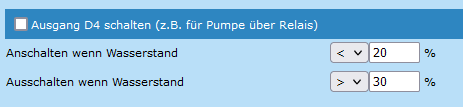
The software supports a switchable output to D4 depending on a configurable minimum and maximum level
- ESP8266WiFi.h
- ESP8266mDNS.h
- ESP8266WebServer.h
- ESP8266HTTPClient.h
- ESP8266httpUpdate.h
- Ticker.h
- EEPROM.h
- Wire.h
All libraries listed above are included in the ESP8266 core (https://github.com/esp8266/Arduino) . Currently it is mandatory to use version 2.4.7! This is done e.g. in the Borad-Manager of the Arduino IDE.
- LiquidCrystal_I2C.h (https://github.com/bitbank2/BitBang_I2C, https://github.com/fdebrabander/Arduino-LiquidCrystal-I2C-library)
- ss_oled.h (https://github.com/bitbank2/ss_oled)
- PubSubClient.h (https://pubsubclient.knolleary.net/)
- NTPClient.h (https://github.com/arduino-libraries/NTPClient)
- WiFiUdp.h
- SimpleTimer.h (https://github.com/kiryanenko/SimpleTimer)
- Pushover.h (https://github.com/ArduinoHannover/Pushover)
- myTypes.h
- DHT.h (https://github.com/adafruit/DHT-sensor-library)
- VL53L0X.h (https://github.com/pololu/vl53l0x-arduino)
- SparkFun_VL53L1X.h (https://github.com/sparkfun/SparkFun_VL53L1X_Arduino_Library)
To support this project, feel free to make a small donation. The donations go to the foundation "Bärenherz" in Wiesbaden (https://www.baerenherz.de/de/)

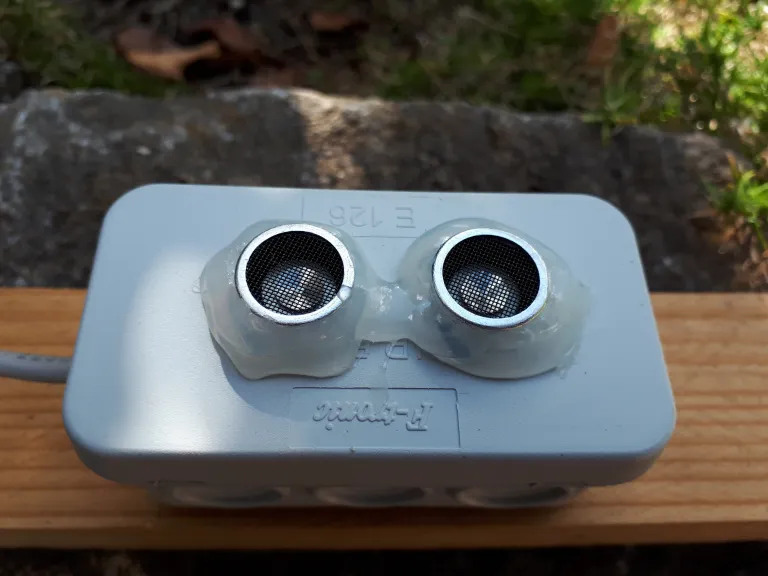
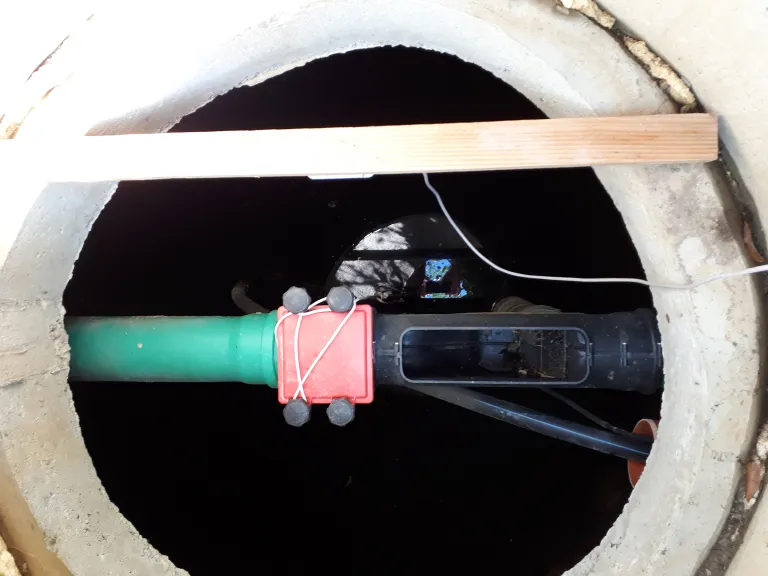
Since the installation is individual depending on the cistern, I won't say much about it. I will only say that I packed the sensor into a surface-mounted box from the DIY store and "potted" it with hot glue. Resin would probably have been better, but the sensor works perfectly so far. The sensor hangs downwards on a board in the cistern. The NodeMCU is connected to a cable about 6m long and is housed in a small storage room.