Simple tutorial on how to setup webpack v2.
Read my blog post on how to setup webpack 2
- Create folder
- Install webpack
- Write webpack config
- Run the webpack
- Setup webpack development server
- Run development server
- Setup development & production env
- Sourcemap for development & production
First let's create a directory called webpack-2-demo and initialize npm:
$ mkdir webpack-2-demo && cd webpack-2-demo
$ npm init -y$ npm install --save-dev webpack@latest webpack-dev-server@latestor do it via Yarn
$ yarn add --dev webpack@latest webpack-dev-server@latestCreate a webpack.config.js in root of our directory and let's write some configuration.
var webpack = require('webpack');

var config = {
  context: __dirname + '/src', // `__dirname` is root of project and `src` is source
  entry: {
    app: './app.js',
  },
  output: {
    path: __dirname + '/dist', // `dist` is the destination
    publicPath: "/assets/",
    filename: 'bundle.js',
  },
};

module.exports = config;
Now lets add lodash to dependencies in package.json by.
$ yarn add --dev lodashAnd let's write some code in src/app.js
var _ = require('lodash');

var array = [1];
var other = _.concat(array, 2, [3], [[4]]);

console.log(other); //[1, 2, 3, [4]]To run webpack in development mode.
$ webpackScreenshot of development server
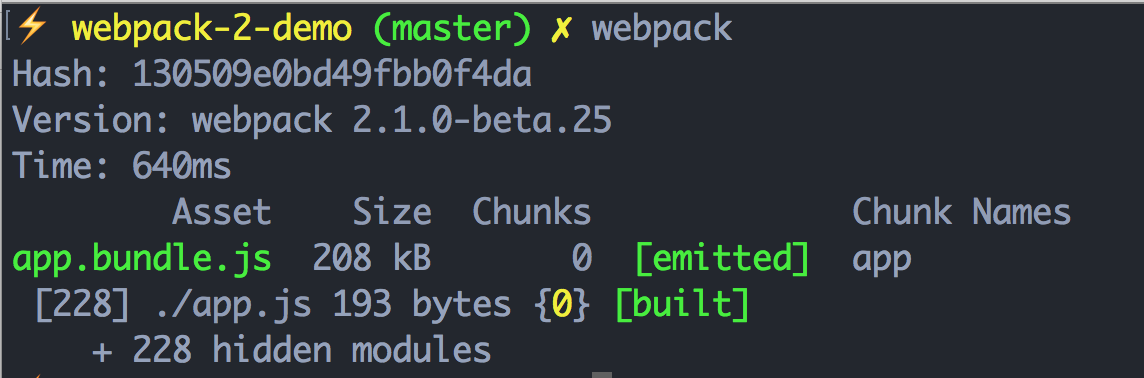
Total Size: 208KB
or run webpack in production mode.
$ webpack -ppis for production which uglifies and minifies files.
Screenshot of development server

Total Size: 38KB
Webpack has its own development server. Lets setup that in webpack.config.js by adding the following.
devServer: {
  open: true, // to open the local server in browser
  contentBase: __dirname + '/src',
},
And add the script for bundle.js in src/index.html.
<!DOCTYPE html>
<html>
<head>
  <title>Webpack 2 Demo</title>
</head>
<body>

  <script src="/assets/bundle.js"></script>
</body>
</html>Run development server.
$ webpack-dev-serverOpen http://localhost:8080/ in your browser.
Thats all basic webpack config is done. But what about SASS, IMAGES, ES6 loaders ? How to setup that ? Lets see.
Lets set up ES6 + Babel using a webpack loader.
$ npm install --save-dev babel-loader babel-core babel-preset-es2015After installation, We have to add config to webpack.config.js file.
module: {
  rules: [
    {
      test: /\.js$/, //Check for all js files
      loader: 'babel-loader',
      query: {
        presets: [ "babel-preset-es2015" ].map(require.resolve)
      }
    }
  ]
}
In order to check babel loader, we will change app.js to ES6 syntax.
'use strict';

import _ from 'lodash'; //ES6 import to check our babel loader

const array = [1];
const other = _.concat(array, 2, [3], [[4]]);

console.log(other); //[1, 2, 3, [4]]
Run the development server and check the console.
$ webpack-dev-serverInstall SASS & CSS Loader
$ npm install --save-dev css-loader style-loader sass-loader node-sassSASS & CSS loader config for webpack is below.
module: {
  rules: [{
    test: /\.(sass|scss)$/, //Check for sass or scss file names
    use: [
      'style-loader',
      'css-loader',
      'sass-loader',
    ]
  }]
}
After loaders, final steps are setting up sourcemaps and env for webpack.
In package.json file, lets add scripts to run our dev server and build with env.
"scripts": {
  "start": "webpack-dev-server",
  "build": "NODE_ENV=production webpack -p --config webpack.config.js"
}
NODE_ENV=production is environment set for build. Using process.env.NODE_ENV, we can check the env in webpack.
Now we know when we are running production build or development. Lets use it to setup the sourcemap accordingly.
var config = {
  devtool: "eval-source-map" // Default development sourcemap
};

// Check if build is running in production mode, then change the sourcemap type
if (process.env.NODE_ENV === "production") {
  config.devtool = "source-map";
}

module.exports = config;
More information on sourcemaps
Final step contains all the config for webpack from above.
'use strict';
var webpack = require('webpack');

var config = {
  context: __dirname + '/src', // `__dirname` is root of project and `src` is source
  entry: {
    app: './app.js',
  },
  output: {
    path: __dirname + '/dist', // `dist` is the destination
    filename: 'bundle.js',
    publicPath: "/assets",
  },
  module: {
    rules: [
      {
        test: /\.js$/, //Check for all js files
        loader: 'babel-loader',
        query: {
          presets: [ "babel-preset-es2015" ].map(require.resolve)
        }
      },
      {
        test: /\.(sass|scss)$/, //Check for sass or scss file names
        use: [
          'style-loader',
          'css-loader',
          'sass-loader',
        ]
      },
      {
        test: /\.json$/,
        loader: "json-loader"  //JSON loader
      }
    ]
  },
  //To run development server
  devServer: {
    contentBase: __dirname + '/src',
  },

  devtool: "eval-source-map" // Default development sourcemap
};

// Check if build is running in production mode, then change the sourcemap type
if (process.env.NODE_ENV === "production") {
  config.devtool = "source-map";

  // Can do more here
  // JSUglify plugin
  // Offline plugin
  // Bundle styles seperatly using plugins etc,
}

module.exports = config;
Thats all. Thanks for reading my repo.