It's headless WordPress! 💀 - https://nextjswp.com
This is a bare-bones Next.js app, which fetches data from WordPress via WPGraphQL and styles it with TailwindCSS.
Please consider it a starting point for your next headless WordPress project.
- Category and Tag Archives
- Comments
- Custom Fields
- Custom Post Types
- On-demand Revalidation
- Post/Page Previews
- RSS Feed
- Search
- Sitemap
- WordPress Menus
- Static Site Generation (SSG)
- TypeScript, ESLint, Stylelint, and Prettier
- Yoast SEO
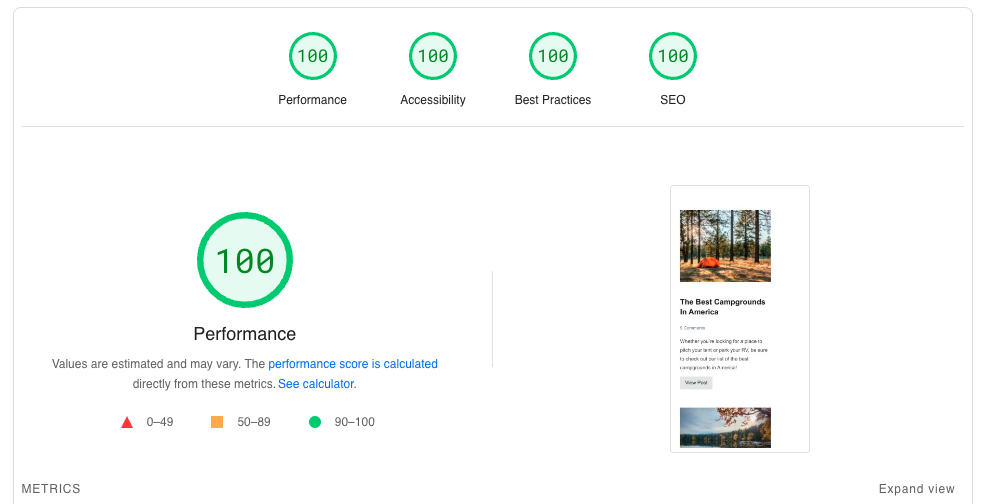
Plus it's really, really fast! 🚀
Yes! You can view a website running this code at https://gregrickaby.com (github repo).
I've decided to simplify things based on the Next.js App Router. You can still view the old repo.
Yes! I'm always interested in taking on headless WordPress projects. Send an email with your budget and requirements to greg@gregrickaby.com
git clone git@github.com:gregrickaby/nextjs-wordpress.gitnpm icp .env.example .env.localCustomize the URLs in .env.local to match your WordPress setup:
# WordPress GraphQL API URL. No trailing slash.
NEXT_PUBLIC_WORDPRESS_GRAPHQL_URL="https://wordpress.nextjswp.com/graphql"

# WordPress REST API URL. No trailing slash.
NEXT_PUBLIC_WORDPRESS_REST_API_URL="https://wordpress.nextjswp.com/wp-json/wp/v2"

# Optional. JWT auth refresh token.
#NEXTJS_AUTH_REFRESH_TOKEN=""

# Preview Secret. Must match the constant in wp-config.php.
NEXTJS_PREVIEW_SECRET="preview"

# Revalidation Secret. Must match the constant in wp-config.php.
NEXTJS_REVALIDATION_SECRET="revalidate"Update the URL in next.config.js to match your WordPress site:
/** @type {import('next').NextConfig} */
const nextConfig = {
  images: {
    remotePatterns: [
      {
        protocol: 'https',
        hostname: '*.nextjswp.**' // <-- Change to your WordPress site
      }
    ]
  }
}

module.exports = nextConfigUpdate the content to match your WordPress site:
const config = {
  siteName: 'Next.js WordPress',
  siteDescription: "It's headless WordPress!",
  siteUrl: 'https://nextjswp.com'
}You'll need either a local or public WordPress site with the following plugins:
- Advanced Custom Fields (free version is fine)
- Next.js WordPress Plugin
- Next.js WordPress Theme
- WPGraphQL Yoast SEO
- WPGraphQL for Advanced Custom Fields
- WPGraphQL JWT Authentication (optional)
- WPGraphQL
- Yoast SEO
After installing all the plugins mentioned above, you'll need to add some constants to your wp-config.php file:
// The URL of your Next.js frontend. Include the trailing slash.
define( 'NEXTJS_FRONTEND_URL', 'https://nextjswp.com/' );

// Optional. JWT auth refresh token.
//define( 'GRAPHQL_JWT_AUTH_SECRET_KEY', '' );

// Any random string. This must match the .env variable in the Next.js frontend.
define( 'NEXTJS_PREVIEW_SECRET', 'preview' );

// Any random string. This must match the .env variable in the Next.js frontend.
define( 'NEXTJS_REVALIDATION_SECRET', 'revalidate' );In order to query draft posts for Previews, you'll need to authenticate with WordPress. The following is a one-time step:
- Install and activate the WPGraphQL JWT Authentication plugin
- Generate a random string. I recommend using the WordPress salt generator
- Copy the string
- Open your
wp-config.phpfile, and paste the string into theGRAPHQL_JWT_AUTH_SECRET_KEYconstant. (Be sure to uncomment the constant by removing the//symbols.)
// Optional. JWT auth refresh token.
define( 'GRAPHQL_JWT_AUTH_SECRET_KEY', 'some-random-string-generated-by-wp-salt' );- Go to GraphQL -> GraphiQL IDE in your WordPress admin
- Copy the following and paste into GraphiQL IDE (replace
your_usernameandyour_passwordwith your WordPress credentials)
mutation Login {
  login(
    input: {
      clientMutationId: "uniqueId"
      password: "your_password"
      username: "your_username"
    }
  ) {
    refreshToken
  }
}- Click the Play button in GraphiQL to run the mutation
- Copy the
refreshTokenreturned by the mutation - Open the Next.js
.env.localfile, and paste therefreshTokeninto theNEXTJS_AUTH_REFRESH_TOKENvariable. (Be sure to uncomment the variable by removing the#symbol.)
# Optional. JWT auth refresh token.
NEXTJS_AUTH_REFRESH_TOKEN="refresh-token-generated-by-grapqh-query"
You should now be able to preview draft posts in your Next.js app by clicking the Preview button in your WordPress admin.
npm run devOnce the dev server has started, you can view the front-end: http://localhost:3000
GraphQL is efficient because we can query multiple endpoints in a single request. If we were to use the WordPress REST-API, we would need to make multiple round trips to each respective endpoint.
We can build our queries in GraphiQL (or your favorite REST client) and let JSON.stringify() format it. Because this is all standard JavaScript, we can even pass variables to our queries-- no need for a 3rd party package!
Here is a query to fetch a single post (based on the slug), the featured image, author meta, categories, tags, SEO, and post comments:
import {Post} from '@/lib/types'

/**
 * Fetch a single post by slug.
 */
export async function getPostBySlug(slug: string) {
  // Define our query.
  const query = `
    query GetPost($slug: ID!) {
      post(id: $slug, idType: SLUG) {
        databaseId
        content(format: RENDERED)
        title(format: RENDERED)
        featuredImage {
          node {
            altText
            mediaDetails {
              sizes(include: MEDIUM) {
                height
                width
                sourceUrl
              }
            }
          }
        }
        author {
          node {
            avatar {
              url
            }
            name
          }
        }
        date
        tags {
          nodes {
            databaseId
            name
          }
        }
        categories {
          nodes {
            databaseId
            name
          }
        }
        seo {
          metaDesc
          title
        }
        comments(first: 30, where: {order: ASC}) {
          nodes {
            content(format: RENDERED)
            databaseId
            date
            status
            author {
              node {
                avatar {
                  url
                }
                email
                name
                url
              }
            }
          }
        }
      }
    }
  `

  // Define our variables.
  const variables = {
    slug: slug
  }

  // Fetch the data using a reusable fetch function. Next.js
  // automatically memoizes and caches these requests.
  const response = await fetchGraphQL(query, variables)

  // Return the post.
  return response.data.post as Post
}
This repo does not use a 3rd party GraphQL package, because Next.js automatically memoizes the fetch() requests in our custom fetch function. This means that if we fetch the same data twice, Next.js will only make one request to WordPress.
If you prefer use a 3rd party GraphQL package, simply swap out the custom
fetchGraphQL()function.
Remember to add all the environment variables from .env.local to your production environment on Vercel or Netlify.
RSS feed and the Sitemap are available at:
Previews are available at:
Contributions are welcome! Please see the contributing guidelines for more information.