It is mandetory to prepare your documents in
Markdownformat. We prepared an example repository in Lab Report Sample. All needed codes described in this repository. For more details about markdown please visit the Example Report
Put all reports into lab/2/ folder in your repository.
Report Deadline = 16/02/2020
The software is created in the spirit of the Processing programming language and the Arduino microcontroller[4] and allows a designer, artist, researcher, or hobbyist to document their Arduino-based prototype and create a PCB layout for manufacturing.
- Download Fritzing
- Create a new
sketch. - Search for
NodeMCU-32Sfritzing part and add it to Fritzing. Note: please insure that the pin maps of the part is as same as the image in Lab 1. (Update: here is the one which corresponds to the ESP32 component you have) - Create a random sketch your self (at least 5 component is needed and please don't forget connect them and use different colors in wiring)
-- Export the result as image(
lab/2/report/1/sketch.png) - Design the Schematic of that. Please style it in a good format.
-- Export the result as image(
lab/2/report/1/schematic.png) - Make a (
lab/2/report/1/README.md) file and put the images and a small description on it and USE MARKDOWN FORMAT PLEASE. For images please use the uploaded images from yourgithub. Example Report
In this lab, we will learn how the I2C/SPI/Serial communication protocol works.
The Wiring Serial serial port allows for easily reading and writing data to and from external devices. It allows two machines to communicate and gives you the flexibility to make your own devices and use them as the input or output to your Wiring programs.
The serial communication is very good for debuging your code. You can connect your arduino board to your computer easily. It works like a simple console. Let's start to use it.
In the Setup function we should define the Serial comunication.
void setup() {
  Serial.begin(9600);  // Start serial Serial at 9600 baud
}
It is important that both devices have the same baud rate (transmission speed). more info You should change the baud rate in your client to read the data correctly.
To send data to the other device we can use following instruction.
Serial.print("string");It will print string.
To read data from other device, we can use the following instruction.
byte b = Serial.read();For more information about Serial take a look here or here
A simple program:
void setup() {
// initialize serial:
Serial.begin(9600);
....
}
void loop() {
// if there's any serial available, read it:
while (Serial.available() > 0) {
// look for the next valid integer in the incoming serial stream:
int i = Serial.parseInt();
// look for the next valid byte in the incoming serial stream:
byte b = Serial.read();
// look for the newline. That's the end of your sentence:
if (Serial.read() == '\n')
.....
// print the three numbers in one string as hexadecimal:
Serial.print(15, HEX);//print F
Serial.print(10, DEC);//Print 10
Serial.println("Hello"); //Print Hello\n
}
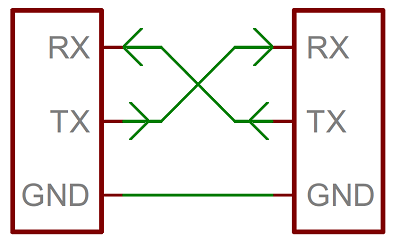
}You can also connect 2 devices with serial communication. Please don't forget to connect TX from one side to RX in another side.
-
Develop an arduino program which can read a byte from serial and adjust the passive buzzer frequency with it. Write, in response, that your buzzer's frequency has changed to the read value. (
lab/2/report/2/code1.ino). -
Connect your Arduino board to computer. Open a serial communication software (You can use built in serial monitor in Arduino IDE by pressing
ctrl+shift+Mor any other softwares like Putty) and send a value to your board! -
Connect the LDR to arduino more info (
lab/2/report/2/code2.ino). Then send the value to computer with serial and plot it. Hint: only send sensor value without any other string. The code to plot the incoming values is available here. It is written inPythonand usespyserialandmatplotliblibraries. You, thus, have to install these two libraries by following these steps:pip install pyserialpip install matplotlib
-
Please don't forget to put your plot in (
lab/2/report/2/plot.png). You can modify the code to improve the way the values are plotted. -
Create a Fritzing sketch contains both and export it on(
lab/2/report/2/sketch.png). -
Write a short report on (lab/2/report/2/README.md). It should contains pictures of your wiring.