| page_type | products | languages | description | urlFragment | extensions | ||||||||||
|---|---|---|---|---|---|---|---|---|---|---|---|---|---|---|---|
sample |
|
|
This sample demonstrates authentication in Microsoft Teams apps. |
microsoft-teams-auth |
|
This sample demonstrates authentication in Microsoft Teams apps.
There is a version of this app running on Microsoft Azure that you can try yourself. Download the AuthBot.zip app package and then upload it into Microsoft Teams. Then start a chat with @authbot.
Start by following the setup instructions in the Microsoft Teams Sample (Node.JS), under Steps to see the full app in Microsoft Teams, applying it to the code in this sample. The instructions in that project walk you through the following steps:
- Set up a tunneling service such as ngrok.
- Register a bot in Microsoft Bot Framework.
- Configure the app so it runs as the registered bot.
- Create an app manifest (follow the "Manual" instructions) and sideload the app into Microsoft Teams.
To be able to use an identity provider, first you have to register your application.
This project uses the config package. The default configuration is in config\default.json.
- Environment variable overrides are defined in
config\custom-environment-variables.json. You can set these environment variables when running node. If you are using Visual Studio Code, you can set these in yourlaunch.jsonfile. - Alternatively, you can specify local modifications in
config\local.json.
The instructions below assume that you're using environment variables to configure the app, and will specify the name of the variable to set.
Registering a bot with the Microsoft Bot Framework automatically creates a corresponding Azure AD application with the same name and ID.
- Go to the Application Registration Portal and sign in with the same account that you used to register your bot.
- Find your application in the list and click on the name to edit.
- Click on "Add platform", choose "Web", then add the following redirect URLs:
https://<your_ngrok_url>/auth/azureADv1/callbackhttps://<your_ngrok_url>/tab/simple-endhttps://<your_ngrok_url>/tab/silent-end
- Scroll to the bottom of the page and click on "Save".
- The bot uses
MICROSOFT_APP_IDandMICROSOFT_APP_PASSWORD, so these should already be set. No further changes needed!
- Follow the instructions in Step 1 — Configuring your LinkedIn application to create and configure a LinkedIn application for OAuth 2.
- In "Authorized Redirect URLs", add
https://<your_ngrok_url>/auth/linkedIn/callback. - Note your app's "Client ID" and "Client Secret".
- Set the environment variables (or equivalent config)
LINKEDIN_CLIENT_ID=<your_client_id>, andLINKEDIN_CLIENT_SECRET=<your_client_secret>.
- Obtain OAuth2 client credentials from the Google API Console. Enable access to the Google People API.
- In "Authorized redirect URLs", add
https://<your_ngrok_url>/auth/google/callback. - Note your app's "Client ID" and "Client Secret".
- Set the environment variables (or equivalent config)
GOOGLE_CLIENT_ID=<your_client_id>, andGOOGLE_CLIENT_SECRET=<your_client_secret>.
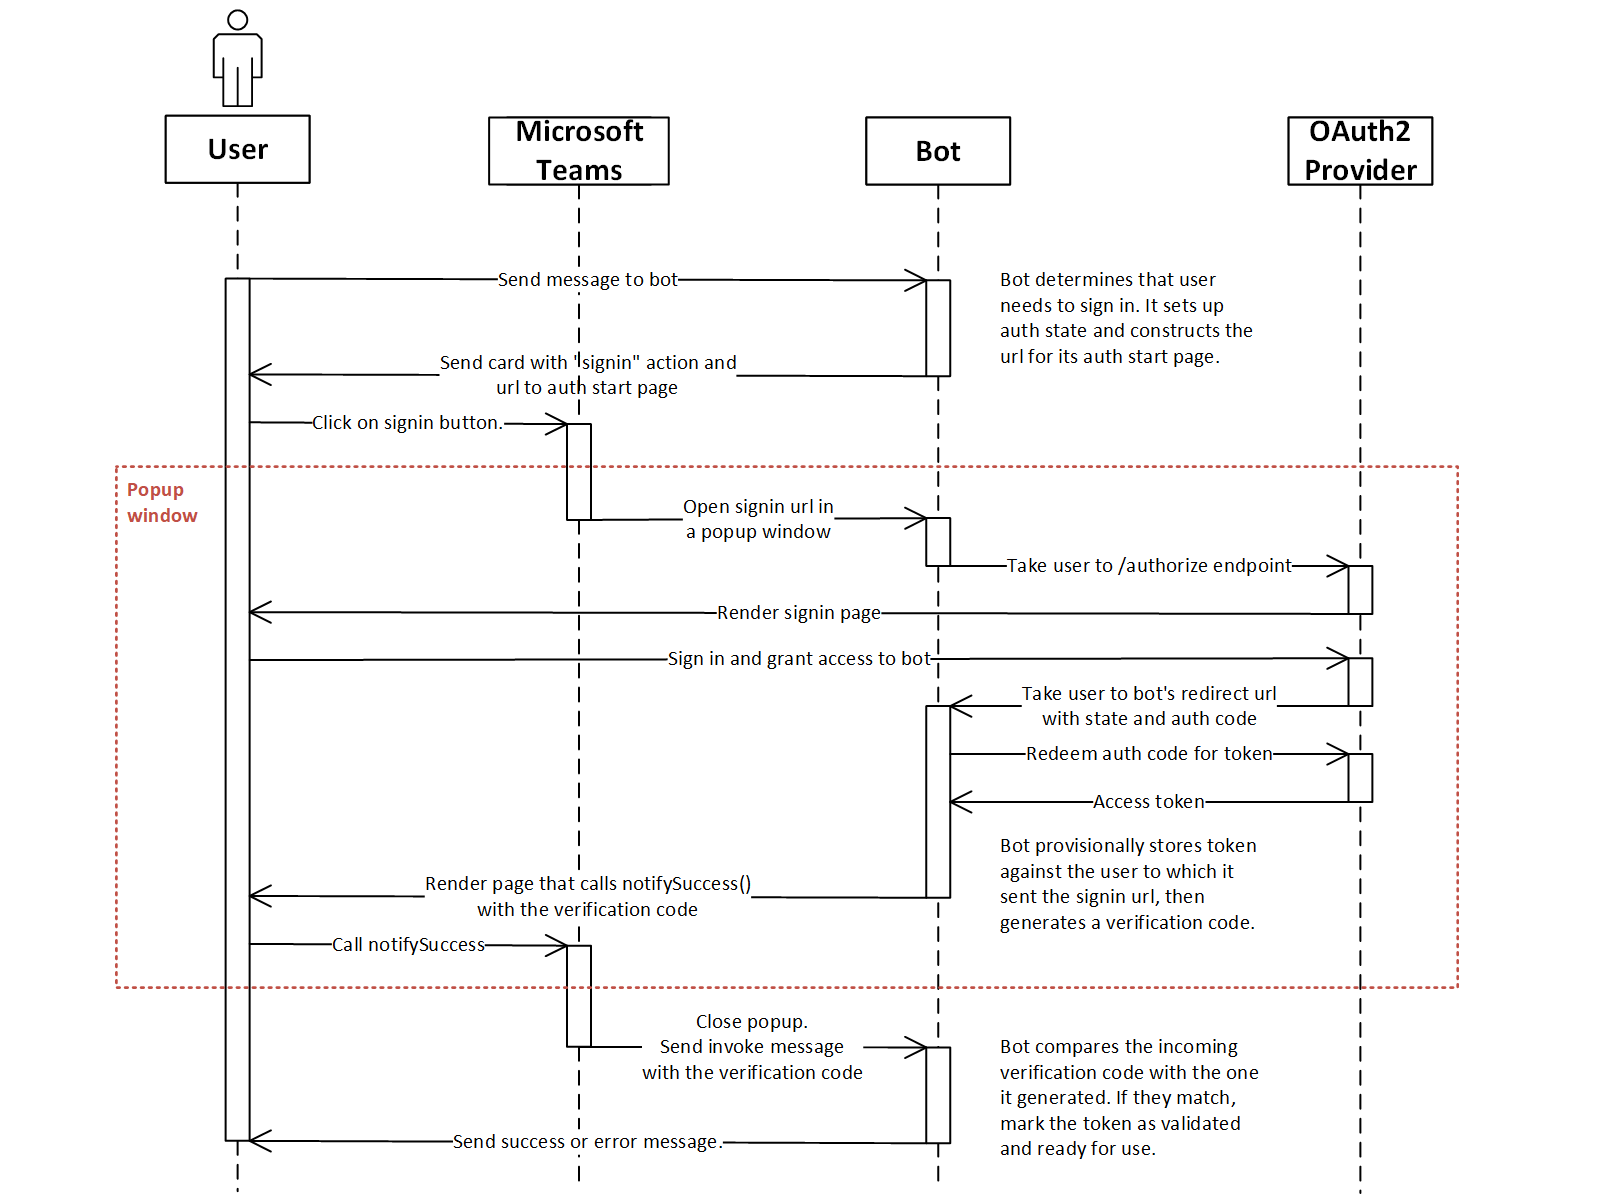
- The user sends a message to the bot.
- The bot determines if the user needs to sign in.
- In the example, the bot stores the access token in its user data store. It asks the user to log in if it doesn't have a validated token for the selected identity provider. (View code)
- The bot constructs the URL to the start page of the auth flow, and sends a card to the user with a
signinaction. (View code)- Like other application auth flows in Teams, the start page must be on a domain that's in your
validDomainslist, and on the same domain as the post-login redirect page.
- Like other application auth flows in Teams, the start page must be on a domain that's in your
- When the user clicks on the button, Teams opens a popup window and navigates it to the start page.
- The start page redirects the user to the identity provider's
authorizeendpoint. (View code) - On the provider's site, the user signs in and grants access to the bot.
- The provider takes the user to the bot's OAuth redirect page, with an authorization code.
- The bot redeems the authorization code for an access token, and provisionally associates the token with the user that initiated the signin flow.
- In the example, the bot uses information in the OAuth
stateparameter to determine the id of the user that started the signin process. Before proceeding, it checksstateagainst the expected value, to detect forged requests. (View code) - IMPORTANT: The bot puts the token in user's data store, but it is marked as "pending validation". The token is not used while in this state. The user has to "complete the loop" first by sending a verification code in Teams. This is to ensure that the user who authorized the bot with the identity provider is the same user who is chatting in Teams. This guards against "man-in-the-middle" attacks. (View code)
- In the example, the bot uses information in the OAuth
- The OAuth callback renders a page that calls
notifySuccess("<verification code>"). (View code) - Teams closes the popup and sends the string given to
notifySuccess()back to the bot. The bot receives an invoke message withname=signin/verifyState. - The bot checks the incoming verification code against the code stored in the user's provisional token. (View code)
- If they match, the bot marks the token as validated and ready for use. Otherwise, the auth flow fails, and the bot deletes the provisional token.
- The verification code mechanism prevents a potential "man in the middle" attack by requiring evidence that the user who authorized the bot in the browser is the same person as the user who is chatting with the bot. Don't remove the need for a verification code without understanding what it is protecting against, and weighing the risk against your use case and threat model.
- Don't use the
signin/verifyStatemessage to pass sensitive data (e.g., access tokens) directly to your bot in plaintext. Thestatevalue should not be usable without additional information that's available only to your bot. - The Teams app sends the
signin/verifyStateinvoke message in a way that's equivalent to the user typing a message to your bot. This means that although the user information in the message is not falsifiable, a malicious user can tamper with the payload, or send additional invoke messages that were not initiated by your app. - Store your users’ access tokens in such a way that they are encrypted at rest, especially if you are also storing refresh tokens. Consider, based on your use case and threat model, how often to rotate the encryption key. (The sample uses an in-memory store for simplicity; do not do this in your production app!)
- If you are using OAuth, remember that the
stateparameter in the authentication request must contain a unique session token to prevent request forgery attacks. The sample uses a randomly-generated GUID.
As of April 2019, Microsoft Teams mobile clients support the signin action protocol (that is, mobile clients work the same way as the desktop/web clients). It does require an updated version of the Microsoft Teams JavaScript library (1.4.1 or later). The way it used to work is described here.