
Add Webhooks to your Azure ServiceStack services

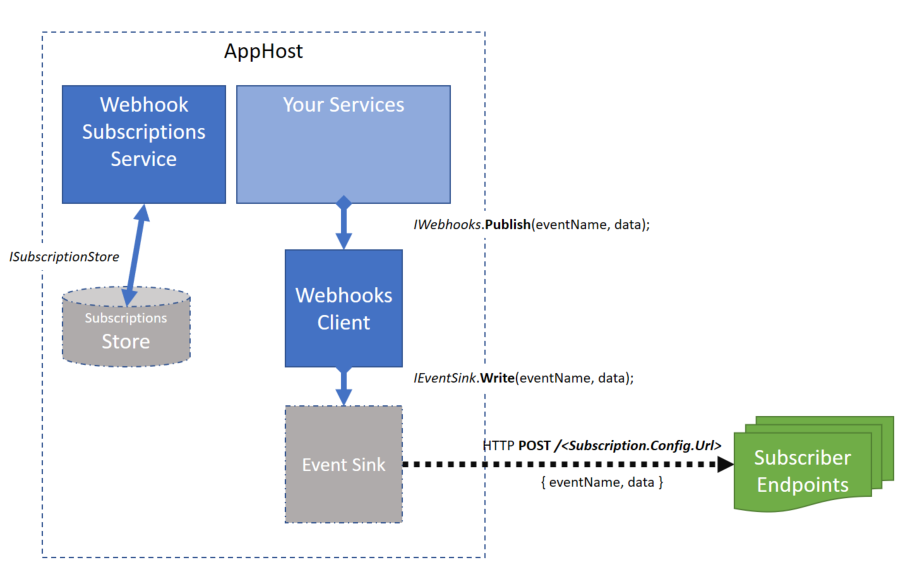
This project makes it very easy to plugin various Azure components to the ServiceStack.Webhooks architecture, which looks like this:
Note: If you cant find the exact Azure component you want for your Azure architecture in this ServiceStack.Webhooks.Azure project, you can easily build your own and just plug it in to your WebhookFeature. See Building Your Own Plugin for more details on that.
Want to get involved in this project? or there is something missing and you want to help improve this capability for your services? just send us a message or pull-request!
If you deploy your ServiceStack web service to Microsoft Azure, you may want to use Azure Table Storage, Queues, Buses etc. to allow your app to scale and perform at scale when using webhooks.
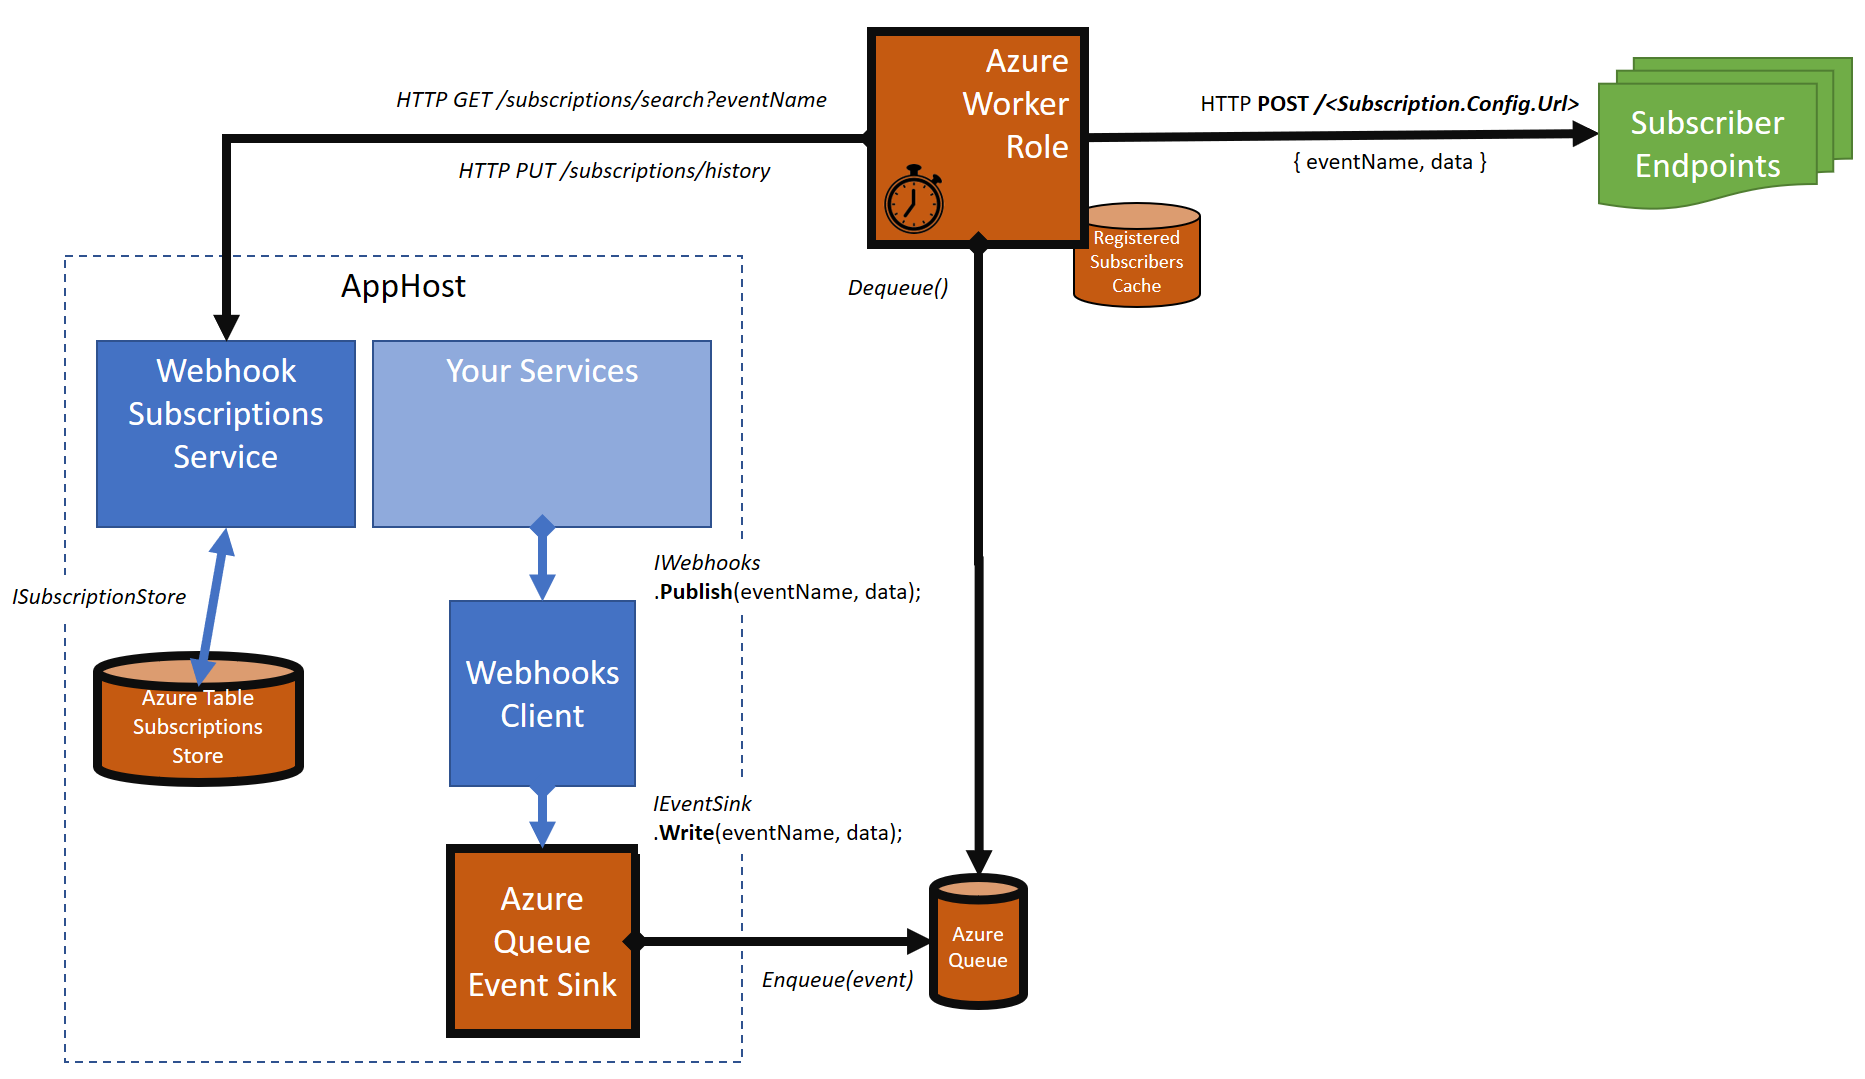
For example, 'subscriptions' can be stored in Azure Table Storage, or Azure SQL, 'events' can be queued in Azure Queue Storage, Function, or Service Bus, and then 'events' can be relayed by a Function, ServiceBus or WorkerRole or StatelessService to subscribers.
In this project, we currently support the following:
- Storing subscriptions in the
AzureTableSubscriptionStore - Sinking events in the
AzureQueueEventSink - Relaying events from the
AzureRelayWorkeras either a Cloud Service (Classic) WorkerRole or Service Fabric StatelessService.
It looks like this:
Install from NuGet:
Install-Package ServiceStack.Webhooks.Azure
Then, add the WebhookFeature in your AppHost.Configure() method as usual, and register the Azure components:
public override void Configure(Container container)
{
    container.Register<ISubscriptionStore>(new AzureTableSubscriptionStore());
    container.Register<IEventSink>(new AzureQueueEventSink());

    Plugins.Add(new WebhookFeature();
}
**WARNING: ** Before deploying your new webhook service to the cloud you will need to make some configuration changes to work with data stores in the cloud, (rather than using local storage on your machine).
By default, the services of this project will use default names for storage table and event queue, and will connect to the local Azure Emulator (UseDevelopmentStorage=true) storage account, which might be fine for you, but you may want to provide different names or connection strings for different deployments.
AzureTableSubscriptionStorewill create and use a storage table named: 'webhooksubscriptions'AzureQueueEventSinkwill create and use a storage queue named: 'webhookevents'
If you are hosting your web service in an Cloud Service WebRole or in a Service Fabric Stateless Service, you may want to customize the 'subscription store' and the 'event sink' in your configuration file, instead of using the defaults, or specifying them in code.
You would do that by registering the CloudAppSettings in your service like this:
public override void Configure(Container container)
{
    var appSettings = new CloudAppSettings();
    container.Register<IAppSettings>(appSettings);

    container.Register<ISubscriptionStore>(new AzureTableSubscriptionStore(appSettings));
    container.Register<IEventSink>(new AzureQueueEventSink(appSettings));

    Plugins.Add(new WebhookFeature();
}
Then, in the configuration of your WebRole or Stateless Service, edit the properties of the role you have for your web service:
- (ConnectionString) AzureTableSubscriptionStore.ConnectionString - The Azure Storage account connection string for your table. Default: UseDevelopmentStorage=true
- (string) AzureTableSubscriptionStore.SubscriptionsTable.Name - The name of the storage table where subscriptions are stored. Default: webhooksubscriptions
- (string) AzureTableSubscriptionStore.DeliveryResultsTable.Name - The name of the storage table where delivery results are stored. Default: webhookdeliveryresults
- (ConnectionString) AzureQueueEventSink.ConnectionString - The Azure Storage account connection string for your queue. Default: UseDevelopmentStorage=true
- (string) AzureQueueEventSink.Queue.Name - The name of the queue where events will be written. Default: webhookevents
Otherwise, you can set those values directly in code when you register the services:
public override void Configure(Container container)
{
    container.Register<ISubscriptionStore>(new AzureTableSubscriptionStore
        {
            SubscriptionTableName = "mytablename",
            DeliveryResultsTableName = "mytablename",
            ConnectionString = "mystorageaccount"
        });
    container.Register<IEventSink>(new AzureQueueEventSink
        {
            QueueName = "myqueuename",
            ConnectionString = "mystorageaccount"
        });

    Plugins.Add(new WebhookFeature();
}
To relay events from an Azure queue, you can deploy an Azure WorkerRole that picks up the events from the 'queue' and relays them to all subscribers.
This is how to do it:
Create a new 'Cloud Service' project in your solution, and add a 'WorkerRole' to it. (in this example we will name it "WebhookEventRelay")
In the new 'WebhookEventRelay' project, install the nuget package:
Install-Package Servicestack.Webhooks.Azure
In the 'WorkerRole.cs' file that was created for you, replace the 'WorkerRole' class with this code:
    public class WorkerRole : AzureWorkerRoleEntryPoint
    {
        private List<WorkerEntryPoint> workers;

        protected override IEnumerable<WorkerEntryPoint> Workers => workers;

        public override void Configure(Container container)
        {
            base.Configure(container);

            container.Register<IAppSettings>(new CloudAppSettings());
            container.Register(new EventRelayWorker(container));

            workers = new List<WorkerEntryPoint>
            {
                container.Resolve<EventRelayWorker>(),
                // (Add other types if you want to use this WorkerRole for multiple workloads)
            };
        }
    }
**WARNING: ** Before deploying your new WorkerRole to a Cloud Service in Azure you will need to make some configuration changes to work with data stores in the cloud, (rather than using local storage on your machine).
Since you are deploying this component to a Cloud Service, the configuration for it will likely exist in (ServiceConfiguration.cscfg) file as well:
In the 'Cloud' project that you created, edit the properties of the 'WebhookEventRelay' role.
Go to the 'Settings' tab and add the following settings:
- (string) SubscriptionServiceClient.SubscriptionService.BaseUrl - The base URL of your webhook subscription service (where the
WebhookFeatureis installed ). For example: http://myserver:80/api - (string) EventRelayQueueProcessor.Polling.Interval.Seconds - The interval (in seconds) that the worker role polls the Azure queue for new events. Default: 5
- (ConnectionString) EventRelayQueueProcessor.ConnectionString - The Azure Storage account connection string. Default: UseDevelopmentStorage=true
- (string) EventRelayQueueProcessor.TargetQueue.Name - The name of the queue where events will be polled. Default: webhookevents
- (string) EventRelayQueueProcessor.UnhandledQueue.Name - The name of the queue where failed events are dropped. Default: unhandledwebhookevents
- (string) EventRelayQueueProcessor.ServiceClient.Retries - The number of retry attempts the relay will make to notify a subscriber before giving up. Default: 3
- (string) EventRelayQueueProcessor.ServiceClient.Timeout.Seconds - The timeout (in seconds) the relay will wait for the subscriber endpoint before cancelling the notification. Default: 60
Note: the value of the setting EventRelayQueueProcessor.TargetQueue.Name must be the same as the AzureQueueEventSink.QueueName that you may have configured in the WebhookFeature.
To relay events from an Azure queue, you can deploy a Stateless Service in Service Fabric that picks up the events from the 'queue' and relays them to all subscribers.
This is how to do it:
Create a new 'Service Fabric Application' project in your solution, and add a 'StatelessService' to it. (in this example we will name it "WebhookEventRelay")
In the new 'WebhookEventRelay' project, install the nuget package:
Install-Package Servicestack.Webhooks.Azure
In the 'WorkerService.cs' file that was created for you, replace the 'WorkerService' class with this code:
    public class WorkerService : AzureWorkerServiceEntryPoint
    {
        private List<WorkerEntryPoint> workers;

        public WorkerService(StatelessServiceContext context) : base(context)
        {
        }

        protected override IEnumerable<WorkerEntryPoint> Workers => workers;

        public override void Configure(Container container)
        {
            base.Configure(container);

            container.Register<IAppSettings>(new FabricAppSettings(Context));
            container.Register(new EventRelayWorker(container));

            workers = new List<WorkerEntryPoint>
            {
                container.Resolve<EventRelayWorker>()
            };
        }
    }
**WARNING: ** Before deploying your new Stateless Service to a Service Fabric in Azure you will need to make some configuration changes to work with data stores in the cloud, (rather than using local storage on your machine).
Since you are deploying this component to a Service Fabric, the configuration for it will likely exist in your (PackageRoot\Config\settings.xml) file of your stateless service project:
Add the following settings:
- (string) SubscriptionServiceClient.SubscriptionService.BaseUrl - The base URL of your webhook subscription service (where the
WebhookFeatureis installed ). For example: http://myserver:80/api - (string) EventRelayQueueProcessor.Polling.Interval.Seconds - The interval (in seconds) that the worker role polls the Azure queue for new events. Default: 5
- (ConnectionString) EventRelayQueueProcessor.ConnectionString - The Azure Storage account connection string. Default: UseDevelopmentStorage=true
- (string) EventRelayQueueProcessor.TargetQueue.Name - The name of the queue where events will be polled. Default: webhookevents
- (string) EventRelayQueueProcessor.UnhandledQueue.Name - The name of the queue where failed events are dropped. Default: unhandledwebhookevents
- (string) EventRelayQueueProcessor.ServiceClient.Retries - The number of retry attempts the relay will make to notify a subscriber before giving up. Default: 3
- (string) EventRelayQueueProcessor.ServiceClient.Timeout.Seconds - The timeout (in seconds) the relay will wait for the subscriber endpoint before cancelling the notification. Default: 60
Note: the value of the setting EventRelayQueueProcessor.TargetQueue.Name must be the same as the AzureQueueEventSink.QueueName that you may have configured in the WebhookFeature.
In the current version (v.3.0.0), depending on where you clone the git repo, you may or may not be able to build and run the Integration tests.
This is due to file path limitations in Windows, and related to copying built Cloud project resources on the disk.
Recommended workaround is to clone the repo to a folder as close to C:\ drive as possible, such as C:\projects\ServiceStack.Webhooks.Azure.