The hardest thing when starting OpenShift from a developer point of view is not in deploying an application to it. This step can be done very easily. We found indeed that the most challenging part is to find the best way to do it ! Because OpenShift is so adaptable and flexible that it offers A Thousand and One Way to deploy an application. The best way will be the one that best fit a bunch of criteria:
- Your development process: what is your existing ecosystem and flow? (already using Jenkins, Nexus, ...)
- Your developer's maturity regarding Containers and CI/CD: do they want to manage Containers Dockerfile or Pipeline as code ?
- Your Ops or Technical experts involvement: wether they need to customize provided base images or base templates for introducing specificities,
- Your will to build different Service offers allowing multiple workflows adapted to multiple development teams.
Following this tutorial, you will deploy the same application using 6 different methods. Remember that this is just 6 methods that represents main ways of doing things, there's a number of variations that may be defined using some elements picked from one or another method exposed here.
For deploying the application repeatedly, you will only need an OpenShift project for isolating things out. Methods #6 may also require a JBoss Developer Studio on version 10+. We propose you create this project using the identifier ocp-tasks because some methods have this id hard-coded.
So startup by creating the project using the following command:
oc new-project ocp-tasks --display-name="OpenShift Tasks" --description="Demonstrating many ways to deploy application on OpenShift"
and here we go!
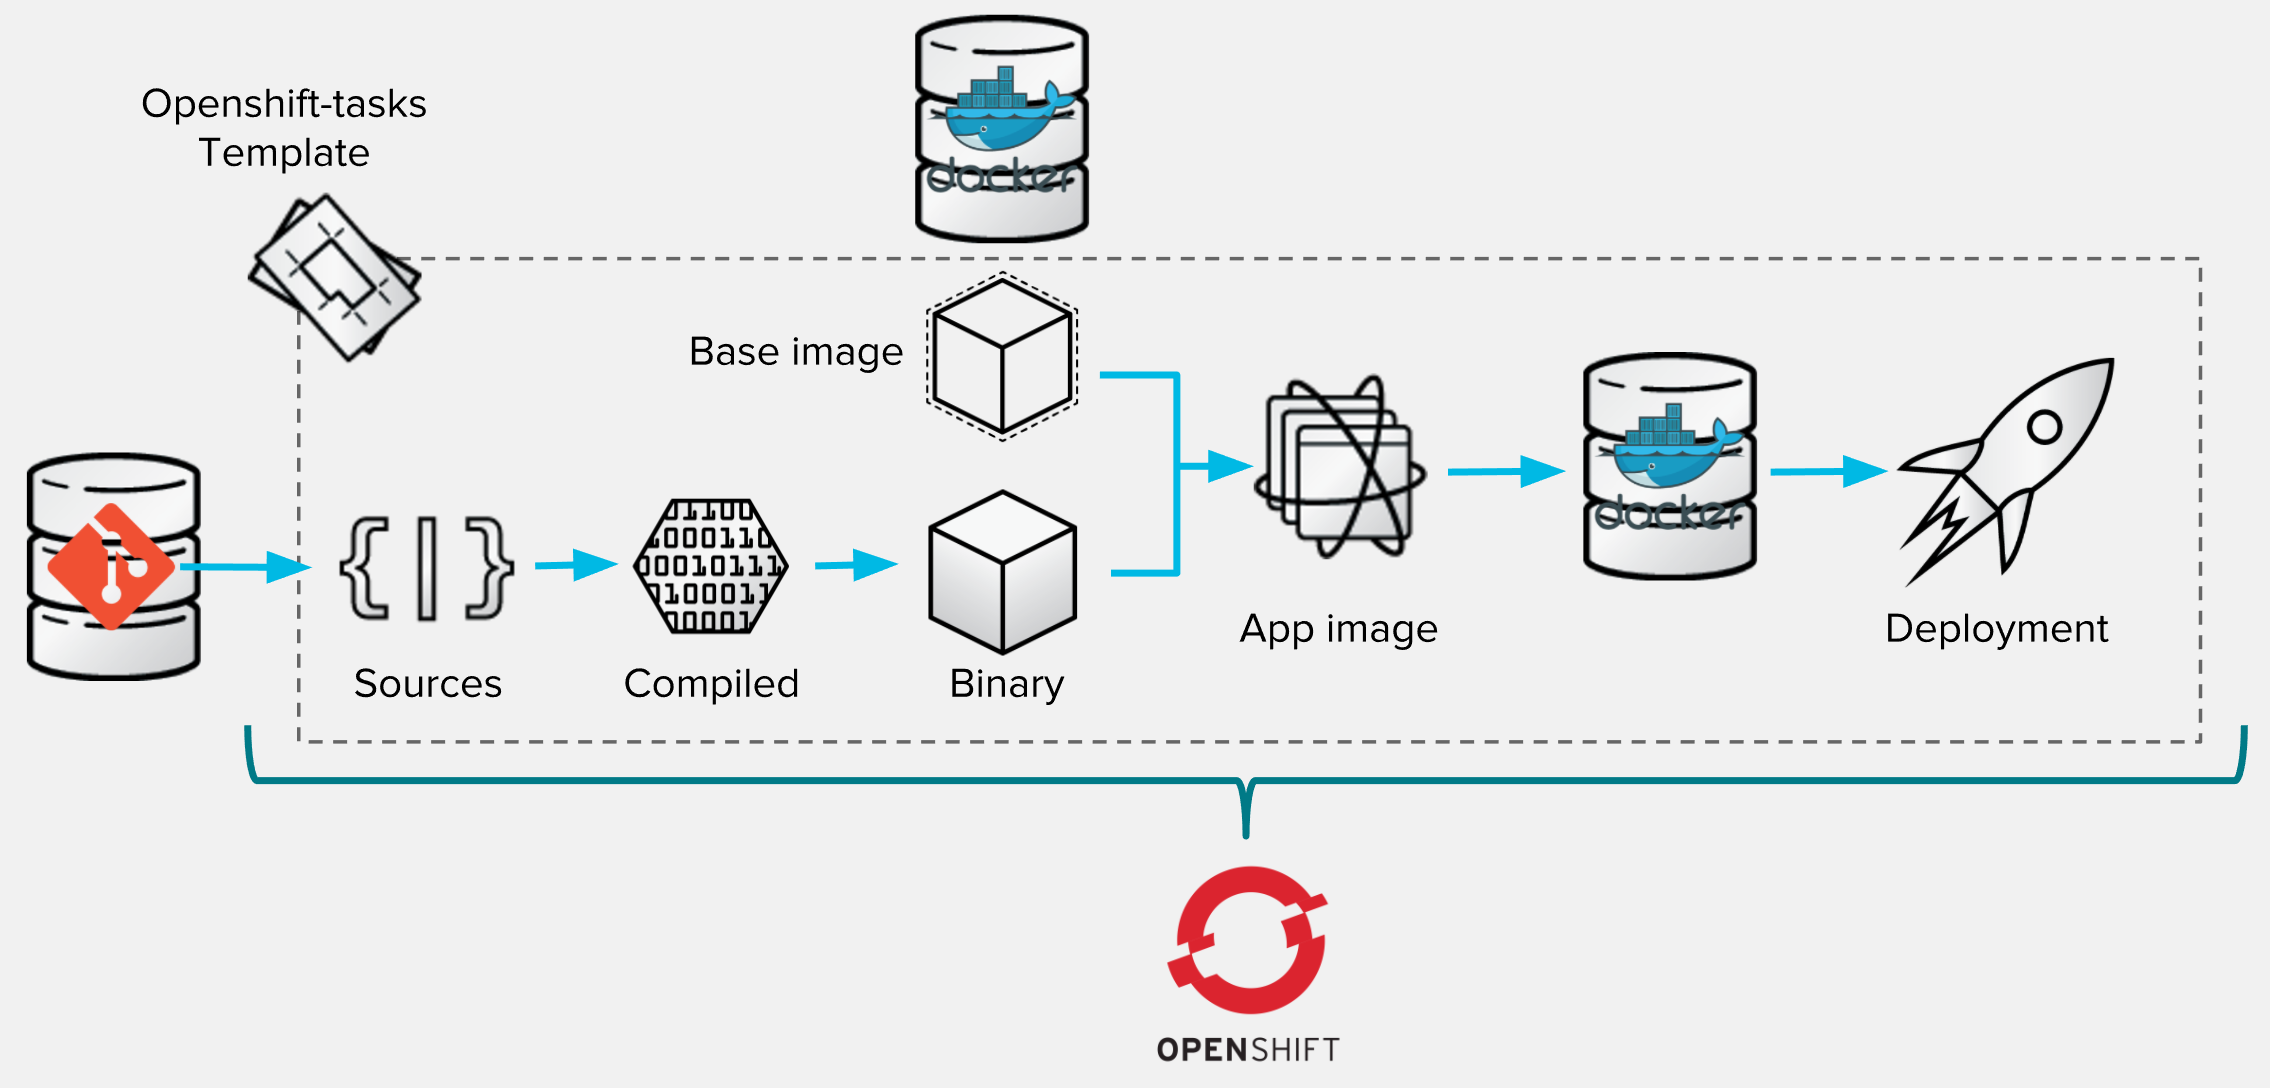
This is the most obvious for people starting with OpenShift: you'll use the default template and base image provided by OpenShift without any customization upfront. To illustrate this flow within your ocp-tasks project:
- Go to "Add to project" page,
- Pick the
jboss-eap70-openshift:1.4template, - Adapt the name of application to
tpl-tasksor something, - Refer this Github repository (
http://github.com/lbroudoux/openshift-tasks) or another internal one, - Optionally, add some extra environment variables on the BuildConfig for referring Maven component mirror (
MAVEN_MIRROR_URL), - Hit the save button and you'll got the application running in few minutes.
The process executed by OpenShift can be described as follow:

- Giving the template configuration and given URL for source repository, OpenShift realize the checkout of code sources,
- It sees that application is powered by Maven and so launches the Maven build so that it produces compiled Java classes and then deployable binary artifact (here called
openshift-task.war), - That later binary artifact is then added on top of
jboss-eap70base image to produce a Docker image for our application, - Image is stored within OpenShift Docker registry and can then trigger a new deployment (because template says that a new image should trigger a new deployment).
This variant consists in providing your own template that will be a customization of OpenShift provided template. Providing your own template allows you to lower the number of parameters the developer will have to fill and fixing hard values. To illustrate this flow within your ocp-tasks project:
- Register your app template in OpenShift using
oc create -f https://raw.githubusercontent.com/lbroudoux/openshift-tasks/master/app-template.yaml -n ocp-tasks, - Go to "Add to project" page,
- Pick the
openshift-taskstemplate, - Adapt the name of application to
s2i-tasksor something, - Refer this Github repository (
http://github.com/lbroudoux/openshift-tasks) or another internal one, - Hit the save button and you'll got the application running in few minutes.
The process executed by OpenShift can be described as follow and is basically the same as with standard base template:
The main differences you may noticed when creating your application is that the form to complete before deploying is drastically simpler than the default one. Providing a custom template allows you to pre-configure or hard write some parameters so that you're sure that users would not be able to change values or be bothered by choosing the right values.
This variant consists in providing your own template like the previous one but adapting the Source-to-image process by making OpenShift build your application image not from source but from a binary file you will inject. This variant is using the S2I customization capabilities as described here. The customization script we used is located into a companion repository here to enforce separation of concerns but it could be located in the same repository.
To illustrate this flow within your ocp-tasks project, we assume that previous step (#2) has been done and template is already registered. The whole process of this variant is fully described here showing the split of responsabilities between Jenkins and OpenShift:
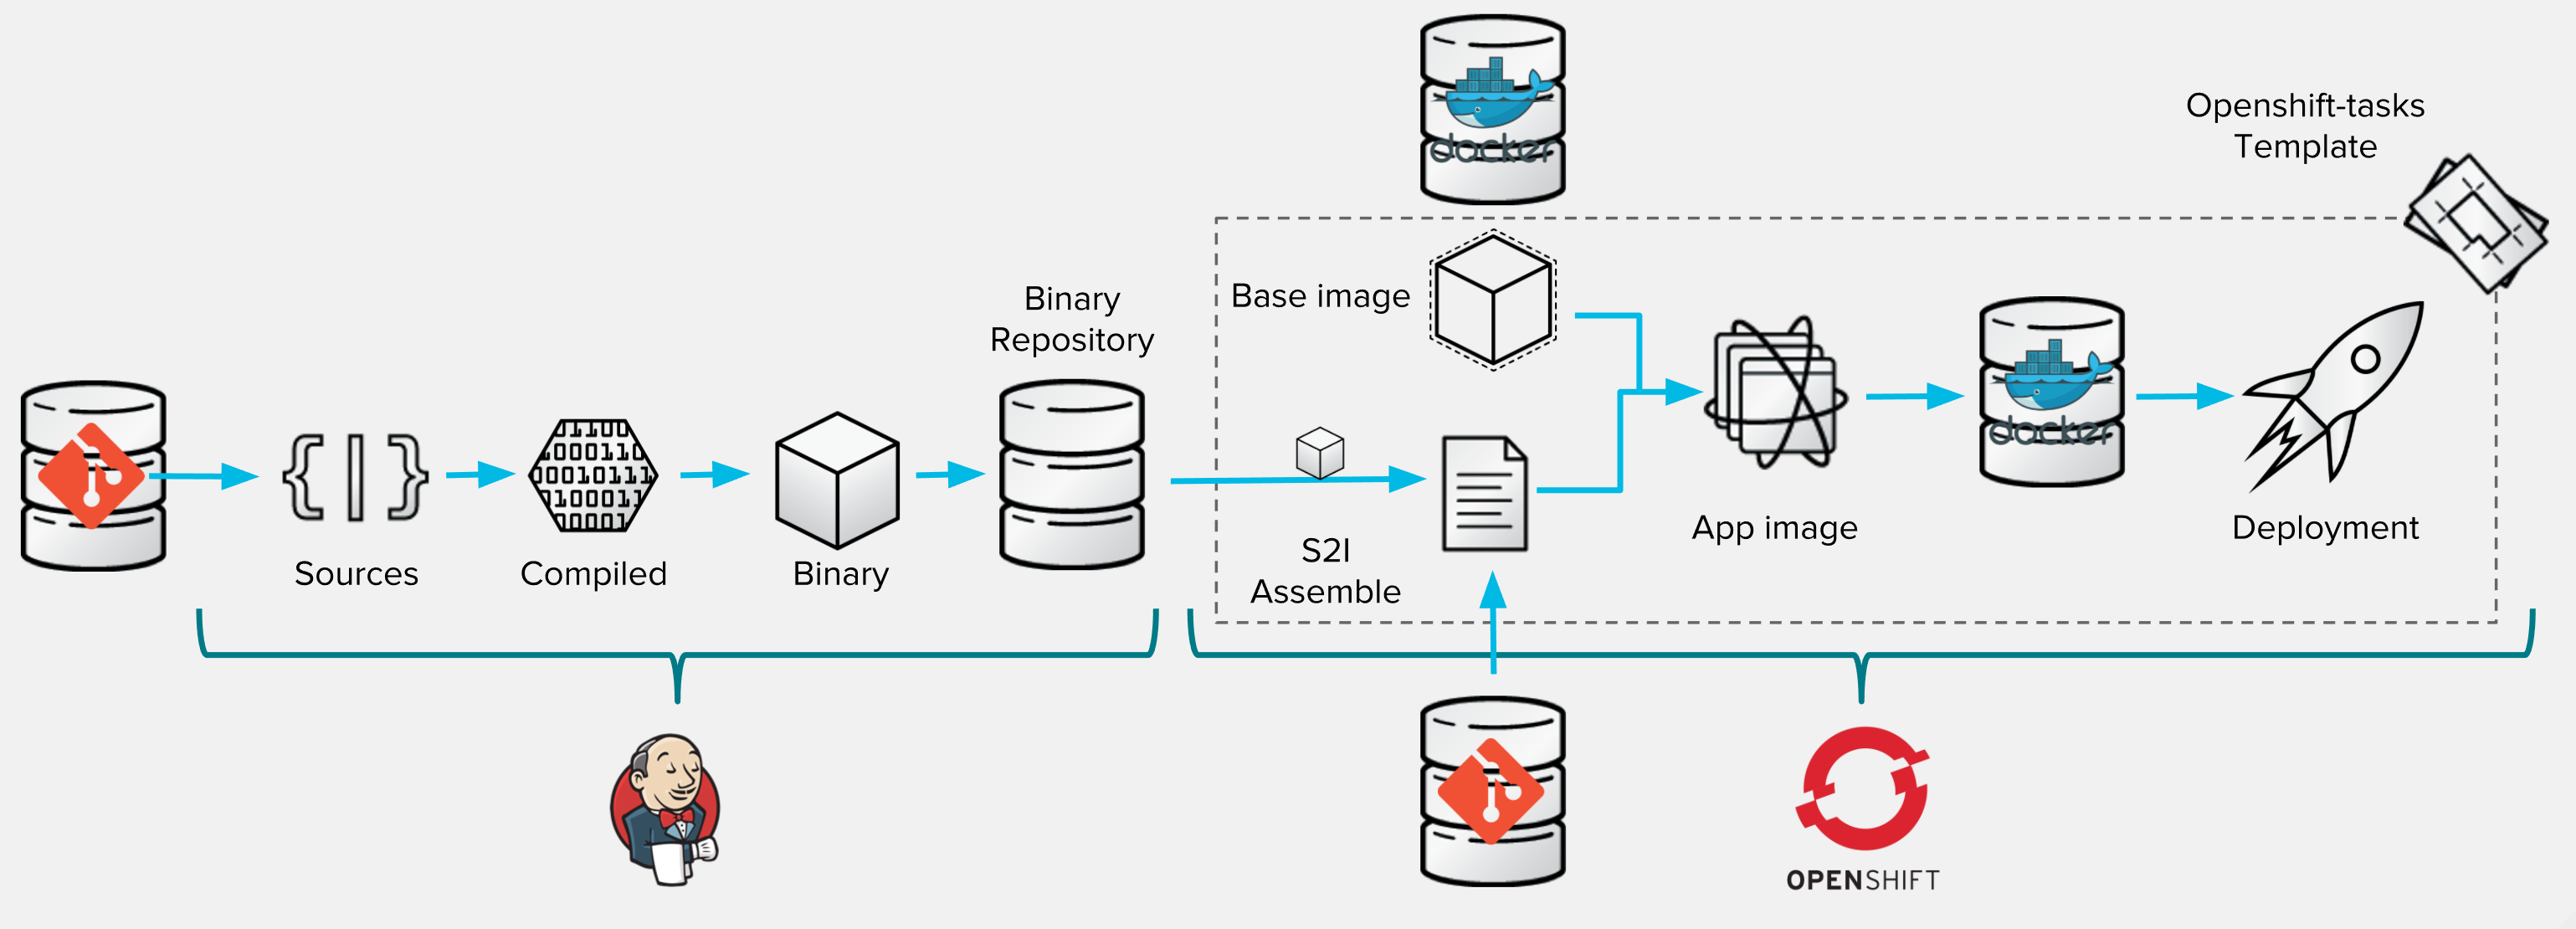
The trick here is to use a Jenkins instance to host the first part of your build process (like you would normally do in a traditional way without OpenShift). For doing that you may of course use a Jenkins instance deployed into your OpenShift project. You can easily create one using the jenkins-persistent template.
In this Jenkins instance, create a new job item (calling it bin-tasks for example) and configure it as a regular Jenkins Maven build. In configuration, you may want to checkout this Github repository (http://github.com/lbroudoux/openshift-tasks), then to realize a mvn package and finally store the generated artifacts using Jenkins built-in store. This last choice is for letting things simple: in a real-world scenario, you would prefer storing the generated artifact into a Nexus or Artifactory repository.
Now the second part is related to OpenShift. Because previous variant has been done, you are now able to:
- Go to "Add to project" page,
- Pick the
openshift-taskstemplate, - Adapt the name of application to
bin-tasksor something, - Refer the companion Github repository (
http://github.com/lbroudoux/openshift-tasks-bin-deploy) or another internal one, - Hit the save button.
Build and then Deployment may start but you will likely deploy an empty JBoss EAP because you have not supplied any deployable artifact yet. So you may cancel automatically started build and deployment before going further.
You now have a build config in Jenkins responsible for producing the binary and a build config in OpenShift that will be responsible for collecting the binary artifact and building a container image for deployment. Having a closer look at assemble file, you'll notice that our Build in OpenShift will need further environment variables to be able to retrieve the artifact. Through the console, go to your bin-tasks build and add these variables:
WAR_FILE_URLwill be URL to which is published your artifact by Jenkins. Something like http://jenkins-ocp-tasks.example.com/job/bin-tasks/lastSuccessfulBuild/artifact/target/openshift-tasks.warWAR_FILE_USERis a user that is allowed to get this file,WAR_FILE_PASSWORDis the Jenkins API token for this user (go to User settings in Jenkins and reveal API Token).
Finally, you may want to link all things together. So that when the bin-tasks job in Jenkins ends up successfully, it may trigger the bin-tasks build configuration into OpenShift. This can be easily done via a new Jenkins job that will use the OpenShift plugin for Jenkins. Create such a new job called for example bin-tasks-deploy (if your Jenkins runs into OpenShift, you may clone de OpenShift Sample job) and configure this job for watching bin-tasks successful result and then trigerring a new OpenShift Built: this is a builtin Build action coming with OpenShift plugin for Jenkins.
In this variant, you'll see how OpenShift enables build pipeline definition and management. In this first variant about CI/CD, the pipeline is managed outside of Source code, in a centralized way, maybe by people not being members of the developement team. To deploy this variant, we'll use a slightly different custom template than in step (#2). In previous step, build and deployment of application were linked together via the template: a trigger was used to automatically deploy a newly created image. The template we'll use now defines no trigger so that the Build and the Deployment are not tied together and can be orchestrated and deployment repeated over and over on a bunch of different environments. For simplicity, we'll just illustrate one deployment on a sole environment but you'll get the point.
To illustrate this flow within your ocp-tasks project, we assume that previous step (#3) has been done and a Jenkins instance is already present in your project. The whole process of this variant is fully described here showing the split of responsabilities between Jenkins and OpenShift:
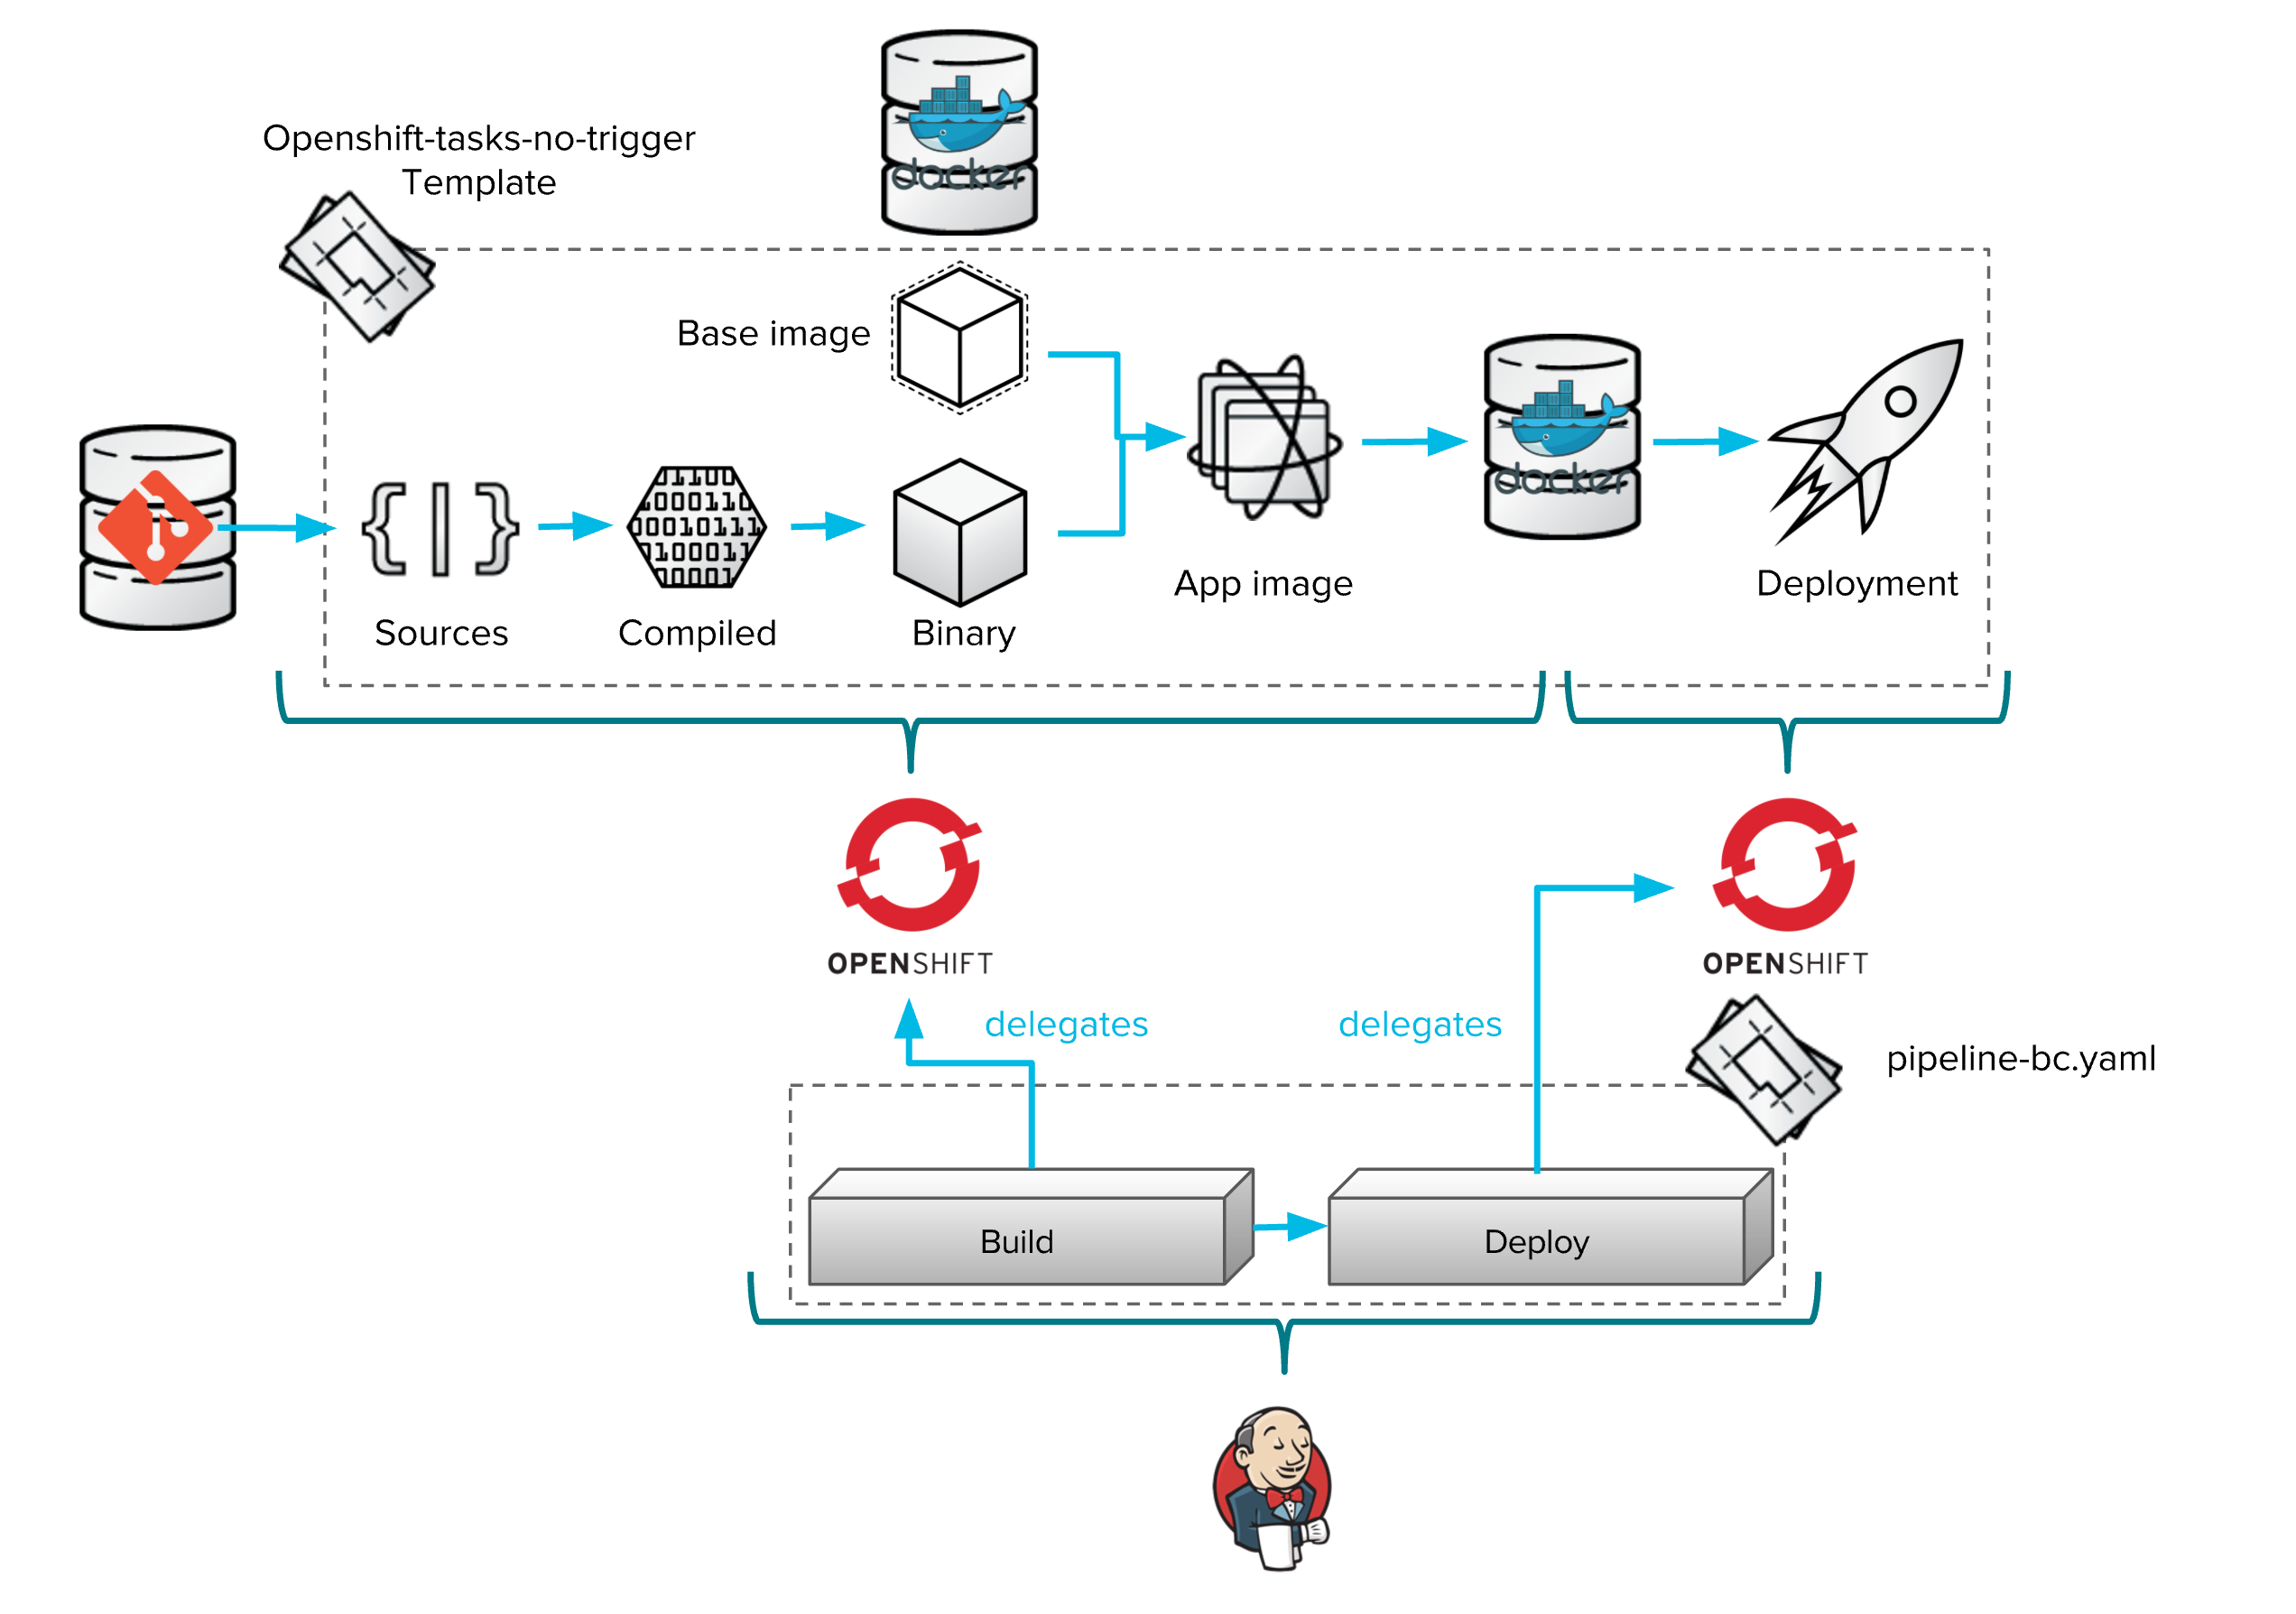
You may notice that the steps of Pipeline are here predictable and managed in Jenkins outside of source code. Jenkins delegate some operations of the pipeline workflow to OpenShift but it's definitely up to you to enrich this process with Integration Tests, Compliance Checks, User Acceptance Tests and so on. In order to deploy this example bootstrap process, follow this steps:
- Register the new app template in OpenShift using
oc create -f https://raw.githubusercontent.com/lbroudoux/openshift-tasks/master/app-template-no-trigger.yaml -n ocp-tasks, - Go to "Add to project" page,
- Pick the
openshift-tasks-no-triggertemplate, - Adapt the name of application to
jkp-tasks, - Refer this Github repository (
http://github.com/lbroudoux/openshift-tasks) or another internal one, - Hit the save button (a first Build should now have been started),
- Declare a new Pipeline build configuration using
oc create -f https://raw.githubusercontent.com/lbroudoux/openshift-tasks/master/pipeline-bc.yaml -n ocp-tasks
A new Pipeline have been created and is now available through the console going to Builds > Pipelines. It is now up to you to start this pipeline and having the application running in few minutes. An optimal way of starting such a Pipeline is by using a Webhook, hooks are available for single Builds and also for Pipelines.
This variant consists in dynamically discovering a Jenkins configuration that will be used to configure a Build Pipeline within a Jenkins instance. It demonstrates the Jenkinsfile build strategy using an external Jenkinsfile that may be used to treat pipeline as code. At the beginning of every build iteration, OpenShift will discover this file and update the corresponding Pipeline definition in Jenkins. To illustrate this flow within your ocp-tasks project:
- Register your app template in OpenShift using
oc create -f https://raw.githubusercontent.com/lbroudoux/openshift-tasks/master/app-template-jenkinsfile.yaml -n ocp-tasks, - Go to "Add to project" page,
- Pick the
openshift-tasks-jenkinsfiletemplate, - Adapt the name of application to
jkf-tasks, - Refer this Github repository (
http://github.com/lbroudoux/openshift-tasks) or another internal one, - Hit the save button.
The application is not automatically built and deployed because our template does not contain any other thing that a Build configuration that just instantiate the pipeline for the first time. Browsing the console and going to Builds > Pipelines, you may find the discovered pipeline. It is now up to you to start this pipeline and having the application running in few minutes. An optimal way of starting such a Pipeline is by using a Webhook, hooks are available for single Builds and also for Pipelines.
This process is described as follow:
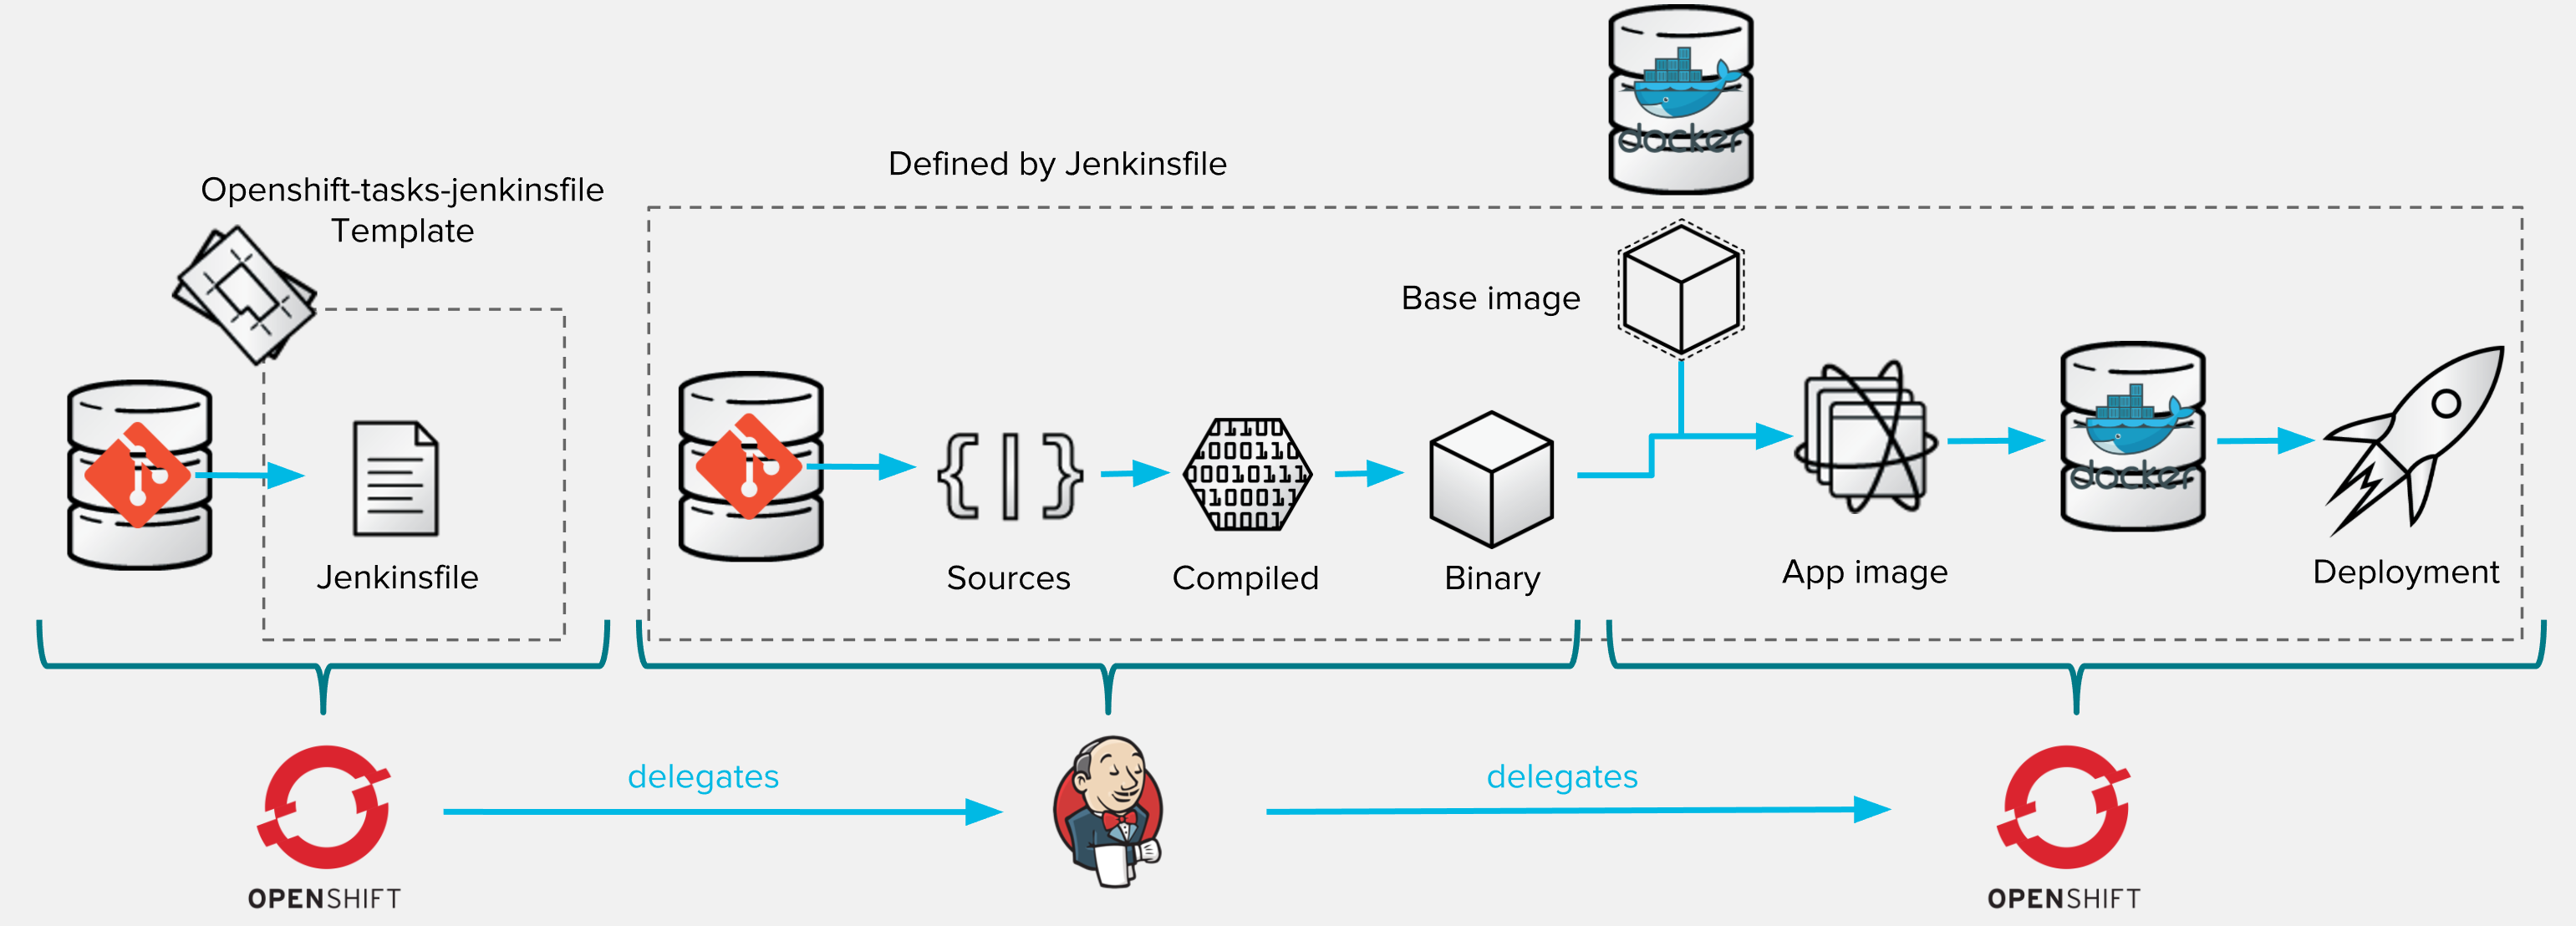
If you have a look at the Jenkinsfile, you'll see that each and every operation of the pipeline process is handled as code.
This last variant will show you how to directly deploy / hot redeploy your application from your IDE. For that we will JBoss Developer Studio that embeds the OpenShift plugin. To illustrate this flow within your ocp-tasks project, we assume that previous step (#2) has been done and template is already registered. You must also have a local copy of the project (cloned from http://github.com/lbroudoux/openshift-tasks for example) that is imported as a Maven project within your IDE.
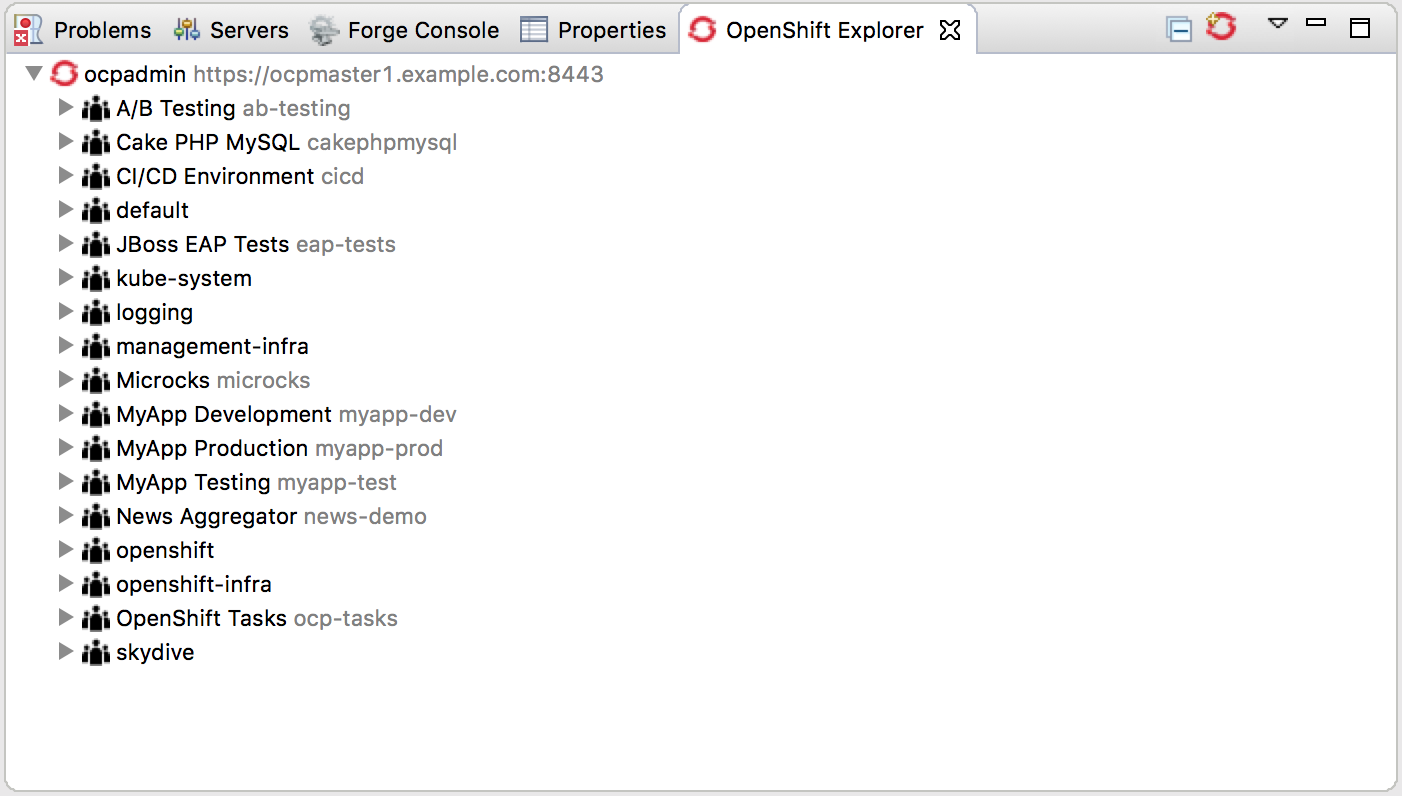
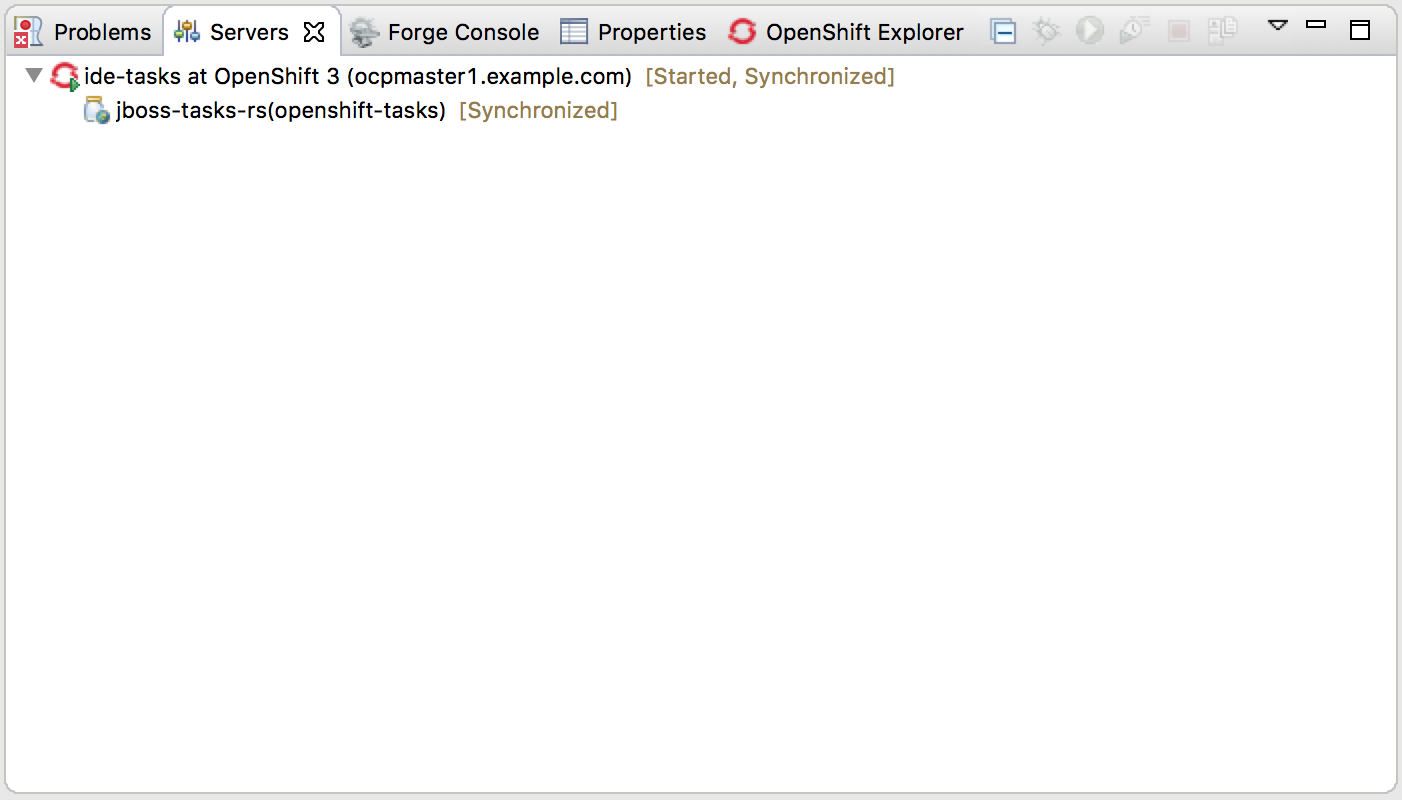
First thing to do is to establish a connection to your OpenShift cluster - this maybe a remote or local instance, no matter. This can be easily done through the OpenShift Explorer view in IDE as shown in screenshot below. The process of connecting is as straightforward as using the webc console. Once this is done, the view displays a tree of the resources you are allowed to access.
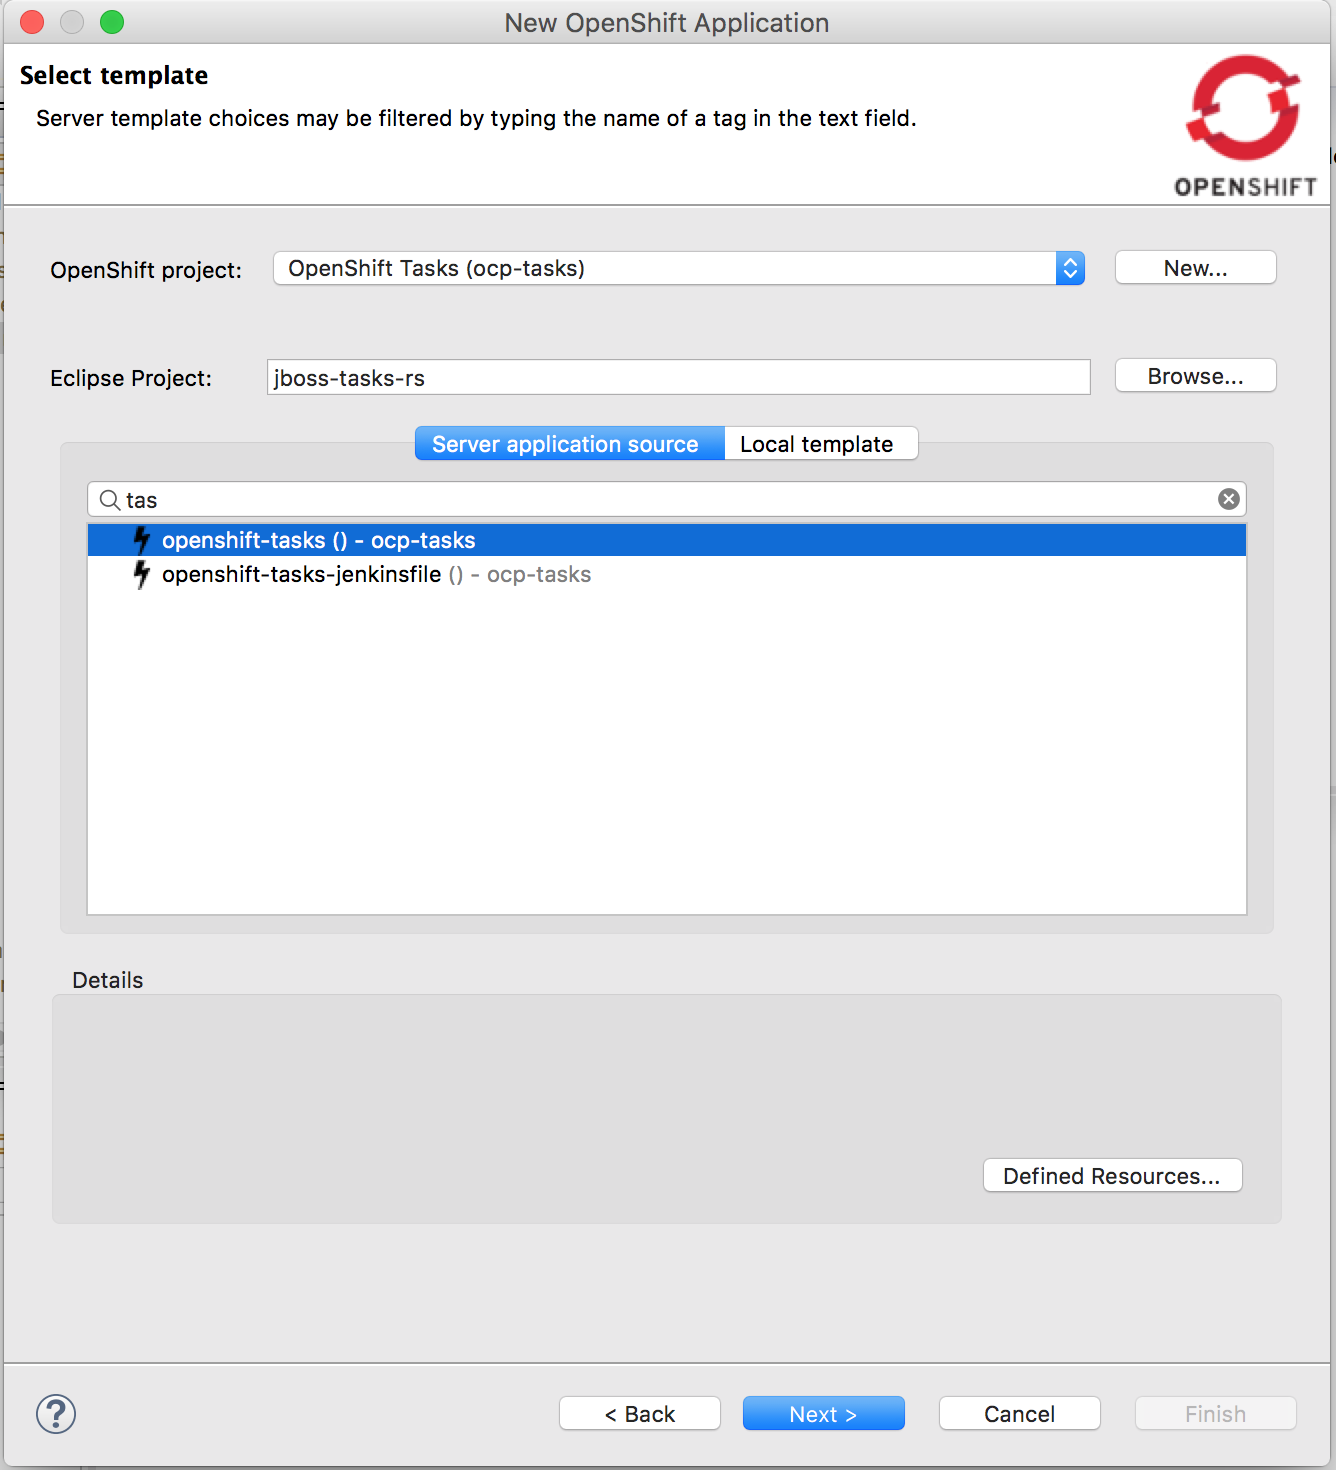
You will now be able to deploy your local project directly to OpenShift. For that, right click on your Project and select Configuration > Deploy to OpenShift. You'll come to a dialog asking you to select the target OpenShift project corresponding to a source IDE project and to select the appropriate template for deploying (reuse openshift-tasks).
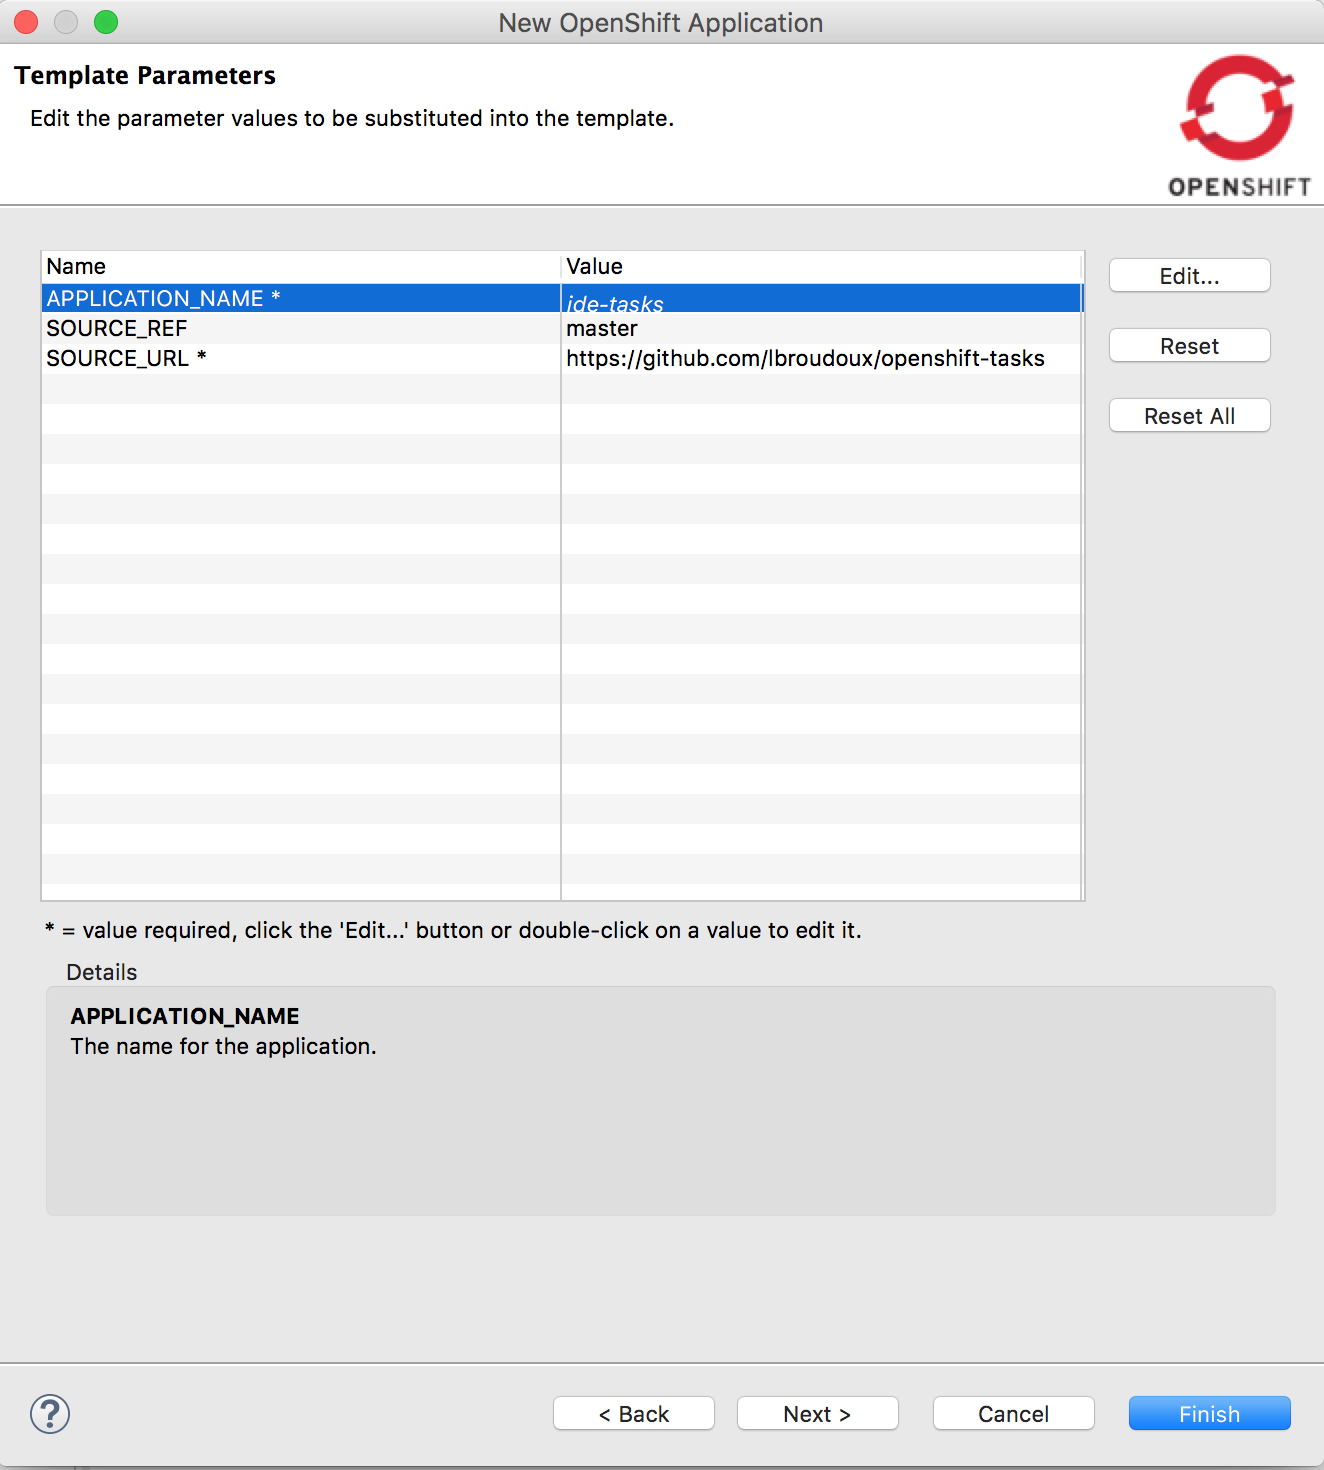
In the next dialog, you'll have access to the template parameters. Name your target application ide-tasks.
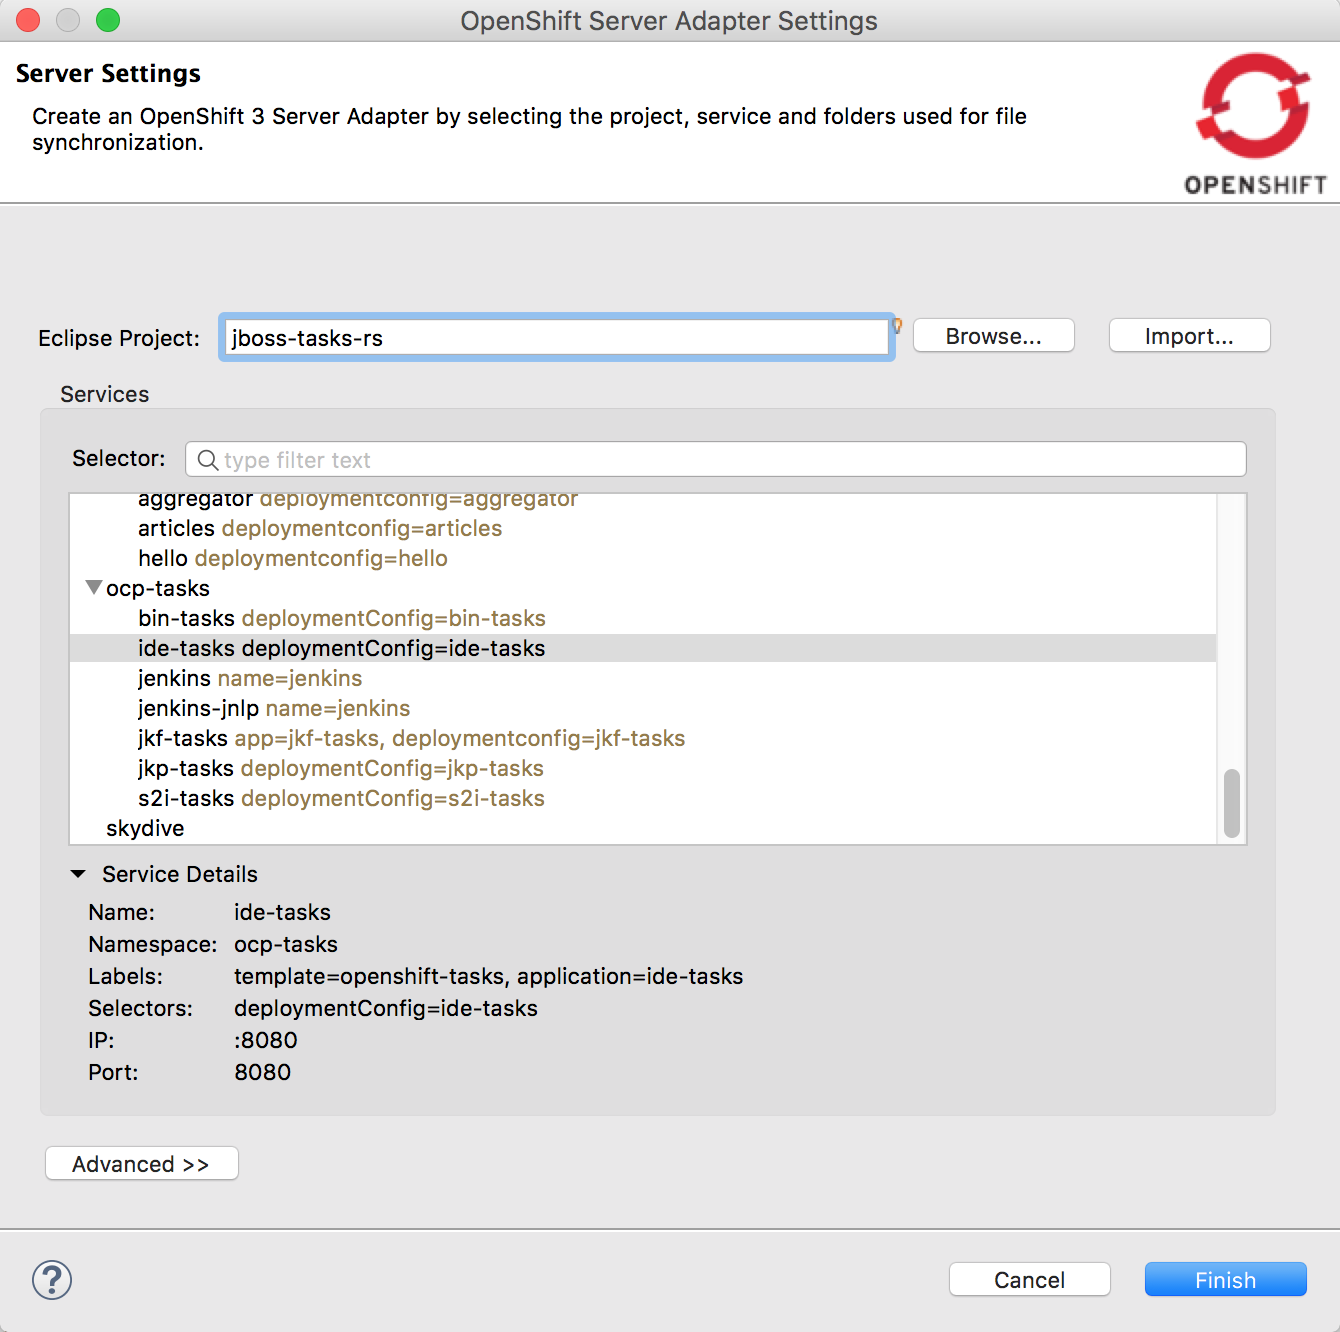
Wait for some minutes and check the deployment success on your OpenShift instance. Now we want to go further and being able to automatically redeploy code changes as we change it in the IDE editor. For doing that go back to the connection view in your IDE, see the newly created ide-tasks Service and right click for choosing Server Adapter.... In the next dialog, you have to create a link between your local Eclipse project and the OpenShift Service.
Once done, you should have this new Server Adapter connection appearing into the Servers view of your IDE.
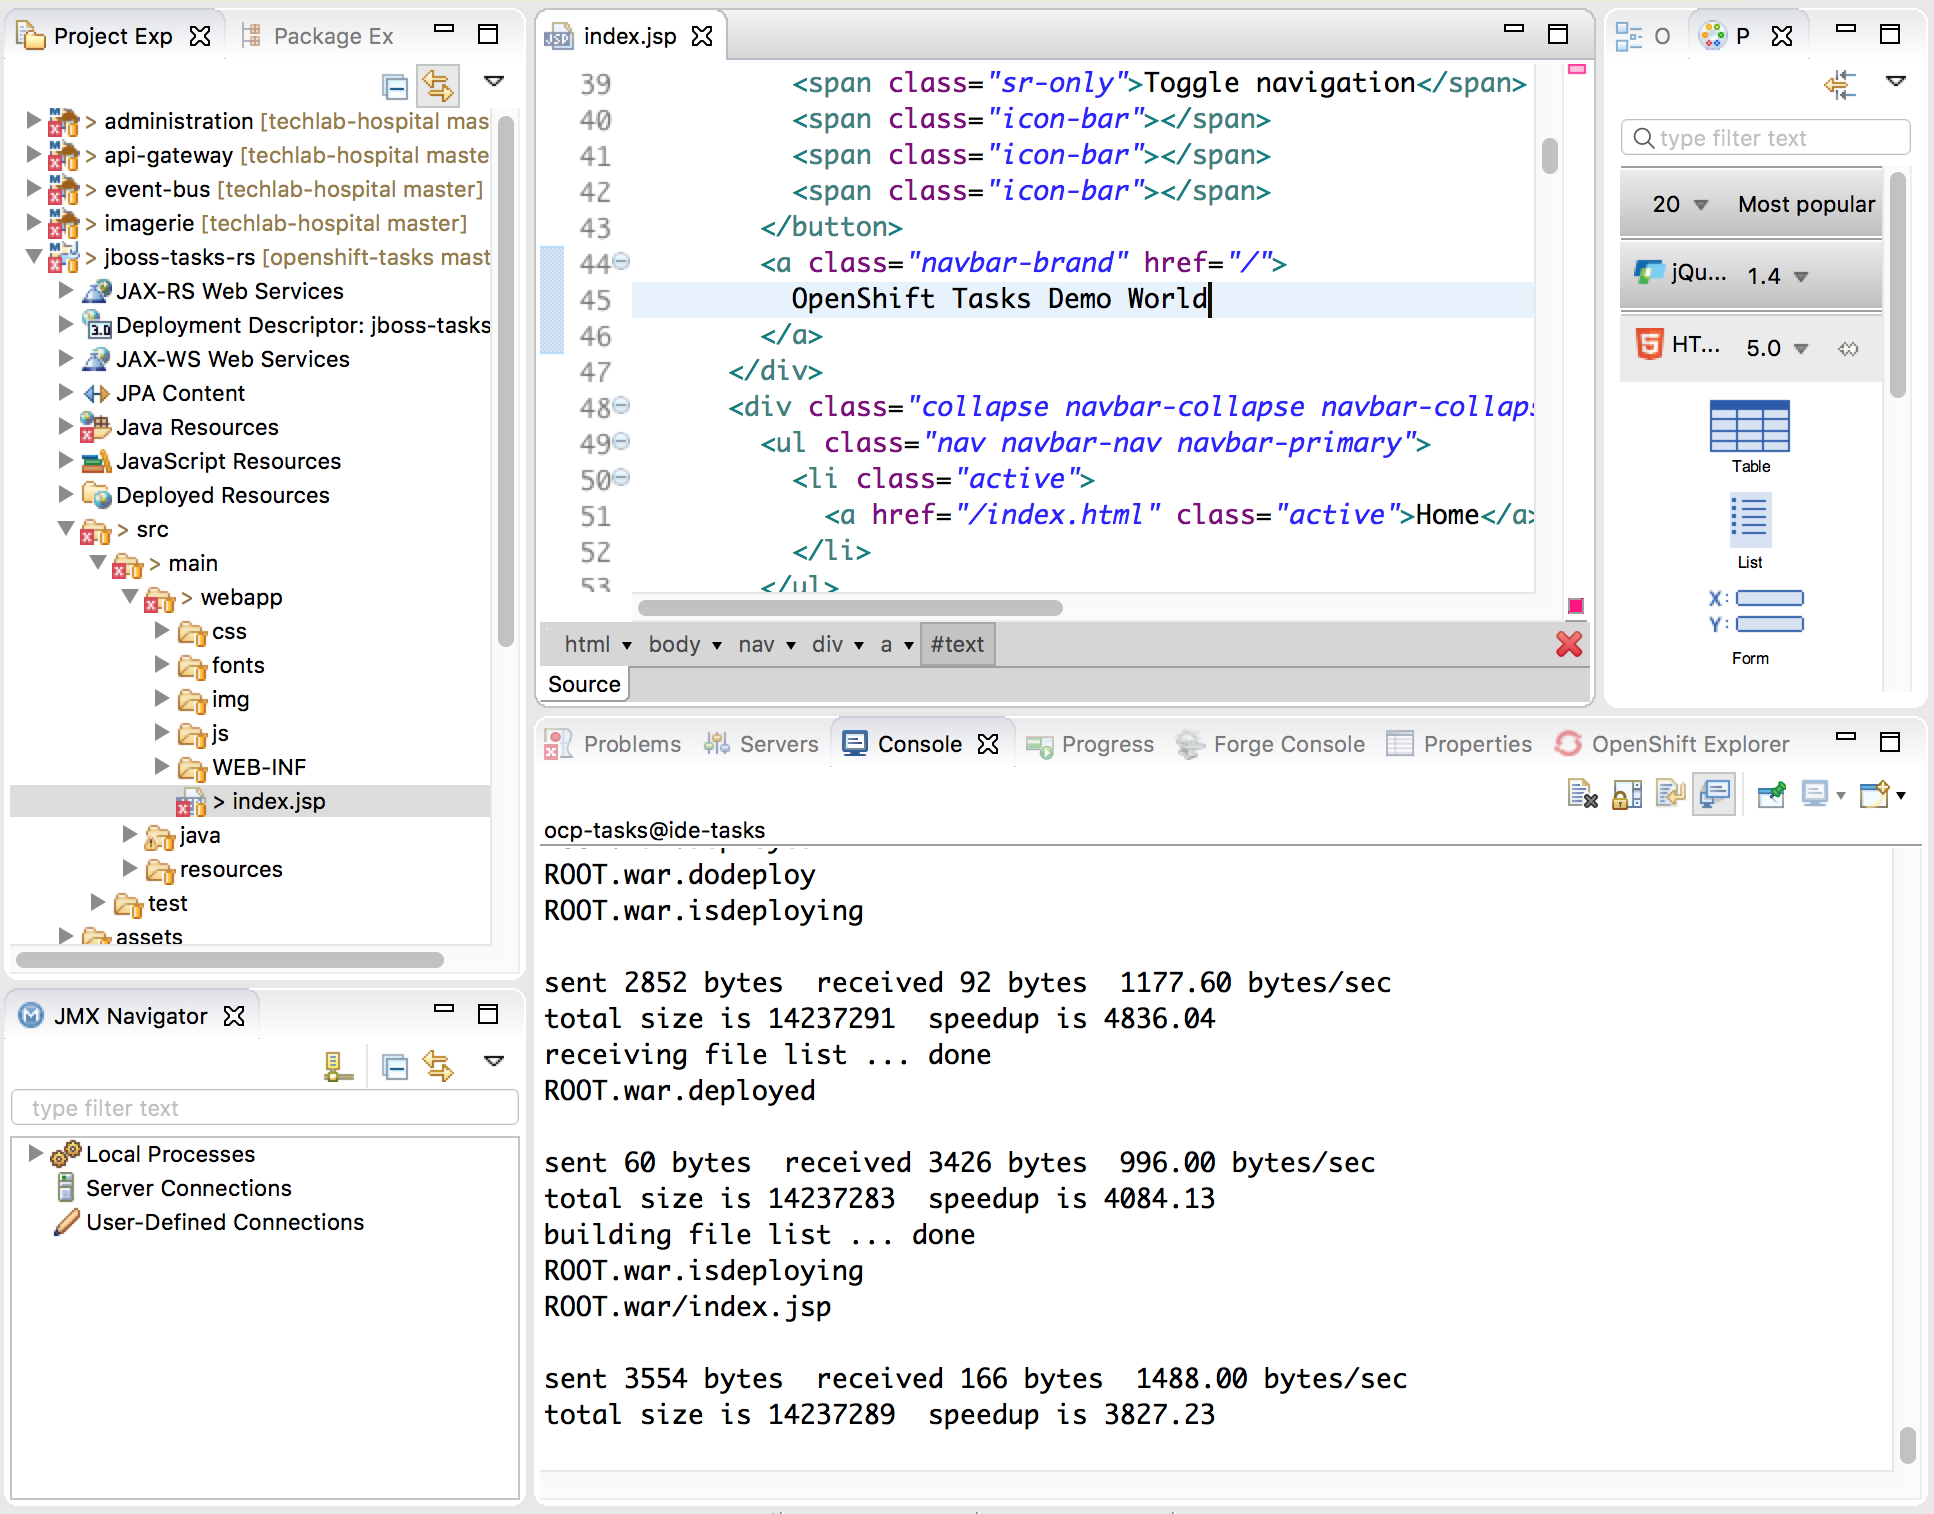
Synchonisation of sources starts and it may take some time as first run. Now, just edit file within your IDE (for example the /src/main/webapp/index.jsp file) and it will be automatically synchronsed and deployed within the War file within the JBoss EAP within the Docker container running your application in OpenShift. I definitely love Russian Dolls! The console within the IDE helps tracking what changes have been synchronised and apply to remote application :
In this tutorial, we have seen 6 different methods for deploying the same application. Remember that these are just 6 methods and that there's a lot of shadows of grey between this black/white methods. Moreover theses methods can be complimentary to each other: it's up to you to find and redefine the one that best suit your expertise and development process.
Depending on my experience and in my humble opinion, I would apply those following criteria for picking-up a bootstrap method:
- (#1) is OK for deploying existing apps that are no more living (no or very few evolution in the roadmap),
- (#2) is well adapted when you have many apps following the same scheme to deploy and when you are on the way to CI/CD. However it is not well suited for application needing velocity and auditability (the binary artifacts are not stored and referenced),
- (#3) is definitely a must have for a serious CI/CD journey in a tracability focused environment. It is an optimized build process with all artifacts being stored for full tracability and ease of analysis, reuse and redeployment,
- (#4) is usually the first step done when starting CI/CD implementation: pipeline definitions and management is delegated to a centralized team responsible of the methodology deployment,
- (#5) represents an evolution of (#4) when CI/CD process are mastered and then delegated to agile and autonomous development teams. Each team, may adapt them to better suit the application needs.
- (#6) may be very useful when working on a application requiring specific configuration or dependencies that cannot be easily reproduced outside of an OpenShift platform.
Fell to share, comment and sending feedback.
The tasks-rs quickstart demonstrates how to implement a JAX-RS service that uses JPA 2.0 persistence deployed to Red Hat JBoss Enterprise Application Platform.
The application manages User and Task JPA entities. A user represents an authenticated principal and is associated with zero or more Tasks. Service methods validate that there is an authenticated principal and the first time a principal is seen, a JPA User entity is created to correspond to the principal. JAX-RS annotated methods are provided for associating Tasks with this User and for listing and removing Tasks.
More information can be found on the original GitHub repository.