forked from raspitv/RasPiCamcorder
lurch/RasPiCamcorder
This commit does not belong to any branch on this repository, and may belong to a fork outside of the repository.
Folders and files
| Name | Name | Last commit message | Last commit date | |
|---|---|---|---|---|
Repository files navigation
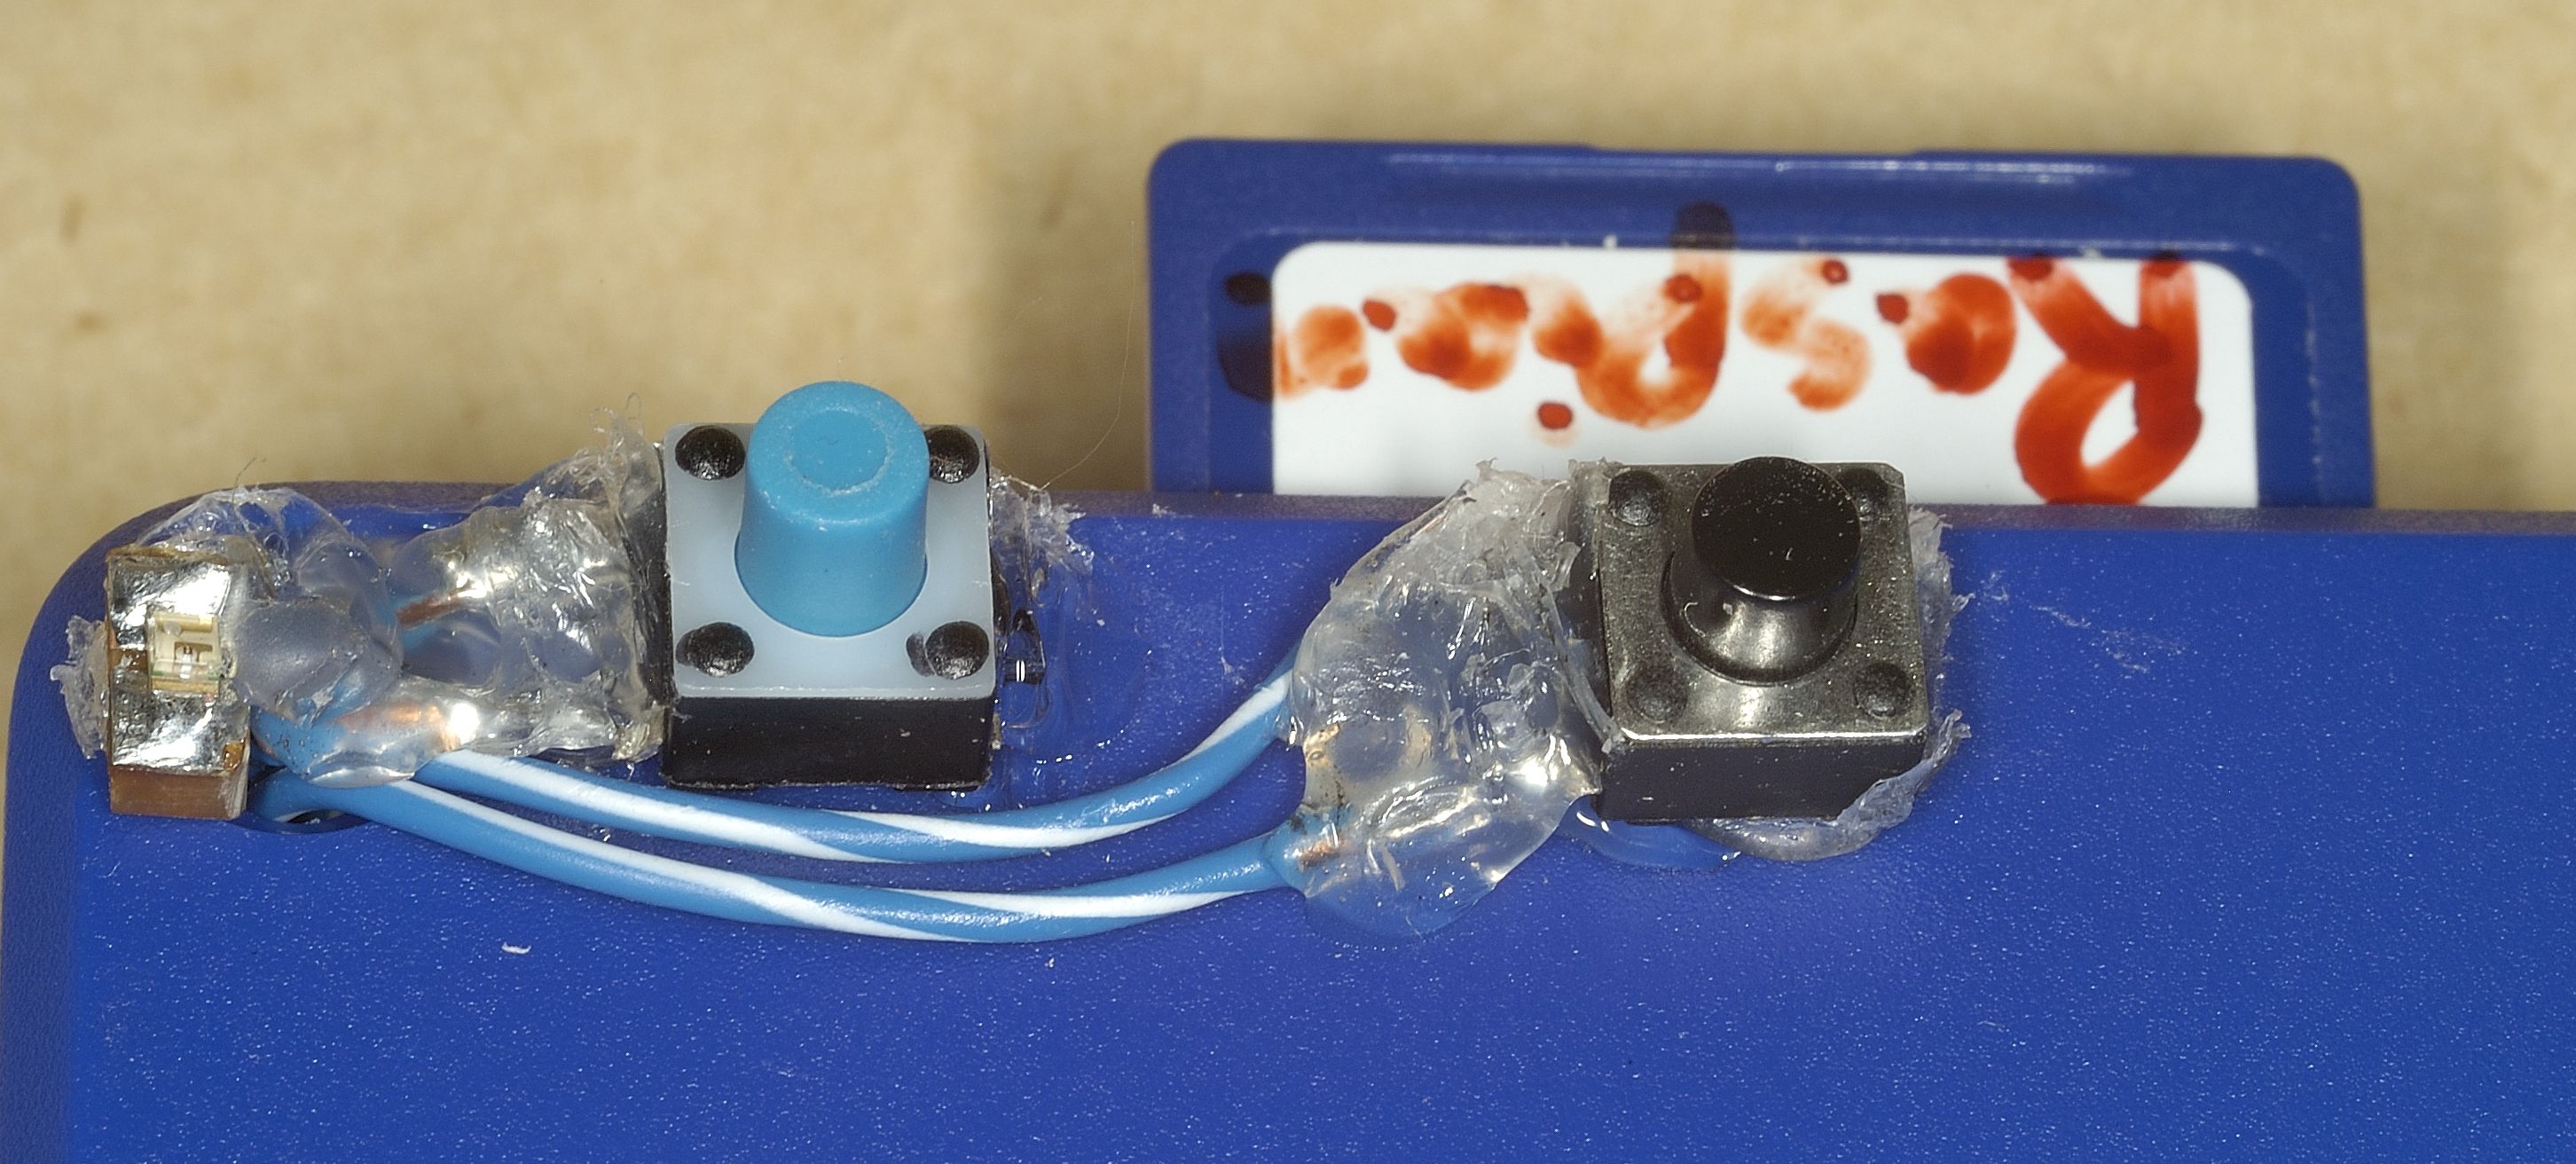
This Readme contains basic info about the RasPiCamcorder 2
by Alex Eames of RasPi.TV

Basically there are three major parts...

Video recording                         [sudo python picamcorder2.py]
Stills capture (plus DropBox upload)    [sudo python picamstills-db.py]
Video streaming                         [python picamstreamer.py]

These are currently three separate programs. See below for details.

Photos and further info on the http://RasPi.TV blog or YouTube...

http://raspi.tv/?p=3424
and
http://youtu.be/dSgj4bUFBCQ

Buttons
=======
Basically you need a button connected between GPIO 23 and GND.
This is the "shoot video or photo" button. (Mine is the blue one in this photo
http://raspi.tv/wp-content/uploads/2013/06/DSC_4467.jpg).

You also need a button between GPIO 24 and 3V3, which is the
"stop shooting" button. It also doubles as the close program and shutdown
button depending on how long you press it for. (Mine is the black one in this
photo http://raspi.tv/wp-content/uploads/2013/06/DSC_4467.jpg).
Pressing this button for >1s stops the program (useful if you are running
automatically on boot). Pressing it for >3s shuts down the Pi.


LEDs
====
The camera LED is on GPIO 5.
I have an additional LED (I wanted one on the back) on GPIO 22

Setting up camera led control (script may not work properly without this)
-----------------------------

sudo nano /boot/config.txt

Add this line to your config.txt

disable_camera_led=1


Usage
=====

Video
-----
To run the video recording program manually, you can type

sudo python picamcorder2.py

Add a 0 (zero) if you want to disable the front LED
(assuming you have added the necessary tweak to your config file)

sudo python picamcorder2.py 0

Stills
------
To run the stills program manually, you can type

sudo python picamstills-db.py
or
sudo python picamstills-db.py 0 (if you want to disable the front LED)

Video Streaming
---------------
This uses two scripts to separate the GPIO and non-GPIO parts since
VLC can't run as root, but RPi.GPIO has to run as root.

To start the video streaming program (it works just as the recording program
except it streams to port 8090 rather than recording) just type...

python picamstreamer.py
or
python picamstreamer.py 0 (if you want to disable the front LED)

This program handles the streaming part, but the GPIO part is handled by
picamstream-sudo.py (which is called by picamstreamer.py).

Then, on your receiving device, you need to have VLC running and looking at
a network stream from...

http://ip_address_of_your_pi:8090

Further instructions about VLC streaming here
http://raspi.tv/?p=3099

I haven't yet managed to get streaming working automatically at boot
because VLC won't run as root. I'm sure there's a way though.


Setting up your Pi
==================

Setting up for auto start on boot
---------------------------------
Add this line to your /etc/rc.local

/home/pi/picamcorder.sh

Which runs a simple bash script on boot, allowing us a 10s time delay.

picamcorder.sh will have to be executable for this to work

chmod +x picamcorder.sh


The bash script picamcorder.sh just contains this...
sleep 10
sudo python /home/pi/picamcorder2.py &

...which slows things down at startup, just enough to make it work and puts
the process in the background.

If you prefer to auto-start-up the stills or streaming programs instead of
video, just edit picamcorder.sh to call the program you want to run.


Setting up for small screen use
-------------------------------

sudo dpkg-reconfigure console-setup

lets you increase console font size for small screens


Setting Up Dropbox Upload for Stills mode
-----------------------------------------
Blog article here http://raspi.tv/?p=3572 shows full instructions on how to
set up DropBox Uploader on your Pi and basic usage.

Full documentation at the author's GitHub
https://github.com/andreafabrizi/Dropbox-Uploader

To set up as a user, should only take an hour or so. A lot less if you already
have a DropBox account.


Hardware Component list
=======================
1 model A Raspberry Pi
1 Raspberry Pi camera board
1 switching regulator board ~$3 ebay LM2596 DC-DC Step-down Adjustable
1 Bluetooth serial adaptor $8 dx.com SKU: 104299
battery & connectors
female .1" pin headers
wire
0605 LED
150R 1206 for led
Cyntech case
White tack
hot glue gun
buttons
bit of stripboard
4x2 angled header


Possible Future Development
===========================

LED on the back to show recording --> DONE
camera LED toggle to disable front LED, maybe with an argv argument? --> DONE
leds flashing on program exit and shutdown --> DONE
indication of how much recording time/disk space left --> DONE
micro USB adaptor so Pi can be stood up at SD card end --> DONE
52mm thread adaptor for adding lenses --> DONE

Stills button or button combo
need a mount for it
possibly pan and tilt
possibly a rotating base for all-round work - either stepper or highly geared

it would be nice to have a third button for stills too, but getting errors
after adding port 25 for stills, so all parts referring to GPIO25 are
commented out for now.

It seems that raspivid and raspistill don't play nicely together in the
same script - (I got MMAL errors which only cleared on reboot),
so had to remove the stills option from the script and implement it separately.
About
Scripts/info for RasPiCamcorder
Resources
Stars
Watchers
Forks
Releases
No releases published
Packages 0
No packages published