WebRTC allows peer-to-peer in-browser video calls 'relatively easy' for advanced developers, and not so much for everyone else.
Luckily, there are other options for beginners and intermediate level developers, which we'll cover in this tutorial.
In this tutorial, we will be using the Daily.co API to create a ‘tutoring website for devs’ that will work with embedded video chat sessions in our Rails app. We are building from the ground-up, if you already have an app, you might want to start in step 6.
fig 1.1
$ rails _5.2.4.1_ new videochat
$ cd videochat
In this tutorial, we will focus on how to integrate video chat on a website. Check out my other tutorials where we create a website to host webinars. (with users, logins, events manager, attendances).
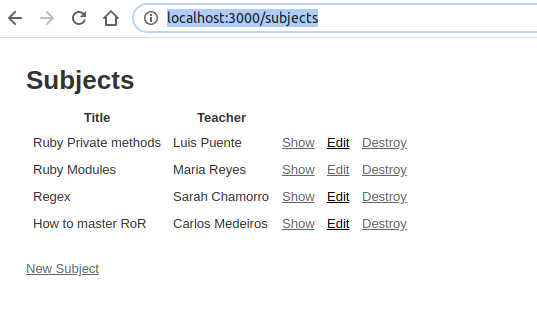
We are going to need a form and a database to add and store the topics and teachers we have in our school, we’ll generate a rails scaffold to take care of that for us. This will create the views, the controller, routes, and migrations for our subjects.
fig 2.1
$ rails generate scaffold Subject title:string teacher:string
$ rails db:migrate
$ rails server
Once the server is running, let’s go to http://localhost:3000/subjects and add a few subjects and teachers.
fig 2.2. visit localhost:3000/subjects to add a few subjects and teachers
Let’s create a controller ‘Welcome’ with the index method that will display our static landing page, and a controller ‘Sessions’ have the show method that will show the sessions that are currently available and include the video chat interface.
fig 3.1. Close the running server with ctrl+c and run the following commands
$ rails generate controller Welcome index
$ rails generate controller Sessions show
Open the app/config/routes.rb file and set the routes for the pages we just created.
fig 4.1
Rails.application.routes.draw do

  # generated by scaffold to take care of all the methods for subjects
    resources :subjects
  # sends a get request to the show method in the sessions controller
    get '/sessions', to: 'sessions#show'
  # sends a post request to the show method in the sessions controller with a parameter passed from the view
    post '/sessions', to: 'sessions#show', as: :sessions_show
  # sends the root to the landig page
    root 'welcome#index'
end
I like creating good looking projects. if you do too, let’s include bootstrap to beautify it. It’s recommended to include the gem, but for practicality, we will be using the CDN. Let’s go to app/views/layout/application.html.erb and add these tags for stylesheets and scripts before the closing tag. You can find the most recent version in getbootstrap.com.
fig 5.1
<meta charset="utf-8">
    <meta name="viewport" content="width=device-width, initial-scale=1, shrink-to-fit=no">
    <link rel="stylesheet" href="https://stackpath.bootstrapcdn.com/bootstrap/4.4.1/css/bootstrap.min.css" integrity="sha384-Vkoo8x4CGsO3+Hhxv8T/Q5PaXtkKtu6ug5TOeNV6gBiFeWPGFN9MuhOf23Q9Ifjh" crossorigin="anonymous">
    <script src="https://code.jquery.com/jquery-3.4.1.slim.min.js" integrity="sha384-J6qa4849blE2+poT4WnyKhv5vZF5SrPo0iEjwBvKU7imGFAV0wwj1yYfoRSJoZ+n" crossorigin="anonymous"></script>
    <script src="https://cdn.jsdelivr.net/npm/popper.js@1.16.0/dist/umd/popper.min.js" integrity="sha384-Q6E9RHvbIyZFJoft+2mJbHaEWldlvI9IOYy5n3zV9zzTtmI3UksdQRVvoxMfooAo" crossorigin="anonymous"></script>
    <script src="https://stackpath.bootstrapcdn.com/bootstrap/4.4.1/js/bootstrap.min.js" integrity="sha384-wfSDF2E50Y2D1uUdj0O3uMBJnjuUD4Ih7YwaYd1iqfktj0Uod8GCExl3Og8ifwB6" crossorigin="anonymous"></script>
In the same file, we are going to render the navbar that will be created in the next step. Add this embedded ruby tag right after tag.
fig 5.2. Add a class “bg-blue” to the body tag to turn the website blue. It must look like this
<body class="bg-blue">
<%= render 'layouts/navbar' %>
<%= yield %>
</body>
Now let’s create a navbar for decoration, create a file ‘_navbar.html.erb’ in the folder app/views/layouts/ with the following code (you can get other styles and colors from getbootstrap.com or even build your own).
fig 5.3
<nav class="navbar navbar-expand-lg navbar-light bg-blue">
  <a class="navbar-brand text-light" href="/">TechMe</a>
  <button class="navbar-toggler" type="button" data-toggle="collapse" data-target="#navbarSupportedContent" aria-controls="navbarSupportedContent" aria-expanded="false" aria-label="Toggle navigation">
    <span class="navbar-toggler-icon"></span>
  </button>

  <div class="collapse navbar-collapse" id="navbarSupportedContent">
    <ul class="navbar-nav mr-auto">
      <li class="nav-item active">
        <a class="nav-link text-light" href="/">Home <span class="sr-only">(current)</span></a>
      </li>
      <li class="nav-item">
        <a class="nav-link text-light" href="/sessions">Sessions</a>
      </li>
    </ul>
    <form class="form-inline my-2 my-lg-0">
      <input class="form-control mr-sm-2" type="search" placeholder="Search" aria-label="Search">
      <button class="btn btn-outline-light my-2 my-sm-0" type="submit">Search</button>
    </form>
  </div>
</nav>
Next, we will fill out the app/views/welcome/index.html.erb with a couple of images and information to invite users to try our video chat website.
Don’t worry if you don’t understand what’s going on, most of the code is bootstrap default classes, it looks confusing at first glance, but it’s really simple to understand and use once you read the docs. fig 5.4
<nav class="navbar navbar-expand-lg navbar-light bg-blue">
  <a class="navbar-brand text-light" href="/">TechMe</a>
  <button class="navbar-toggler" type="button" data-toggle="collapse" data-target="#navbarSupportedContent" aria-controls="navbarSupportedContent" aria-expanded="false" aria-label="Toggle navigation">
    <span class="navbar-toggler-icon"></span>
  </button>

  <div class="collapse navbar-collapse" id="navbarSupportedContent">
    <ul class="navbar-nav mr-auto">
      <li class="nav-item active">
        <a class="nav-link text-light" href="/">Home <span class="sr-only">(current)</span></a>
      </li>
      <li class="nav-item">
        <a class="nav-link text-light" href="/sessions">Sessions</a>
      </li>
    </ul>
    <form class="form-inline my-2 my-lg-0">
      <input class="form-control mr-sm-2" type="search" placeholder="Search" aria-label="Search">
      <button class="btn btn-outline-light my-2 my-sm-0" type="submit">Search</button>
    </form>
  </div>
</nav>
And last, add a background image and a custom color to the app/assets/stylesheets/application.css file fig 5.5
.bg-blue {
background-color: #6610f2
}
.bgbg {
background-image: url('https://github.com/mkezmkez/tech-me/blob/master/app/assets/images/banne.png?raw=true');
background-position: 100% 0;
background-repeat: no-repeat;
}
We are now going to integrate the video into our project. You can use this account for testing (username: tutorial@tutorial.com, pass: tutorial123) or create your own for free at Daily.co We are going to be using the Sessions controller show method, to display all the available subjects and teachers trough the variable @subjects and while we are there, let’s add a @clicked variable. We’ll need it later. Fill your ‘show’ method in app/controllers/sessions_controller.rb
fig 6.1
def show
  @subjects = Subject.all
  @clicked = params[:subject]
end
Next, go to the app/views/sessions/show.html.erb to add the code for the calls.
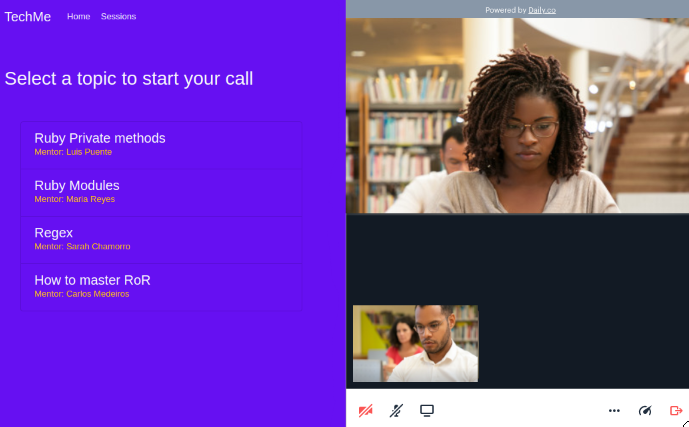
First, we add some HTML and bootstrap classes to guide our visitors on what to do next. We are listing all the subjects we previously created. All of the sessions will use the same room, for now, to keep it simpler, but multiple rooms can be created with the click of a button with the RESTful API.
fig 6.2
<%# This is the title, responsive for small screens and bigger screens %>

<h1 class= "h3 ml-3 my-5 text-light d-block d-md-none" > Select a topic to  <br> start your call </h1>
<h1 class= "h3 ml-3 my-5 text-light d-md-block d-none" > Select a topic to start your call </h1>


<%# This is the list of the subjects that we got from the @subjects variable, and we are creating a table with all of them! %>
<%# All of the sessions will use the same room for now to keep it simpler %>

  <ul cass="list-group list-group-flush bg-transparent">
    <% @subjects.each do |subject| %>
      <li class = "list-group-item bg-transparent col-10 col-md-5 ">
        <%= link_to subject.title, sessions_show_path(subject: subject), method: :post, class: "text-light h5" %>
        <p class="text-warning mb-1"> Mentor: <%= subject.teacher %> </p>
      </li>
    <% end %>
  </ul>
Now, we include the script that will embed the Daily.co video chat right below the previous code. The video chat appears on the bottom-right side of the screen by default. This is the basic script to embed the call. You can leave it like that, or tweak it to fit your needs.
(Fig. 6.3)
<script crossorigin src="https://unpkg.com/@daily-co/daily-js"></script>
<script>
callFrame = window.DailyIframe.createFrame();
callFrame.join({ url: 'https://tutorial.daily.co/hello' })
</script>
Congratulations! You have a working video chat interface now. Fire up the rails server to check it out!
Right now the video starts automatically when hitting sessions. But I prefer to start it when clicking one of the subjects. This will join the room we defined in the callFrame.join({‘this room’}). You can define them manually for each link, or create them trough your sessions controller via the Daily.co API (which will be covered in another tutorial, this tutorial uses the tutorial URL for all rooms).
We can customize the script provided by Daily to match our needs. Change the code in fig 6.3 to the one in fig 7.1
We are adding the following customizations to the script:
- When we selected a subject and clicked on it, it sends the subject to the controller and returns true, which gives the instruction to run the script with the <% if @clicked %>
- We added a javascript conditional if the width of the window is less than 400px, we would return the fullscreen video, on a cellphone screen, for example.
- If it is bigger than 400px, we will run the video chat script in 50% of the width, 100% height which will suit better for bigger horizontal screens.
<% if @clicked %>
<script crossorigin src="https://unpkg.com/@daily-co/daily-js"></script>
<script>
if (window.innerWidth <= 400) {
  callFrame = window.DailyIframe.createFrame({
  showLeaveButton: true,
      iframeStyle: {
      position: 'fixed',
      bottom: 0,
      width: '100%',
      height: '100%'

      }
});

  callFrame.join({ url: 'https://tutorial.daily.co/hello' })
} else {
      callFrame = window.DailyIframe.createFrame({
      showLeaveButton: true,
      iframeStyle: {
      position: 'fixed',
      top: 0,
      right: 0,
      width: '50%',
      height: '100%'
      }
});

  callFrame.join({ url: 'https://tutorial.daily.co/hello' })
}

</script>

<% end %>
In a few steps, we were able to build a beautiful working app for video, Your app is ready to be deployed, I recommend using Heroku, it’s free and it makes it easy to deploy, but that’s outside the scope of this tutorial.
If you want to take a look at my live demo with integrated API room creation, you can find it in https://tech-me.herokuapp.com/
Let’s connect, I’m on twitter
Images under freepik.com free license.