

![]()
| Component | Build Status | NuGet Package |
|---|---|---|
| nanoFramework.Hardware.Esp32 |  |
This section will give you essential elements about how to use Touch Pad pins on ESP32 and ESP32-S2.
Touch Pad pins numbering is different from GPIO pin. You can check which GPIO pins correspond to which GPIO pin using the following:
const int TouchPadNumber = 5;
var pinNum = TouchPad.GetGpioNumberFromTouchNumber(TouchPadNumber);
Console.WriteLine($"Pad {TouchPadNumber} is GPIO{pinNum}");
The pin numbering is different on ESP32 and S2. There are 10 valid touch pad on ESP32 (0 to 9) and 13 on S2 (1 to 13).
In this example touch pad 5 will be GPIO 12 on ESP32 and GPIO 5 on S2.
On ESP32, if you touch the sensor, the values will be lower, so you have to set a threshold that is lower than the calibration data:
TouchPad touchpad = new(TouchPadNumber);
Console.WriteLine($"Calibrating touch pad {touchpad.TouchPadNumber}, DO NOT TOUCH it during the process.");
var calib = touchpad.GetCalibrationData();
Console.WriteLine($"calib: {calib} vs Calibration {touchpad.CalibrationData}");
// On ESP32: Setup a threshold, usually 2/3 or 80% is a good value.
touchpad.Threshold = (uint)(touchpad.CalibrationData * 2 / 3);
touchpad.ValueChanged += TouchpadValueChanged;

Thread.Sleep(Timeout.Infinite);

private static void TouchpadValueChanged(object sender, TouchPadEventArgs e)
{
    Console.WriteLine($"Touchpad {e.PadNumber} is {(e.Touched ? "touched" : "not touched")}");
}On S2, if you touch the sensor, the values will be higher, so you have to set a threshold that is higher than the calibration data and set trigger mode as above:
TouchPad touchpad = new(TouchPadNumber);
Console.WriteLine($"Calibrating touch pad {touchpad.TouchPadNumber}, DO NOT TOUCH it during the process.");
var calib = touchpad.GetCalibrationData();
Console.WriteLine($"calib: {calib} vs Calibration {touchpad.CalibrationData}");
// On S2/S3, the actual read values will be higher, so let's use 20% more
TouchPad.TouchTriggerMode = TouchTriggerMode.AboveThreshold;
touchpad.Threshold = (uint)(touchpad.CalibrationData * 1.2);

touchpad.ValueChanged += TouchpadValueChanged;

Thread.Sleep(Timeout.Infinite);

private static void TouchpadValueChanged(object sender, TouchPadEventArgs e)
{
    Console.WriteLine($"Touchpad {e.PadNumber} is {(e.Touched ? "touched" : "not touched")}");
}You have quite a lot of other features available, filters, some specific denoising. You can check the sample repository for more details.
You can wake up your ESP32 or ESP32-S2 by touch.
ESP32 can be woke up by 1 or 2 touch pad. Here is how to do it with 1:
Sleep.EnableWakeupByTouchPad(PadForSleep1, thresholdCoefficient: 80);And with 2 pads:
Sleep.EnableWakeupByTouchPad(PadForSleep1, PadForSleep2);Note that the coefficient can be adjusted by doing couple of tests, there is default value of 80 that seems to work in all cases. The coefficient represent a percentage value.
S2 can only be woke up with 1 touch pad. It is recommended to do tests to find the best coefficient:
Sleep.EnableWakeupByTouchPad(PadForSleep, thresholdCoefficient: 90);It is possible to use light sleep in any supported nanoFramework ESP32 with UART wake up. There are few elements to keep in mind:
-
You must properly setup your COM port, in the following for COM2:
nanoFramework.Hardware.Esp32.Configuration.SetPinFunction(19, nanoFramework.Hardware.Esp32.DeviceFunction.COM2_TX);
nanoFramework.Hardware.Esp32.Configuration.SetPinFunction(21, nanoFramework.Hardware.Esp32.DeviceFunction.COM2_RX);
-
Only COM1 and COM2 are supported. Note that by default COM1 is used for debug. Except if you've build your own version, you may not necessarily use it are a normal UART. But you can definitely use it to wake up your board. In that case, the pins are the default ones and the previous step is not necessary.
-
In order to wake up the board, you need to set a threshold on how many changes in the RX pin (the reception pin of the UART) is necessary. According to the documentation, you will lose few characters. So the sender should take this into consideration in the protocol.
Usage is straight forward:
EnableWakeupByUart(WakeUpPort.COM2, 5);
StartLightSleep();
Pulse counter allows to count pulses without having to setup a GPIO controller and events. It's a fast way to get count during a specific amount of time. This pulse counter allows as well to use 2 different pins and get a pulse count depending on their respective polarities.
The following code illustrate how to setup a counter for 1 pin:
GpioPulseCounter counter = new GpioPulseCounter(26);
counter.Polarity = GpioPulsePolarity.Rising;
counter.FilterPulses = 0;
counter.Start();
int inc = 0;
GpioPulseCount counterCount;
while (inc++ < 100)
{
counterCount = counter.Read();
Console.WriteLine($"{counterCount.RelativeTime}: {counterCount.Count}");
Thread.Sleep(1000);
}
counter.Stop();
counter.Dispose();The counter will always be positive and incremental. You can reset to 0 the count by calling the Reset function:
GpioPulseCount pulses = counter.Reset();
// pulses.Count contains the actual count, it is then put to 0 once the function is calledThis is typically a rotary encoder scenario. In this case, you need 2 pins and they'll act like in this graphic:**

You can then use a rotary encoder connected to 2 pins:
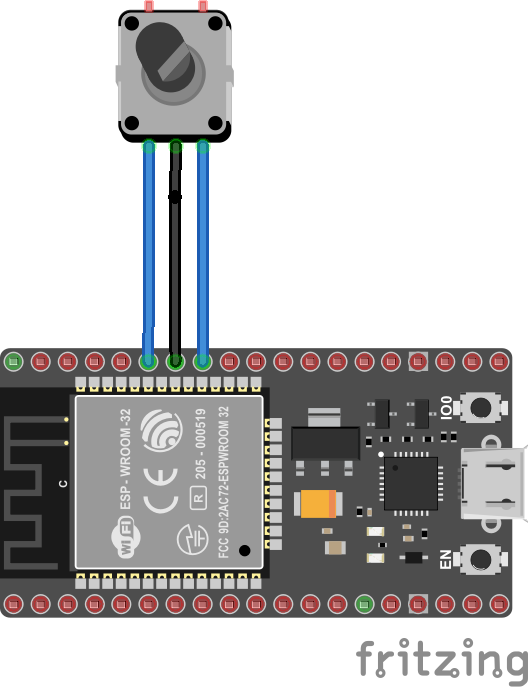
The associated code is the same as for 1 pin except in the constructor:
GpioPulseCounter encoder = new GpioPulseCounter(12, 14);
encoder.Start();
int incEncod = 0;
GpioPulseCount counterCountEncode;
while (incEncod++ < 100)
{
counterCountEncode = encoder.Read();
Console.WriteLine($"{counterCountEncode.RelativeTime}: {counterCountEncode.Count}");
Thread.Sleep(1000);
}
encoder.Stop();
encoder.Dispose();As a result, you'll get positives and negative pulses
For documentation, providing feedback, issues and finding out how to contribute please refer to the Home repo.
Join our Discord community here.
The list of contributors to this project can be found at CONTRIBUTORS.
The nanoFramework Class Libraries are licensed under the MIT license.
This project has adopted the code of conduct defined by the Contributor Covenant to clarify expected behaviour in our community. For more information see the .NET Foundation Code of Conduct.
This project is supported by the .NET Foundation.