
As I said, I wrote the project on Django and Angular frameworks. Additional libraries are also used to create asynchronous functions or to work with sockets, the full list can be found here [requirements]. The game provides 2 variants of the field 3x3 and 19x19.
Also the program code is written using many programming patterns, such as Factory or SOLID principle. So nothing prevents you to fork it and change or add something :)
Next will be more about the backend of the project than about the front, I will try to describe the problems I encountered and what solutions I found. If you, like me, have just started working with Django-based sockets - I hope I can help you.
First, make sure you have PostgreSQL and Redis-server running. They are necessary for the application to work. Also, double-check the environment variables so that there are no connection problems.
The project has docker-compose, you can use it and automatically deploy the containers to your local machine. To do this you will need to clone my project to yourself:
git clone https://github.com/nikakoy-png/Tik-tak-toe/tree/master
git clone https://github.com/nikakoy-png/Tik-tak-toe/tree/master
Next, go to the directory with the docker-compose.yml file (which you can also modify if necessary) and enter the command:
docker-compose up
Also fill in the dependencies on the backend and the frontend.
Also for sockets to work correctly, it is necessary to create SSL keys to be able to raise microservices on https protocol. For this you can refer to the official documentation of OpenSsl. Yes, you can do without it, but security is always better).
If you set everything up correctly, congratulations!
We should also clone the project to ourselves:
git clone https://github.com/nikakoy-png/Tik-tak-toe/tree/master
git clone https://github.com/nikakoy-png/Tik-tak-toe/tree/master
Then it is necessary to install dependencies and migrate models to the database (by the way PostgreSQL is used):
pip install -r requirements.txt

python manage.py makemigrations
python manage.py migrate
Next, we can also create SSL keys and place them in the root of the directory
Now we're ready to launch the backend:
uvicorn tik_tak_toe_back.asgi:application --host 0.0.0.0 --port 8000 --ssl-keyfile ./ssl/localhost.key --ssl-certfile ./ssl/localhost.crt --reload
Or without keys
uvicorn tik_tak_toe_back.asgi:application --host 0.0.0.0 --port 8000 --reload
Now let's deal with the frontend. We need to go to the root with the frontend and set dependencies:
npm install -g @angular/cli@13
npm ci
ng build --configuration=production
Now we can get the frontend up and running:
ng serve --host 0.0.0.0 --ssl --configuration=ssl
Or without keys
ng serve --host 0.0.0.0
If you set everything up correctly, congratulations!

As I mentioned earlier, I ran into some problems while writing a seemingly simple application. As you may have already noticed, I don't use sessions to authorize users, but a JWT token. Thanks to the token that is stored in the user's cookie identifying the user is easy and fast, this is very convenient in a REST architecture application.
But while writing a consumer for the socket, an obvious problem was found, the scope["user"] method doesn't work.
Because of this I always got an anonymous user, no matter what.
I fixed this problem by adding a custom class for Middleware.
It parses the user request, getting the header and the user token from there.
Sounds like a crutch, but I haven't found a better solution :)
class WebSocketTokenAuthMiddleware(BaseMiddleware):
    async def __call__(self, scope, receive, send):
        User = get_user_model()

        try:
            cookies = dict(scope["headers"]).get(b"cookie", b"").decode("utf-8")
            token = None
            if cookies:
                cookie_items = cookies.split(";")
                for item in cookie_items:
                    if item.strip().startswith("token="):
                        token = item.strip().split("=")[1]
                        break

            if token:
                decoded_token = jwt.decode(token, settings.SECRET_KEY, algorithms=["HS256"])
                user_id = decoded_token.get("user_id")
                if user_id:
                    user = await self.get_user(user_id, User)
                    scope["user"] = user

        except jwt.exceptions.InvalidTokenError:
            pass

        return await super().__call__(scope, receive, send)

    @database_sync_to_async
    def get_user(self, user_id, User):
        try:
            return User.objects.get(id=user_id)
        except User.DoesNotExist:
            return None
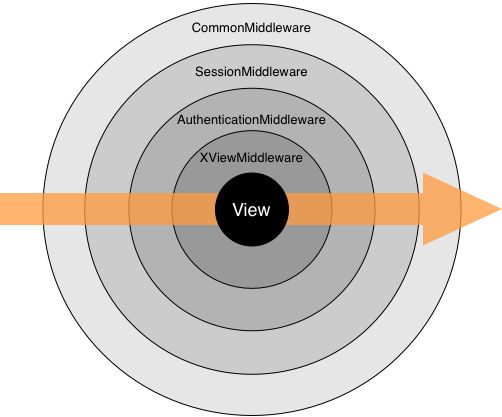
As you can see in the diagram above (in case you don't know how middleware works) the request goes both ways through all the middleware layers, and the standard class is not suitable for us.
application = ProtocolTypeRouter(
    {
        "http": get_asgi_application(),
        "websocket": AllowedHostsOriginValidator(
           WebSocketTokenAuthMiddleware( # here
                AuthMiddlewareStack(URLRouter(websocket_urlpatterns))
            )
        ),
    }
)
If everything was clear with that, now there is a problem that I think everyone who writes asynchronous views has faced.
The thing is that so far there is no standard solution for creating such endpoints, because the standard djangorestframework library does not support asynchronous views.
The only working solution I found is to use a custom library that allows you to do this.
So, if you are facing this problem now, please take a look at adrf.
from adrf.decorators import api_view
It's also worth remembering that you can't use the models before Django loads them ;)
Surprisingly, everything was smooth with the front and there were no peculiarities.