Flutter-based project, implementing the multi-module approach.
Since I'm working on a mac machine, what you need is to install HomeBrew first, then you need to install Flutter Version Manager (FVM) on your machine:
brew tap leoafarias/fvm
brew install fvm
After you install Flutter Version Manager, you need to install Flutter SDK using FVM, FVM is a very helpful tool for managing different flutter versions on multiple projects:
fvm install
fvm use stable --force
Why use --force? Because we need to set FVM on a non-flutter root directory since we are moving all of our Flutter modules inside another package.
The last part is to make the project and generate a dependencies tree, just run command below on the root project:
bash make_project.sh
Basically, I'm an Android Developer, my main weapon is Android Studio, which is an Intellij IDE. So if you are using Visual Studio code, you can adjust or contribute to this readme file. What you need is to set up the SDK location inside the IDE since you will see your entire project showing compilation errors when you opening the project first time. To resolve this, below are some steps:
- Open the preferences, or you can just press
command+,. - Go to Languages & Frameworks, then select Flutter.
- Open the Flutter SDK path dropdown.
- Select a shortcut folder provide by FVM:
flutter_boilerplate/.fvm/flutter_sdk - Apply and restart your IDE.
Basically, there is 2 types of module, public module and private module, public stand for a module that can be shared and following the rule, while private module stands for a module who have an owner and can't depend or implemented by another module.
Below is the outline of the architecture diagram showing the level of modules:
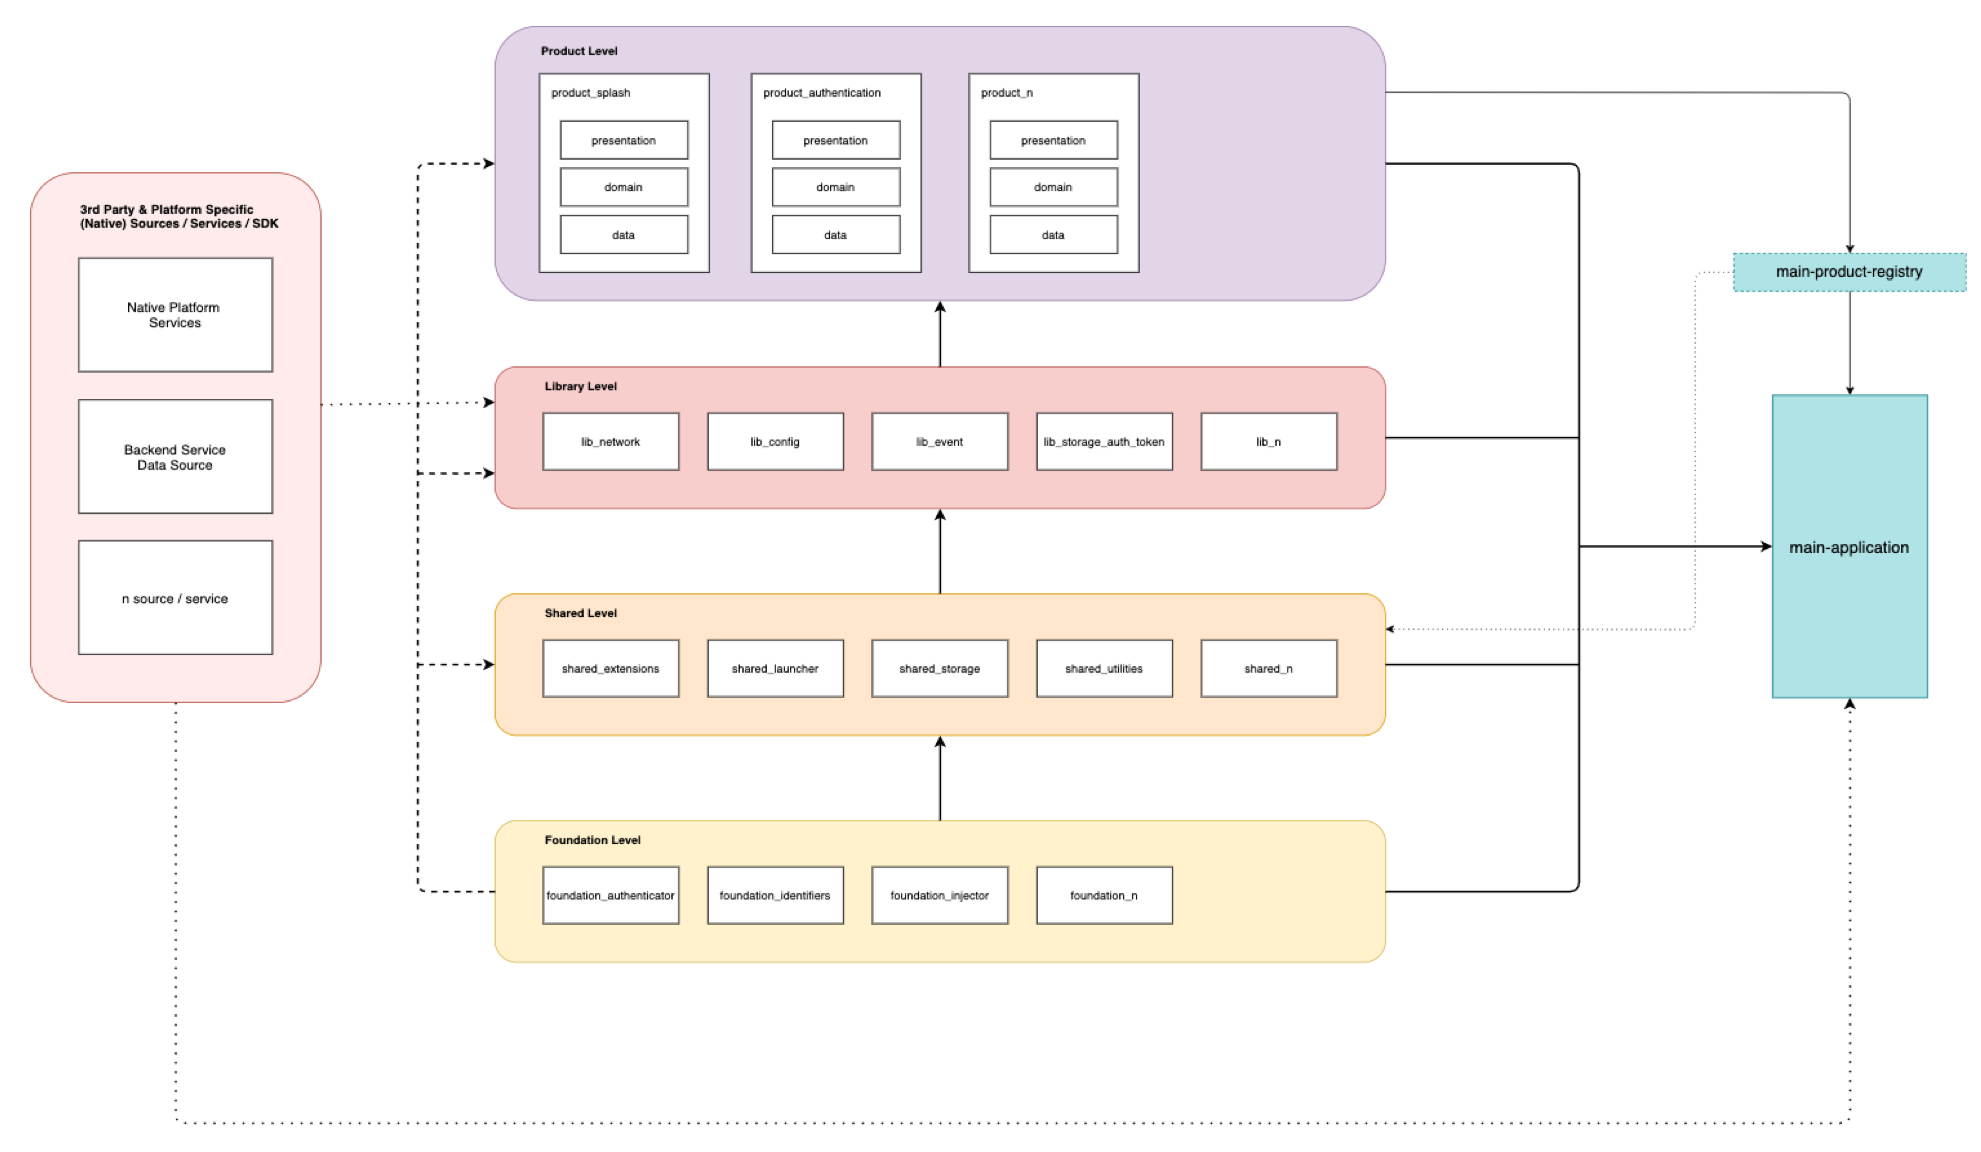
If you are a back-end guy, you may see this is similar to micro-services architecture, actually yes this is the same approach but in our case, we use this approach for:
- Separate of concern, each module have their own responsibility, independent between each other module, and has clear API.
- Allowing better re-usability.
- A modular system design or product can be easily upgraded (for example, for better performance of a smartphone or laptop). In non-modular products, it is harder to achieve incremental upgrades.
- Easier to customize according to individual customer needs or preferences.
- Easier to manage development on each product or feature parallel by different and multiple teams.
Based on the previous section, there is 4 layer on this architecture:
- Application: main module, used for register some services and running the app.
- Product: this layer contains a set of features on each module, can be owned by a separate team.
- Library: this layer can be called an integration layer, any 3rd party / data sources / services should be integrated here.
- Shared: this layer contains shared logic and can be shared on each module.
- Foundation: this layer is the basic infrastructure and the core for building the entire framework.
And below is the illustration for the rule of layering:
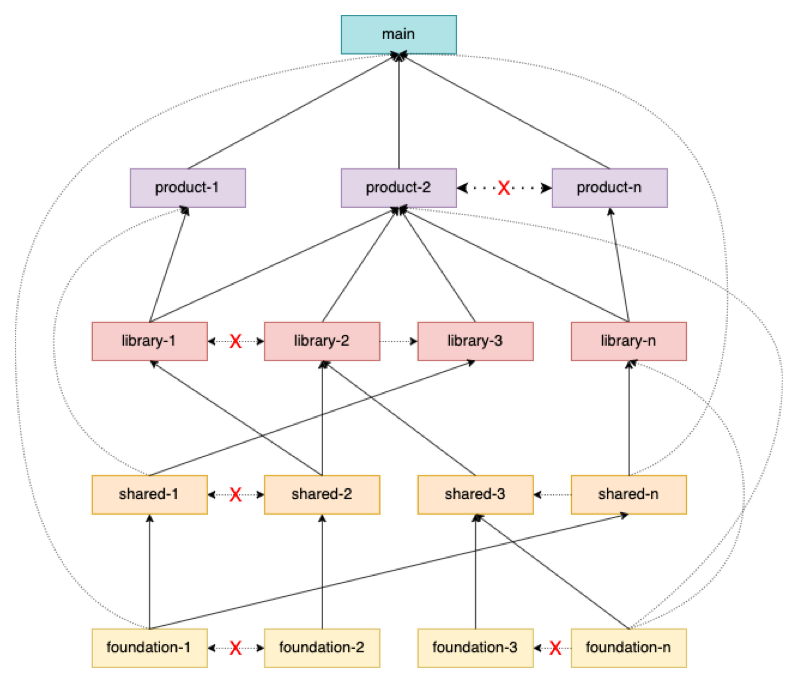
You need to follow rules below to avoid new issues comes up (such as circular dependencies):
- Application: the main module used to run the app, all layers can be dependent here.
- Product: modules on the layer below can be dependent here, but can't depend on modules on the same level or above.
- Library: modules on the layer below can be dependent here, can depend on the module on the same level but need to avoid circular dependency, and can't depend on the upper level, all 3rd party / data sources / services should be integrated here.
- Shared: modules on the layer below can be dependent here, can depend on the module on the same level but need to avoid circular dependency, and can't depend on the upper level.
- Foundation: an independent module, can't depend on the modules on the same level and can depend on the module on the upper layer.
Sometimes modular approach have big issue for navigating between pages, especially the page is located in different module. To handle that, I use an interface or in this case using abstract. Yes the abstract, will be act as a contract for registering the product module along with the page.
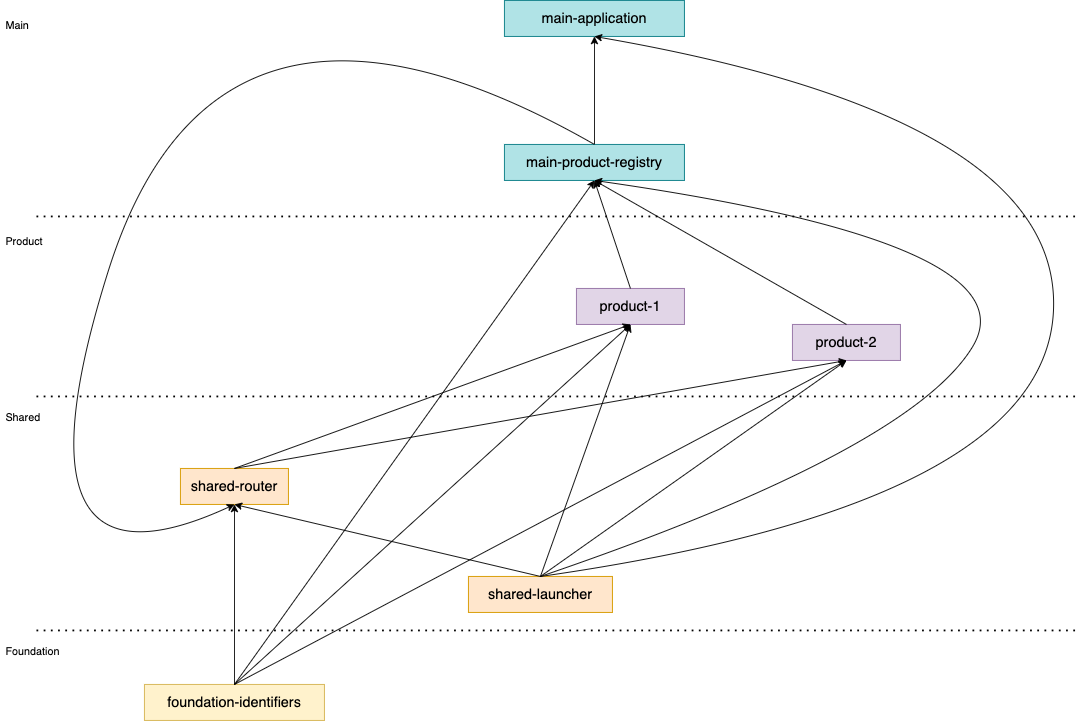
Diagram above describe about the module structure of product registration and navigation. Yes, each time you want to create a product, you need to register it using a singleton class, on that singleton you need to register your page too.
If you are creating a new product module, make sure you add module below on your pubspec.yaml:
foundation_identifiers: used for registering your product and page identifiers.shared_launcher: you need abstraction from this module, it will work like a launcher.shared_router: this module will work for navigating to the page you want.
Make sure you never implement your product module on these 3 modules as it not allowed to do that based on our modularization rule. So below is some steps to create a product module and register it:
- You need to define your product identifiers first on
foundation_identifiers, for example:SPLASHas enum value onProductIdentifier. - After that, you need to create a singleton acting as launcher for your product module. for example like code below:
class SplashProduct implements Product {
  @override
  ProductIdentifier productId = ProductIdentifier.SPLASH;

  @override
  Map<PageIdentifier, RegisteredPage> registeredPages = {};

  @override
  RegisteredPage defaultPage = RegisteredPage(
    PathIdentifier.SPLASH,
    (args) => SplashApp(),
  );

  @override
  Future<void> onConfigureDependencies() async {}

  @override
  void onBuild(BuildContext context) {}
}- As you can see above that you need a default page for this class, for this case I already create a
SplashApp()so I just put it that.
You need to register your pages on you product singleton to make it exposed to other module, by doing this other modules can open your page without adding your product as another products' dependency as it disallowed here. Below is the steps:
- Register your page identifier and path identifiers inside
foundation_identifiers, as example I will register mySplashApp()below:
abstract class PathIdentifier {
  static const String SPLASH = "/splash";
}
enum PageIdentifier {
SPLASH,
}- After that, just register your page inside your product singleton like code below:
class SplashProduct implements Product {
  @override
  ProductIdentifier productId = ProductIdentifier.SPLASH;

  @override
  Map<PageIdentifier, RegisteredPage> registeredPages = {
    PageIdentifier.SPLASH: RegisteredPage(
      PathIdentifier.SPLASH,
      (args) => SplashApp(),
    )
  };

  @override
  RegisteredPage defaultPage = RegisteredPage(
    PathIdentifier.SPLASH,
    (args) => SplashApp(),
  );

  @override
  Future<void> onConfigureDependencies() async {}

  @override
  void onBuild(BuildContext context) {}
}- Last things, you can just navigate it using
MaterialRouteor if you are usingflurolike me, you can just call this method:
navigateTo(
  context,
  PathIdentifier.SPLASH,
);