
Web application for the project Úspěšný prvňáček.
Read this in other languages: English, Czech.
![]()


![]()


![]()


Sentry · Fly.io · Slack · DeepCode · Google Analytics ·
Web application for the project Úspěšný prvňáček (check out its website, also my work) – based on a techstack: React (TypeScript), Django (Python), REST API, Django REST Framework.
The app has been created in a bachelor's thesis at FIT CTU – see a repo with the text of the bachelor's thesis. Since then, the app is successfully used in the project Úspěšný prvňáček on a daily basis and is constantly extended and worked on ❤️. In 2020 within a master's thesis at FIT CTU, I focused on all of the existing extensions of the app by new features, technologies and tools – see a repo with the text of the master's thesis. And of course, the development and maintenance of this application continues.
In the following list there are the most important features offered by this app (the list is not exhaustive):
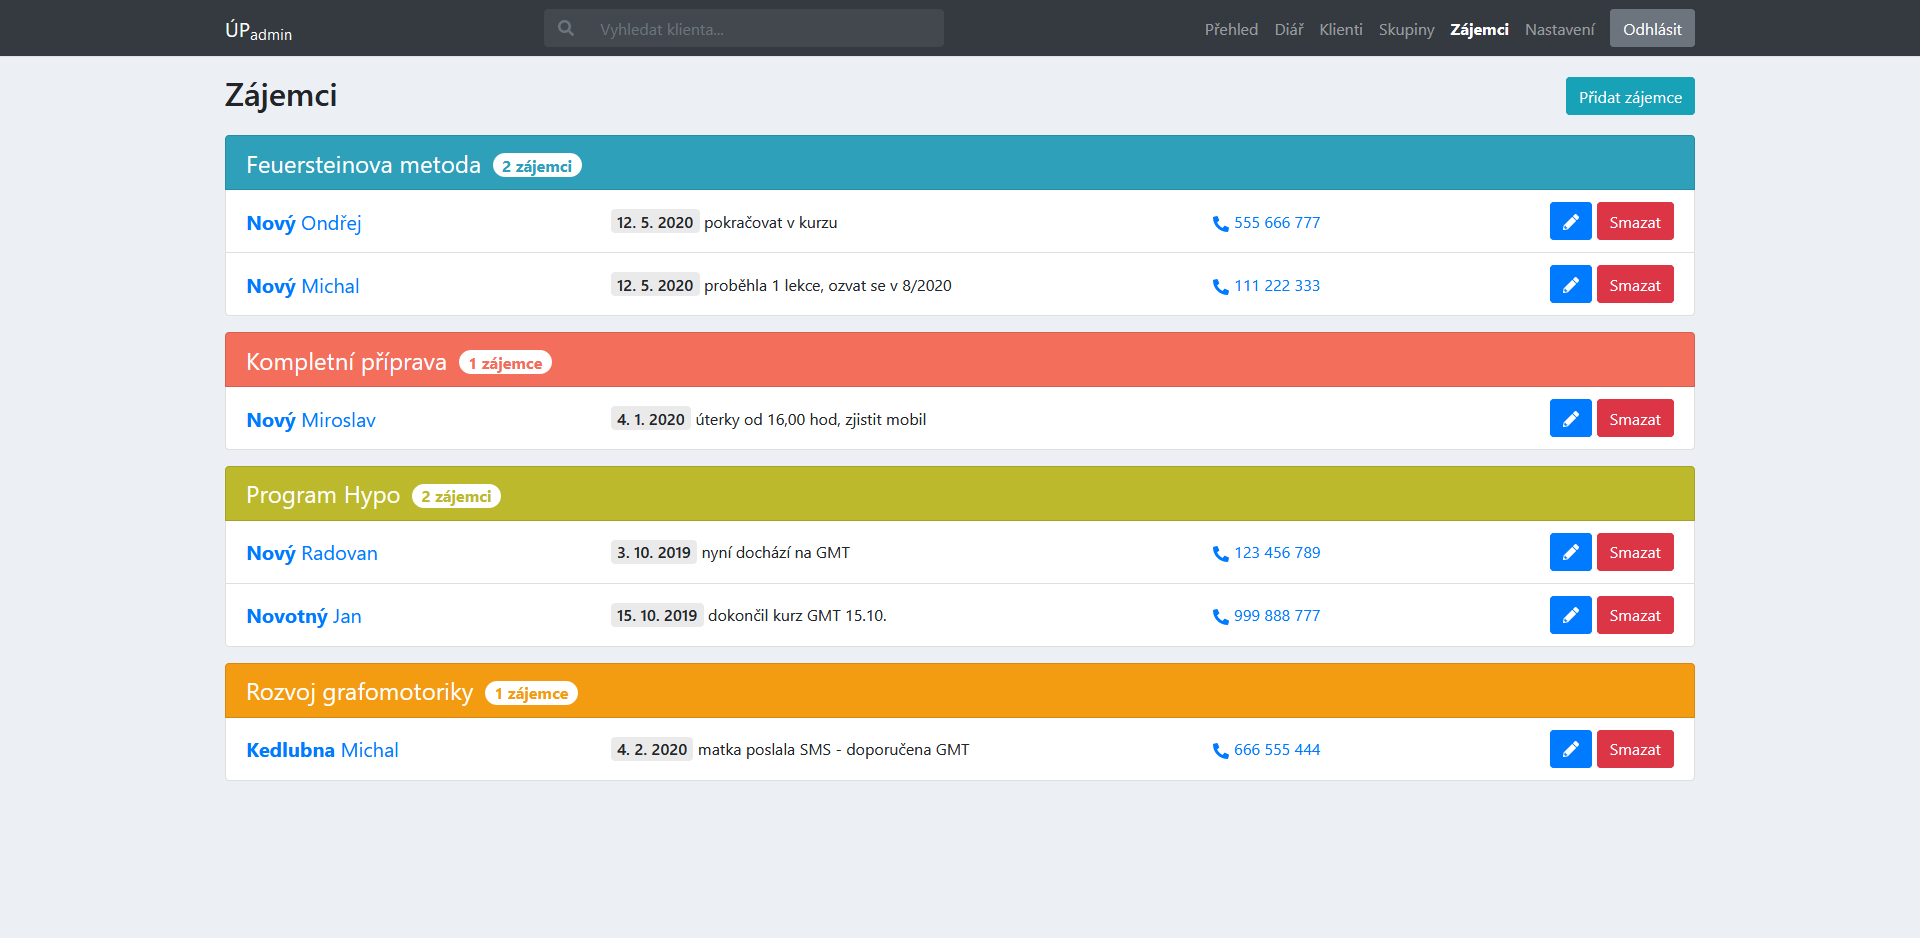
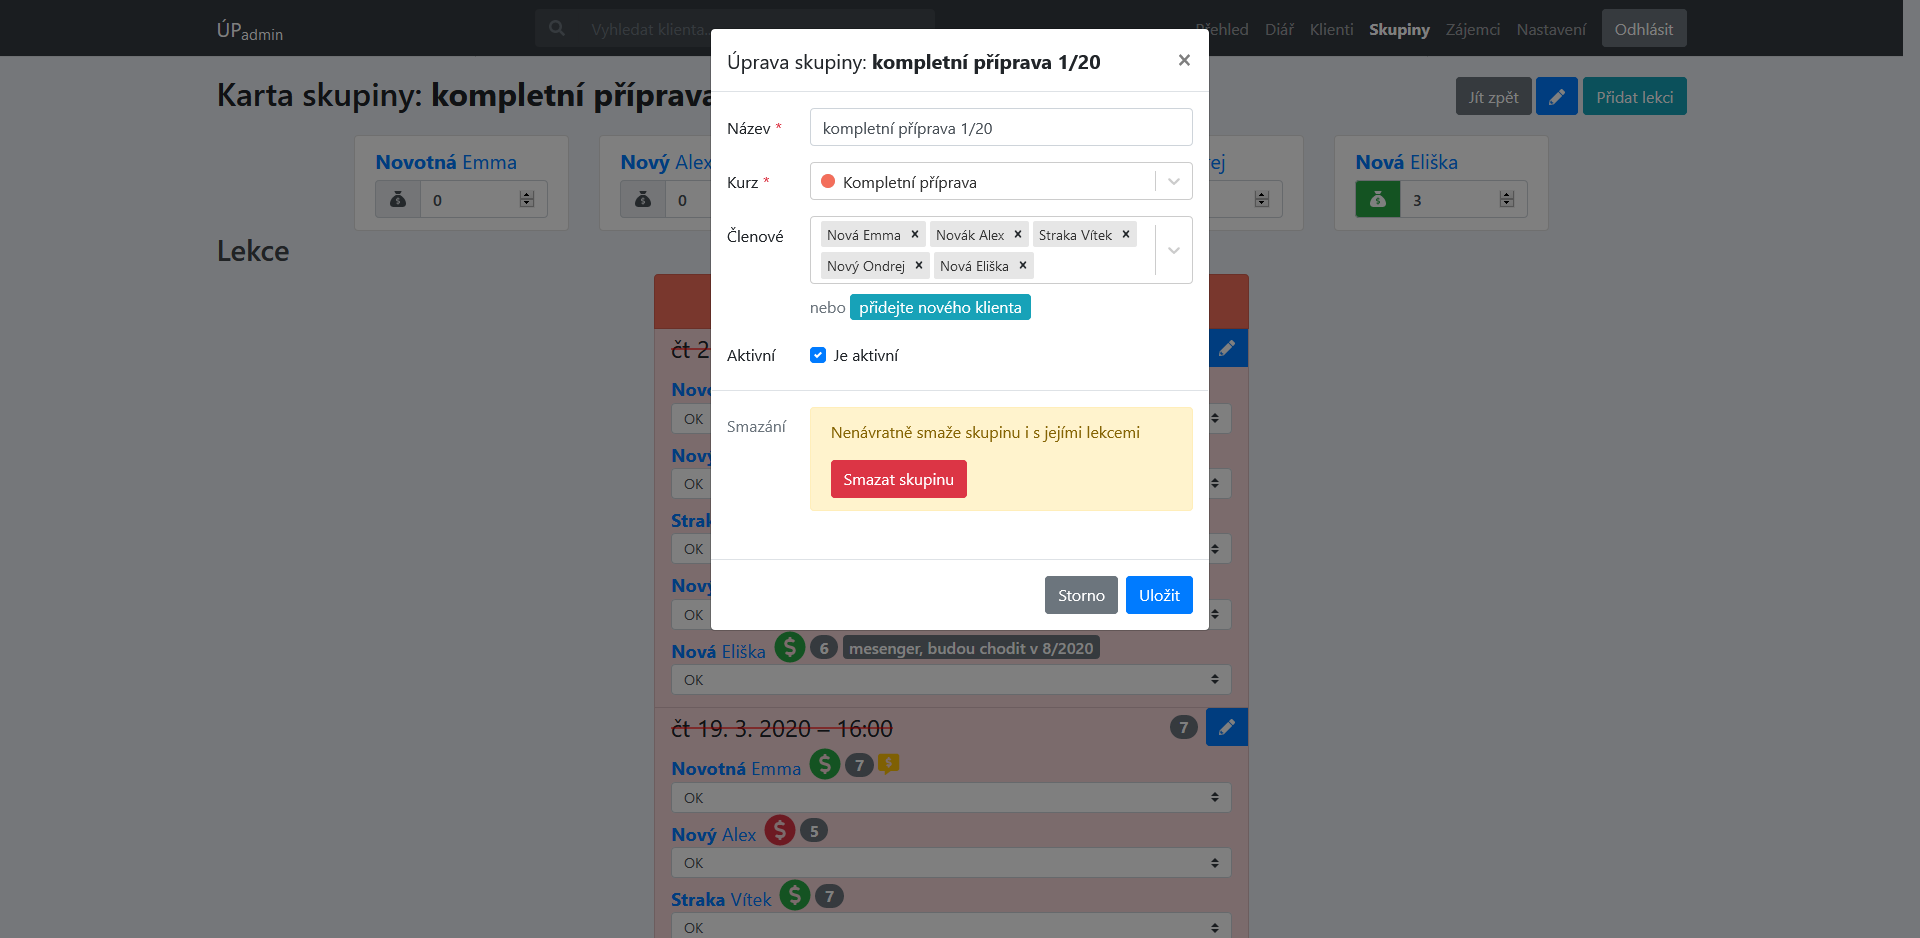
- storing information about clients and groups of clients attending the lectures of courses,
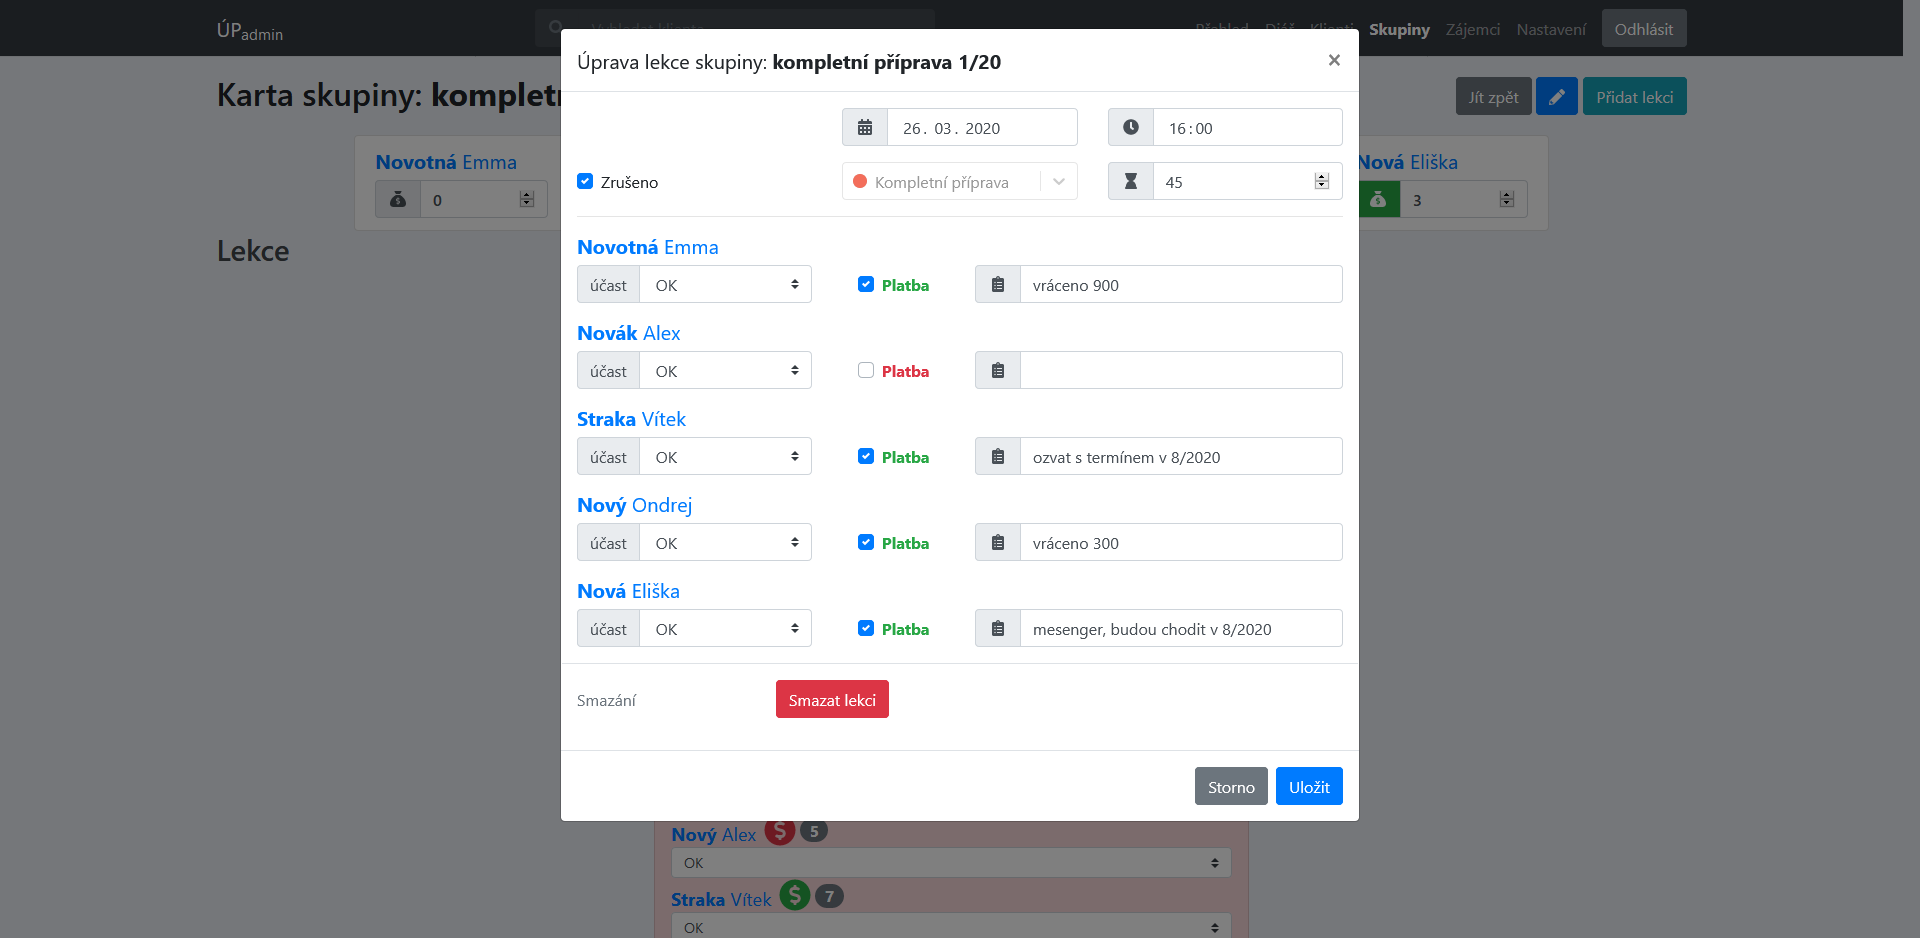
- storing information about lectures of the clients and groups including the prepaid ones – attendance state, payment, date, time, cancellation, notes,
- keeping track of applicants for the courses,
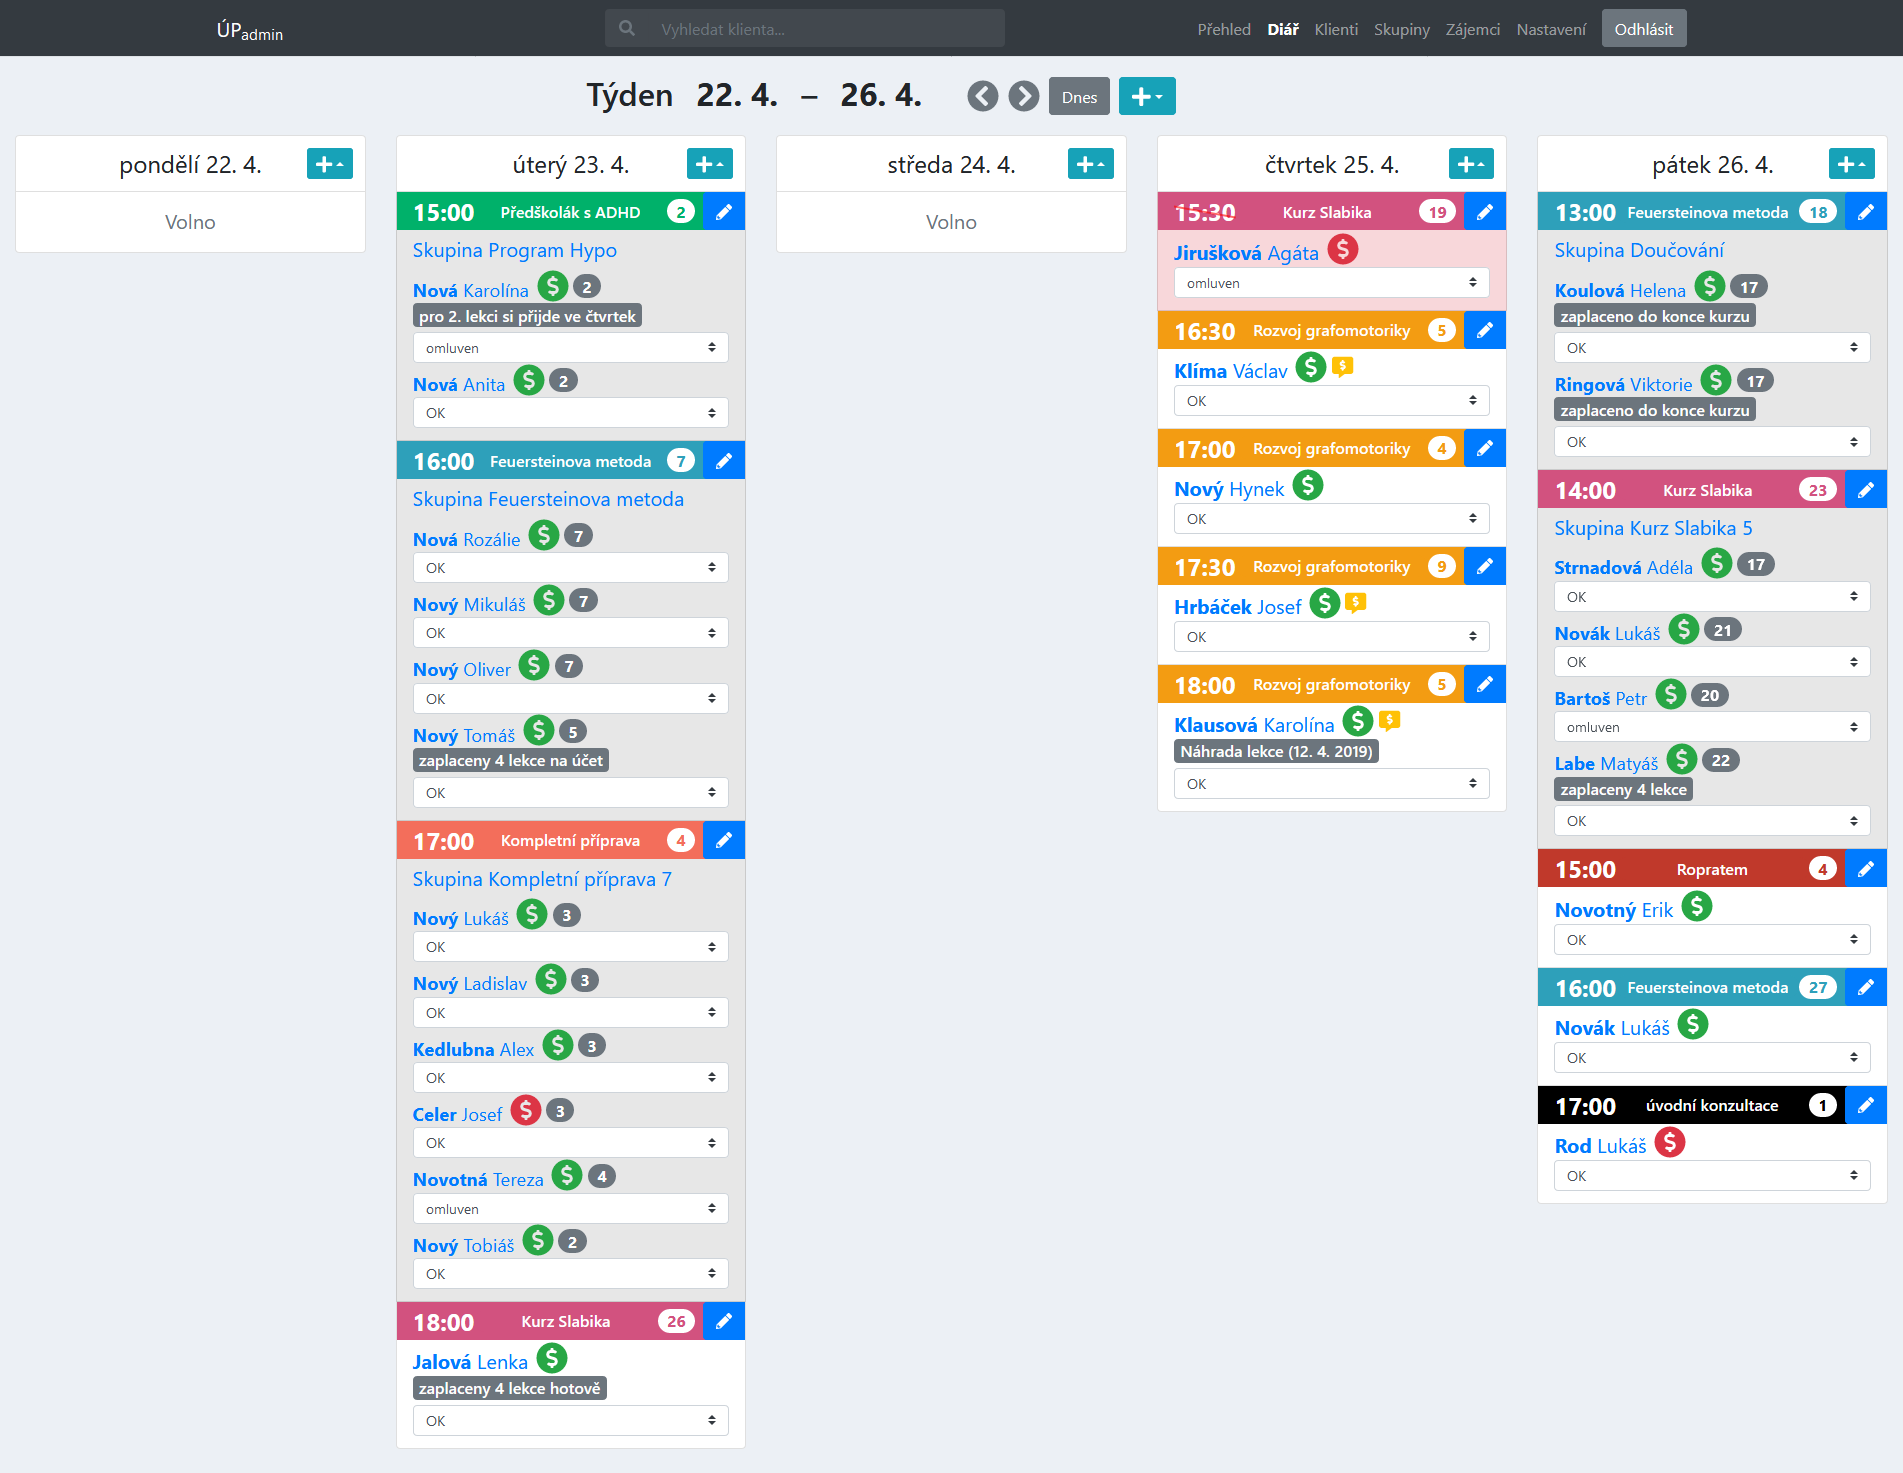
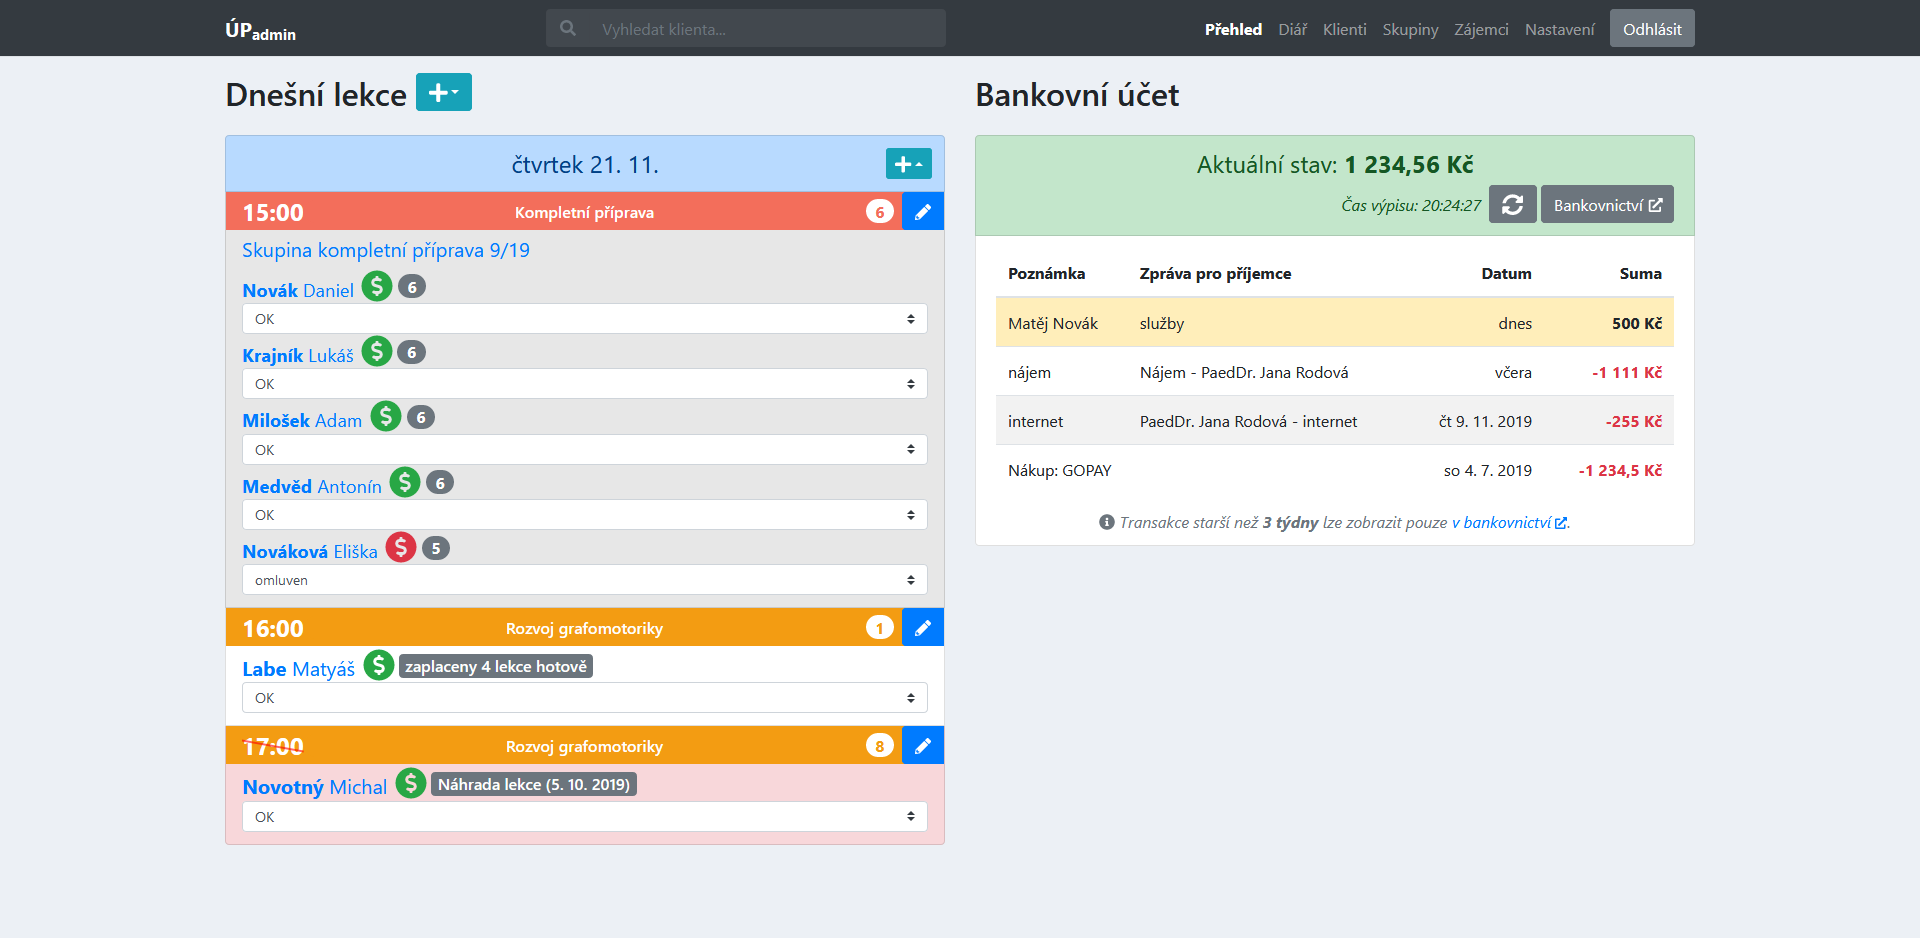
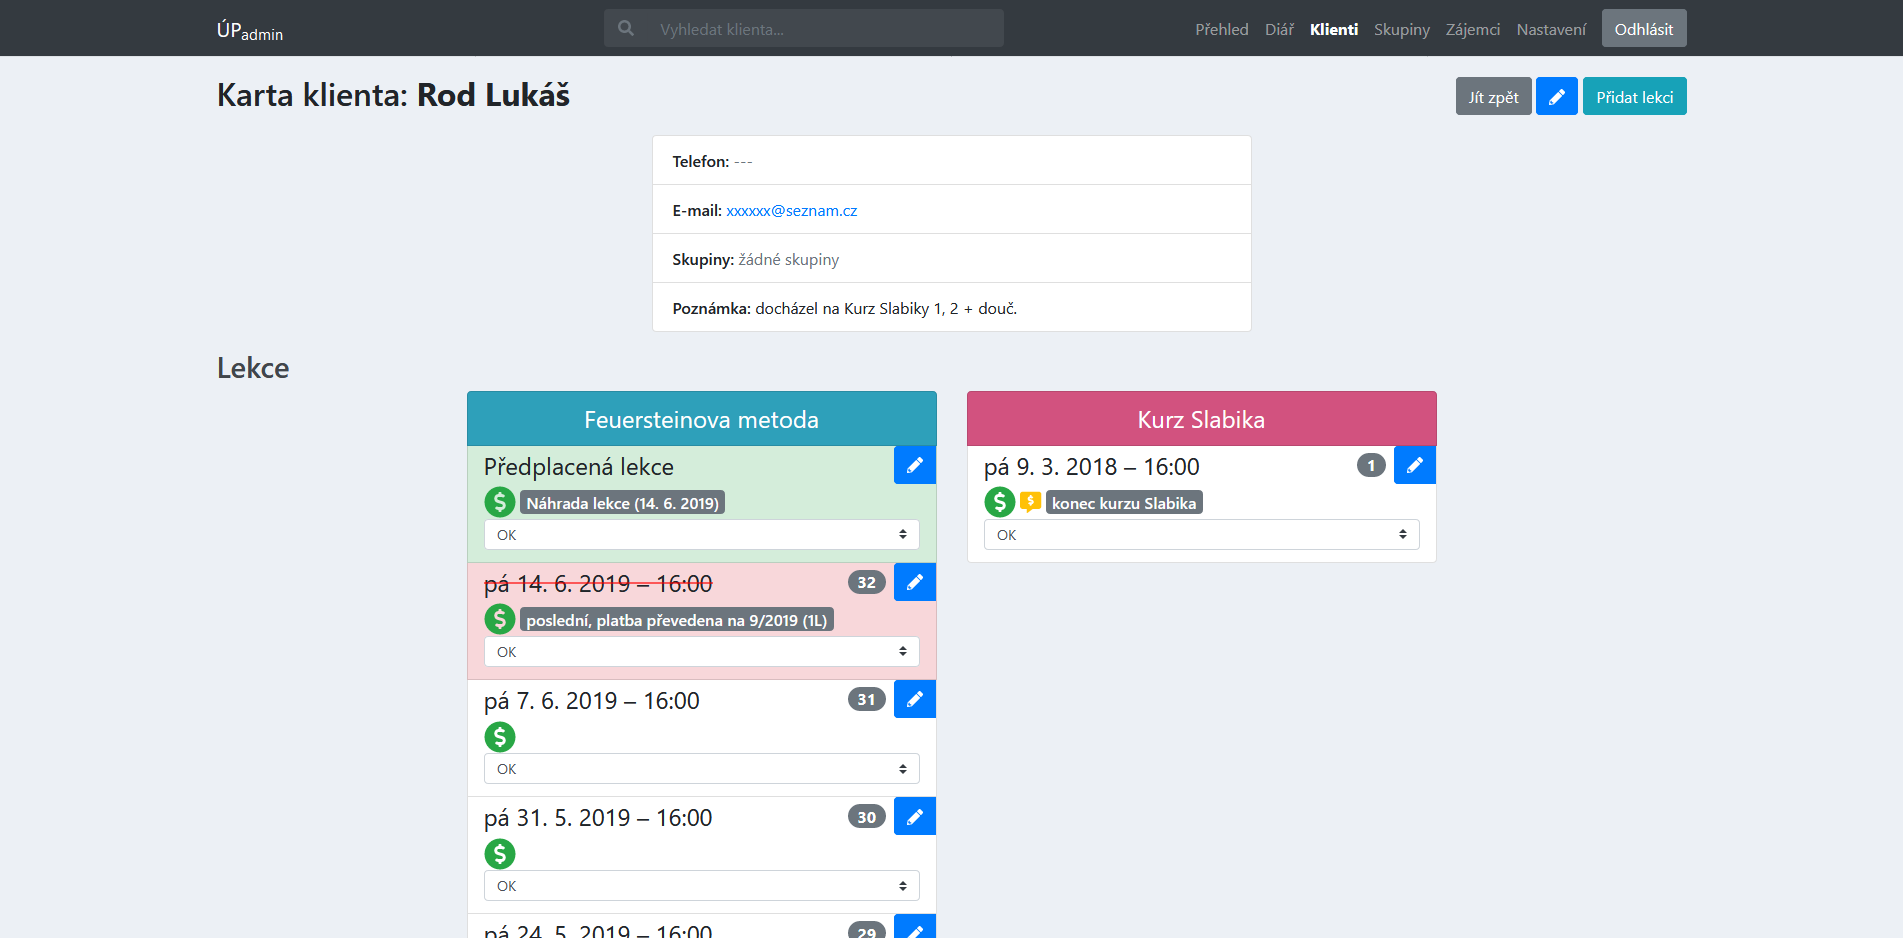
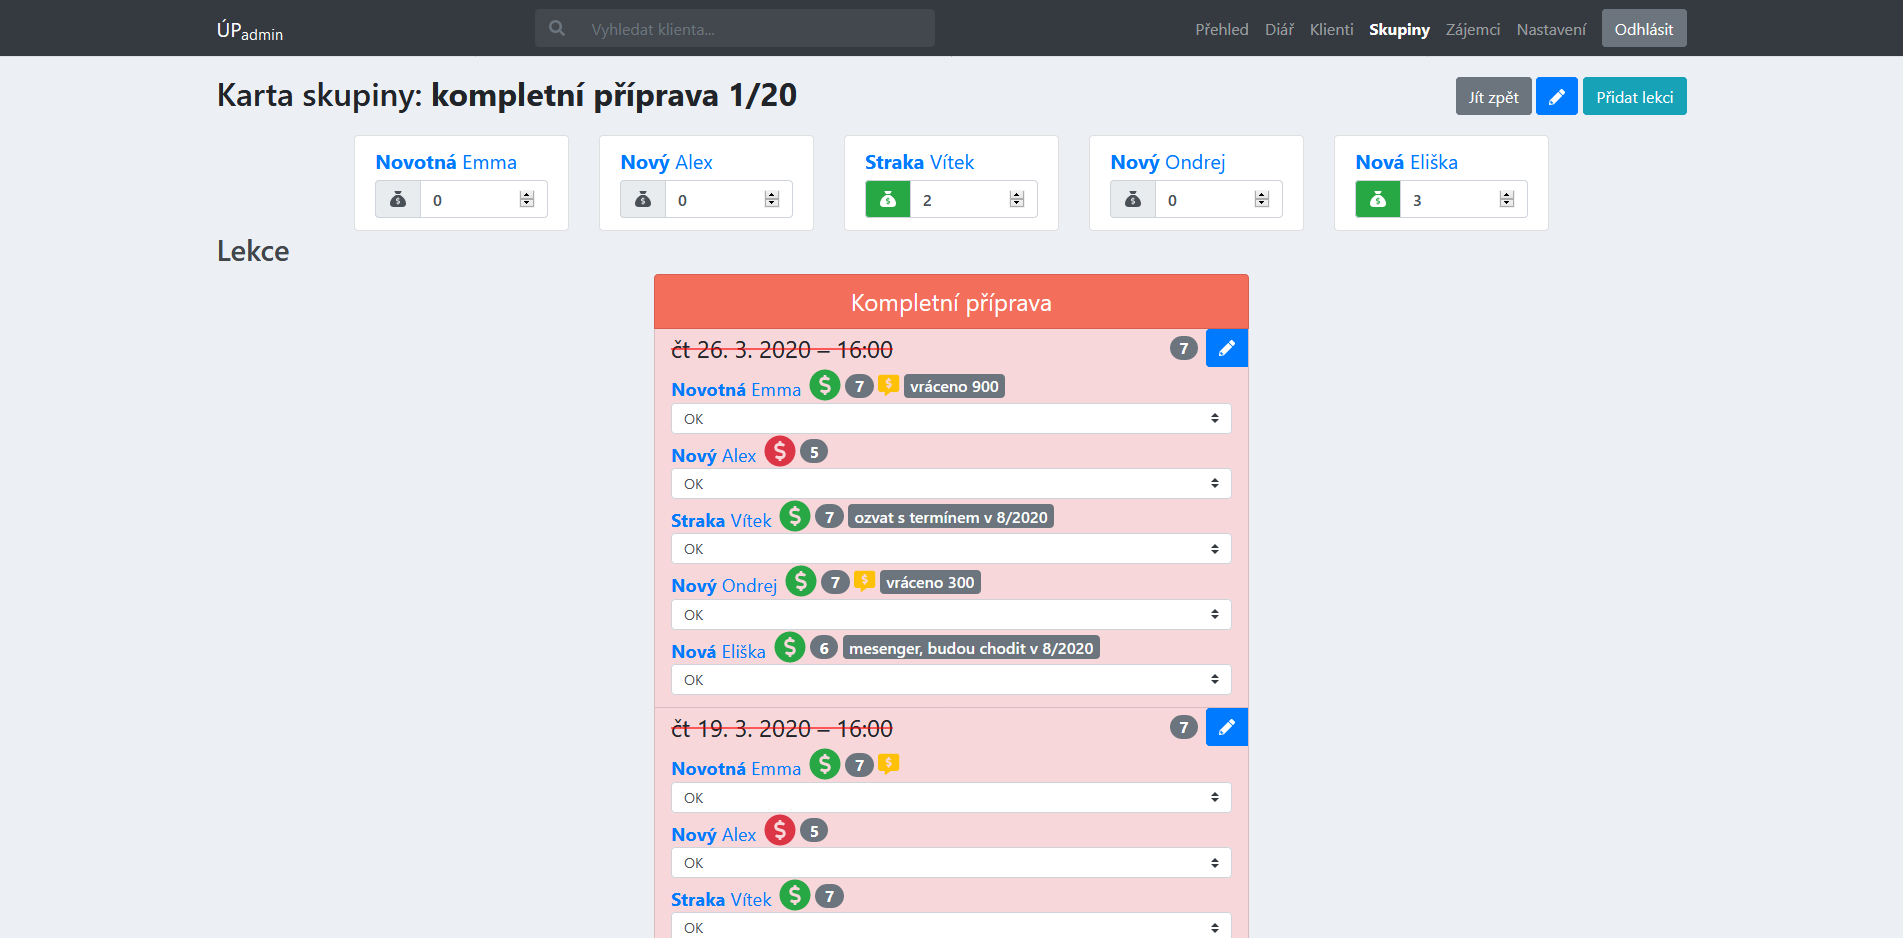
- 3 views for the lectures: in a card of the client/group, diary and on the main page in today's overview,
- identifying time conflicting lectures,
- automatic lecture cancellation for lectures without attendants,
- automatic creation of the prepaid alternative lecture in case of the excuse or cancellation by a lecturer,
- notification of the next lecture payment,
- lecture number computation with respect to clients' attendances,
- searching for clients (fuzzy searching)
- course and attendance state configuration including e.g. an intuitive course color selection,
- integration with the API of Fio bank – on the main page there is a pretty overview of the latest bank transactions,
- automatic estimation of the course, date and time for newly added lectures,
- respecting and checking all the restrictions and limitations given by the domain (e.g. duplications),
- keeping records of active and inactive clients and groups.
The app is composed of the frontend and backend connected via a REST API secured using JWT authentication. PostgreSQL 14 is used as a database.
ℹ️ Note: a part of this repo is dedicated to a deployment diagram and logical data model – see
docs/README.md.
Includes all the logic and exposes a REST API for a client, built on these technologies:
Django complex SQL queries are highly optimized (multiple times speed increase) (see articles [1], [2]). Advanced debugging in a remote/local environment is offered thanks to Django Debug Toolbar and its plugin Django Debug Toolbar Request History.
Static type checking available across the codebase based on type hints (module typing), the checking is done via mypy and Pycharm. Dead code elimination is checked with vulture.
Responsive JS (TypeScript) web app, specifically SPA (Single-Page-App) built on these technologies:
- React 17,
- TypeScript 4,
- Bootstrap 4 (with Reactstrap),
- React Router 5,
- FontAwesome 5 PRO (published to a private Github Package Registry)
- a další...
Main tools used for the frontend development:
- Webpack 5 with custom configuration (local and production) + Webpack DevServer,
- Babel 7,
- Typescript 4 – static type checking,
- ESlint 8 and stylelint – linters for static code analysis,
- husky and lint-staged – pre-commit checks (eslint, stylelint)
- and React Hot Loader – for HMR.
The app is resilient against JS errors thanks to
React Error Boundaries.
React.lazy + React Suspense are used for
faster loading of the whole app.
Webpack DevServer is integrated in a development
phase with Django dev server with all the related benefits
including HMR. A global state of the app is
managed with React Context. Part of the codebase also
takes advantage of React Hooks.
The app is deployed to 2 PaaS Fly.io environments varying in a version of the deployed app, database instance and debugging options. Additionally, the app can be run in a local dev environment, of course. The type of the environment is also highlighted with a top menu label title and color (except for the production).
List of environments:
- local – for local development,
- testing – the same config as production, each commit is deployed here; debugging mode can be turned on,
- production – production version used by a customer, deploy of the releases,
- Deployed apps are HTTPS-only (+ advanced security protection, see [1], [2]).
- Automatic code formatting with Black (Python) and Prettier (TS, TSX, JS, CSS, HTML, JSON, YAML, TOML, MD), both these tools are integrated with an IDE and perform automatic enhancements.
- The apps are connected to more services:
- CI and CD is taken care of by GitHub Actions – automated build, testing and deployment to various environments, automated execution of advanced scripts for e.g. automated app version addition to app, tokens handling, uploading static assets (frontend) to GitHub Release Assets, integration of cloud service for measuring code coverage.
- Automated continuous code analysis including code quality measure, finding zero-days and preventing critical vulnerabilities is taken care of by GitHub CodeQL, SonarCloud and DeepScan.
- Error monitoring of backend and frontend including triage, notifications and integration with the repo is taken care of by Sentry (sorted according to the environment, active on deployed apps). Integrated ability to collect additional feedback upon hitting an error from user thanks to the connection of Sentry and React Error Boundaries.
- User flow analysis thanks to the integration of Google Analytics (via a module react-ga).
- Slack
- audit-ci is used for automated security review of the project's dependency tree on the CI.
- Various standards are enforced: PEP 8, 12-Factor App, ROCA.
- Developed in IDE Pycharm (Professional Edition) (takes care of automatic import optimization, automatic code formatting etc.).
- Complex tests of the API and UI (E2E) are an important part of the app, the tests are
automatically run on the CI and can also be run in the local environment. A part of the frontend
is moreover covered with unit tests.
- E2E testing is built on a BDD framework behave – testing scenarios are written using a natural language (Gherkin), each of the tests is run according to them.
- Unit tests are built on a Jest framework and tools like React Testing Library (simple React testing utilities), jest-dom (custom DOM element matchers for Jest) and MSW (API mocking).
- UI (E2E) testing is taken care of by Selenium.
- Details about the tests are available in
tests/README.md(CZ).
├── .github ...... GitHub Actions configuration
├── .idea ........ IDE settings (Pycharm from Jetbrains)
├── admin ........ Django app for the web app
├── api .......... Django app for the REST API
├── db ........... Dockerfiles for PostgreSQL
├── docs ......... additional docs and files for the app including diagrams
├── frontend ..... frontend part of the web app
├── scripts ...... scripts for the CI/CD/PaaS/installation
├── staticfiles .. directory for static files (empty, filled on the CI)
├── tests ........ tests of the API and UI (e2e)
└── up ........... entire Django project
There are two modes that the app can be run in on the local dev environment. The default one is the classic dev mode – this mode includes advanced debugging tools, Django dev server and webpack-dev-server for the frontend are run. Since there is some work with private GitHub Package registry here (see below), the frontend cannot be built without these tokens so that the alternative way to run this app without these tokens is the second mode – manual production version of the app, it's also the closest one to the customer's version, this mode will also be run in this tutorial.
Minimum requirements are:
-
Clone the repo, open its folder and download the latest production version of the repo:
git clone "https://github.com/rodlukas/UP-admin.git" && cd UP-admin
git checkout $(git describe --tags `git rev-list --tags --max-count=1`)
-
Create your local environment config from the sample config file
.env.template:cp .env.template .env
-
Use the Docker Compose V2 to launch all the containers 🚀:
docker compose up
-
And while the containers are up, set up the user account in a separate CLI:
docker compose run web python manage.py createsuperuser
-
The app is now available at http://localhost:8000/ ✅.
⚠️ Warning: Docker Compose file uses Django dev server (not Gunicorn), it's only for local testing purposes, deployed environments use Gunicorn server.
ℹ️ Note: access the app from devices on the same network – the app is ready for use from other network devices (e.g. smartphone), usually there are two steps required to make this happen:
- allow Python and Node.js in a firewall (e.g. activate an interactive mode for ESET for a while),
- type the hostname or private IP address of the computer running the server to your portable device.
You can also launch the app with plain Docker without Docker Compose V2, but it's much harder!
Show me the alternative advanced installation
ℹ️ Note: Node.js and npm are not required since the frontend cannot be built without tokens to private GitHub Package registry (for FontAwesome PRO). Instead of this we'll use automatically generated assets of the latest production version from the CI.
-
Clone the repo, open its folder and download the latest production version of the repo:
git clone "https://github.com/rodlukas/UP-admin.git" && cd UP-admin
git checkout $(git describe --tags `git rev-list --tags --max-count=1`)
-
Download the prepared assets for the frontend from the latest production version and unzip them to the repo (and remove the
frontend.zip):wget https://github.com/rodlukas/UP-admin/releases/latest/download/frontend.zip unzip frontend.zip && rm frontend.zip -
Create your local environment config from the sample config file
.env.template:cp .env.template .env
-
Install all the backend requirements and activate a virtual Python environment:
pipenv install --dev
pipenv shell
-
Create docker image and run the PostgreSQL container:
source scripts/shell/postgresql_docker.sh -
Prepare the Django app for a run (the script will set the default Django settings file, prepare the static frontend files and creates a database schema):
source scripts/shell/release_tasks.sh -
Create a user account for accessing the database (choose some credentials that will be used for the login later):
python manage.py createsuperuser
-
💡 (OPTIONAL) Finally, you can also fill the database with some prepared sample data that show some great features of the app out of the box and make the first experience enjoyable (the sample data includes some clients, groups, lectures, applicants, courses and attendance states):
docker exec postgresql_cz psql --dbname postgres -h localhost -U postgres -f sample_data.pgsql
Run the dev server 🚀:
python manage.py runserver 0.0.0.0:8000✅ The app is now available at http://localhost:8000/.
Various tests of the app can be executed, e.g. test of the API for clients:
python manage.py behave --stage=api --tags=clientsThe repo contains complex tests of the API and UI (e2e) – see the details about the tests and executing options (CZ).
ℹ️ Note: personal details are fictitious.

Project originally used Travis for CI & CD, but in November 2022 the flow was migrated to GitHub Actions.
Automated continuous code analysis was ensured among others by LGTM until November 2022 when it was replaced by its successor GitHub CodeQL.
Project was originally deployed to Heroku PaaS. There were 4 running
independent instances - testing (automatic deployment from master branch), staging (same as
production), production and demo (with public credentials and sample data that were
automatically and periodically refreshed using Heroku Scheduler). Due to
announced Heroku's pricing changes the decision to move on
was made. At first in November 2022 the testing environment was migrated to
Fly.io. Shortly afterwards in December 2022 the whole production was also
migrated to the same place. The migration included also the PostgreSQL database with all the data.
The instances staging and demo were terminated without replacement.
Since the app was historically deployed to Heroku PaaS using theirs Builpacks, it didn't use any form of containerization. This approach had it's advantages and disadvantages. However, with the arrival of other PaaS like Fly.io migration to container approach was required. These efforts led to fully containerized app based on Docker (and published image in Github Container Registry). With the help of the newly introduced Docker Compose V2 the README Install & Run instruction could also be rapidly simplified and the app can be launched with a few lines.
Licensed under the MIT license.
Copyright (c) 2018–2023 Lukáš Rod