A PID Controller allows you to target a set value and achieve that setting in a smoothly and mantinin it without fluctuations


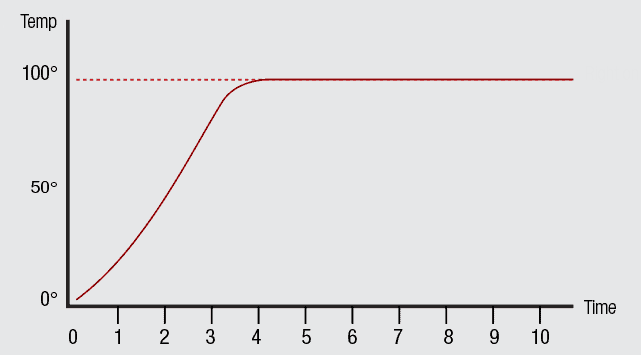
When coding a temperature controller for exemple, we like to set the max temperature and control the flow output or temperature output, based on the response from the temperature sensors.A PID Controller retrieves the response of the sensors and calculates the power output necessary to achieve the desired target or maintain it with small oscillations.
- Have [HACS][hacs] installed, this will allow you to easily manage and track updates.
- Search for "PID Controller".
- Click Install below the found integration.
... then if you want to use
configuration.yamlto configure the sensor... - Add
pid_controllersensor to yourconfiguration.yamlfile. See configuration examples below. - Restart Home Assistant
- Using the tool of choice open the directory (folder) for your HA configuration (where you find
configuration.yaml). - If you do not have a
custom_componentsdirectory (folder) there, you need to create it. - Download the content from the custom_components to that folder
... then if you want to use
configuration.yamlto configure sensor... - Add
pid_controllersensor to yourconfiguration.yamlfile. See configuration examples below. - Restart Home Assistant
A example with all inputs that allows to test the PID Controller
# Configure a default setup of Home Assistant (frontend, api, etc)
default_config:


pid_controller:

sensor:
  - platform: pid_controller
    name: hello
    enabled: '{{ states("input_boolean.enabled") }}'
    set_point: '{{ states("input_number.set_point") }}'
    p: '{{ states("input_number.proportional") }}'
    i: '{{ states("input_number.integral") }}'
    d: '{{ states("input_number.derivative") }}'
    entity_id: input_number.reading
    invert: '{{ states("input_boolean.invert") }}'
    precision: '{{ states("input_number.precision") }}'
    minimum: '{{ states("input_number.minimum") }}'
    maximum: '{{ states("input_number.maximum") }}'
    round: '{{ states("input_select.round") }}'
    sample_time: '{{ states("input_number.sample_time") }}'
    windup: '{{ states("input_number.windup") }}'

input_boolean:
  invert:
    name: Invert
    initial: no
  enabled:
    name: Enabled

input_select:
  round:
    initial: Round
    options:
      - Floor
      - Ceil
      - Round

input_number:
  sample_time:
    name: Sample Time
    initial: 0
    min: 0
    max: 30
    step: 1

  minimum:
    name: Minimum
    initial: 0
    min: 0
    max: 5
    step: 1

  maximum:
    name: Maximum
    initial: 5
    min: 0
    max: 20
    step: 1

  reading:
    name: Reading
    initial: 0
    min: 0
    max: 30
    step: 1

  set_point:
    name: Set Point
    initial: 15
    min: 0
    max: 30
    step: 1

  proportional:
    name: Proportional
    initial: 0
    min: 0
    max: 10
    step: 0.01

  integral:
    name: Integral
    initial: 0
    min: 0
    max: 10
    step: 0.01

  derivative:
    name: Derivative
    initial: 0
    min: 0
    max: 10
    step: 0.01

  precision:
    name: Precision
    initial: 2
    min: 0
    max: 10
    step: 1

  windup:
    name: Windup
    initial: 0
    min: 0
    max: 30
    step: 1
set_point: (number/template) (Required) The target value (Ex. 25°C)
entity_id: (entity id) (Required) The sensor entity id that will provide the PID with the feedback values (Ex. sensor.livingroom_temperature)
precision: (number/template) (Optional: Default 2) The precision of the returned value, decimals (Ex. 2)
round: (string/template) (Optional: Default round) The type of round to perform in calculations, can be round|ceil|floor (Ex. floor)
sample_time: (number/template) (Optional: Default 0) The time in seconds between samples to accept into the calculations of the PID (Ex. 30)
enabled: (boolean/template) (Optional: Default yes) If the pid is enabled (Ex. yes)
invert: (boolean/template) (Optional: Default no) If the pid should be Inverted, check invert pid section for more information (Ex. no)
minimum (number/template) (Optional: Default 0) The minimum output of the PID (Ex. 18°C)
maximum (number/template) (Optional: Default 1) The maximum output of the PID (Ex. 32°C)
windup (number/template) (Optional: Default 0) The maximum value to increment in the integral portion of the PID, check Calibrate the PID section for more information (Ex. 5)
p/i/d (number/template) (Optional: Default 0) The PID calibration values, check Calibrate the PID section to more information
unit_of_measurement (string/template) (Optional: Default points) The unit of measurement of the sensor
For this I'm gonna use a practical example on calibrating the PID to be used as a thermostat to a climate system. Warming a room The PID is calibrated using the p|i|d variables.
For start:
- Set all to zero. It helps to have this as an input_number.
- Set target temperature (set_point). It helps to have this as an input_number.
- Set minimum to 0 (for now). It helps to have this as an input_number.
- Set maximum to 1 (for now). It helps to have this as an input_number.
- Set the entity_id to a sensor that reports the temperature of the room
Setting all p|i|d variables to zero, the pid will behave as a normal on/off thermostat, siting to the max value when below the target temperature, and to the min value when above. Start the climate, the room should start warming up, and the PID should start receiving feedback from the sensor. When the temperature is below the target the PID should return 1 (target this to turn on your climate), when above the target it should return 0 (target this to turn off your climate). You should see something like this:
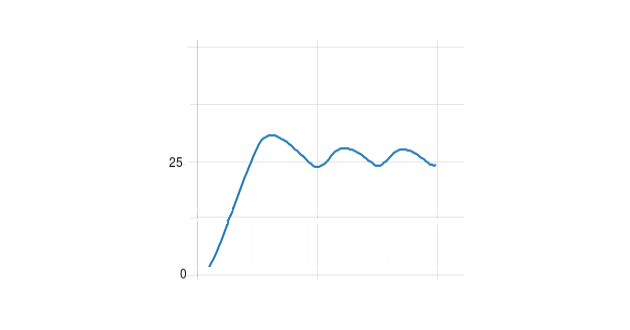
The blue line is cycling around the target (25). From this we should take note of 2 important references:
- The peak temperature, in this case we will assume 30 aka overshoot
- The time that it took since it crossed the set point until it reached the peak, in this case we will assume 11 seconds.
To set a p value we will start with double the overshoot, in this example 10 (5*2). This should pull down the reporting value from the PID, making a lower overshoot, and setteling bellow the set point
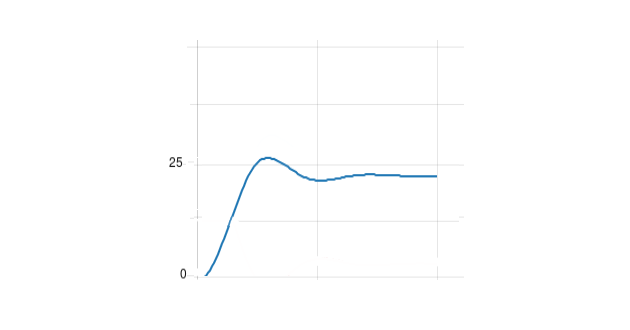
We still can notice a bit of 'waving', but the overshoot is a lot smaller, and the other peaks start getting smaller, until barely noticeable.
To set the i value we will double the time of the overshoot of the first phase, in our example 22 (11*2). This will pull the values to the set point, but will add a bit of 'waving' (we will deal with this next). Lower values will result on a faster approatch to the target, at the cost of stability.
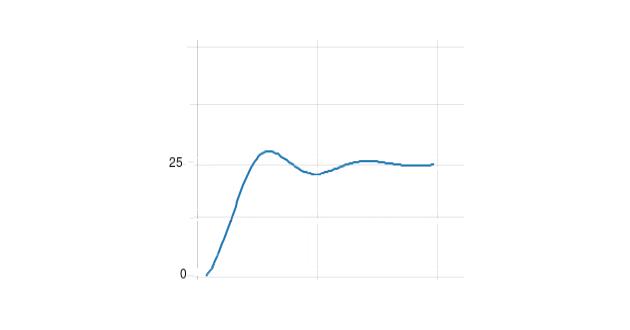
To reduce the waving and the overshoot we can add some Derivate, to calculate this we can set half the overshoot time measured in phase 1, in our case 5 (11/2). This is the result:

The Integral part of the PID works by incrementing the error from the reading to increment the output. Sometime it can happen, if the error is too big that the incremental part scales the output way too far. To handle this you can set a maximum incremental value in the waveup value.
You can look at the attributes of the sensor to the p|i|d variables, that should return the amount that each part is contributing to the PID output.
The PID standard behavior is to output the power that would be needed to raise the reported value to reach the set point. But if you need the inverted behavior, like a cooling system, that the rise of the output would lower the reported value, until it reaches the set point. To do this you can set invert: yes.
- How to tune PID Loops: https://www.crossco.com/resources/technical/how-to-tune-pid-loops/