Game : Game Engine Developer Guide
This is the developer guide for the Source Academy's Game Engine. You can use this to delve deeper to the engine inner workings, or use it for your own reference. If you want to contribute as story writers, please refer to the Story Writer Guide and the Txt Guide.
Source Academy Game Engine uses Phaser 3 internally, and its documentation can be found here.
This developer guide assumes basic familiarity with Phaser 3 structure (primarily on what is
Phaser.SceneandPhaser.Game)
- Important Notes to know
- Story Processing Pipeline
- Interactions of Components
- Features
- Scenes
- Workflows
- Managers
- Parser
- Game Manager
- Customise My Room (CMR)
- Testing Checklist
All the source code of the game engine can be found in src/features/game and src/pages/academy/game of this repository.
All the development of the game engine follows two main constraints:
- Story writers do not need, at any time, required to set up their own local Source Academy i.e. story writing experience must be doable without touching the game engine itself.
- Exercise good software principles; primarily extensibility and maintainability. This is an open source project; hence all modifications should be done while keeping these in mind.
This is a game engine, not an application. While we try our best to make it as modular as possible, there is bound to be high coupling within the game engine.
In the config, we use Phaser.CANVAS instead of Phaser.WEBGL for our game. Certain Phaser features does not work in this configuration, namely:
- Bitmap Masks
- Tint
❗ Do not be surprised if you find some features to not work.
This decision is made because macOS performance drops when it interacts with webGL, which leads to heavy RAM consumption (double the consumption). Hence, we use Phaser.CANVAS.
Issues and bugs report should be reported normally through Github Issues. Please tag the issue with game label so the team can identify it easily.
For progress on the game development, we dedicate a GitHub project board to track progress of development of the game.
Reach goals are also documented within the project board, and titled as Reach goals.
Below is a diagram of how the Game Engine consumes a text file written by the story writers.

This workflow allows story writer to only care about the Txt Syntax, and do not need to interact directly with the game engine.
The Parser will process the Txt file and output an object that is able to be processed by the game engine.
| Pros | Cons |
|---|---|
| - Obey the main constraint | - Need to create API for game engine's capabilities at parser |
| - Separation of concern between game engine and story writing syntax |

Game Simulator accepts the uploading of Txt file, and fed them into the normal workflow in order to simulate the checkpoint. Note that in the diagram above, the Game Simulator does not upload the Txt file into the AWS S3 server; it is stored locally for game simulation.
Only when assets and Txt files are uploaded through Asset Uploader in Game Simulator that the Game Simulator will upload to the AWS S3 server.

Game Engine requires the two information from Front End in order to function. Achievements is used for the Awards Hall and Awards Menu, while Session ID is used to fetch and store student's exclusive information e.g. assessments, game progression, collectibles.
Achievements here refer to both the achievements and goals, depending on the current architecture of the achievement.

We use an AWS S3 server to store and fetch assets from. Meanwhile, game progression is stored and fetched from backend. The game progression is stored based on the account information.
Assets at AWS S3 server is fetched based on the link to the asset.
Actions is one of the main method that the game progresses (others being completing a mission or getting an achievement). Commonly, actions are triggered when user:
- Interact with an object in Explore mode
- Converse with a character at a location
That is, the actions are loaded into user interactions. Actions are powerful; they are able to mutate the state of the game (adding/deleting/mutating game state) through many ways e.g. adding a new talk topics, unlocking a new locations, etc. An interaction can be loaded with an array of action IDs, which will be executed sequentially.
Actions are managed by Action Manager.
We provide a diagram on how action is processed internally. Note that in actuality, Other Managers may also refer to State Manager if the action requires to mutate the game state.

An interaction within the game can be loaded with an array of action IDs, in which will be passed to the Game Manager. The Game Manager will then pass the action IDs to Action Manager for the Action Manager to execute the actions associated with the IDs sequentially. In order to obtain the actual action associated with the ID, Action Manager must fetches the action associated with the ID from State Managers.
This is related to how the game state is stored; based on the completed actions. We can generally divide actions into two types:
- State Changing Action: Actions that mutate the state of the game e.g. adding a new mode to a location, removing a character from a location, etc.
- Non-state Changing Action: Actions that does not mutate the state of the game e.g. bring up a dialogue, bring up a notification
Fast forward actions are those that are under State Changing Action, and the completed State Changing Action are stored to represent the game state. When the game initialises, the fast forward actions can be executed sequentially to update the initial game state all the way to the latest played state.
Game progression is saved automatically whenever an action is executed.
Awards refer to both Collectibles and Achievements.
| Awards Type | Description |
|---|---|
| Collectibles | Objects collected by users in-game; found as user progresses the game story. |
| Achievements | Source Academy achievement, commonly from outside the game; e.g. given when user complete a mission |
Some awards are tied to an asset and rewards student with its asset key, which can be used within the Room Preview scene.
If used, the asset tied to the asset can be used by the user. The associated asset key can be obtained by hovering over the award at Awards Hall scene, or on the Awards Menus of the Dashboard (under the preview of the asset).
Mapping between an award and the asset is stored at S3, under the name of awardsMapping.txt. Please refer to Text Mapping for details on how the awardsMapping.txt is written.

Awards Menu is a section of the Dashboard where the user can browse through their awards. Awards Menu provides a preview of the award (the title of award, the preview of the asset, the asset key, as well as the awards description. On hover of the asset key, explanation of the asset key usage will be shown with a pop up.
The Awards Menus for collectibles and achievements are each managed by separate Awards Managers.

Characters adds an extra depth to the story. The y coordinate of the character is automatically tailored such that the bottom of the sprite touches the bottom edge of the screen. The character sprite is also automatically resized based on the scale specified by the story writer.
Character can be placed at different positions (left/middle/right), as well as shows different expressions. Characters shown on the Menu Mode will take on the default expression tied to the character.
Characters shows up when user is in Menu Mode, or during a dialogue. The characters being shown during Menu Mode is stored at Game Location, where as the characters being shown during a dialogue is written along the dialogue script. It is up to the writers whether the two characters (the one that appears in Menu Mode and dialogues at the location) are the same character or not.
Characters are managed by Character Manager. Its transition outside dialogue is managed by Game Manager, while transition within a dialogue is managed by Dialogue Manager.

A story is encapsulated within a checkpoint. A series of checkpoints makes up a chapter. A series of chapter is the entire story line. Internally, we mostly only use the term checkpoint; as that is what we are dealing most of the time.
The difference between chapter and checkpoint is only significant at Chapter Select scene; where chapter refers to the first checkpoint of the chapter.
In order to progress to the next checkpoint, the following must be fulfilled:
- All objectives of previous checkpoint is completed
In order to progress to the next chapter, the following must be fulfilled:
- Previous chapter is completed
- Chapter has been published
Due to the sequential unlocking of chapter, it is only necessary to store the last chapter completed to know the users' progress.

The Dashboard is an in-game menu that can be triggered by the user to view various information. The possible pages in the dashboard are the Dialogue Log, the Task Log, and the Awards Menus for Collectibles and Achievements. The Dashboard can be set to show a different set of pages by providing a different list of pages and Dashboard Page Managers. All 4 pages are shown in the main game but only the Awards Menus are shown in the Room Preview scene.
The Dashboard is managed by Dashboard Manager, and its transition is managed by Phase Manager.

The primary method to tell the story. Internally, dialogue is a sequence of promises that resolves when user interacts with the dialogue box. Automatically apply the typewriter effect on to the dialogue lines, as well format and position the speaker name in the speaker box.
Whenever @you is used within the script, we will make use of the display name of the student, attained from the name stored at the Account Information.
Managed by Dialogue Manager, and its internal working will be explained further under the Dialogue Manager section.

The Dialogue Log is a page on the Dashboard which displays all the dialogue that the player has seen so far in that chapter. It is managed by the Log Manager.

Escape menu is an in-game menu that can be triggered by user to navigate to Main Menu, Continue, or apply a new setting to the game. Escape menu is managed by Escape Manager, and its transition is managed by Phase Manager.
Game Checkpoint stores Game Map, and Game Map stores Game Locations.
Game Checkpoint stores the starting location of the checkpoint when user first starts the checkpoint. If the checkpoint has been played before i.e. there is a progress stored for this checkpoint, we will not use the starting location, instead we use the last place visited by the user.
Additionally, it also stores the Objectives of the checkpoint.
Below is the architecture and graph of a checkpoint object. This shows how data is encapsulated within the Game Checkpoint type.

Encapsulate the entire checkpoint information. Game Map stores all the informations exclusive to the checkpoint; i.e. image and sound assets, as well as mapping from an ID to its actual object (e.g. Item Id -> Game Action, Item Id -> Character).
The structure of Game Map is as follows:

Instead of letting individual locations to carry the actual object, we separate the mapping and the assets and store it at the Game Map level. This allows for centralised storing and anticipate the (although unlikely) event that two locations share the same resource. This also allows for resources to be easily moved to another location, or to exist but remain hidden (ie present in the Game Map, but its ID is not present in the location).

In-game, Game Location refers to places that users can navigate to. Internally, it refers to a broader meaning.
In-game, upon moving into a location, the followings are triggered by Game Manager:
- Play BGM Music tied to the location, if any
- Render all required assets (background, objects, bounding boxes, character)
- Execute start actions, if required
- Bring up notification, if required
Internally, Game Location is the object that carries the actual story line within the checkpoint. Due to the type of game that we are working on, story and interactions are highly dependent on which location it is triggered at. You would not want to trigger a conversation about cookies at Grand Master Hartin Menz's room, wouldn't you? (Yes, you may want it; but let's just get the idea across) That is to say, the interactions and story of a location is likely to be exclusive to the location.
This leads to us to group information based on which location it is stored at, hence we place great importance to Location IDand it acts as a key in obtaining the necessary information. Precisely, the following information are stored within a location:
| Information | Description |
|---|---|
| id | the id to identify that location |
| name | the proper English name of the location e.g. 'Dining Hall' |
| asset key | the asset key for the background image of the location |
| modes | the game modes that are available in the location |
| talk topics | the dialogue id of topics that players can talk about in Talk menu of that location |
| objects | the object id of objects rendered in the location |
| bounding boxes | the id of the bounding boxes (invisible rectangles) in that location |
| BGM key | the asset key of background music being played in that location |
All these attributes essentially stores IDs, which we can obtain the actual object from Game Map's various mapping.
Game Objectives are stored under Game Map, in the form of an Game Objective object. In order to progress from one checkpoint to the next, user must complete all objective allocated to the checkpoint. Objectives, and its completion, are defined by the story writers.
Internally, we check for objective completion at every phase transition. This is done by defining the interrupt callback at Phase Manager. Additionally, it requires that the active mode to be Menu mode. This is to prevent checkpoint transition while the user are in other modes (e.g. in the middle of a dialogue).
Game Objectives are not shown in-game. Rather, it should be implied by the story telling.
Various modes that users can engage with within the game. Modes encapsulate ways user plays the game. Within the game engine, only one mode is able to be active at any one time.
❗ For consistency, this should be the only way game engine developers add a new type of game play into the game instead of adding a separate, hidden game play. If you truly wish to add another game play another way, think hard and justify it carefully before adding it.
❕ This is where extensibility of the game comes from.
Due to UI restriction, a location should hold at most 4 modes at any one time. Else, the UI will get cluttered.

Here, users can interact with object placed on the location. Interactions may trigger an action, depending on whether the object is loaded with one or not. Game cursor is set to a custom cursor during this mode. Upon hovering the cursor on interactive object, the cursor will change to alert the player of the interaction. Cursor will change based on whether the interaction has been triggered previously or not.
Explore mode make use of Activatables, which can refer to either Objects (managed by Object Manager) or bounding boxes (managed by Bounding Box Manager) and load them with required functionalities. The functionalities include the cursor change on hover/out, as well triggering the action related to the action ID assigned to the object.
On interact, any effect of the Activatables will be triggered e.g glowing effect.
Upon exiting the mode, Explore mode disables these functionalities and reset the cursor back to normal. This is because interaction with objects are limited to the Explore Mode, and should not be triggered when user are in other modes.
All interacted objects are kept track by StateManager.

Users are able to choose from selection of modes available to the location. The possible modes are fetched from State Manager. Interaction with any of the mode button will essentially trigger a phase transition to the new mode.

Users are able to choose to navigate to other locations by selecting the options given. The possible navigation are fetched from State Manager and used for preview. Upon hovering of any of the location button, this mode automatically sets a preview of the location on the left side. This mode shows the location name instead of its id.
This is a mode where dialogue and notification operates in, and transitioned to automatically whenever a dialogue or notification is triggered. This mode is meant to cater to modes that requires it for other modes to be inactive (e.g. Dialogue should not be triggered while Move mode is active).
This mode essentially leverage the fact that there is only one mode that can be active at any one time; hence making it into a separate mode will allow Phase Manager to ensure that while Sequence mode is active, no other modes is active. This allow us to display interactions that users cannot skip (e.g. skipping via interacting with other modes).

Users can choose Talk Topics, which is dialogue topics available for users to choose from. Once interacted, the game will transition to Sequence mode, followed by bringing up the associated dialogue. Once the dialogue is finished, it will transition back into Talk Mode.
All interacted talk topics are tracked by State Manager.

A notification that display a message on top of the screen. It resides within the Sequence mode, hence other modes UI will be deactivated before transitioning to the notification.
In game, notification is used to display location name when users navigate to the location. Notification only appears if there is an update to the location since the last time users visited it e.g. new dialogue, new objects, or new characters. This is to allow users to recognise that they have made progression in the story.
Notification make use similar functionality to Dialogue, in that it uses the same dialogue box as its UI component.

A pop up that display an image for a duration to the user. Pop ups are able to be shown on the left/middle/right of the screen, and able to be shown in small/medium/large size. At a position (e.g. left screen), only one pop up can be shown at any one time i.e. the previous pop up at the position will be destroyed. This is to prevent multiple pop ups laying on top of one another. Story writers can use this to briefly display an object found by the player, highlighting an object, etc.
Prompt is another type of pop up that appear on the side of the screen. The main difference between prompt and Pop Up is that, prompt offer choices to the user. When the user clicks on one of the options, the Prompt will return the index of the selected option.
In game, prompt is used to asks whether user wants to navigate to the assessment page or not. If 'Yes', then a new window tab with the assessment URL will be opened. If 'No', then nothing will happen.
The quiz question is embedded into the dialogue. A prompt is poped up for users can decide to start attempting the quiz. The user can read the question displayed in the dialogue box and select the correct option. Different responses from users may result in different reactions of the avartar. The results of the quiz (the number of questions answered correctly) is saved.
Start Actions are executed once when the checkpoint first initialises. In other words, Start Actions are executed when the checkpoint first loads, regardless of the location or the state that the game is in. Story writers can use this feature to highlight/inquire facts that is relevant throughout the checkpoint.
Story Complete Actions are executed once just before the game transition to the next checkpoint. In other words, Story Complete Actions is executed when the current checkpoint is completed. Story writers can use this feature to conclude the story of the checkpoint.

The Task Log is a page on the Dashboard which shows the tasks the player has received. Completed tasks are marked with a tick. The Task Log helps ensure players can easily check what they are supposed to do next. It is managed by the Task Log Manager.

The Toolbar is a UI rendered in the top right corner of the screen featuring buttons for the player to easily open the Dashboard and Escape Menu. It is managed by the Toolbar Manager.
This section details the various scene that is present in the game. Scene here refers to Phaser.Scene, and stored exclusively under the src/features/game/scenes/.

Awards Hall is a scene where users can browse through their awards. The asset associated with the award is shown as preview. On hover of an award, a pop-up detailing the title of award, the asset key associated with the award, and the description of the award is shown. Awards Hall allows scrolling (left and right) when the numbers of awards exceed the capacity of the screen. The background is required to be seamless on its horizontal edge to achieve this.
Internally, Awards Hall make use of Phaser.GameObjects.TileSprite to allow for seamless scrolling of the background. As stated in the documentation of Tilesprite, the background image needs to have a power of two (POT) dimension in order to avoid graphics artifacts.
The specification of the Awards Hall background is as follows:

This format assumes that the screen size of the game is 1920x1080px.

Bindings scene shows the bindings used within the game. This scene is purely static.

This scene allows user to select the chapter to play. Upon entering the scene, we auto-scroll to the latest, biggest numbered chapter that student is able to play. There are two options possible to be done on each chapter:
- Play/Continue - Starts the chapter, resuming from the last checkpoint that user was in. If there is no checkpoint progress on this chapter, the chapter will start from the first checkpoint.
- Reset progress - Restarts the chapter i.e. start from the first checkpoint.
Within the scene, for disabled chapters, a black tint will be overlaid on top of the chapter frame to disable users' interaction. In order to unlock a chapter, the followings must be true:
- Previous chapter is completed
- Chapter has been published
Chapter Select obtains the chapter details (title and image preview) from the back end.
The preview image dimensions are 400x280px. Any provided preview image for a chapter will be resized to these dimensions. (Note: The dimensions used to be 500x700px. This has since been changed to fit more chapters into the screen and help users scroll around faster.)

We dedicate a scene for chapter and checkpoint transition. This scene is triggered in between checkpoints/chapters. From users' perspective, it is when the in-between scene that is triggered after they completed a checkpoint.
Internally, we use this scene to fully load the next checkpoint, before finally loading the next scene. We cannot load these information at the start of Game Manager as it can alter the sequencing of preload() and create() in the Game Manager.
Specifically, the following information is processed:
- Fetching of the checkpoint text file and default checkpoint text file
- Parsing of the checkpoint text file and default checkpoint text file
The output of the parser i.e. the checkpoint object, is passed to the next scene to be used.
The sequencing of chapters and checkpoints only need to be loaded once, hence we load it within the Entry scene. The sequencing of chapters and checkpoints are stored at the back end.
Entry is triggered only once, when users' first load the game. It automatically leads to the Main Menu afterwards, and it is not accessible from any other scenes.
Commonly, assets are loaded within the preload() of the scene. However, Phaser behaviour execute preload() every time the scene is loaded. That is, if we load information and data within a scene preload(), we will unnecessarily repeat it as often as the number of time that the scene is loaded. Entry which is only loaded once provide us the opportunity for us to load all information and data that only needs to be done once throughout the game.
Specifically, the following information and data are processed within Entry:
- Assets used throughout the game (e.g. UI asset, sound effects, and fonts)
- Chapters information
- Users' progress/save state
- Users' user state
- Users' settings & apply it
- Users' code for CMR
- Awards asset loading
Only
this.loadfunctions are awaited at Phaserpreload(). This means additional information that is fetched from the back end/S3 (thus without usingthis.load) is not awaited. Manually convertingpreload()to async and awaiting these information cause the order ofpreload()andcreate()to be executed in no clear order (create()can finish first beforepreload()), thus messing up the scene loading. Hence, we load these additional information atcreate()instead.
The scene that play interact with the most; this is where all the game play occurs. There is no screenshot given because most of the Features screenshot is from the Game Manager scene. Game Manager is responsible of orchestrating the entire game play, location change, etc. The details of which will be discussed under Game Manager section.

Users can navigate to other scene from here.

This scene uses the students code and display its output on the screen. Complete workflow is described under Customise My Room (CMR) section. Apart from Game Manager, this is the only scene that incorporates the Toolbar, Dashboard and Escape Menu features.

Users can set up the game settings from here. Settings are only applied when users click the Apply Settings button. Internally, Settings contact Save Manager to save users settings and necessary managers to apply the settings.
For simplicity, we will group most managers beside Game Manager into Other Managers. From a bird eye view, the game engine can be seen to consist of the following notable entities:
| Entity | Description |
|---|---|
| Game Manager | Handle in game phase transition, location transition, and checkpoint transition |
| State Manager | Handle states related to the checkpoint (available interactions, actions, triggered actions, etc) |
| User State Manager | Handle states unrelated to the checkpoint (players' collectibles, achievements, etc) |
| Other Managers | Individually specialised for their own purpose |
| Checkpoint Object | current checkpoint being loaded |
Below is a diagram on how these entities interact with one another.

Within this architecture, we have single source of truth (SSOT) about the player's state, stored at User State Manager and State Manager. Game Manager will track the current Location ID at all times. In order to render, the managers must make use of the given a Location ID to fetch the latest state and information from the state managers.
❕ This also mean that other managers must be as stateless as possible to maintain the SSOT.
The game has two global singletons - SourceAcademyGame and GameGlobalAPI. We use singletons to create global state for variables/managers shared across different scenes. This makes global variables easily accessible to managers, without having to pass data down through function parameters.
SourceAcademyGame is a Phaser.Game instance, meaning it is persistent across different Phaser.Scenes.
Here, we store managers and variables that persist across scenes - such as sounds and user data.
The following are some key global managers and what they do.
| Manager | Description |
|---|---|
| Sound Manager | Manager global volume, in charge of switching background music and playing sound effects |
| Save Manager | Keeps track of taking game snapshots and contacting the server to send them over |
| User State Manager | Keeps track of collectibles, achievements, assessments completed by the user |
The following are some global variables and what they do.
| Variable | Description |
|---|---|
| accountInfo | User account info such as his refresh and bearer tokens |
| setStorySimState | A setter for the state of Story Simulator, so that the game engine can have control over React variables |
| awardsMapping | A Map that provides information on how to render each award |
| currentSceneRef | A reference to the current Phaser.Scene, so that we could perform scene related functionalities |
| gameType | Whether we are using Story Simulator or actual game |
| gameChapters | Details of each chapter, its title, background image, and corresponding .txts |
| ssChapterSimFilenames | List of checkpoint files that you want to simulate in Chapter Simulator |
| isUsingMock | When testing out engine, use this to use mock .txts or actual .txts that are specified by Story writers |
Is only usable when the scene is GameManager scene.
It contains all API's of gameManager's managers. We apply the Service Locator pattern, where one global class is called to make services and functions easily accessible to other managers.
The game engine depends on certain mapping. In order to keep it flexible and not hard-coded within the code, we save the mapping within S3, where staff/writers can freely update the text file to include/remove mappings.
All mappings are stored under the stories/ directory under S3.
Awards Mapping is determined based on the content of awardsMapping.txt. It has the following format:
collectibles
    <award id>
        <asset key>, <asset URL>, <award title>, <award description>

achievements
    <award id>
        <asset key>, <asset URL>, <award title>, <award description>
The award needs to be assigned to an award type i.e. collectibles or achievements. Below is the sample text file:
collectibles
    cookies
        cookies-award, /images/cookies.png, Cookies, Cookies are delicious!
    computer
        computer-award, /objects/cmd-monitor03/normal.png, Computer, Computer is advanced technology

achievements
    1
        place-award, /images/2d-2018-1st-place.png, Rune Master, This is an award you get for obtaining rune master
    2
        popular-award, /images/2d-2018-1st-popular.png, Popular, Wow, Mr. Popular! :)
For achievement's award ID, the ID is assigned by the Source Academy's Achievement System. The mapping must make use of the said ID.
The CMR default background make use of the mapping to determine the default background to be used. It has the following format:
<assessment ID>
    <asset URL>
Below is the sample text file:
405
    /locations/yourRoom-dim/normal.png

404
    /locations/deathCube_ext/shields-down.png
Assessment's ID can be obtained by looking at the URL of the assessment itself.
Process all actions given the list of action Ids
(1) For a given action Id, retrieve the corresponding GameAction object from State Manager
(2) Check that action has never been triggered based on triggeredInteractions, or action is repeatable. If so proceed to (3)
(3) Check if all conditions to perform this action are satisfied. If so, proceed to (4)
(4) Execute this action.
(5) Repeat (1-4) for all action Ids that need to be processed.
(6) Save the game after series of actions is executed.
| Game Loop Methods | Description | Usage |
|---|---|---|
fastForwardGameActions |
Executes all actions in order of action ids. | Called by GameManager at the start to replay all state-change that occurred when student last played this game to bring the state to the same as last player's progress |
processGameActions |
Executes all actions if the condition to execute them is satisfied, and saves the game afterwards. | Called every time actions are triggered - Game Start Actions, Checkpoint Complete Actions, and Location Actions; in-dialogue actions; Object/ Bounding Box actions |
| Helper Methods | ||
processGameAction |
Executes 1 action if the condition to execute them is satisfied. | Called by processGameActions repeatedly to process all actions |
checkCanPlayAction |
Determines whether an action can play. Firstly, the action conditions have to all be satisfied. Secondly, the action has to be either triggered for the first time, or a repeatable action | Called by processGameAction
|
| Condition Methods | ||
checkAllConditionsSatisfied |
Checks all the condition objects if each condition is satisfied | Called by checkCanPlayAction
|
checkConditionSatisfied |
Checks whether 1 condition is satisfied. If the condition is on userstate, then it can be stubbed by story writers. If the condition is on game state, then we look into the Checkpoint Objectives to see if they are satisfied. | Called by ActionConditionChecker.checkAllConditionsSatisfied repeatedly to check if all conditions are satisfied |
| Execute Action Methods | ||
executeGameAction |
Plays 1 action by checking the action type to call the correct manager and passing in the action params | Called by fastForwardGameActions and processGameActions
|
Given the Awards Mapping from Source Academy Game's Award Mapping object, and the list of awards obtained from User State Manager, be able to render the award, the keys, and the descriptions of each award on the dashboard.
| Property Name | Description | Rationale |
|---|---|---|
activePageNumber |
The page number that is active | Keep track of page number for this Award page |
awardsGetter |
The callback function used to obtain the award keys | Allows separate Awards Managers to be instantiated to handle each type of award |
itemsContainer |
A container to hold all the award assets inside the UI container | Component of uiContainer We keep track of this to easily destroy this container when replacing it |
previewContainer |
A container to preview the awards | Component of uiContainer We keep track of this to easily destroy this container when replacing it |
scene |
Reference to the phaser scene since different scenes can call this | Access the scene's base managers - input, phase, layer manager |
uiContainer |
Holds the entire user interface for Awards | We keep track of this in order to be able to easily replace the nested containers inside |
| UI Methods | Description | Usage |
|---|---|---|
createUIContainer |
Creates the Awards Menu UI container | Called by the Dashboard Manager the first time the relevant awards page is opened |
Render the background in a Game Location onto Background Layer as specified by assetKey of the Location in State Manager's game map
| Game Loop Methods | Description | Usage |
|---|---|---|
renderBackgroundLayerContainer |
Obtains all asset key for a location and renders background image on entire screen | Called by GameManager on location render |
| Helper Methods | ||
renderBackgroundImage |
Render background image based on asset given key | Called by renderBackgroundLayerContainer to render GameLocation's background image |
| Action Methods | ||
renderBackgroundLayerContainer |
Obtains all asset key for a location and renders background image on entire screen | On change_background action |
Renders all rectangular bounding boxes in a Game Location onto the BBox Layer as specified by BBoxProperty in State Manager's game map, and manages the sprites of all bounding boxes.
| Property Name | Description | Rationale |
|---|---|---|
bboxes |
Mapping between bbox ID and activatable bounding boxes that are present on screen right now. | Indexed by bbox ID so that when updates need to be called on certain bboxes, we can easily rerender/remove this bounding box from screen. |
| Game Loop Methods | Description | Usage |
|---|---|---|
renderBBoxLayerContainer |
Obtains all bbox IDs present in a Game Location and renders each bbox based on BBoxProperty specification | Called by GameManager on location render. |
| Helper Methods | ||
createBBox |
Render 1 rectangular bbox by its bbox id specifications provided by BBoxProperty | Called by renderBBoxLayerContainer repeatedly to render all bboxes individually |
| State Observer Methods | ||
handleAdd |
Renders 1 bbox | Called by State Manager on add_item action |
handleDelete |
Deletes 1 on-screen bbox sprite | Called by State Manager on remove_item action |
handleMutate |
Replaces 1 on-screen bbox sprite with the same character with another property | Called by State Manager on setBBoxProperty action |
Render all characters in a Game Location onto the Character Layer as specified by Character object in State Manager's game map, and manages the sprites of all characters.
| Property Name | Description | Rationale |
|---|---|---|
characterSpriteMap |
Mapping between character ID and sprites of Characters that are present on screen right now. | Indexed by character ID so that when updates need to be called on certain characters, we can easily rerender/remove this character |
| Game Loop Methods | Description | Usage |
|---|---|---|
renderCharacterLayerContainer |
Obtains all character IDs present in a Game Location and renders each character based on Character specification | Called by GameManager on location render. |
| Helper Methods | ||
createCharacterSprite(id) |
Render 1 character by its character id using default expression and position of the character. | Called by renderCharacterLayerContainer repeatedly to render all characters individually |
createCharacterSprite(id, expression, position) |
Renders 1 character with a different expression (based on the different asset keys stored in Character data type) and different position (based on Character constants) |
Called by DialogueSpeakerRenderer to render speaker avatars |
| State Observer Methods | ||
handleAdd |
Renders 1 character | Called by State Manager on add_item action |
handleDelete |
Deletes 1 on-screen character sprite | Called by State Manager on remove_item action |
handleMutate |
Replaces 1 on-screen character sprite with the same character id but with another property | Called by State Manager on move_character and update_character action |
- Given a list of dashboard pages and their respective managers, renders a dashboard UI for the player to view the different pages.
- Implements Game UI as Dashboard is one of the possible game phases.
| Property Name | Description | Rationale |
|---|---|---|
currPageIndex |
The page number that is active | Keep track of which dashboard page is open |
pageChosenContainer |
A container for the "page-chosen" banner sprites at the side of the dashboard | Component of uiContainer We keep track of this to easily destroy this container when replacing it |
pageManagers |
The dashboard page managers used for rendering each dashboard page | Allows different lists of page managers to be supplied when creating the dashboard |
pageMask |
A Geometry Mask over the dashboard page area | Ensures content of dashboard pages are only visible within a certain area of the screen |
pages |
The types of pages that this dashboard has | Allows different lists of pages to be specified when creating the dashboard |
pageUIContainers |
The UI containers of the dashboard pages | Cache UI containers so that each page's container is only created at most once each time the dashboard is opened |
scene |
Reference to the phaser scene since different scenes can call this | Access the scene's base managers - input, phase, layer manager |
uiContainer |
A container holding the dashboard components and all the dashboard pages' containers | We keep track of this in order to be able to activate and deactivate this container when dashboard phase is toggled |
| UI Methods | Description | Usage |
|---|---|---|
activateUI |
Activates the dashboard | Called by scenes when Tab key is pressed or when dashboard icon on toolbar is clicked |
deactivateUI |
Deactivates the dashboard | Called by scenes when Tab key is pressed or when dashboard icon on toolbar is clicked again |
Renders dialogues as specified by Dialogue object retrieved from State Manager's game map.
| Property Name | Description | Usage |
|---|---|---|
dialogueGenerator |
Class which holds a pointer to the current part and line in the Dialogue object, it keeps track of the lines that should play next |
Called by Dialogue Manager on line change |
dialogueRenderer |
Renderer that displays the green box and flashes text using the typewriter effect | Called by Dialogue Manager on line change |
speakerRenderer |
Manager which renders the speaker box speaker avatar | Called by Dialogue Manager on line change |
| Game Loop Methods | Description | Usage |
|---|---|---|
showDialogue |
Plays out an entire dialogue, orchestrating the change in speakers, lines and in-dialogue actions. | Called in Talk mode and during show_dialogue action |
| Helper Methods | ||
playWholeDialogue |
Starts a promise to play the entire dialogue. Attaches listener to green dialogue box, so that when clicked, it can show the next line. | Main function called by showDialogue
|
showNextLine |
Renders one dialogue line, by generating line using dialogueGenerator, rendering the text using dialogueRenderer, changing the speaker using speakerRenderer and processing actions using Action Manager's processActions. If no more lines, it resolves the promise and ends the dialogue. |
Called by playWholeDialogue on start of dialogue and whenever dialogue box is clicked |
- Renders the Escape Menu, which provides options for changing user settings and going back to Main Menu.
- Implements Game UI as EscapeMenu is one of the possible game phases.
| Property Name | Description | Rationale |
|---|---|---|
bgmVolumeRadioButtons |
||
scene |
Reference to the phaser scene since different scenes can call this IGameUI | Access the scene's base managers - input, phase, layer manager |
sfxVolumeRadioButtons |
| UI Methods | Description | Usage |
|---|---|---|
activateUI |
Activates the Escape Menu in the scene. | Called by scenes when Esc key is pressed or when escape menu icon on toolbar is clicked |
deactivateUI |
Deactivates the Escape Menu in the scene. | Called by scenes when Esc key is pressed or when escape menu icon on toolbar is clicked again |
Manages all listeners in the scene. Activates/deactivates these listeners during phase transitions, and destroys all of them at the end of each scene.
| Property Name | Description | Rationale |
|---|---|---|
eventListeners |
List of all mouse event listeners | So that all mouse listeners can be temporarily deactivated during transition, and destroyed when scene is done. |
keyboardListeners |
List of all mouse keyboard listeners | So that all keyboard listeners can be temporarily deactivated during transition, and destroyed when scene is done. |
scene |
Reference to the phaser scene to access the scene's input property | Access different Phaser.Scene's input property |
| Game Loop Methods | Description | Usage |
|---|---|---|
clearListeners |
List of all mouse event listeners | So that all mouse listeners can be temporarily deactivated during transition, and destroyed when scene is done. |
enableKeyboardInput |
List of all mouse keyboard listeners | So that all keyboard listeners can be temporarily deactivated during transition, and destroyed when scene is done. |
enableMouseInput |
List of all mouse event listeners | So that all mouse listeners can be temporarily deactivated during transition, and destroyed when scene is done. |
registerEventListener |
Reference to the phaser scene to access the scene's input property | Access different Phaser.Scene's input property |
registerKeyboardListener |
Reference to the phaser scene to access the scene's input property | Access different Phaser.Scene's input property |
Keeps a default ordering of layers (e.g Background > ... > Objects > BBox > Characters > ... Effects), and corresponding Phaser Container for each layer. This enables other managers to add game objects to their desired layer.
Properties
| Property Name | Description | Usage |
|---|---|---|
layers |
Mapping between layer name and layer container | We store layers by ID so that other managers can easily put game objects to chosen layer |
| Game Loop Methods | Description | Usage |
|---|---|---|
addToLayer |
Adds a game object to a specific layer specified by layer name. | Called by many managers to add desired object into specific layer by name. |
clearLayerContents |
Clears all game objects in 1 layer | Called by many managers to clear a layer so that they can add new game objects to that layer. |
clearSeveralLayers |
Clears all game objects in several layer | Called by managers to clear several layers at once |
clearSeveralLayers |
Clears all game objects in all layers | Used to cleanup the scene |
| Extra Methods | ||
fadeInLayer |
Fades a layer in | As and when effect is needed |
fadeOutLayer |
Fades a layer out | As and when effect is needed |
showLayer |
Makes layer visible | As and when effect is needed |
hideLayer |
Makes layer invisible | As and when effect is needed |
Given the dialogue log from the Dialogue Storage, be able to display the dialogue on the dashboard.
| Property Name | Description | Rationale |
|---|---|---|
scene |
Reference to the phaser scene | Know which scene to render the Game Objects in |
| UI Methods | Description | Usage |
|---|---|---|
createUIContainer |
Creates the Log UI container | Called by the Dashboard Manager the first time the log page is opened |
Render all sprites of objects in a Game Location onto the Objects Layer as specified by ObjectProperty in State Manager's game map, and manages the sprites of all objects.
| Property Name | Description | Rationale |
|---|---|---|
objects |
Mapping between object ID and activatable objects that are present on screen right now. | Indexed by object ID so that when updates need to be called on certain objects, we can easily rerender/remove this object from screen. |
| Game Loop Methods | Description | Usage |
|---|---|---|
renderObjectsLayerContainer |
Obtains all object IDs present in a Game Location and renders each object based on ObjectProperty specification | Called by GameManager on location render. |
| Helper Methods | ||
createObject |
Render 1 object image sprite by its object id ObjectProperty. | Called by renderObjectsLayerContainer repeatedly to render all objects individually |
| State Observer Methods | ||
handleAdd |
Renders 1 object | Called by State Manager on add_item action |
handleDelete |
Deletes 1 on-screen object sprite | Called by State Manager on remove_item action |
handleMutate |
Replaces 1 on-screen object sprite with another property | Called by State Manager on setObjProperty action |
| Action Methods | ||
makeObjectGlow |
Makes one object glow by calling the Glowing Image's glow functions, which makes a yellow tint overlay blink |
Called on make_object_glow action |
makeObjectBlink |
Makes one object blink by calling the Glowing Image's blink functions, which makes the image blink |
Called on make_object_blink action |
Performs state transitions by activating and deactivating modes. Also keeps track of history of previous active states using a stack, so that we can revisit previous active states if needed.
We use Finite State Machine (FSM) model to manage the game phases.
Phases here refers to:
| Phase | In-game Description |
|---|---|
| Menu | the phase when player can choose between modes, commonly Talk, Explore, or Move
|
| Explore | the phase when 'Explore' mode is active |
| Talk | the phase where 'Talk' mode is active |
| Move | the phase where 'Move' mode is active |
| EscapeMenu | escape screen, where player can changes their settings and return to main menu |
| AwardsMenu | award screen, where player can browse their awards |
| Sequence | other phase in game, includes bringing up notification and dialogue |
Internally, we keep a stack of phases to keep track the game phases. Similar to a normal stack, we can perform pop() and push(), with the additional operation of swap() which replace the top element of the stack with the new element.
Renders popups for a specified amount of time.
| Game Loop Methods | Description | Usage |
|---|---|---|
displayPopup |
Display a popup image on the screen, given an object ID, position, duration and size. | |
| Helper Methods | ||
destroyPopUp |
Destroys the current popup | Called by renderBackgroundLayerContainer to render GameLocation's background image |
Renders quizzes as specified by the Quiz object retrived from the State Manager's game map
| Property Name | Description | Usage |
|---|---|---|
quizReactionManager |
Class in charge of displaying reaction after users' response | called by quiz manager
|
quizSpeakerRenderer |
Class in charge of rendering avartar of speakers | called by quiz manager
|
| Game loop methods | Description | Usage |
|---|---|---|
showQuiz |
Taking in the Id of the quiz and rebder the quiz section | Called by GameActionExecuter when the action type is ShowQuiz |
| Helper Methods | ||
showStartPrompt |
Display a prompt before quiz to start the quiz | Called by GameQuizManager when showing the quiz in the method of showQuiz
|
showQuizQuestion |
Display quiz question in the dialogue box and options in prompts | Called by GameQuizManager when showing the quiz in the method of ShowQuiz
|
showReaction |
Display reactions after users make the selection | Called by GameQuizManager when showing the quiz in the method of showQuizQuestion
|
getNumOfQns |
Count the number of questions of the quiz |
Loads user data at the start of entire game, saves game data and saves settings to backend
Normally, game engine stores various game states as 'snapshot' to represent game progress. However within this game action, we are at a unique position as actions are the only way that allow for mutation on the game state (adding/removing/mutating item/state).
This allow us to make space optimisation on how we represent player's progress: a series of completed action's ID.
This leads to the following:
| Type | Method |
|---|---|
| Progress Loading | Simulate all completed actions on the initial checkpoint object, which should bring the state to the same as last player's progress |
| Progress Saving | Store a series of completed action ID |
During simulation of completed actions, we skip actions that does not mutate the state, e.g. bring up a dialogue.
The following is a diagram of when and how loading and saving occurs.

| Game Loop Methods | Description | Usage |
|---|---|---|
loadLastSaveState |
Loads the last save state from backend into Save Manager's fullSaveState | Called by Entry Scene at start of game |
saveGame |
Updates the fullSaveState with information from State Managers and Game Managers, and then sends fullSaveState over to backend. | Called by Action Manager after series of actions are performed. |
saveSettings |
Updates the settings in fullSaveState, and sends the fullSaveState over to backend | Called by GameManager on location render. |
saveChapterComplete |
Updates fullSaveState's biggestChapterCompleted, and then sends the fullSaveState over to backend | Called by Checkpoint Transition to mark that a player has completed a chapter. |
| getter methods | Obtains a particular field in fullSaveState | Called throughout game to retrieve information from last save state |
- Plays and pauses plays background music throughout the game with the volume specified in user settings
- Plays sound effects with volume specified in user settings
Manages user progression throughout the game by keeping track of SSOT - game map which contains dynamic information about the objects, characters and other entities in each location. Also keeps track of user progression throughout the game by updating checkpoint objectives completed, full set of interactions triggered by user, and array of triggered state-change actions.
| Property Name | Description | Rationale |
|---|---|---|
checkpointObjective |
List of objectives in the game, mapped to a boolean of whether or not they've been completed by user. | Keep track of how far user has completed all the objectives for the checkpoint. |
gameMap |
Contains dynamic information about entities (objects, characters, modes, etc.) in each location.
|
Keep track of game map as single source of truth about entities the game |
subscribers |
Mapping between game item type ID and manager that handles this item. | Be able to easily contact the managers to rerender particular objects on add_item, remove_item or mutate actions. |
triggeredInteractions |
Map of interactions and whether or not they have been triggered | Marks talk topics, objects, etc items as having been interacted with, so we can show the tick mark in Talk/Explore mode. |
triggeredStateChangeActions |
Ordered array of state-change actions. State-Change actions are those that permanently change the state of the game map. | Keep track of entire list of state-change actions user has triggered so that whenever we load the game, we can replay these actions and fast-forward to the newest state of the game map. |
updatedLocations |
Set of locations which need to have the notification because they have updates. Note: All locations have notifications at start of game. | Keep set of updated locations to notify players that location has been updated. (Players see this as the green notif with location's name when visiting an updated location) |
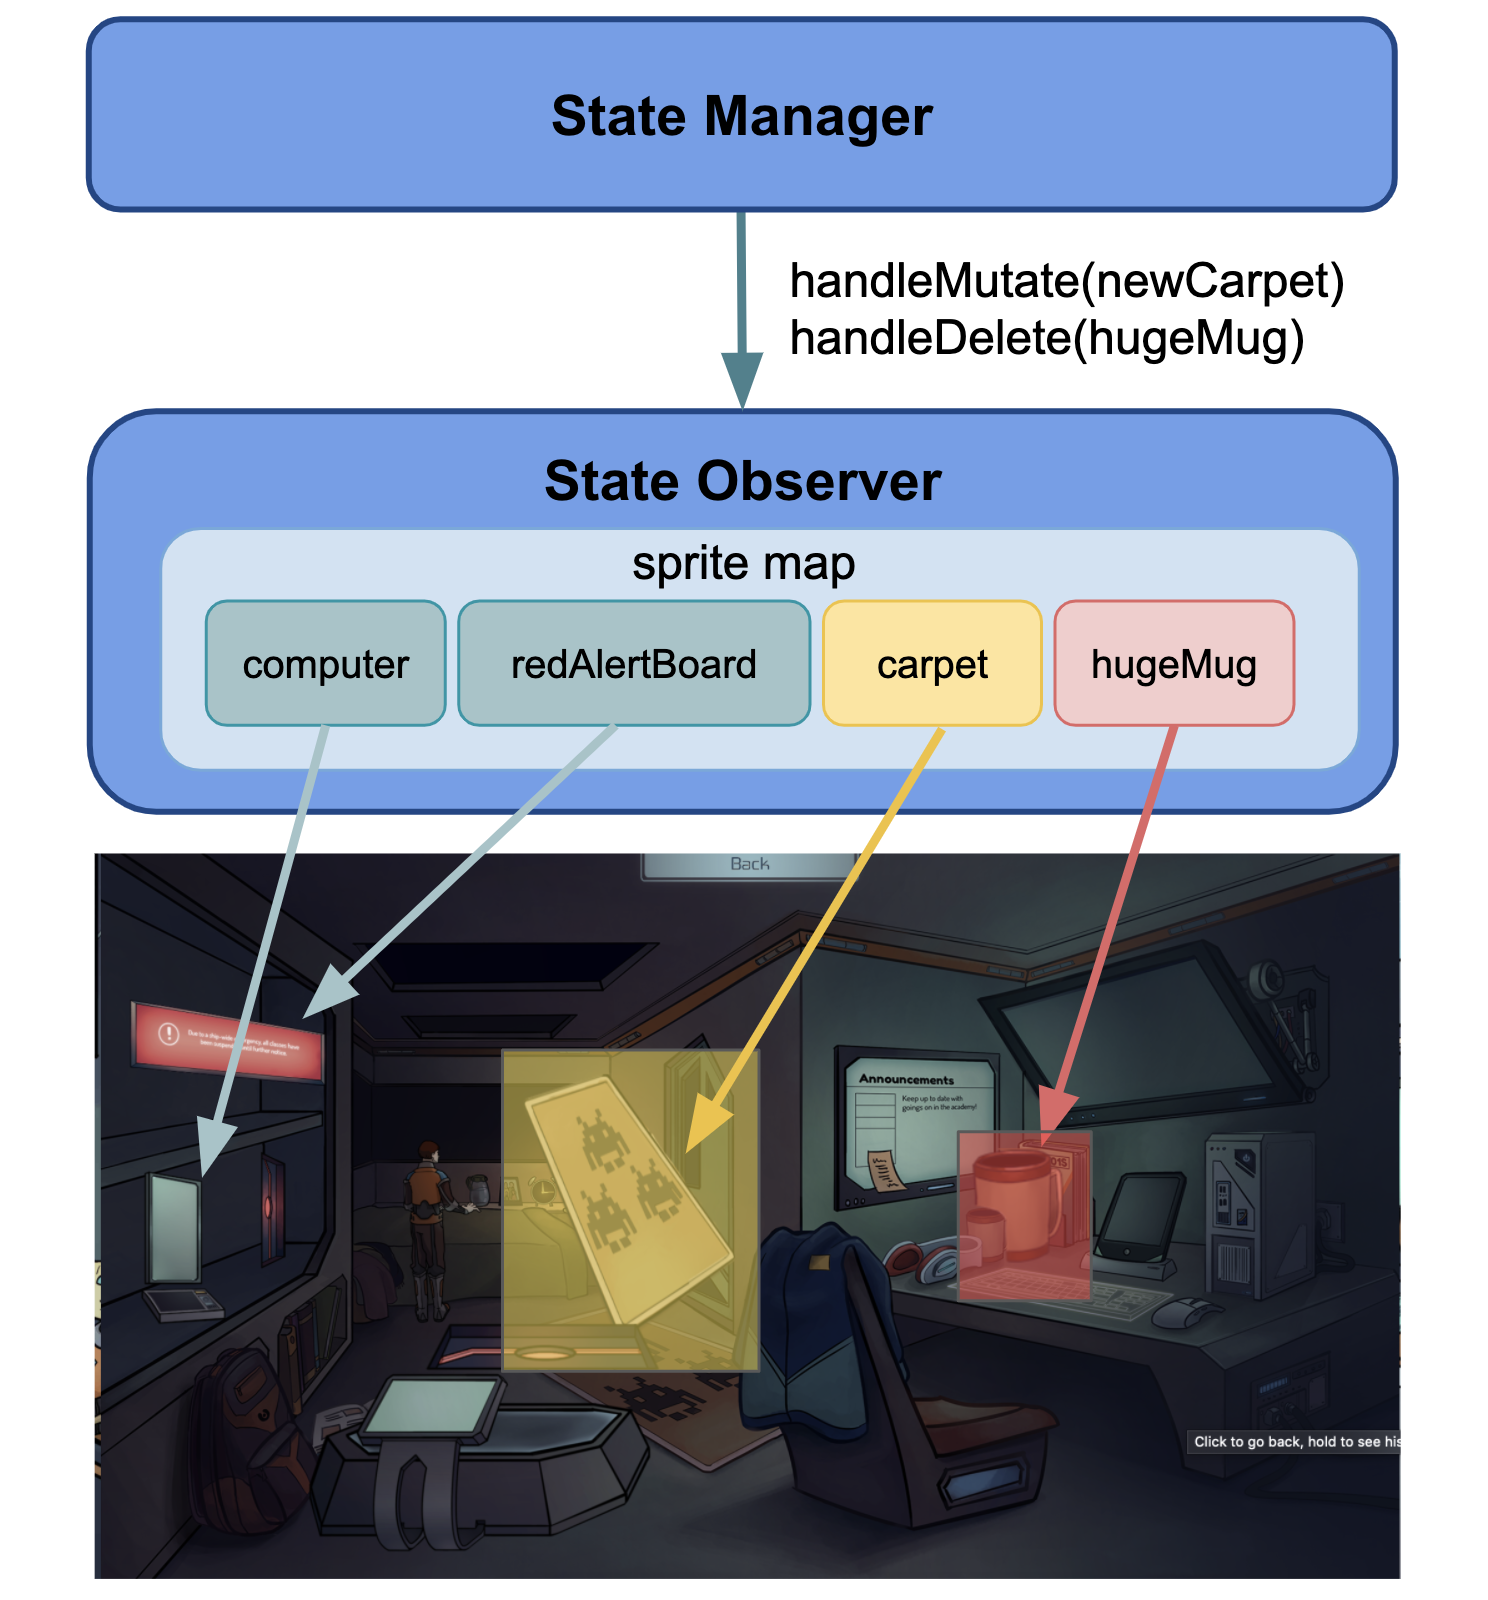
This is how state-change actions occur in the game.

The following is what happens when state-change actions occur:
Firstly, the game map has to be updated because any state-update involve a permanent mutation to the game map. Thus, we need to update the SSOT, which is State Manager's gameMap for rendering of locations later on.
Next, we see if the state-change involves the current location. If it does, then we need to be able to respond to the change instantaneously. That is why we contact the State Observers to handle the addition/removal/mutation of a particular entity.
If on the other hand, the state-change involves a location other than the current one, then we simply note that the location has been updated. If so, we can show the users the updated-location notification later on when he visits this location.
Lastly, because we have triggered a state-change action, we have to note the action id down, so that these actions can be replayed whenever player revisits this checkpoint.
Given the list of tasks available, be able to display a list of completed and incomplete tasks on the dashboard.
| Property Name | Description | Rationale |
|---|---|---|
scene |
Reference to the phaser scene | Know which scene to render the Game Objects in |
| UI Methods | Description | Usage |
|---|---|---|
createUIContainer |
Creates the Task Log UI container | Called by the Dashboard Manager the first time the task log page is opened |
Renders the toolbar at the top right corner of the screen.
| Property Name | Description | Rationale |
|---|---|---|
scene |
Reference to the phaser scene | Know which scene to render the Game Objects in |
uiContainer |
Holds the entire user interface for the Toolbar | Contains the buttons that make up the Toolbar |
| UI Methods | Description | Usage |
|---|---|---|
renderToolbarContainer |
Renders the toolbar to the screen | Called by the Game Manager in every location |
Manages states related to the player, available regardless of which checkpoint player is at. Stores achievements, collectibles, and assessments completed by the user.
Within the game engine, we differentiate two states: User State and Game State. Specifically,
| Type | Description | Manager |
|---|---|---|
| User State | States unrelated to the checkpoint, and exclusive to the player e.g. players' collectible and achievements | User State Manager |
| Game State | States related to the checkpoint, and exclusive to the checkpoint e.g. triggered actions, mapping between ID and properties, players' progress | State Manager |
The two manager acts as single source of truth (SSOT) within the game engine.
As the user state is independent of the checkpoint object and only need to be loaded in once, we load it within the Entry scene into the User State Manager. Meanwhile, State Manager is only loaded once checkpoint object is loaded.
NOTE: In implementation, State Manager stores the GameMap directly and mutate it as checkpoint story progresses. This is because GameMap already provides the functionality needed to mutate its properties, and we do not want to replicate the functionality at the State Manager. However, having State Manager storing the GameMap causes many explanation to be difficult to get across. Hence for the sake of simplicity, the explanation within this guide will treat the GameMap and State Manager to be separate.
All Parser classes are static classes. They all modify the public gameCheckpoint: GameCheckpoint variable in Parser.ts. This prevents the need to pass down the game checkpoint object, or for the need to return objects in each function.
In order to parse the two files needed for a checkpoint, (1) default checkpoint text, as well as (2) "checkpoint txt file", we simply call the Parser's "parse" twice with a different text file. During the first call, the Parser is reset and creates a new Checkpoint object. During the 2nd call, we simply mutate and add on to the same Checkpoint object. In the end, we return the Checkpoint object that was created using 2 "parse" calls.
The parser works by recursively splitting the text checkpoint file into "paragraphs", and dealing with those paragraphs individually. A paragraph is defined by a header and an 4-space/tab indented body (the body can contain lines and further paragraphs).
Sample text:
header1
    line3
    line4
header5
    line6
        line7
        line8
    line9
    line10
        line11
    line12
This sample text has 2 paragraphs. The splitToParagraph function will split this text into into header and body lines[], and produce the following:
| Header | Body Lines |
|---|---|
header1 |
[line3, line4] |
header5 |
[line6, \tline7,\tline8,line9,line10, \tline11,line12] |
Notice that the body lines's first tab has been removed by the splitToParagraph function. However line7, line8, and line11 still have their tabs with them, so that we can preserve the tab hierarchy within the 2nd main paragraph's body.
Here is how the 2nd body paragraph can be split further into several paragraphs:
| Header | Body Lines |
|---|---|
line6 |
[line7, line8] |
line9 |
[] |
line10 |
[line11] |
line12 |
[] |
The main class is Parser.ts. This splits the paragraph into its main constituents and assign the job of reading other paragraphs to other parsers: Dialogues, Actions, Locations. etc. Likewise, a location paragraph can assign its body paragraphs for other parsers to interpret, such as Objects, Characters, and Bounding Boxes.
We use the LocationDetails.ts paragraph to parse the paragraph with locations as the header.
We use the Location.ts paragraph to parse paragraph with a location ID as the header. You may use a similar naming convention if you need to distinguish between a specific header or a general header.
Base entities such as objects and bounding boxes typically perform the following roles:
- Create the object/bbox/character with properties using
splitfunction for CSV properties. - Register the object into the gamemap's Map<ItemId, Entity> file.
- Parse actions and register actions into gameMap, and place their actionIds inside the entity property.
- Possibly add the entity to a particular location where it should be found.
Class that converts any string into int/enum used in the game.
Actions, like most entities also have ID's and have an Object representation format.
A string such as add_item(objects, room, car, 3) will be converted to an action object such as the following:
{
  actionType: GameActionType.AddPopup
  actionParamObj: {gameItemType: objects, locationId: room, id: car, duration: 3
  actionCondition: {}
}
The concept is the Command Pattern much like Redux action objects, where we use objects to encapsulate data on actions that can be triggered later.
All of these actions are stored in GameMap's actions Map<ItemId, Action>.
Unlike most entities, the action has action IDs are not defined by the storywriter, but are generated by numerically and like this: action#17. The action IDs are then stored inside the object that can trigger the action.
The class, Parser Validator, validates the Checkpoint object before it is played by the engine. It ensures two things:
It does this by keeping a set of ID's and checking whenever you add a new one, that the set of ID's is unique and has not been previously declared. Otherwise, error is thrown.
Some lines in the text file require that variables of certain type be declared. e.g. show_dialogue(hi) means that hi must be a valid dialogue ID, or change_location(hallway) means that hallway is an actual location ID.
We cannot throw error on when variable is used without declaration, since usage/reference of ID can come before declaration of the ID. Thus, the solution is to store a list of assertions inside Parser validator. We store all the assertions such as assert hi is a dialogue ID or hallway is a location in a Map<Assertion Type, Assertion IDs []> data structure format.
Then, just before returning the checkpoint object, we verify all the assertions are correct by checking the gameCheckpoint for whether all ID's have been declared.
This way, we can make type assertions for IDs anywhere during the parsing process even without having previously declared the ID.
This special file is not really part of the Parser.ts set of classes, as it is not called when creating the gameCheckpoint. It just parses collectibles and achievements and produces an Awards Mapping object, encapsulating data about what assets correspond to which achievement/collectible.
The txt file can be highlighted by using the following extension Source Academy Syntax Highlighter The following lines are highlighted:
- Comments - anything beginning with double-slash (though not supported by parser)
- Functions - anything behind the parenthesis
- Keywords - boundingBoxes, objects, actions etc, you name it are all highlighted
- CharacterIds - Anything beginning with @symbol
- URLs - Anything beginning with a slash
- Numbers - All digits

Game Manager is where the entire game play happens. Many of the managers are entirely dependent on Game Manager, and thus exclusive to the Game Manager scene. In general, Game Manager is responsible for the following:
- Dictate condition for showing/hiding character layers
- Dictate condition for progressing to the next checkpoint
- Manages location change, as well as prompting rendering of necessary objects
- Executes fast forward actions to bring starting game state to last played state
- Executes start action and story complete action
- Bring up Location Notification
These duties are helped by the respective managers that are under Game Manager.
Game Manager manages the rendering of a location when user navigates to the location. In particular, it does the following:
- Play the BGM of the current location. Even if there is no BGM key attached, will stop the previous BGM.
- Render the background, objects, bounding boxes, and character layers of the location. These layers are available irregardless of the current
Modethat user is in, hence needs to be rendered beforehand. - Execute fast forward actions, if required
- Execute start action of chapter, if required
- Bring up notification, if required
- Swap phase to Menu Mode
From users' perspective, normal game play starts after phase swap to Menu Mode is done; hence it must be done last.
Fast forward actions and start action is done within location rendering instead of create() due to the following reason:
- Fast forward actions & start action may display something on the screen. If we perform this at
create(), thus before the location is rendered, the results of the actions will be rendered on top of un-rendered location i.e. black screen.
We sequentially execute fast forward actions to bring the initial game state to the latest played game state. This is only done on the first location render i.e. triggered from the create() function. This ensures that we do not execute fast forward actions every time.
We perform start action of chapter on the first location render i.e. triggered from the create() action. This obey the definition of start action, where it is only executed when the chapter is loaded.
Notification is only triggered if the location has a notification update. Notification update is added to the location if there is a recent change to the location (e.g. addition/removal of mode, addition/removal of items) since last visit.
Progression to next checkpoint is handled as an interrupt callback in the Phase Manager. In other words, we check whether user can progress to the next checkpoint during every phase transition.
Character Layer is handled as a transition callback in the Phase Manager. Character Layer is only shown when it is Menu Mode. Other than that, the character layer will be hidden.
CMR is an extension to the Game, where we allow student to customise their room layout using Source. This section details the complete workflow of CMR. We provide a diagram to explain the overall flow of CMR.

We face similar issue to Checkpoint Transition and Entry, where informations that is loaded without using this.load method by Phaser is not awaited in preload(). As the assets loading comes from students' code which require evaluation of students code in JS-slang (thus not using this.load), we perform manual assets loading within create().
All the load_ function provided to the students e.g. load_image, load_spritesheet, simply populate a map to store all the assets to be loaded later. We then make use of this map to load the required assets during create().
Within the CMR, students can display the assets associated with the award rewarded to them. Some award is associated with an asset key, which can be fed into create_award function at the game.js. If the given asset key is valid, a verification tag will be added onto the award asset when user hover over the award.

We provide a way to verify that an award comes from create_award function and not uploaded manually via load_image and create_image function. On hover, a verified tag should pop up to indicate that the asset comes from create_award. The award verification tag should be difficult, or impossible, to be replicated by the students in order to guarantee (to an extent) the authenticity of the award. The same idea is found in money forgery, where a feature that is difficult to be duplicated is used to distinguish between the real and the fake.
The rationale of adding verification is due to the flexibility of create_image function and the possible future feature of being able to visit others' room.
- Students can easily discover the URL of the asset being used (although a public secret, we will not state here), and simply create a fake award using the
create_imagefunction. - Once the possible feature of being able visiting others' room is implemented, there can be greater temptation for students to forge their own awards.
As we do not want to discount students who has the integrity of attaining the awards, we provide a way to check for authenticity of awards.
The background used within the CMR changes as students complete their assessments. The default background of CMR is based on the assessment that fulfilled the following:
Submitted assessment that has the most recent close date
We use the assessment ID that fulfilled the requirement to determine the default background of CMR. If there is no mapping for that ID, we use a fallback, that is submitted assessment with the next closest close date.
We will continue using this rule until we find a valid mapping. If there is no valid mapping, we use the default background of CMR instead.
The mapping between an assessment ID and the background to be used is stored at S3 under the name roomPreviewMapping.txt. The details of which can be seen under Text Mapping.
The Source API for game functionalities are at game.js at modules repo. In order to use it within the code, simply import the necessary functions to be used.
import { .... } from 'game';

// Your CodeThe game.js require parameters to run with, which is provided through JS-slang context created by the Room Preview scene. We pass all necessary information, such as reference to the scene, constants, and utilities through the context.
We make use of runInContext function, provided by JS-slang, to run the student code and the library with the required context. Notably, runInContext also update the context every time it is run.
runInContext behaviour is to append a new frame to its .nativeStorage.globals on every run, which implies more and more memory is consumed to store the frames created on every runInContext execution.
For update(), we need to run runInContext as often as the game FPS, which would lead to out of memory error due to the runInContext behaviour. Thus, we replace the current context with the updated one instead of appending it to workaround the behaviour.
Internally, we execute preload(), create(), and update() function at the corresponding Phaser life cycle functions. Hence, there should be a preload(), create(), and update() function present at the students code. Removing or lacking any of the 3 functions from the code will lead to errors.
Unlike other scenes, we do not construct the managers at the init() or preload(). This is primarily to ensure that the Layer Manager sits in front of the students' program. Else, whatever added to the Layer Manager will be covered by objects added to the student. Afterwards, we construct other managers that dependent on Layer Manager.
Layer Managerinternally works with containers. However, many of Phaser capabilities do not work well once integrated with containers (e.g. mask or animations), which limits the students' capability in customising their room. This leads to student code to not be integrated withLayer Manageri.e. added manually into the scene.
For CMR, the following constraints must be fulfilled for the storing and fetching of the code:
- Code ownership must be clear i.e. code must be able to be associated with a unique student ID
- Code must be readily fetch-able from any machine i.e. should not depend on local cache
- Code must easily be stored
- Student must be able to resume their code writing i.e. need not to write the code from scratch every time
We realise that Source Academy's mission (or internally known as assessment) fulfills all of the required conditions. Hence, we make use of the Mission system within Source Academy to provide a platform where student can write the code for CMR. This allow students to code in a familiar environment (assessment workspace).
CMR will then fetch the code from the mission to be used to render the Room Preview scene. The CMR code is fetched at the Entry scene. This means that in order to reflect the users' code output in CMR, users must refresh their game.
Until automated testing is in place, please ensure that the following test passes. These are what usually 'breaks' after changes.
- If a new feature is added & exposed to story writers, include it in the
mockChapter0.txtfor future testing
- Should be functional at both CMR and normal gameplay.
- Can be transitioned into and out smoothly during Start Action and Story Complete Action
- Locked achievements/collectibles should have their asset keys hidden
- Should be functional at both CMR and normal gameplay.
- Can be transitioned into and out smoothly during Start Action and Story Complete Action
- Apply setting button should functional i.e. apply the settings
- Trigger all the actions at
mockChapter0.txtand ensure they are all working properly.
- BGM transition from one location to another. The previous BGM should fade out.
- BGM transition from Main Menu to in-game. The previous BGM should fade out.
- While 'Entry' scene is loading, navigate away from
/academy/game. BGM should not play. - Navigate to another URL, say
/playground. BGM should stop. - Navigate to another URL and back to the game. BGM should start normally.