This is a guide for arch linux installation with Openbox Window Manager.
- Arch Linux now comes with an installer, so if you just want a minimal system ready in a few minutes, you're better off just doing
archinstall
- The only officially supported architecture by Arch Linux is x86_64, so make sure your computer uses that architecture before attempting to install it.
- This guide is for UEFI only, not BIOS.
- so you should enable the UEFI mode and disable the secure boot option on your BIOS system. (Also remember to change the boot order to boot through your USB device).
First of all, you need the Arch Linux image, that can be downloaded from the Official Website. After that, you should create the bootable flash drive with the Arch Linux image.
- Write the Arch Linux ISO into a USB drive. There are several tools available for this, like dd, balenaEtcher.
If you're on a GNU/linux distribution, you can use the dd command for it. Like:
dd bs=4M if=/path/to/archlinux.iso of=/dev/sdx status=progress oflag=sync && syncNote that you need to update the
of=/dev/sdxwith your USB device location (it can be discovered with thelsblkcommand).
Otherwise, if you're on Windows, you can use balenaEtcher or Rufus.
You can follow this tutorial
-
Disable Secure Boot in the UEFI.
-
Boot from the USB drive.
To check if the UEFI mode is enabled, run:
ls /sys/firmware/efi/efivarsIf the directory does not exists, the system may be booted in BIOS (not UEFI).
https://help.uaudio.com/hc/en-us/articles/213195423-How-To-Disable-Fast-Startup-in-Windows-10
Time to connect to the Internet:
-
If you're not going to use DHCP, check the Arch Wiki on how to manually set a static IP.
-
If you're using a wired connection (recommended), it should already be working.
-
If you're using a wireless connection, the live system comes with
iwdenabled, so you can useiwctl.iwctl's man page (man iwctl) shows a simple example on how to connect to a network.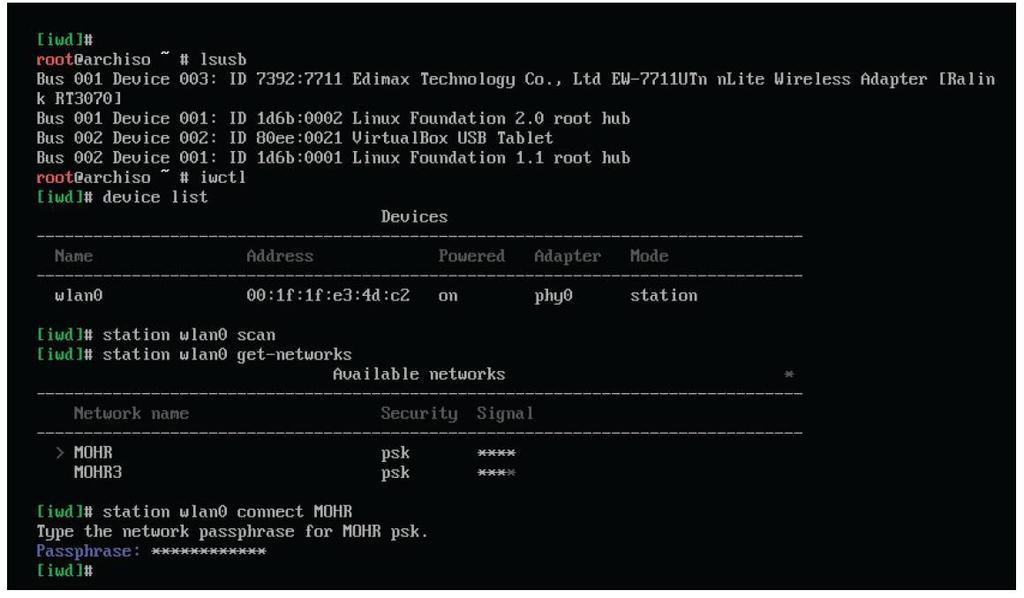
-
If scanning with
iwctlisn't working (you get no networks found), simply dosystemctl restart iwdand try again. -
Do
ping -4c4 archlinux.orgto verify that everything is working properly.ping -4c4 archlinux.org
Ensures that the system clock is accurate.
timedatectl set-ntp trueFirst, define your partitions size. There's no rules about this process.
Tip: If you use a SSD drive, it's recommended to leave 25% of his storage free. More info here.
My SSD has 512GB of storage. I want to have Dual-Boot with Windows11. If Windows was installed first, then you could see it's partitions. For that example, I have 4 Windows partitions already created:
(in my case, I'll work with /dev/nvme0n1 disk. Use fdisk -l /dev/nvme0n1 to list partitions)
| Name | Size | Type |
|---|---|---|
| nvme0n1p1 | 625M | Windows recovery environment |
| nvme0n1p2 | 100M | EFI System |
| nvme0n1p3 | 16M | Microsoft Reserved |
| nvme0n1p4 | 356G | Microsoft Basic Data |
EFI partition was created by Windows, so we don't need to care about it. We need to create additional partitions for Linux installation.
| Name | Mount | Size | Type |
|---|---|---|---|
| nvme0n1p5 | swap |
4G | Linux Swap |
| nvme0n1p6 | / |
32G | Linux Root x86-64 (Ext4) |
| nvme0n1p7 | /home |
Remaining Space | Linux Home (Ext4) |
Look at partitioning layout examples: https://wiki.archlinux.org/index.php/partitioning#Example_layouts
Use fdisk to create partitions.
To create partitions, I'll use gdisk since to work on UEFI mode we need GPT partitions.
First, list partitions (Informational only) with the following command
fdisk -l /dev/nvme0n1Here's a table with some handy gdisk commands
| Command | Description |
|---|---|
| p | Print partitions table |
| n | Add a new partition |
| d | Delete a partition |
| w | Write table to disk and exit |
| l | List known partition types |
| t | Change a partition type |
| m | Help |
-
Enter in the interactive menu
fdisk /dev/nvme0n1
-
Create boot partition (If not Dual-Boot)
- Type
nto create a new partition - Partition Number: default (return)
- First Sector: default
- Last Sector:
+512M - Type:
1- EFI System
- Type
-
Create root partition
- Type
nto create a new partition - Partition Number: default
- First Sector: default
- Last Sector:
+32G - Type:
24- Linux Root (x86-64)
- Type
-
Create swap partition
- Type
nto create a new partition - Partition Number: default
- First Sector: default
- Last Sector:
+4G - Type:
19- Linux Swap
- Type
-
Create home partition
- Type
nto create a new partition - Partition Number: default
- First Sector: default
- Last Sector: default
- Type:
28- Linux Home
- Type
-
Save changes with
w
Once the partitions have been created, each (except swap) should be formatted with an appropriated file system. So run:
mkfs.btrfs -L arch_root /dev/nvme0n1p6  #-- root partition
mkfs.btrfs -L HOME /dev/nvme0n1p7       #-- home partition
If not Dual Boot format partition for EFI boot
mkfs.fat -F32 -n BOOT /dev/nvme0n1p2 #-- boot partitionThe process for swap partition is slight different:
mkswap -L swap /dev/nvme0n1p5
swapon /dev/nvme0n1p5
To check if the swap partition is working, run
swapon -sorfree -h.
-
Mount root partition:
mount /dev/nvme0n1p6 /mnt
-
Mount home partition:
mkdir -p /mnt/home
mount /dev/nvme0n1p7 /mnt/home
-
Mount boot partition: (to use
grub-installlater)mkdir -p /mnt/boot mount /dev/nvme0n1p2 /mnt/boot
Do
lsblkto verify everything is correct.
Now we'll install arch on disk
Before installation,It is recommended to select the best mirror servers.
So open the file /etc/pacman.d/mirrorlist (again, you can use nano or vi to do that) and move the best mirror to the top of the file.
Tip: That link generates a mirror list based on your location, you can use them as reference.
Now that the mirrors are already set, use pacstrap to install the base package group:
Open the file /etc/pacman.conf and uncomment the line #ParallelDownloads = 5
pacstrap /mnt base{,-devel} btrfs-progs dkms linux{{,-lts}{,-headers},-firmware} nano- If the install failed because of signature issues, run below command to update the keyring and try again
pacman -Sy --needed archlinux-keyring
Now you should generate the fstab with the genfstab script:
genfstab -p /mnt >> /mnt/etc/fstabOptional: You can add
noatime,commit=60,barrier=0to the generatedfstabfile (on root and home partitions) to increase IO performance. https://wiki.archlinux.org/index.php/ext4#Improving_performance
Now, we'll change root into the new system
arch-chroot /mntpacman-key --init
pacman-key --populate archlinux-
Again open the file
/etc/pacman.confand uncomment the line#ParallelDownloads = 5nano /etc/pacman.conf
-
Uncomment this line
#ParallelDownloads = 5 -
Press
CRTL + Sto save andCRTL + Xto exit
Install some important packages with
pacman -S dhclient git man-{db,pages} nano networkmanager openssh polkit vi vim-
Edit the file
/etc/NetworkManager/conf.d/dhcp.confto contain the following:[main] dhcp=dhclient -
Edit the file
/etc/NetworkManager/conf.d/dns.confto contain the following:[main] dns=systemd-resolved -
If you want to enable mDNS support, which is useful for adding network printers for example, do the following:
-
Edit the file
/etc/systemd/resolved.confand uncomment the line#MulticastDNS=yes -
Edit the file
/etc/NetworkManager/conf.d/dns.confand add the following lines:[connection] connection.mdns=2
-
-
Do
ln -svf /usr/share/zoneinfo/$(tzselect | tail -1) /etc/localtimeto set your timezone. -
Example
ln -svf /usr/share/zoneinfo/Asia/Kolkata /etc/localtime
-
Then, do
hwclock -wto update the hardware clock. -
You can do
hwclock -rto see the current time stored by the hardware clock. You'll notice that it takes the timezone into account.
-
Open the file
/etc/locale.gen. Uncomment theen_US.UTF-8and any other locales you want to use. -
Do
locale-gento generate the uncommented locales. -
Do
echo LANG=LOCALE > /etc/locale.conf, LOCALE being your preferred locale from the ones you just generated. -
Example
echo LANG=en_US.UTF-8 > /etc/locale.conf -
Now you'll have to execute the following command:
locale-gen
-
Do
echo KEYMAP=KEYMAP > /etc/vconsole.conf, KEYMAP being the name of the keymap you're using (set when you used theloadkeyscommand earlier). -
Example:
echo KEYMAP=mac-us > /etc/vconsole.conf
-
Do
echo FONT=lat0-16 >> /etc/vconsole.conf. You can find all fonts available in/usr/share/kbd/consolefonts.
-
Do
echo HOSTNAME > /etc/hostname, HOSTNAME being the name you want your system to have. -
The hostname must be compatible with the following regex expression:
^(:?[0-9a-zA-Z][0-9a-zA-Z-]{0,61}[0-9a-zA-Z]|[0-9a-zA-Z]{1,63})$. -
You can click here and put the hostname you want your computer to have in the text field to see if you can actually use it.
-
Edit the file
/etc/hoststo contain the following:# Static table lookup for hostnames. # See hosts(5) for details. 127.0.0.1 localhost ::1 localhost 127.0.1.1 HOSTNAMENote: HOSTNAME being the hostname you chose in the previous command.
-
Enable some services with
systemctl enable sshd NetworkManager systemd-resolved -
If you have an SSD, do
systemctl enable fstrim.timer -
Run below commad for the system to automatically update the pacman keyring.
systemctl enable archlinux-keyring-wkd-sync.timer
-
Edit the file
/etc/mkinitcpio.confand changeudevtosystemdin theHOOKSlist. https://wiki.archlinux.org/index.php/Installation_guide#Initramfs -
Creating a new initramfs is usually not required.
mkinitcpio -P linux
You may want to set a password for the root user because why not? To do so, execute the following command:
passwdThe passwd command lets you change the password for a user. By default it affects the current user's password which is the root right now.
It'll ask for a new password and confirmation password. Input them carefully and make sure you don't forget the password.
According to PCMag,
A set of elementary instructions in a complex instruction set computer (CISC). The microcode resides in a separate high-speed memory and functions as a translation layer between the machine instructions and the circuit level of the computer. Microcode enables the computer designer to create machine instructions without having to design electronic circuits. Processor manufacturers such as Intel and AMD often release stability and security updates to the processor. These updates are crucial for the system's stability.
In Arch Linux, microcode updates are available through official packages that every user should install on their systems.
Just installing these packages is not enough though. You'll have to make sure that your bootloader is loading them. You'll learn about it in the next section.
- Time to install the microcode updater:
-
If you're using an Intel CPU, do
pacman -S intel-ucode
-
If you're using an AMD CPU, do
pacman -S amd-ucode
-
-
Run below command to install grub and efibootmgr.
pacman -S grub efibootmgr os-prober
-
If you're dual-booting with other operating systems, you'll have to enable os-prober before generating the configuration file. To do so, open the
/etc/default/grubfile in nano text editor. Locate the following line and uncomment it:# GRUB_DISABLE_OS_PROBER=falseThis should be the last line in the aforementioned file so just scroll to the bottom and uncomment it.
-
Then do
grub-install --target=x86_64-efi --efi-directory=/boot --bootloader-id=Arch\ Linux -
Then do
grub-mkconfig -o /boot/grub/grub.cfg -
Do
exitand thenumount -R /mnt. -
You can now do
shutdown now.
But we're not done yet. We still have to create a user and do some final touches
-
Start by logining in as
root. Doln -svf /run/systemd/resolve/resolv.conf /etc/resolv.conf.ln -svf /run/systemd/resolve/resolv.conf /etc/resolv.conf
sudo pacman -S zsh
-
Change
root's shell by doingchsh -s /bin/zsh. -
Do
timedatectl set-ntp trueandtimedatectl statusagain to make sure the time is setup correctly. The RTC and Universal time should be in UTC and the Local time in your timezone.
-
Now add a user by doing
useradd -m -U -G wheel -s /bin/zsh -c "REAL NAME" USERNAME, REAL NAME being the user's real name, and USERNAME a valid username. Example:useradd -m -U -G wheel -s /bin/zsh -c "Sumith Emmadi" sumithemmadi -
Usernames in Unix-like OSs are valid if they're compatible with the regex expression
^[a-z_]([0-9a-z_-]{0,31}|[0-9a-z_-]{0,30}\$)$. -
You can check if a username is valid by clicking here.
-
Set the user's password with
passwd USERNAME. Example:passwd sumithemmadi
-
Finally, you'll have to enable sudo privilege for this new user. To do so, open the
/etc/sudoersfile using nano. Once open, locate the following line and uncomment it:# %wheel ALL=(ALL:ALL) ALL -
Add the line
Defaults pwfeedback, preferably before## Runas alias specificationin same file, if you want asterisks when inputting your password. -
This file essentially means that all users in the wheel group can use sudo by providing their password. Save the file by hitting Ctrl + S and exit nano by hitting Ctrl + X. Now the new user will be able to use sudo when necessary.
-
Do
nmtuiand setup your Internet connection. -
Open the file
/etc/pacman.confand perform the following:- Uncomment the line
#ParallelDownloads = 5. - Uncomment the line
#[multilib]and the line below it.
- Uncomment the line
-
Do
pacman -Syuto updatepacman's configuration and to perform any updates available. -
Reboot by doing
shutdown -r now.
-
Login as the user you've created. In the ZSH configuration, continue to configure zsh or press q to quit if you already have a configuration in your dotfiles.
sudo pacman -S bat lm_sensors neofetch
Installing Paru in Arch Linux is easy!
-
First, install git and base-devel package group that includes tools needed for building (compiling and linking) packages from source.
sudo pacman -S --needed git base-devel
-
Git clone Paru repository using command:
git clone https://aur.archlinux.org/paru-bin.git
This command will download the contents of the Paru GitHub repository in a local directory named paru-bin.
-
Change into the paru directory:
cd paru-bin -
Finally, build and install Paru AUR helper in Arch Linux using the following command:
makepkg -sri
-
After the installation is done, do
cd .., and thenrm -rf paru-bin. -
Now you can use
parufor install packages from AUR -
From now on we'll be using
paruinstead ofsudo pacman.paru -S xdg-user-dirs pacman-cleanup-hook
-
Setup zsh with oh-my-zsh framework.
paru -S oh-my-zsh-git oh-my-zsh-plugin-syntax-highlighting oh-my-zsh-plugin-autosuggestions
Follow this tutorial
To connect the headphone:
-
Install required packages:
sudo pacman -S pulseaudio pulseaudio-bluetooth pavucontrol bluez-utils
-
Edit
/etc/pulse/system.paand add:load-module module-bluez5-device load-module module-bluez5-discover
-
Connect to bluetooth device
$ bluetoothctl
# power on
# agent on
# default-agent
# scan on
# pair HEADPHONE_MAC
# trust HEADPHONE_MAC
# connect HEADPHONE_MAC
# quit
To auto switch to A2DP mode:
-
Edit
/etc/pulse/default.paand add:.ifexists module-bluetooth-discover.so load-module module-bluetooth-discover load-module module-switch-on-connect # Add this line .endif -
Modify (or create)
/etc/bluetooth/audio.confto auto select AD2P profile:[General] Disable=Headset
-
Reboot PC to apply changes
reboot.
Installing Openbox
-
To have audio, do
paru pipewireand select the following packages:extra/pipewireextra/pipewire-alsaextra/pipewire-jackextra/pipewire-pulseextra/wireplumbermultilib/lib32-pipewiremultilib/lib32-pipewire-jack
or
paru -S \
  extra/pipewire \
  extra/pipewire-alsa \
  extra/pipewire-jack \
  extra/pipewire-pulse \
  extra/wireplumber \
  multilib/lib32-pipewire \
  multilib/lib32-pipewire-jack
-
For fonts, run below command
paru -S noto-fonts{,-{cjk,emoji,extra}} ttf-fira-code -
To install Rust (which we'll need to compile packages from the AUR):
- Do
paru -S rustup. - Do
rustup default stable.
- Do
-
I use a simple TUI greeter. To install it, do
paru -S greetd{,-tuigreet}.- For the provider of
greetd, simply selectgreetd.
- For the provider of
-
Edit
/etc/greetd/config.toml:- Change the
commandsetting totuigreet -itrc 'systemd-cat -t xinit xinit -- :1'.
- Change the
-
Do
sudo systemctl enable greetd. -
For the base of the graphical environment, do
paru -S alacritty openbox xorg-{server,xinit}.-
Get the default configuration files by doing the following commands:
cp /etc/X11/xinit/xinitrc ~/.xinitrc.cp /etc/X11/xinit/xserverrc ~/.xserverrc.
-
Edit
~/.xinitrcand replace the last block of commands withexec openbox-session. Remove all last lines fromtwm &to last line.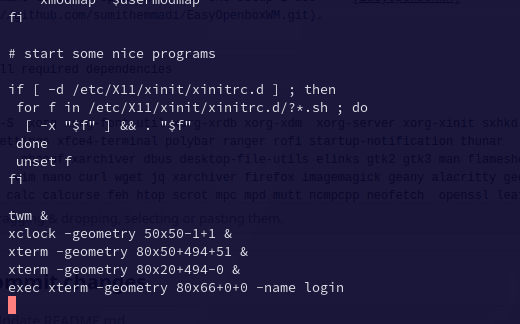
-
replace the last block of commands with
exec openbox-session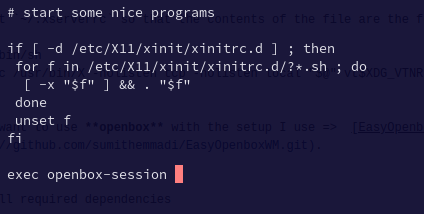
-
Edit
~/.xserverrcso that the contents of the file are the following:#!/bin/sh exec /usr/bin/X -nolisten tcp -nolisten local "$@" vt$XDG_VTNR
-
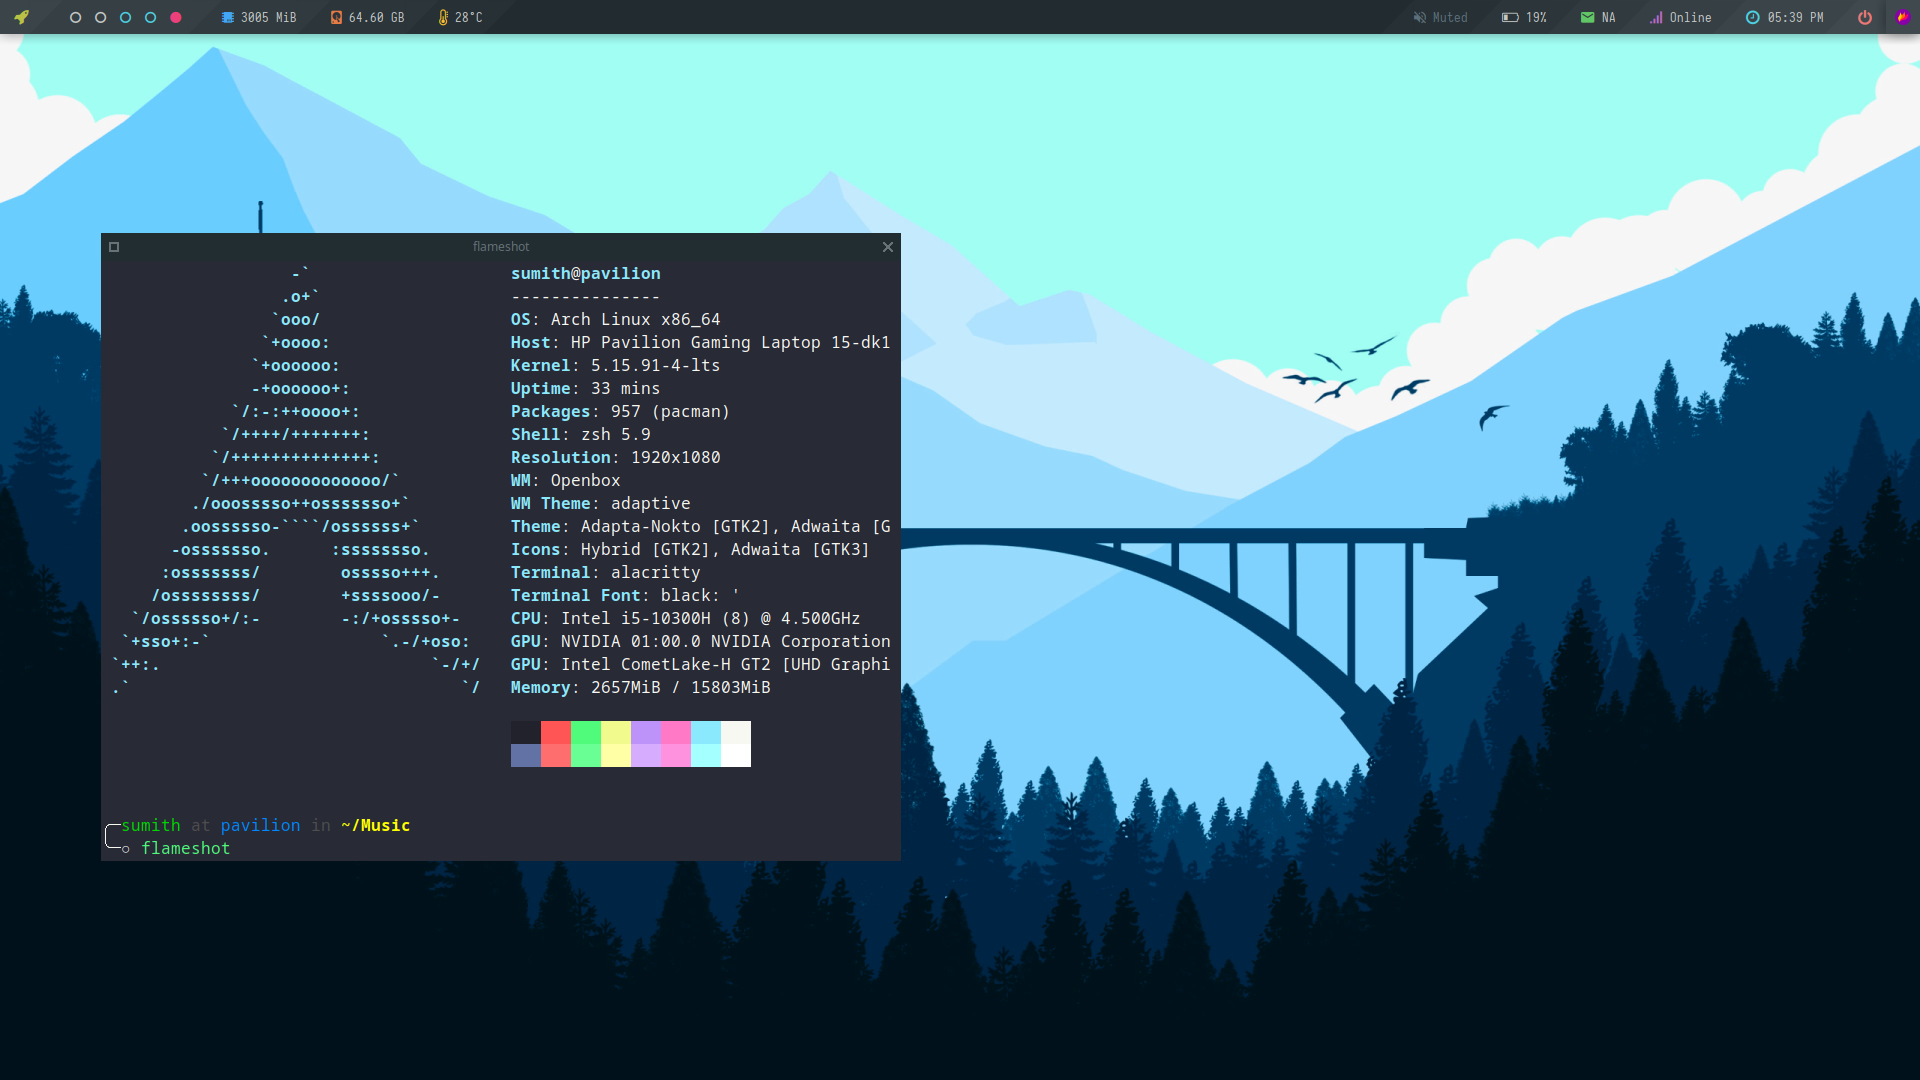
If you want to use openbox with the setup I use => EasyOpenboxWM.
-
Install required dependencies
pacman -S  xorg xorg-font-util xorg-xrdb xorg-xdm  xorg-server xorg-xinit sxhkd \
xfce4-settings xfce4-terminal polybar ranger rofi startup-notification thunar   \
openbox   obconf xarchiver dbus desktop-file-utils elinks gtk2 gtk3 man flameshot \
zsh git  vim nano curl wget jq xarchiver firefox imagemagick geany alacritty gedit \
bc bmon calc calcurse feh htop scrot mpc mpd mutt ncmpcpp neofetch  openssl leafpad \
xmlstarlet xbitmaps ranger  xcompmgr nitrogen brightnessctl alsa-utils imv maim mpv
-
Clone this repository
cd ~/
git clone https://github.com/sumithemmadi/EasyOpenboxWM.git
cd EasyOpenboxWM
-
Run below command to install open box config files.
configs=($(ls -A $(pwd)/files))
for _config in "${configs[@]}"; do
   cp -rf $(pwd)/files/$_config $HOME;
done
-
And wait for some time untill installation is done.
Start Openbox Window Manager:
startx
-
If not working, restart your PC and run again.
If it shows a black screen then press
CTRL + AL + F1and with your username.
Follow these steps to enable tap-to-click in window manager.
Follow these steps carefully, they require root privileges!
Install this package.
sudo pacman -S --needed xf86-input-libinputThen Edit this file.
sudo nano /etc/X11/xorg.conf.d/30-touchpad.confPaste this text into 30-touchpad.conf
Section "InputClass"
  Identifier "touchpad"
  Driver "libinput"
  MatchIsTouchpad "on"
  Option "tapping" "on"
  Option "AccelProfile" "adaptive"
  Option "TappingButtonMap" "lrm"
EndSection
Save the file (Ctrl + S) Quit the editor (Ctrl + X)
Reboot
Tap to click should now be enabled!
Here's some shortcut keys you want to use to speed up your work. For more, Right click on desktop > Keybinds
| Keys | Action | ----- | Keys | Action |
|---|---|---|---|---|
W-1 |
Go To Desktop 1 | S-W-1 |
Send To Desktop 1 | |
W-2 |
Go To Desktop 2 | S-W-2 |
Send To Desktop 2 | |
W-3 |
Go To Desktop 3 | S-W-3 |
Send To Desktop 3 | |
W-4 |
Go To Desktop 4 | S-W-4 |
Send To Desktop 4 | |
W-5 |
Go To Desktop 5 | S-W-5 |
Send To Desktop 5 | |
W-S-Left |
Send To Prev Desktop | W-S-Right |
Send To Next Desktop | |
A-Tab |
Next Window (Current Workspace) | W-Tab |
Next Window (All Workspaces) | |
W-h |
Move to TopLeft | W-j |
Move to BottomLeft | |
W-k |
Move to TopRight | W-l |
Move to BottomRight | |
W-Left |
Move To Left Edge | W-Right |
Move To Right Edge | |
W-Up |
Maximized | W-Down |
Unmaximized | |
W-q/c |
Close Windows | A-r/m |
Toggle Resize/Move | |
W-Space |
Openbox Menu | W-p/A-F1 |
App Launcher | |
W-d |
Toggle Desktop | W-v |
Set Tasks | |
W-f |
File Manager | W-e |
Text Editor | |
W-t/return |
Terminal | W-w |
Web Browser | |
W-x |
Exit Menu | W-m |
Music Menu | |
W-b |
Battery Menu | W-n |
Network Menu | |
C-A-v |
Vim | C-A-r |
Ranger | |
C-A-h |
Htop | C-A-n |
Nano |