Skip to content
New issue

Have a question about this project? Sign up for a free GitHub account to open an issue and contact its maintainers and the community.

By clicking “Sign up for GitHub”, you agree to our terms of service and privacy statement. We’ll occasionally send you account related emails.

Already on GitHub? Sign in to your account

Add debug support #4

Open
wants to merge 1 commit into
base: main
Choose a base branch
from
Open

Add debug support #4

wants to merge 1 commit into from

Conversation

sago35
Copy link
Member

@sago35 sago35 commented Feb 14, 2022

This PR adds debug support to vscode-tinygo.
It works as follows.

  1. Add some definitions to .vscode/settings.json
  2. Add settings for debug launch to .vscode/launch.json
    • With this configuration, pressing F5 will launch the debugger with TinyGo configured.
  3. Add build tasks to .vscode/tasks.json to be used from .vscode/launch.json

The following are the parts that are not done so far.

  1. If tasks.json does not exist, adding a task will fail. fixed
    • If you create the file to be written later first, there will be no error.
  2. This is my first time using typescript, so I'm not sure if I'm writing the right code.

@sago35
Copy link
Member Author

sago35 commented Feb 14, 2022

Use it this way for now.
If there is a better way, I'd like your opinion.

https://www.youtube.com/watch?v=omT0agnFHA4

@sago35
Copy link
Member Author

sago35 commented Feb 14, 2022

I forgot to write.
In order to run it, you will need tinygo from the following branch

https://github.com/tinygo-org/tinygo/tree/buildinfo

@sago35
Copy link
Member Author

sago35 commented Feb 16, 2022

It is now possible to easily launch a debugger using VSCode.
If you run tinygo target on the screen where the main package to be debugged is open, the various settings will be updated.
After that, press F5 to execute the build and start debugging.

image
image
image
image
image
image

Right now, only openocd is supported.
However, the openocdInterface can be changed

image

@sago35 sago35 marked this pull request as ready for review February 16, 2022 10:12
@bmentink
Copy link

@sago35
HI, could you please write a quick HOWTO of getting VSCode debugging going for a RP Pico target? I have another RP Pico programmed as a USB->SWD that I can use for the hardware interface, I also have an openocd that supports that target. WHat scripts will I need for VSCode to connect gdb/openocd etc ..

Cherrs

@sago35
Copy link
Member Author

sago35 commented Mar 14, 2022

@bmentink
First you must be able to run tinygo flash with picoprobe.

openocd must support picoprobe.
You can use the official raspberrypi one or the following.

https://github.com/ciniml/debug-tools-builder/releases/

$ tinygo flash --target pico --size short --programmer picoprobe examples/blinky1
   code    data     bss |   flash     ram
   5704       4    2264 |    5708    2268
Open On-Chip Debugger 0.11.0-rc2+dev-gcafa0b5 (2021-02-20-22:09)
Licensed under GNU GPL v2
For bug reports, read
        http://openocd.org/doc/doxygen/bugs.html
Info : only one transport option; autoselect 'swd'
Warn : Transport "swd" was already selected
adapter speed: 5000 kHz

Warn : Transport "swd" was already selected
swd
Info : Hardware thread awareness created
Info : RP2040 Flash Bank Command
Info : clock speed 5000 kHz
Info : SWD DPIDR 0x0bc12477
Info : SWD DLPIDR 0x00000001
Info : SWD DPIDR 0x0bc12477
Info : SWD DLPIDR 0x10000001
Info : rp2040.core0: hardware has 4 breakpoints, 2 watchpoints
Info : rp2040.core1: hardware has 4 breakpoints, 2 watchpoints
Info : starting gdb server for rp2040.core0 on 3333
Info : Listening on port 3333 for gdb connections
target halted due to debug-request, current mode: Thread
xPSR: 0xf1000000 pc: 0x000000ee msp: 0x20041f00
target halted due to debug-request, current mode: Thread
xPSR: 0xf1000000 pc: 0x000000ee msp: 0x20041f00
** Programming Started **
Info : RP2040 B0 Flash Probe: 2097152 bytes @10000000, in 512 sectors

target halted due to debug-request, current mode: Thread
xPSR: 0x01000000 pc: 0x00000178 msp: 0x20041f00
target halted due to debug-request, current mode: Thread
xPSR: 0x01000000 pc: 0x00000178 msp: 0x20041f00
target halted due to debug-request, current mode: Thread
xPSR: 0x01000000 pc: 0x00000178 msp: 0x20041f00
Info : Writing 8192 bytes starting at 0x0
target halted due to debug-request, current mode: Thread
xPSR: 0x01000000 pc: 0x00000178 msp: 0x20041f00
target halted due to debug-request, current mode: Thread
xPSR: 0x01000000 pc: 0x00000178 msp: 0x20041f00
target halted due to debug-request, current mode: Thread
xPSR: 0x01000000 pc: 0x00000178 msp: 0x20041f00
** Programming Finished **
** Resetting Target **
shutdown command invoked

If you can tinygo flash, next you need to check tinygo gdb.
Make sure tinygo gdb is running correctly by using continue, etc.

$ tinygo gdb --target pico --size short --programmer picoprobe examples/blinky1

Next you need to build tinygo at buildinfo branch.
It is OK if JSON is output by executing the following command.

https://github.com/tinygo-org/tinygo/tree/buildinfo

$ tinygo build -json --target pico --size short --programmer picoprobe examples/blinky1
{
  "Options": {
    ...
  },
  "Target": {
    ...
  },
  "GoMinorVersion": 17,
  "ClangHeaders": "C:\\tinygo\\tinygo\\llvm-project\\clang\\lib\\Headers",
  "TestConfig": {
    "CompileTestBinary": false
  }
}

@sago35
Copy link
Member Author

sago35 commented Mar 14, 2022

Openocd Interface must be configured.

image

@bmentink
Copy link

bmentink commented Mar 15, 2022

Many Thanks. Regarding the "building tinygo" step. I am using your custom branch that has the PWM max frequency fix, has that been applied to the buildinfo branch ?

@sago35 .. Also, what is the extension name that gives you the vscode picoprobe openocd interface? I only see one for MacOS and I am on Linux .... or does it work for Linux as well .. (My TinyGo extension does not have any options you can set)

@bmentink
Copy link

bmentink commented Mar 18, 2022

@sago35 I have picoprobe flashing and gdb talking to the board. I just need further help with setting up visualStudio. Thanks.
Maybe you can be more specific with the steps, what extension to load, what JSON file to use .. etc i.e launch.json

@sago35
Copy link
Member Author

sago35 commented Mar 18, 2022

Now you can use the vsce package command to create an extension for this branch version.

Once created, install the extension.
You only need to configure openocd interface for vscode.

Subsequent steps are as shown in the video below.
https://twitter.com/sago35tk/status/1503330468707860481

note:
It is not necessary to create launch.json, etc., as they are generated by the extension.

@bmentink
Copy link

bmentink commented Mar 21, 2022

@sago35
I can't use the buildinfo branch unless you have applied the patch for the PWM max freqency fix ... I ask again, have you?
If not, how can I patch the buildinf branch with the PWM fix ..?

Is the vsce package command only available in the buildinfo branch as I don't see it anywhere ..

@sago35
Copy link
Member Author

sago35 commented Mar 21, 2022

@bmentink
In most cases, it should be a simple matter to do the following

$ git checkout buildinfo
$ git rebase  YOUR_BRANCH_NAME
$ make llvm-build && make
$ ./build/tinygo version

Is the vsce package command only available in the buildinfo branch as I don't see it anywhere ..

vsce is for VSCode.
In other words, it is for tinygo-org/vscode-tinygo.

https://code.visualstudio.com/api/working-with-extensions/publishing-extension

@bmentink
Copy link

bmentink commented Mar 21, 2022

I don't have vsce installed, do I have to install that with npm? You say vsce is for VSCode but I see from the link above, that vsce is Video Studio code EXTENSION to manage extensions. I have vscode but not vsce ... I am confused.

Please give clear steps on what to do with visual to get the extension .. i.e treat me like a baby :)

@sago35
Copy link
Member Author

sago35 commented Mar 21, 2022

@bmentink

Please wait a moment while I upload the vsix file.
If you are in a hurry, do the following


First, Node.js must be installed.
After that, vsce must be installed with the following command.

https://code.visualstudio.com/api/working-with-extensions/publishing-extension
Installation
Make sure you have Node.js installed. Then run:

$ npm install -g vsce

Now all that remains is to run the following to create vscode-tinygo-<version>.vsix.

https://github.com/tinygo-org/vscode-tinygo#development

To create an extension as a package, run the following command:
vsce package
This creates a new vscode-tinygo-.vsix file that you can install directly in VS Code.

$ git clone https://github.com/tinygo-org/vscode-tinygo
$ cd vscode-tinygo
$ git checkout gdb
$ vsce package

@bmentink
Copy link

Perfect .. Thanks 👍

@sago35
Copy link
Member Author

sago35 commented Mar 21, 2022

@bmentink
Unzip the following zip file and load it into vscode.

image

vscode-tinygo-0.3.0-dev1.vsix.zip

@bmentink
Copy link

bmentink commented Mar 21, 2022

I have the extension installed, and I have selected the openocd interface. However the settings.json file and the tasks.json files look wrong, as this is what I get when trying to run a debug session.

The terminal process "/usr/bin/bash '-c', 'tinygo build -o /out.elf -target pico -size short -opt 1 ./bldc'" terminated with exit code: 2.

Am I not mean't to edit those files with the correct paths etc ..?

@sago35
Copy link
Member Author

sago35 commented Mar 21, 2022

@bmentink
Please rename or delete the .vscode directory and try again.

@bmentink
Copy link

bmentink commented Mar 21, 2022

@sago35 I tried what you suggested, I removed .vscode, and reinstalled go and the .vsix file as you suggested. the paths still took wrong.

tasks.json looks like:

{
	"version": "2.0.0",
	"tasks": [
		{
			"label": "tinygo build task",
			"type": "shell",
			"command": "tinygo build -o ${env:TMP}/out.elf -target ${config:go.toolsEnvVars.TARGET} -size short -opt 1 ${config:go.toolsEnvVars.TargetPkg}",
			"problemMatcher": [],
			"group": {
				"kind": "build",
				"isDefault": true
			}
		}
	]
}

The error was:

panic: expected main package to have name 'main'

goroutine 1 [running]:
github.com/tinygo-org/tinygo/loader.(*Package).Check(0xc0003b7dc0)
        /home/runner/work/tinygo/tinygo/loader/loader.go:373 +0x318
github.com/tinygo-org/tinygo/loader.(*Program).Parse(0xc00026c0c0)
        /home/runner/work/tinygo/tinygo/loader/loader.go:299 +0xb9
github.com/tinygo-org/tinygo/builder.Build({0x7fff4f07669d, 0x6}, {0x7fff4f076674, 0x60}, 0xc00023e510, 0xc004d0b7e0)
        /home/runner/work/tinygo/tinygo/builder/build.go:177 +0xfa9
main.Build({0x7fff4f07669d, 0x6}, {0x7fff4f076674, 0x8}, 0x1)
        /home/runner/work/tinygo/tinygo/main.go:151 +0x8f
main.main()
        /home/runner/work/tinygo/tinygo/main.go:1337 +0x3aed
The terminal process "/usr/bin/bash '-c', 'tinygo build -o /out.elf -target pico -size short -opt 1 ./bldc'" terminated with exit code: 2.

Terminal will be reused by tasks, press any key to close it.2.

It seems to have ignored me setting the tinygo path to my custom build tinygo ... The tinygo path in my case is: ~/tinygo/build/tinygo

For reference, my settings.json looks like:

{
    "go.toolsEnvVars": {
        "GOROOT": "/home/bmentink/.cache/tinygo/goroot-69d4dd4e42b0c20ced8e32cfa58b0593ee5a356c354f3328202260d070e3e317",
        "GOFLAGS": "-tags=cortexm,baremetal,linux,arm,rp2040,rp,pico,tinygo,math_big_pure_go,gc.conservative,scheduler.tasks,serial.uart",
        "TARGET": "pico",
        "TINYGOROOT": "/home/bmentink/tinygo/build/tinygo",
        "GdbPath": "",
        "OpenocdInterface": "picoprobe",
        "OpenocdTarget": "",
        "X01": "/home/bmentink/Code/tinygo_BLDC_M3_180deg_soft",
        "TargetPkg": "./bldc"
    }
}

@bmentink
Copy link

bmentink commented Mar 21, 2022

Ahhh, I missed setting the target when the window containing main() is open ... very important step !!!! ...
Now I have a permission error as I usually have to run tinygo with sudo ...

tinygo:ld.lld: error: cannot open /usr/local/lib/tinygo/pkg/thumbv6m-unknown-unknown-eabi-cortex-m0plus/compiler-rt/lib.a: Permission denied
tinygo:ld.lld: error: cannot open /usr/local/lib/tinygo/pkg/thumbv6m-unknown-unknown-eabi-cortex-m0plus/picolibc/lib.a: Permission denied

@sago35
Copy link
Member Author

sago35 commented Mar 21, 2022

@bmentink

panic: expected main package to have name 'main'

When starting debug, run it while the main package is displayed in VSCode.

Also, please let me know the results of the following command so I can look into it.
If the package name (./bldc) is incorrect, please provide the correct value.

$ tinygo build -json -o /out.elf -target pico -size short -opt 1 ./bldc

@bmentink
Copy link

What do you mean by package name?, In my source directory (where main.go is) there is also a sub-directory called bldc, maybe it is getting confused?

The out put of the above command is:

{
  "Options": {
    "GOOS": "linux",
    "GOARCH": "amd64",
    "GOARM": "6",
    "Target": "pico",
    "Opt": "1",
    "GC": "",
    "PanicStrategy": "print",
    "Scheduler": "",
    "Serial": "",
    "PrintIR": false,
    "DumpSSA": false,
    "VerifyIR": false,
    "Debug": true,
    "PrintSizes": "short",
    "PrintAllocs": null,
    "PrintStacks": false,
    "Tags": "",
    "WasmAbi": "",
    "GlobalValues": {},
    "TestConfig": {
      "CompileTestBinary": false
    },
    "Programmer": "",
    "OpenOCDCommands": null,
    "LLVMFeatures": "",
    "Directory": "",
    "PrintJSON": true
  },
  "Target": {
    "inherits": [
      "cortex-m",
      "cortex-m0plus",
      "rp2040"
    ],
    "llvm-target": "thumbv6m-unknown-unknown-eabi",
    "cpu": "cortex-m0plus",
    "features": "+armv6-m,+soft-float,+strict-align,+thumb-mode,-aes,-bf16,-cdecp0,-cdecp1,-cdecp2,-cdecp3,-cdecp4,-cdecp5,-cdecp6,-cdecp7,-crc,-crypto,-d32,-dotprod,-dsp,-fp-armv8,-fp-armv8d16,-fp-armv8d16sp,-fp-armv8sp,-fp16,-fp16fml,-fp64,-fpregs,-fullfp16,-hwdiv,-hwdiv-arm,-i8mm,-lob,-mve,-mve.fp,-neon,-ras,-sb,-sha2,-vfp2,-vfp2sp,-vfp3,-vfp3d16,-vfp3d16sp,-vfp3sp,-vfp4,-vfp4d16,-vfp4d16sp,-vfp4sp",
    "goos": "linux",
    "goarch": "arm",
    "build-tags": [
      "cortexm",
      "baremetal",
      "linux",
      "arm",
      "rp2040",
      "rp",
      "pico"
    ],
    "gc": "conservative",
    "scheduler": "tasks",
    "serial": "uart",
    "linker": "ld.lld",
    "rtlib": "compiler-rt",
    "libc": "picolibc",
    "automatic-stack-size": true,
    "default-stack-size": 2048,
    "cflags": [
      "-Werror",
      "-fshort-enums",
      "-fomit-frame-pointer",
      "-mfloat-abi=soft",
      "-fno-exceptions",
      "-fno-unwind-tables",
      "-ffunction-sections",
      "-fdata-sections"
    ],
    "ldflags": [
      "--emit-relocs",
      "--gc-sections"
    ],
    "linkerscript": "targets/pico.ld",
    "extra-files": [
      "src/device/arm/cortexm.s",
      "src/internal/task/task_stack_cortexm.S",
      "src/runtime/gc_arm.S",
      "src/device/rp/rp2040.s",
      "targets/pico-boot-stage2.S"
    ],
    "rp2040-boot-patch": true,
    "emulator": null,
    "flash-command": "",
    "gdb": [
      "gdb-multiarch",
      "arm-none-eabi-gdb"
    ],
    "flash-1200-bps-reset": "",
    "serial-port": null,
    "flash-method": "msd",
    "msd-volume-name": "RPI-RP2",
    "msd-firmware-name": "firmware.uf2",
    "uf2-family-id": "0xe48bff56",
    "binary-format": "uf2",
    "openocd-interface": "",
    "openocd-target": "rp2040",
    "openocd-transport": "swd",
    "openocd-commands": null,
    "jlink-device": "",
    "code-model": "",
    "relocation-model": "",
    "wasm-abi": ""
  },
  "GoMinorVersion": 17,
  "ClangHeaders": "/home/bmentink/tinygo/llvm-project/clang/lib/Headers",
  "TestConfig": {
    "CompileTestBinary": false
  }
}

@bmentink
Copy link

If by package, you mean main.go, then the above command should be ..
tinygo build -json -o /out.elf -target pico -size short -opt 1 main.go ?

@bmentink
Copy link

At the moment, I am getting a permission error where it is compiling the .elf file:

error: open /out.elf: permission denied
The terminal process "/usr/bin/bash '-c', 'tinygo build -o /out.elf -target pico -size short -opt 1 ./.'" terminated with exit code: 1.

why is there a "/" in front of the out.elf?

@sago35
Copy link
Member Author

sago35 commented Mar 21, 2022

I think the tinygo build tinygo build -json results are fine.

update: change tinygo build to tinygo build -json

@bmentink
Copy link

@bmentink
Copy link

Adding the rules did not help ... will investigate further.. cheers

@sago35
Copy link
Member Author

sago35 commented Mar 22, 2022

Can tinygo gdb run at this point?
Will openocd work from tinygo gdb?

@bmentink
Copy link

tinygo gdb has always worked. How do I add openocd to the tinygo gdb command?

@sago35
Copy link
Member Author

sago35 commented Mar 22, 2022

When tinygo gdb is run, openocd is also run.
Try adding the -x option to tinygo gdb.

@sago35
Copy link
Member Author

sago35 commented Mar 22, 2022

Adding -ocd-output would make it clearer.

@sago35
Copy link
Member Author

sago35 commented Mar 22, 2022

You may try rebooting linux once.

@bmentink
Copy link

bmentink commented Mar 22, 2022 via email

@bmentink
Copy link

tinygo gdb -x -ocd-output shows everything working normally ..

@bmentink
Copy link

Yay, got it working. I discovered openocd requires you to be part of the plugdev group as well ... just dialout is not enough ..

@sago35 sago35 marked this pull request as draft March 24, 2022 12:00
@sago35
Copy link
Member Author

sago35 commented Mar 24, 2022

To complete this PR, the remaining tasks are as follows

  1. Locate tmpdir using a method other than the $TMP environment variable
  2. Delete the debugging key named X01
  3. Add the following settings to settings.json
    • cortex-debug.armToolchainPath
    • cortex-debug.gdbPath
  4. Add dependency settings for cortex-debug
  5. Mention that binutils-arm-none-eabi is required even when using gdb-multiarch No action required.
  6. Get the location of the svd file from tinygo build -json
    • To do this, the tinygo command must be changed
    • Once support is stopped because non tinygo developers don't have the svd files

@sago35
Copy link
Member Author

sago35 commented Mar 24, 2022

@sago35
Copy link
Member Author

sago35 commented Mar 24, 2022

No more $TMP setup, etc.
It is really easy to start the debugger.

Now ready for reaview.

@sago35 sago35 marked this pull request as ready for review March 24, 2022 13:22
@sago35 sago35 requested a review from aykevl March 24, 2022 13:22
@bmentink
Copy link

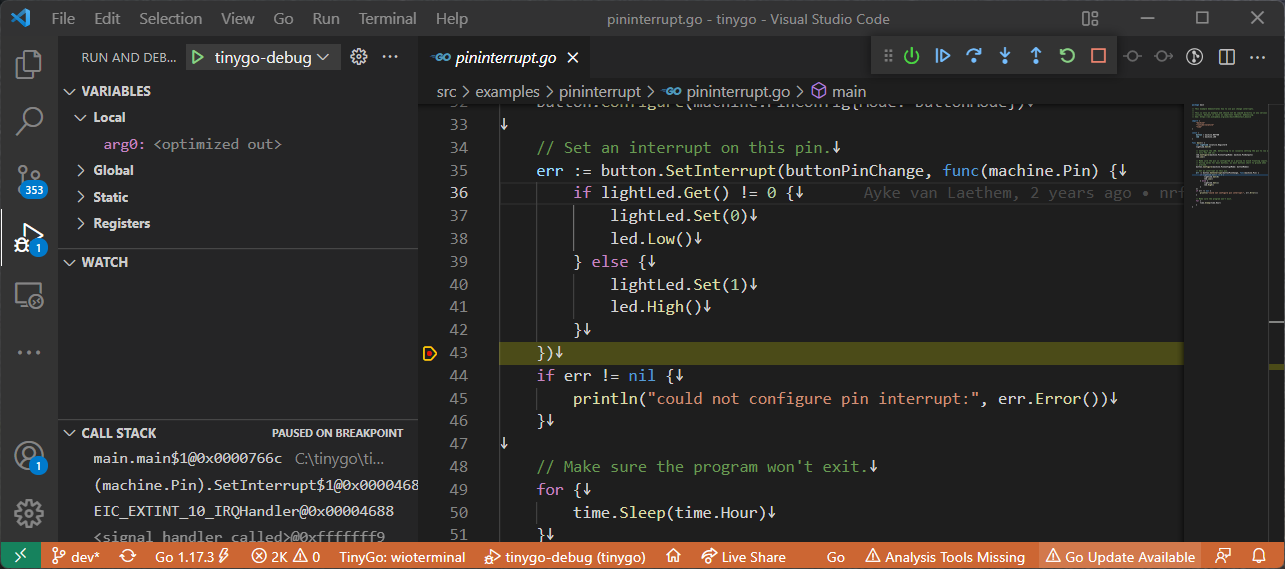
Great job!

@sago35 Have you tried debugging into interrupt handlers, or functions called from the handler? I can only seem to debug mainline code, which is frustrating, as all my code runs off interrupts ...

@sago35
Copy link
Member Author

sago35 commented Mar 26, 2022

@bmentink

I tried this with feather-m4-can.
It is possible to set break even for interrupts.
However, it is not comfortable to use.

image

I think we need better debugging support for tinygo, not just for interrupts.
Please create an issue at tinygo.org/tinygo.

@sago35 sago35 marked this pull request as ready for review June 13, 2022 11:32
@sago35
Copy link
Member Author

sago35 commented Jun 13, 2022

@aykevl
gdb branch rebased to 0.3.0.
Now ready for review.

By the way, the 0.3.0 tag does not seem to have been pushed.

@sago35
Copy link
Member Author

sago35 commented Jun 13, 2022

Pre-built binaries can be downloaded from the following links
vscode-tinygo-0.4.0-dev1.vsix.zip

@sago35
Copy link
Member Author

sago35 commented Aug 31, 2022

ping @aykevl

@sago35
Copy link
Member Author

sago35 commented Aug 31, 2022

If this PR takes a long time to review, I would like to see #6 released. @aykevl

Copy link
Member

@aykevl aykevl left a comment

Choose a reason for hiding this comment

The reason will be displayed to describe this comment to others. Learn more.

First review.

It looks like you are first building a binary using tinygo build and then debugging it separately using the Cortex-M debug extension, correct?
I think there is a better way, but I haven't investigated it yet: by using tinygo gdb directly and providing the gdb-rsp port number to the debugger. This will make it possible to debug all architectures, not just Cortex-M.
(Right now tinygo gdb will run GDB itself, but it could be modified to simply output the openocd port number that a VS Code extension could attach to).

"tinygo.openocdInterface": {
"description": "which hardware programmer to use (ex: jlink, cmsis-dap, stlink-v2, ...)",
"type": "string",
"default": "cmsis-dap"
Copy link
Member

Choose a reason for hiding this comment

The reason will be displayed to describe this comment to others. Learn more.

I think this should be an empty string by default, for boards that have an on-board debugger. For example, the BBC micro:bit has a cmsis-dap debugger on board while many STM32 development boards have a ST-Link debugger on board. By picking a debugger here, it looks like you are overriding the default for a particular board.

Comment on lines +38 to +42
let buildPkg = '';
let editor = vscode.window.activeTextEditor;
if (editor) {
buildPkg = editor.document.fileName;
}
Copy link
Member

Choose a reason for hiding this comment

The reason will be displayed to describe this comment to others. Learn more.

Go packages normally work in packages, not in files. I think this should use the directory of the current file, not the path of the current file.

Comment on lines +145 to +150
envVars.TARGET = target;
envVars.TINYGOROOT = tinygoroot;
envVars.GdbPath = path.basename(gdbPath);
envVars.OpenocdInterface = openocdInterface;
envVars.OpenocdTarget = openocdTarget;
envVars.TmpDir = os.tmpdir();
Copy link
Member

Choose a reason for hiding this comment

The reason will be displayed to describe this comment to others. Learn more.

Why are you storing all of these in .vscode/settings.json? I don't see how they are necessary for the Go extension.

@sago35
Copy link
Member Author

sago35 commented Sep 15, 2022

@aykevl Thanks for the review.

I think there is a better way, but I haven't investigated it yet: by using tinygo gdb directly and providing the gdb-rsp port number to the debugger. This will make it possible to debug all architectures, not just Cortex-M.

I think that is a very good idea.
I will give it a try.
This would remove most of the envVars.

@aykevl
Copy link
Member

aykevl commented Sep 15, 2022

If you didn't see it already, this will be useful: https://code.visualstudio.com/api/extension-guides/debugger-extension (I didn't read the page yet).

Sign up for free to join this conversation on GitHub. Already have an account? Sign in to comment
Labels
None yet
Projects
None yet
Development

Successfully merging this pull request may close these issues.

None yet

3 participants