- Trackingplan
- Add Trackingplan to your Android app
- Advanced options
- Disable Trackingplan
- Trackingplan for Regression Testing
- Building from source code
- Need help?
- Learn more
With Trackingplan for Android you can make sure that your tracking is going as you planned without changing your current analytics stack or code.
Trackingplan will monitor traffic between your app and data destinations and automatically detect any changes in your analytics implementation and warn you about inconsistencies like hit drops, missing properties, rogue events, and more.
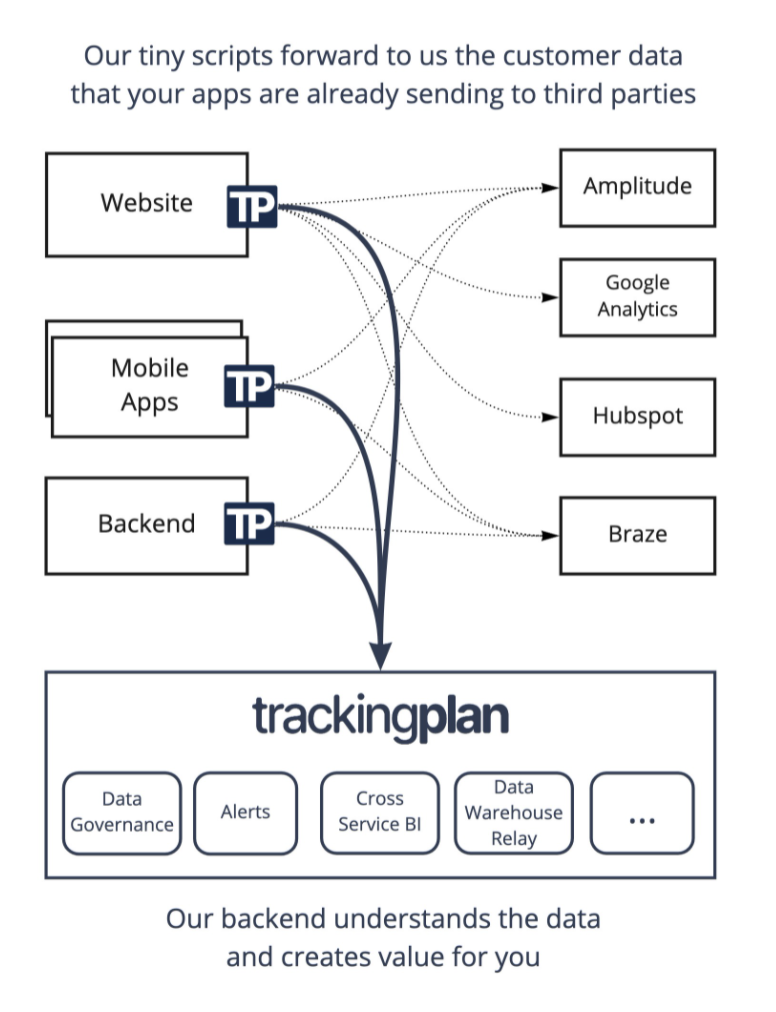
Trackingplan is currently available for Web, iOS and Android. More clients will come soon.
Please request your TrackingplanId at trackingplan.com or write us to team@trackingplan.com.
The recommended way to install Trackingplan for Android is by using Android Studio. Please, make sure your project targets API level 24 (Lollipop) or later.
First, add the Trackingplan dependency using Android Studio, like so:
In Android Studio, expand the Gradle Scripts section

Select the project-level build.gradle file and add com.trackingplan.client:adapter:1.7.0 as a classpath dependency to the dependencies section:
dependencies {
    // ...
    classpath "com.trackingplan.client:adapter:1.7.0"
    // ...
}
After that, select the module-level build.gradle file and modify it as indicated below:
- Add
id 'com.trackingplan.client'to the plugins section.
plugins {
    // ...
    id 'com.trackingplan.client'
    // ...
}- Add
implementation 'com.trackingplan.client:sdk:1.7.0'to the dependencies section.
dependencies {
    // ...
    implementation 'com.trackingplan.client:sdk:1.7.0'
    // ...
}
Then in the onCreate method of your Application's Main Activity, set up the SDK like so:
Trackingplan.init("YOUR_TP_ID").start(this)And of course, import the SDK:
import com.trackingplan.client.sdk.Trackingplan;All set!
Trackingplan for Android supports the following advanced options during its initialization:
| Parameter | Description | Default |
|---|---|---|
enableDebug() |
Enables debug mode. Prints debug information in the console. | disabled |
environment(value) |
Allows to isolate the data between production and testing environments. | PRODUCTION |
dryRun() |
Enables dry run mode. Do not send intercepted requests to Trackingplan. | disabled |
customDomains(map) |
Allows to extend the list of monitored domains. Any request made to these domains will also be forwarded to Trackingplan. The map argument must be a key-value with the domain to be looked for and the alias you want to use for that analytics domain. |
empty map |
sourceAlias(value) |
Allows to differentiate between sources. | android |
tags(map) |
Allows to tag the data sent to Trackingplan. The map argument must be a key-value with the tag name and the tag value. |
empty map |
Trackingplan.init("YOUR_TP_ID")
    .environment("development")
    .sourceAlias("my_application")
//  .tags(new HashMap<>(){{
//      put("tag1", "value1");
//  }})
//  .customDomains(new HashMap<>(){{
//      put("my.domain.com", "myanalytics");
//  }})
//  .enableDebug()
//  .dryRun()
.start(this)To disable Trackingplan for Android SDK the client that works at runtime must be disabled explictly.
Replace the call to Trackingplan.init("YOUR_TP_ID").start(this) by the next one:
Trackingplan.stop(this);Alternatively, since Trackingplan for Android SDK uses App Startup to perform its runtime initialization, the client can be disabled by adding the following to the AndroidManifest.xml of the app:
<provider
    android:name="androidx.startup.InitializationProvider"
    android:authorities="${applicationId}.androidx-startup"
    android:exported="false"
    tools:node="merge">
    <meta-data
        android:name="com.trackingplan.client.sdk.TrackingplanInitializer"
        tools:node="remove" />
</provider>Optionally, the adapter plugin that works at compile time can be disabled as well. This way no bytecode transformations are applied to your app.
To disable the adapter plugin globally for your app, add the next line to your gradle.properties file:
trackingplan.enableSdk=falseAlternatively, the adapter plugin can be disabled per build type. For instance, to have it disabled for your debug build, add the next lines to your build.gradle file inside your android section:
buildTypes {
    debug {
        trackingplan {
            enabled false
        }
    }
}
Trackingplan for Android supports running as part of your instrumented tests. This way, existing tests can be used to catch analytics data problems before they get into production. In order to do so, follow the steps below:
- Add
com.trackingplan.client:junit-tools:1.7.0as aandroidTestImplementationdependency to the dependencies section of your module-levelbuild.gradlefile:
dependencies {
    // ...
    androidTestImplementation "com.trackingplan.client:junit-tools:1.7.0"
    // ...
}- Import the
TrackingplanJUnit:
import com.trackingplan.client.junit.TrackingplanJUnit;- In each JUnit file, add the imported rule to your instrumented test code:
@Rule
public TrackingplanRule trackingplanRule =
    TrackingplanJUnit.init("YOUR_TP_ID", "YOUR_ENVIRONMENT")
            .tags(new HashMap<>() {{
                put("test_title", "My test");
                put("test_session_name", "My session");
            }})
            //.dryRun()
            .newRule();
Or in Kotlin:
@get:Rule
val trackingplanRule = TrackingplanJUnit.init("YOUR_TP_ID", "YOUR_ENVIRONMENT")
    .tags(mapOf(
        "test_title" to "My Test",
        "test_session_name" to "My Session"
    ))
    //.dryRun()
    .newRule()
The TrackingplanRule will initialize the SDK before each test is executed. And it will ensure that all the collected data is sent to Trackingplan after every test execution. Note that this rule will overwrite any existing initialization of Trackingplan SDK for Android in your app.
First of all, clone this repository to a local directory in your machine. After that, open a terminal in that directory and run:
$ ./gradlew cleanBuildPublishLocalIn order to use this custom built, modify your project-level build.gradle file as indicated below:
buildscript {
    repositories {
        // ...
        mavenLocal() // <-- Add maven local
    }

}

allprojects {
    repositories {
        // ...
        mavenLocal() // <-- Add maven local
    }
}
Remember to change the version of Trackingplan in your dependencies to 1.2.0-SNAPSHOT.
Questions? Problems? Need more info? We can help! Contact us here.
Visit www.trackingplan.com
Copyright © 2021 Trackingplan Inc. All Rights Reserved.