                                 __
                                / /________  _________ _____ _____ _
                               / / ___/ __ \/ ___/ __ `/ __ `/ __ `/
                              / (__  ) /_/ (__  ) /_/ / /_/ / /_/ /
                             /_/____/ .___/____/\__,_/\__, /\__,_/
                                   /_/               /____/

                          ⚡ Designed for convenience and efficiency ⚡
A lightweight LSP plugin based on Neovim's built-in LSP with a highly performant UI.
You can use plugin managers like lazy.nvim and packer.nvim to install lspsaga and lazy load lspsaga using the plugin manager's keyword for lazy loading (lazy for lazy.nvim and opt for packer.nvim).
cmd- Loadlspsagaonly when alspsagacommand is called.ft-lazy.nvimandpacker.nvimboth provide lazy loading by filetype. This way, you can loadlspsagaaccording to the filetypes that you use a LSP in.event- Only loadlspsagaon an event likeBufReadorBufReadPost. Do make sure that your LSP plugins, like lsp-zero or lsp-config, are loaded before loadinglspsaga.dependencies- Forlazy.nvimyou can setglepnir/lspsaga.nvimas a dependency ofnvim-lspconfigusing thedependencieskeyword and vice versa. Forpacker.nvimyou should userequiresas the keyword instead.after- Forpacker.nvimyou can useafterkeyword to ensurelspsagaonly loads after your LSP plugins have loaded. This is not necessary forlazy.nvim.
require("lazy").setup({
    "glepnir/lspsaga.nvim",
    event = "BufRead",
    config = function()
        require("lspsaga").setup({})
    end,
    dependencies = { {"nvim-tree/nvim-web-devicons"} }
}, opt)use({
"glepnir/lspsaga.nvim",
branch = "main",
config = function()
require("lspsaga").setup({})
end,
requires = { {"nvim-tree/nvim-web-devicons"} }
})require("lazy").setup({
"glepnir/lspsaga.nvim",
event = "BufRead",
config = function()
require("lspsaga").setup({})
end,
dependencies = { {"nvim-tree/nvim-web-devicons"} }
})
local keymap = vim.keymap.set
-- LSP finder - Find the symbol's definition
-- If there is no definition, it will instead be hidden
-- When you use an action in finder like "open vsplit",
-- you can use <C-t> to jump back
keymap("n", "gh", "<cmd>Lspsaga lsp_finder<CR>")
-- Code action
keymap({"n","v"}, "<leader>ca", "<cmd>Lspsaga code_action<CR>")
-- Rename all occurrences of the hovered word for the entire file
keymap("n", "gr", "<cmd>Lspsaga rename<CR>")
-- Rename all occurrences of the hovered word for the selected files
keymap("n", "gr", "<cmd>Lspsaga rename ++project<CR>")
-- Peek definition
-- You can edit the file containing the definition in the floating window
-- It also supports open/vsplit/etc operations, do refer to "definition_action_keys"
-- It also supports tagstack
-- Use <C-t> to jump back
keymap("n", "gd", "<cmd>Lspsaga peek_definition<CR>")
-- Go to definition
keymap("n","gd", "<cmd>Lspsaga goto_definition<CR>")
-- Show line diagnostics
-- You can pass argument ++unfocus to
-- unfocus the show_line_diagnostics floating window
keymap("n", "<leader>sl", "<cmd>Lspsaga show_line_diagnostics<CR>")
-- Show cursor diagnostics
-- Like show_line_diagnostics, it supports passing the ++unfocus argument
keymap("n", "<leader>sc", "<cmd>Lspsaga show_cursor_diagnostics<CR>")
-- Show buffer diagnostics
keymap("n", "<leader>sb", "<cmd>Lspsaga show_buf_diagnostics<CR>")
-- Diagnostic jump
-- You can use <C-o> to jump back to your previous location
keymap("n", "[e", "<cmd>Lspsaga diagnostic_jump_prev<CR>")
keymap("n", "]e", "<cmd>Lspsaga diagnostic_jump_next<CR>")
-- Diagnostic jump with filters such as only jumping to an error
keymap("n", "[E", function()
require("lspsaga.diagnostic"):goto_prev({ severity = vim.diagnostic.severity.ERROR })
end)
keymap("n", "]E", function()
require("lspsaga.diagnostic"):goto_next({ severity = vim.diagnostic.severity.ERROR })
end)
-- Toggle outline
keymap("n","<leader>o", "<cmd>Lspsaga outline<CR>")
-- Hover Doc
-- If there is no hover doc,
-- there will be a notification stating that
-- there is no information available.
-- To disable it just use ":Lspsaga hover_doc ++quiet"
-- Pressing the key twice will enter the hover window
keymap("n", "K", "<cmd>Lspsaga hover_doc<CR>")
-- If you want to keep the hover window in the top right hand corner,
-- you can pass the ++keep argument
-- Note that if you use hover with ++keep, pressing this key again will
-- close the hover window. If you want to jump to the hover window
-- you should use the wincmd command "<C-w>w"
keymap("n", "K", "<cmd>Lspsaga hover_doc ++keep<CR>")
-- Call hierarchy
keymap("n", "<Leader>ci", "<cmd>Lspsaga incoming_calls<CR>")
keymap("n", "<Leader>co", "<cmd>Lspsaga outgoing_calls<CR>")
-- Floating terminal
keymap({"n", "t"}, "<A-d>", "<cmd>Lspsaga term_toggle<CR>")Note that the title in the floating window requires Neovim 0.9 or greater. If you are using Neovim 0.8 you won't see a title.
**If you are using Neovim 0.9 and want to disable the title, see Customizing Lspsaga's Appearance
You need not copy all of the options into the setup function. Just set the options that you've changed in the setup function and it will be extended with the default options!
You can find the documentation for Lspsaga in Neovim by using :h lspsaga.
  preview = {
    lines_above = 0,
    lines_below = 10,
  },
  scroll_preview = {
    scroll_down = "<C-f>",
    scroll_up = "<C-b>",
  },
request_timeout = 2000,A finder to show the defintion, reference and implementation (only shown when current hovered word is a function, a type, a class, or an interface).
Default options:
  finder = {
    edit = { "o", "<CR>" },
    vsplit = "s",
    split = "i",
    tabe = "t",
    quit = { "q", "<ESC>" },
},There are two commands, :Lspsaga peek_definition and :Lspsaga goto_definition. The peek_definition command works like the VSCode command of the same name, which shows the target file in an editable floating window.
Default options:
  definition = {
    edit = "<C-c>o",
    vsplit = "<C-c>v",
    split = "<C-c>i",
    tabe = "<C-c>t",
    quit = "q",
    close = "<Esc>",
  }
peek_definition showcase
The steps demonstrated in this showcase are:
- Pressing
gdto run:Lspsaga peek_definition - Editing a comment and using
:wto save - Pressing
<C-c>oto jump to the file in the floating window - Lspsaga shows a beacon highlight after jumping to the file
Jumps to the definition of the hovered word and shows a beacon highlight.
Default options:
  code_action = {
    num_shortcut = true,
    keys = {
      -- string | table type
      quit = "q",
      exec = "<CR>",
    },
},num_shortcut- It istrueby default so you can quickly run a code action by pressing its corresponding number.
code_action showcase
The steps demonstrated in this showcase are:
- Pressing
gato run:Lspsaga code_action - Pressing
jto move within the code action preview window - Pressing
<Cr>to run the action
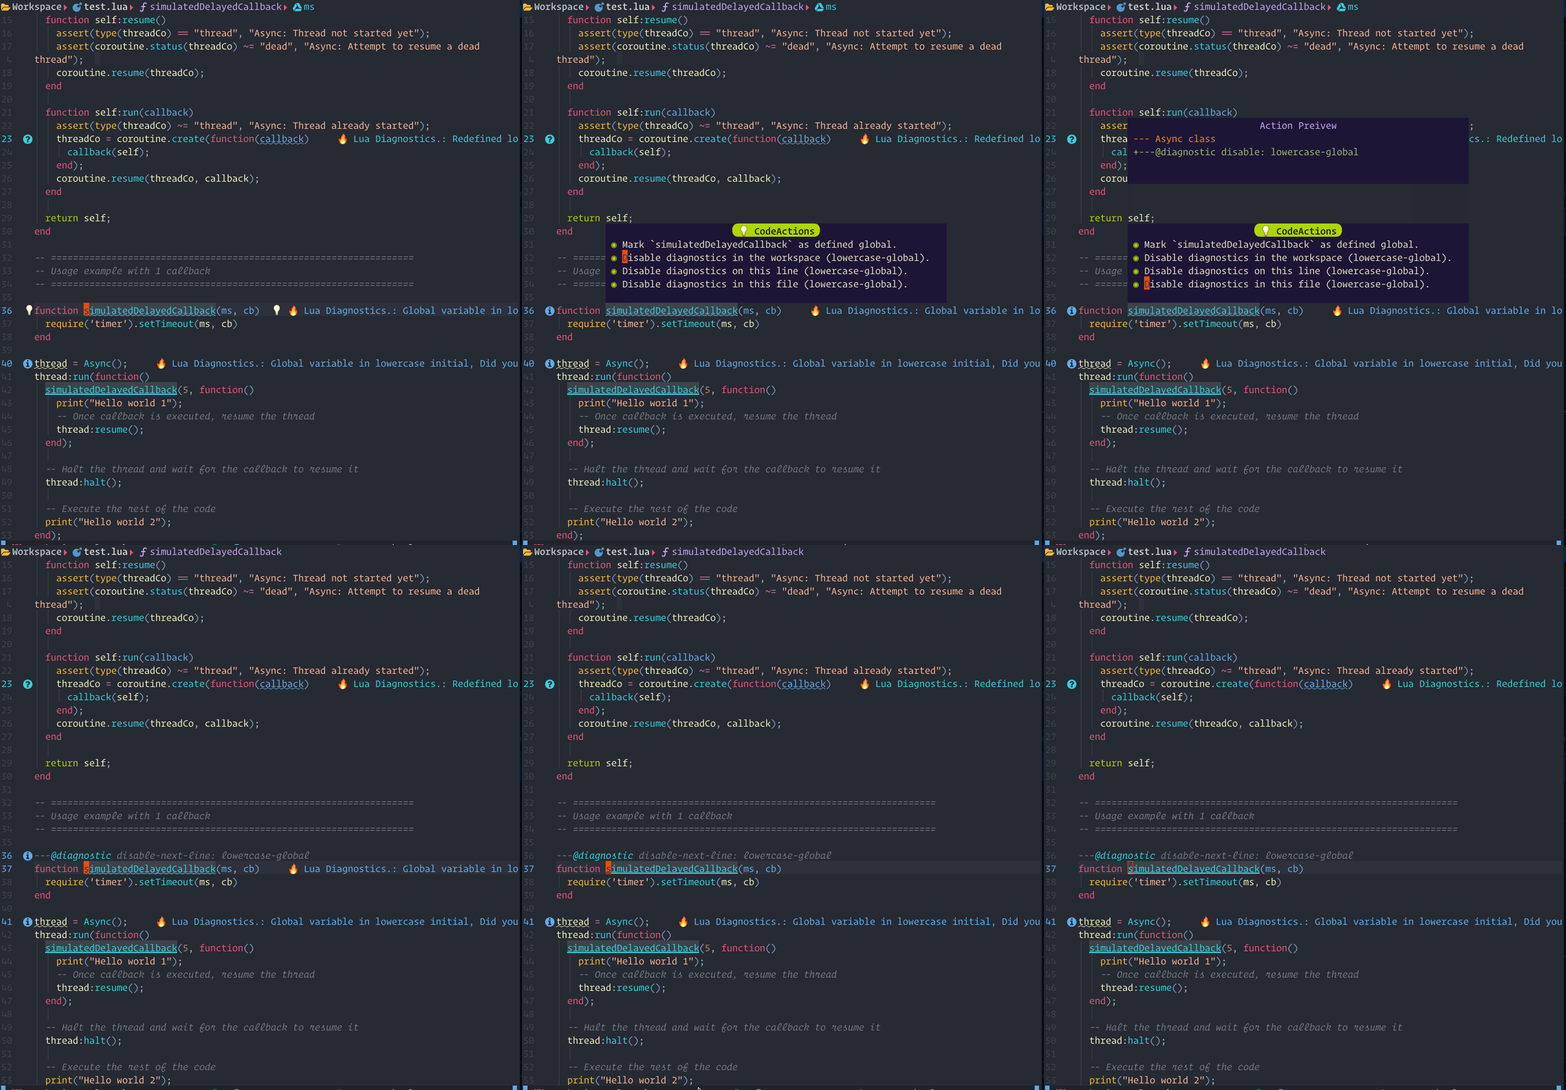
When there are possible code actions to be taken, a lightbulb icon will be shown.
Default options:
  lightbulb = {
    enable = true,
    enable_in_insert = true,
    sign = true,
    sign_priority = 40,
    virtual_text = true,
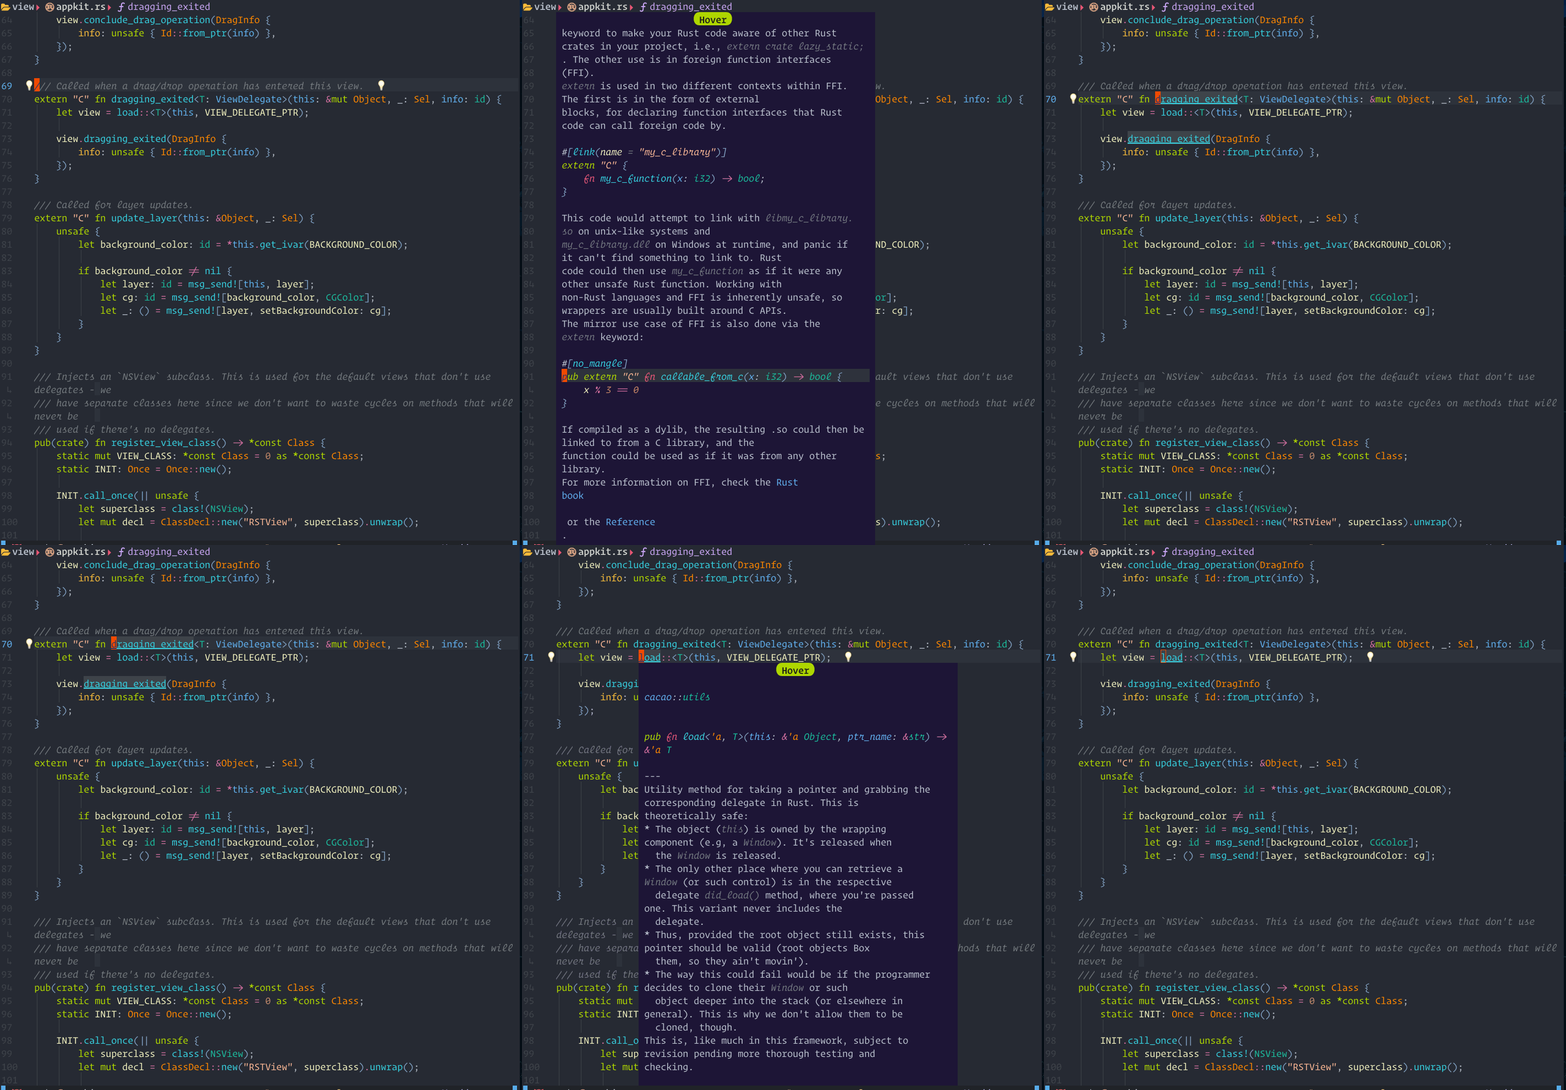
},You should install the treesitter markdown parser so Lspsaga can use it to render the hover window.
You can press the keyboard shortcut for :Lspsaga hover_doc twice to enter the hover window.
hover_docshow case
The steps demonstrated in this showcase are:
- Pressing
Konce to run:Lspsaga hover_doc - Pressing
Kagain to enter the hover window - Pressing
qto quit
Jumps to next diagnostic position and show a beacon highlight. Lspsaga will then show the code actions.
Default options:
  diagnostic = {
    show_code_action = true,
    show_source = true,
    jump_num_shortcut = true,
    keys = {
      exec_action = "o",
      quit = "q",
      go_action = "g"
    },
},- Using
go_action, you can quickly jump to line where actions need to be taken in the diagnostics floating window. jump_num_shortcut- The default istrue. After jumping, Lspasga will automatically bind code actions to a number. Afterwards, you can press the number to execute the code action. After the floating window is closed, these numbers will no longer be tied to the same code actions.
You can also use a filter when using diagnostic jump by using a Lspsaga function. The function takes a table as its argument.
It is functionally identical to :h vim.diagnostic.get_next.
-- This will only jump to an error
-- If no error is found, it executes "goto_next"
require("lspsaga.diagnostic"):goto_prev({ severity = vim.diagnostic.severity.ERROR })
diagnostic_jump_next showcase
The steps demonstrated in this showcase are:
- Pressing
[eto jump to the next diagnostic position, which shows the beacon highlight and the code actions in a diagnostic window - Pressing the number
2to execute the code action without needing to enter the floating window
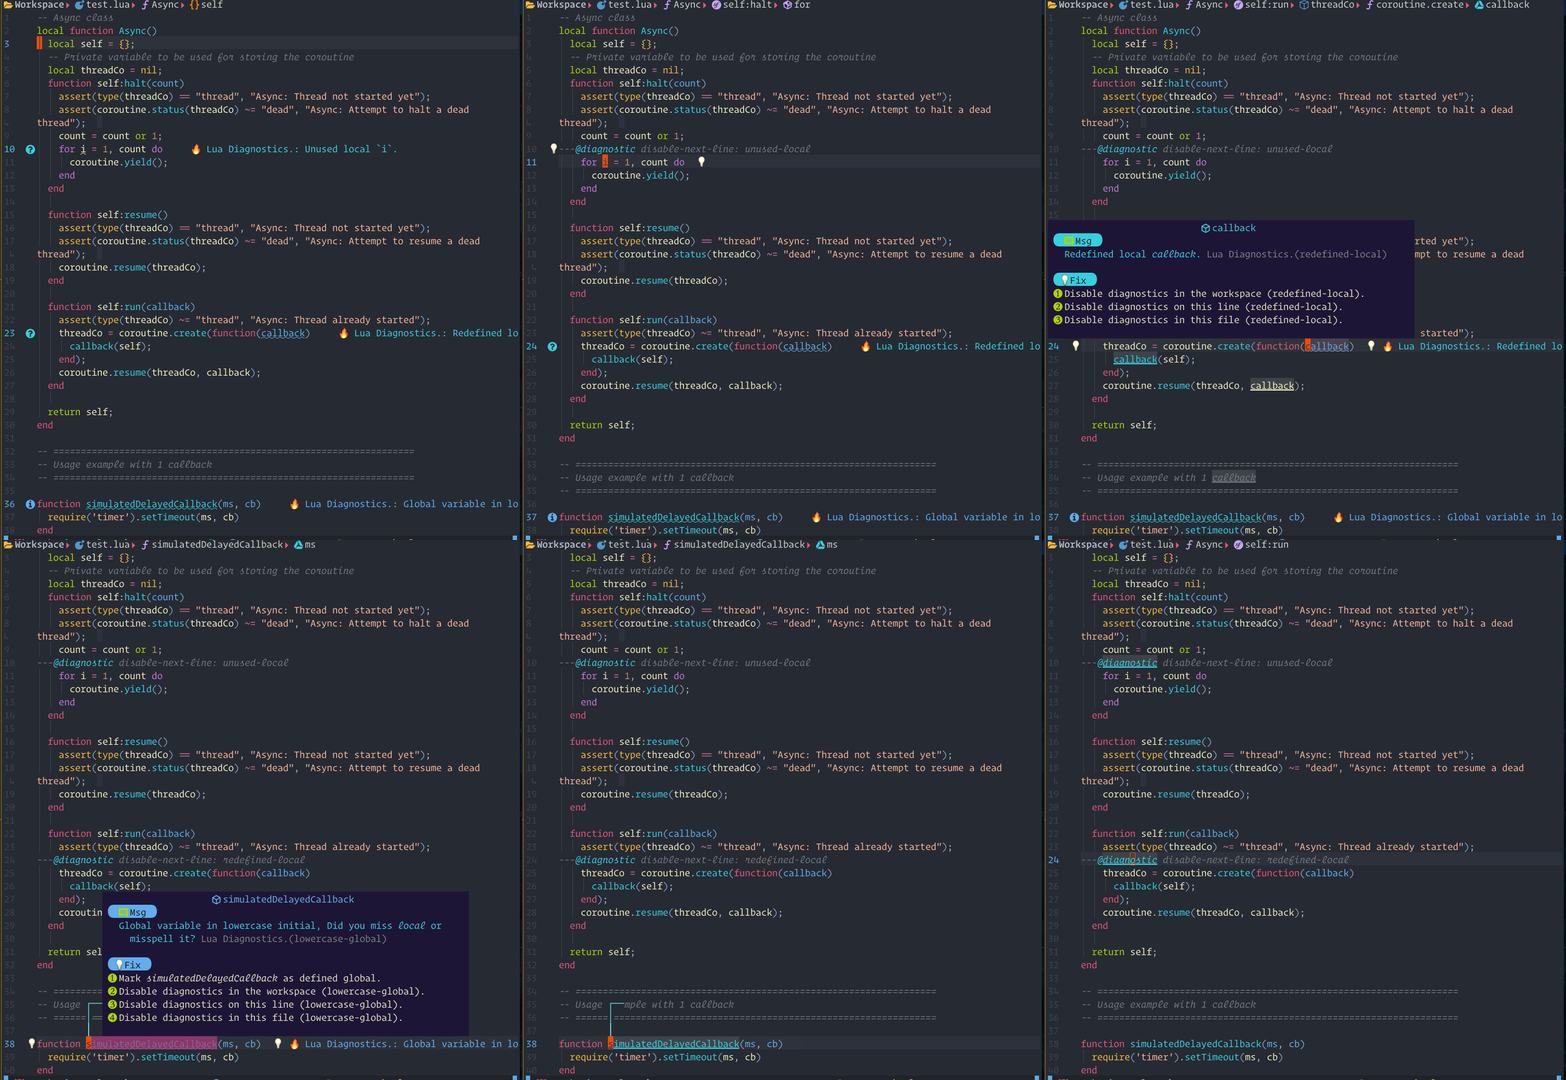
- If you want to see the code action, you can use
<C-w>wto enter the floating window. - Press
gto go to the action line and see the code action preview. - Press
oto execute the action.

show_line_diagnostics, show_buf_diagnostics, show_cursor_diagnostics
Uses the current LSP to rename the hovered word.
Default options:
  rename = {
    quit = "<C-c>",
    exec = "<CR>",
    mark = "x",
    confirm = "<CR>",
    in_select = true,
},markis used for the++projectargument. It is used to mark the files which you want to rename the hovered word in.confirm- After you have marked the files, press this key to execute the rename.
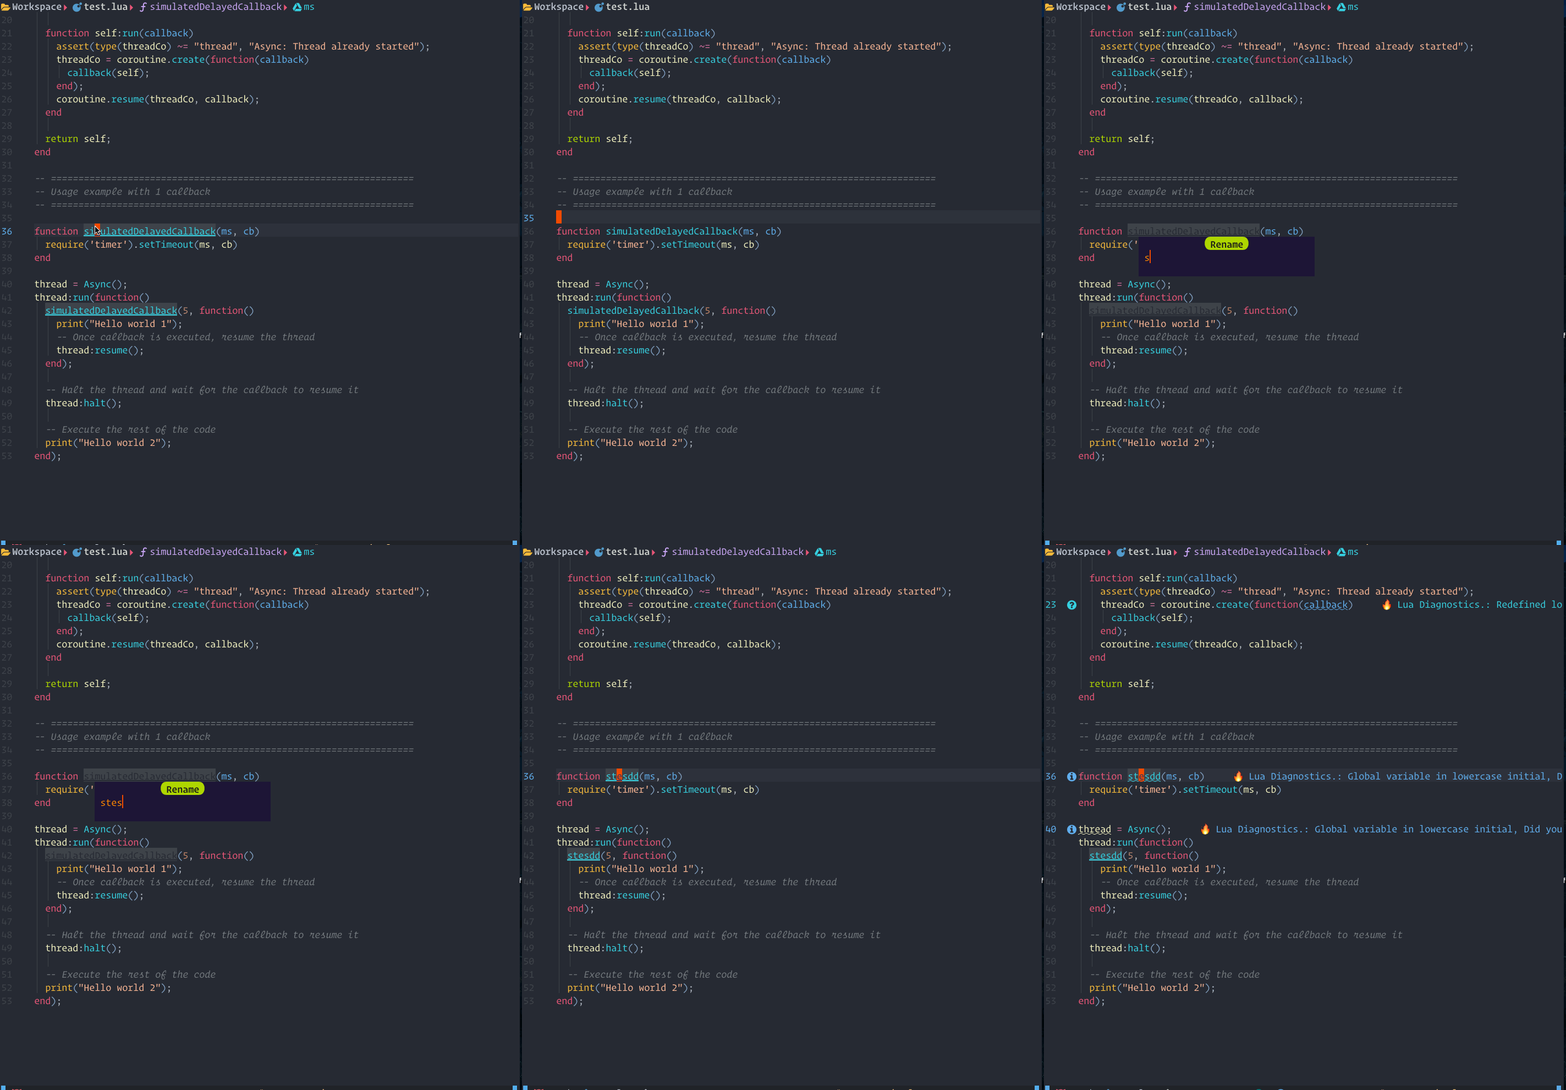
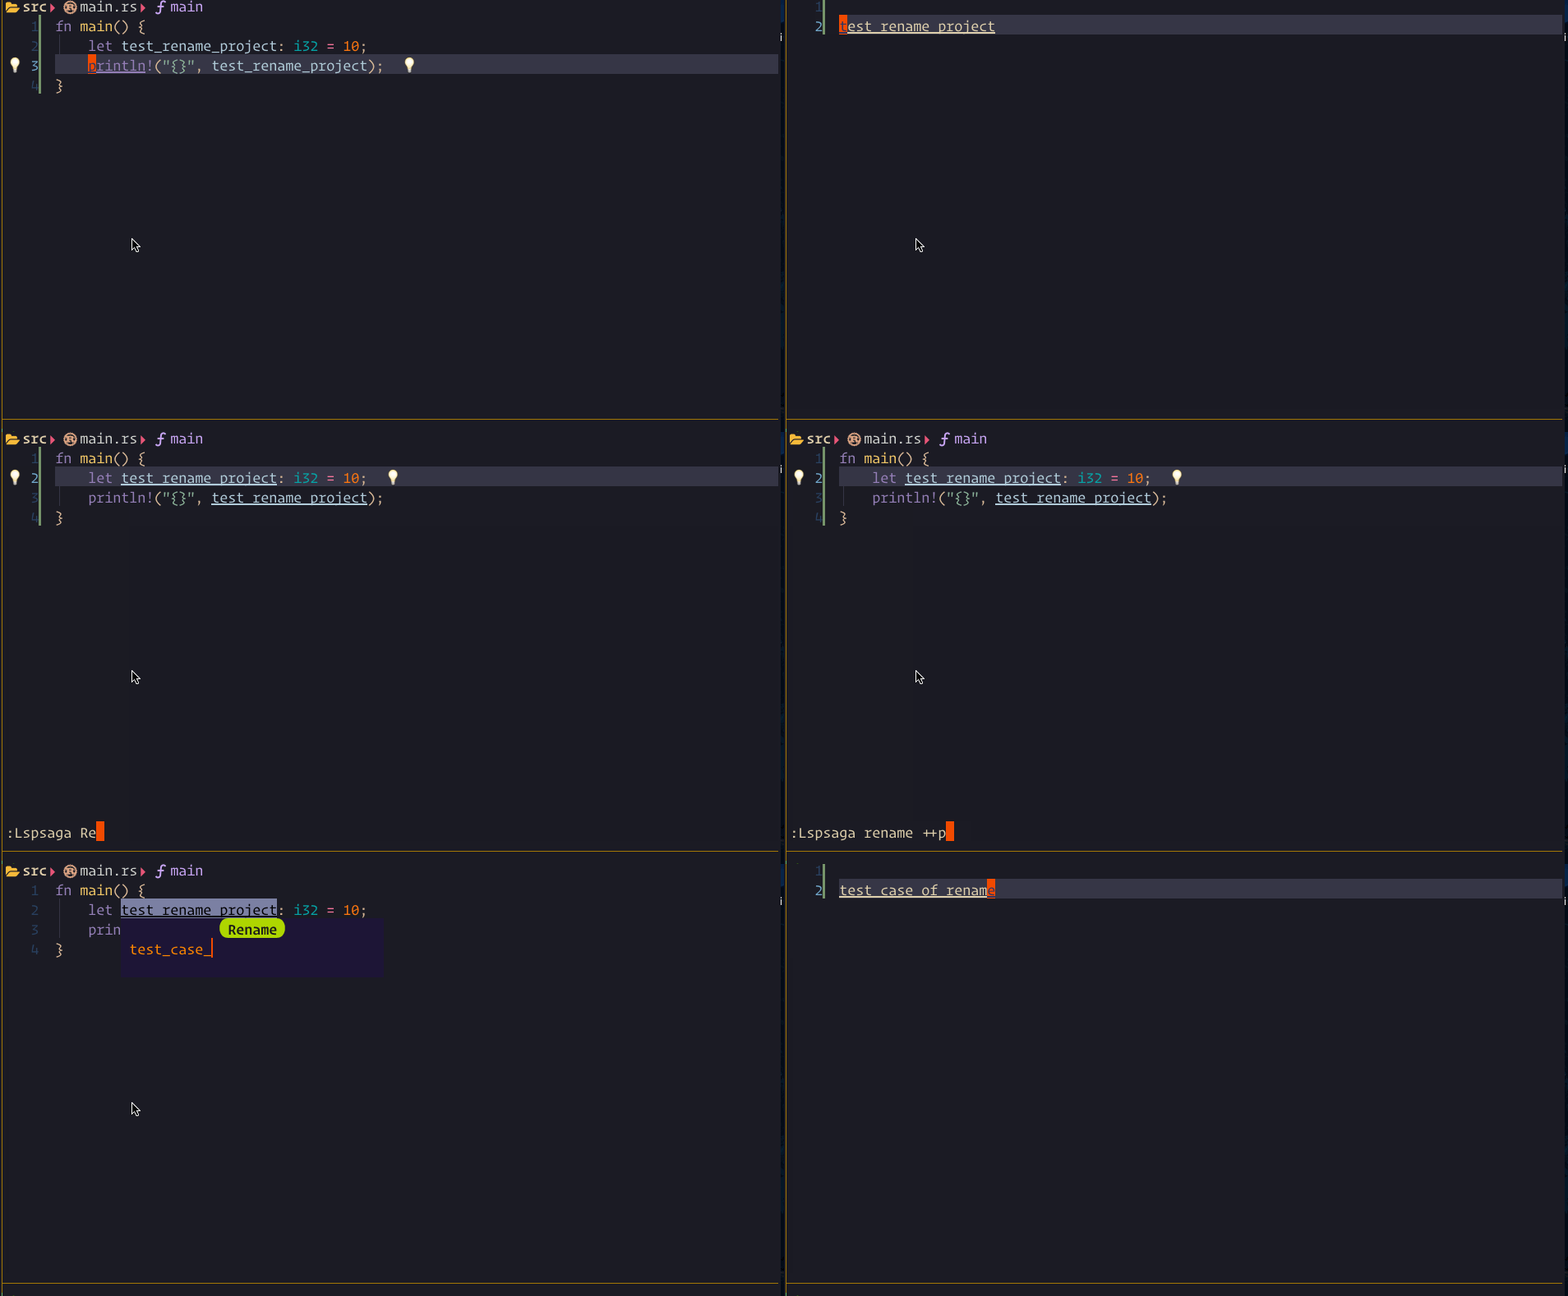
rename showcase
The steps demonstrated in this showcase are:
- Pressing
grto run:Lspsaga rename - Typing
stesddand then pressing<CR>to execute the rename
The steps demonstrated in this showcase are:
- Pressing
gRto run:Lspsaga rename ++project - Pressing
xto mark the file - Pressing
<CR>to execute rename
Default options:
  outline = {
    win_position = "right",
    win_with = "",
    win_width = 30,
    show_detail = true,
    auto_preview = true,
    auto_refresh = true,
    auto_close = true,
    custom_sort = nil,
    keys = {
      jump = "o",
      expand_collapse = "u",
      quit = "q",
    },
  },
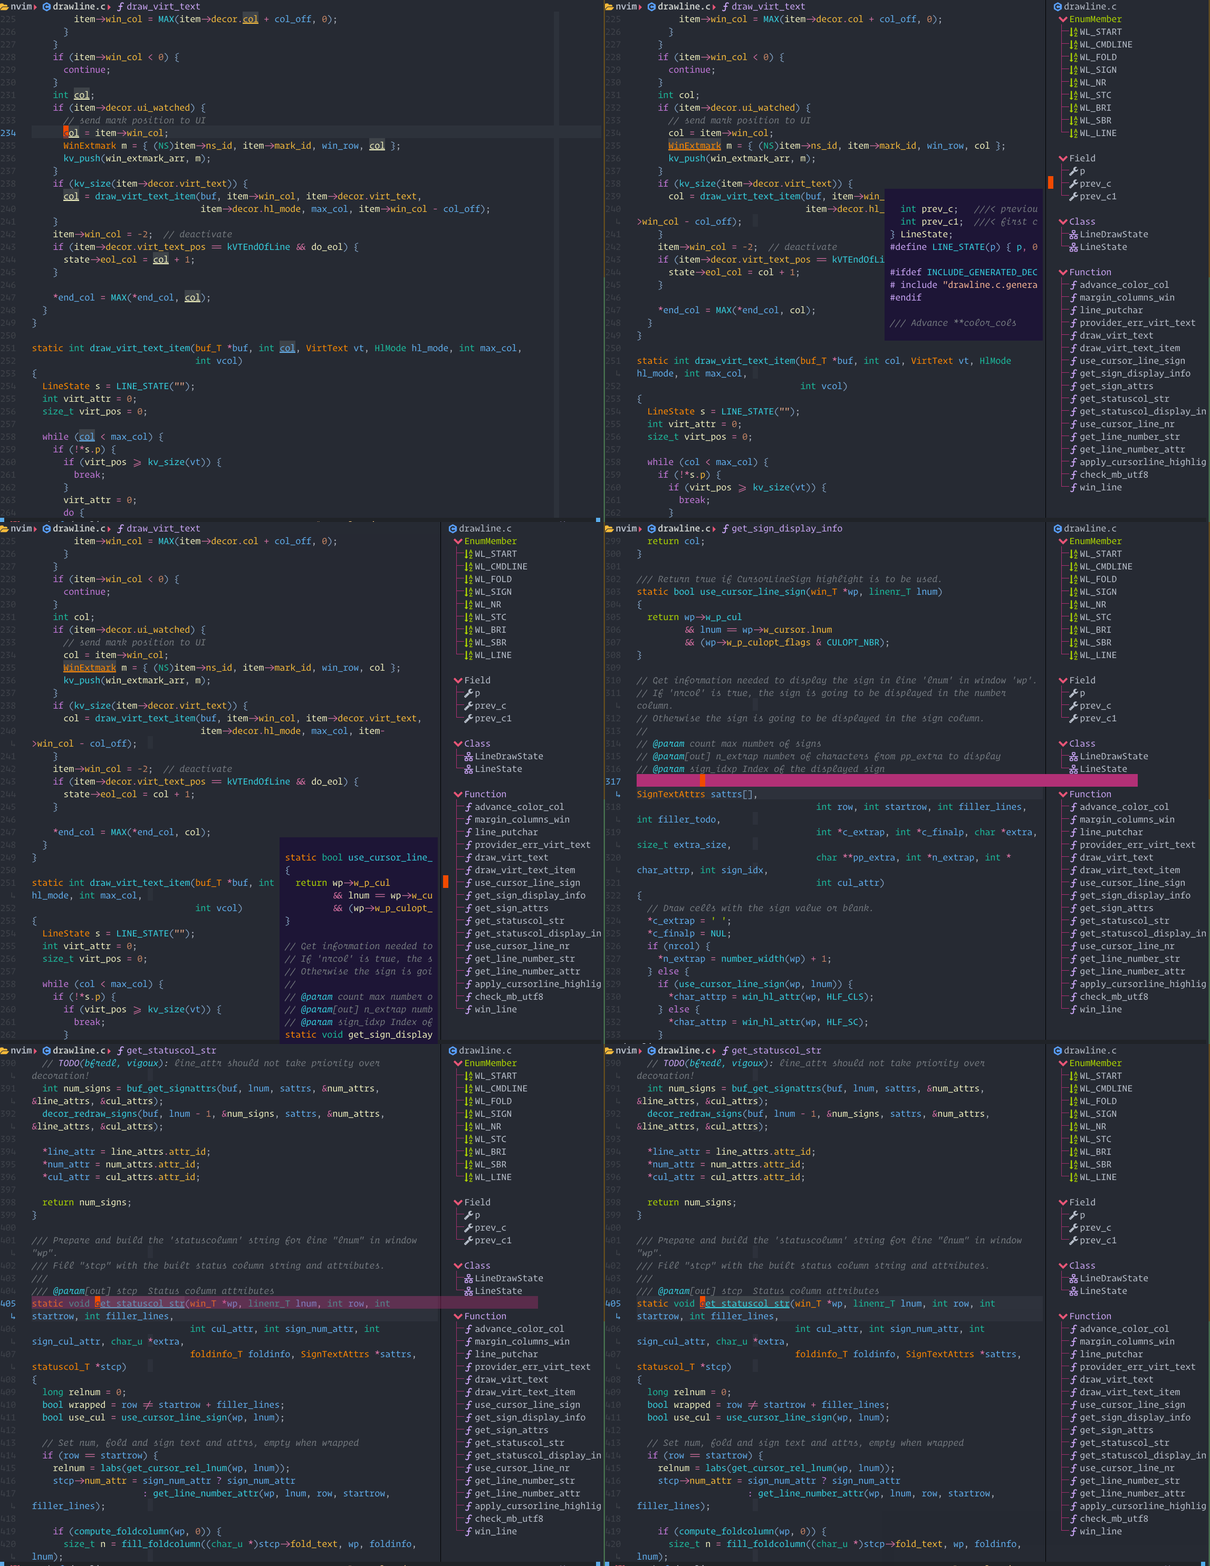
outline showcase
The steps demonstrated in this showcase are:
- Pressing
<Leader>orun:Lspsaga outline - Pressing
jto move down - Pressing
oto jump
Runs the LSP's callhierarchy/incoming_calls.
Default options:
  callhierarchy = {
    show_detail = false,
    keys = {
      edit = "e",
      vsplit = "s",
      split = "i",
      tabe = "t",
      jump = "o",
      quit = "q",
      expand_collapse = "u",
    },
},Runs the LSP's callhierarchy/outgoing_calls.
This requires Neovim version >= 0.8.
Default options:
symbol_in_winbar = {
enable = true,
separator = " ",
hide_keyword = true,
show_file = true,
folder_level = 2,
respect_root = false,
color_mode = true,
},hide_keyword- The default value istrue. Lspsaga will hide some keywords and temporary variables to make the symbols look cleaner.folder_levelonly works whenshow_fileistrue.respect_rootwill respect the LSP's root. If this istrue, Lspsaga will ignore thefolder_leveloption. If no LSP client is being used, Lspsaga will fall back to using folder level.color_mode- The default value istrue. When it is set tofalse, only icons will have color.
Lspsaga provides an API that you can use in your custom winbar or statusline.
vim.wo.winbar / vim.wo.stl = require('lspsaga.symbolwinbar'):get_winbar()A simple floating terminal.
Default UI options
ui = {
-- Currently, only the round theme exists
theme = "round",
-- This option only works in Neovim 0.9
title = true,
-- Border type can be single, double, rounded, solid, shadow.
border = "solid",
winblend = 0,
expand = "",
collapse = "",
preview = " ",
code_action = "💡",
diagnostic = "🐞",
incoming = " ",
outgoing = " ",
colors = {
-- Normal background color for floating window
normal_bg = "#1d1536",
-- Title background color
title_bg = "#afd700",
red = "#e95678",
magenta = "#b33076",
orange = "#FF8700",
yellow = "#f7bb3b",
green = "#afd700",
cyan = "#36d0e0",
blue = "#61afef",
purple = "#CBA6F7",
white = "#d1d4cf",
black = "#1c1c19",
},
kind = {},
},If you don't like the colors or if you want to switch your colorscheme over time, you can change the highlight group in your colorscheme or config. All highlight groups can be found in highlight.lua.
Modify ui.kind to change the icons of the kinds.
All kinds used in Lspsaga are defined in lspkind.lua.
The key in ui.kind is the kind name, and the value can either be a string or a table. If a string is passed, it is setting the icon. If table is passed, it will be passed as { icon, color }.
Thanks for everything!
@Möller Lukas, @HendrikPetertje, @Bojan Wilytsch and @Burgess Darrion
Currently, I am in need of some donations. If you'd like to support my work financially, please donate through PayPal. Thanks!
Licensed under the MIT license.


