| About The Project | Usage | Prerequisites | Deployment | Cost Estimate | Appendix |
|---|
Sample project to collect the Microsoft Teams Call Records data.
The official Microsoft documentation about the Call Records API can be found here:
Working with the call records API in Microsoft Graph
⚠️ This is NOT an official solution by Microsoft. This example should demonstrate an potential process on how to collect Microsoft Teams call records data using Graph API and Azure resources.
- teams-call-records-api
- Table of Contents
- About The Project
- Getting Started
- Prerequisites
- Deployment
- 1. Clone the repo or download the files directly
- 2. Update the Configuration file
- 3. Run the deployment script
- 4. Publish the Azure Function with VSCode
- 5. Update the Azure Function Configuration
- 6. Create the required tables in the ADX
- 7. Create the data connections in ADX
- 8. Update the subscription
- 9. Test Call
- 10. Scale-out options
- Usage
- Cost Estimate
- Roadmap
- Contributing
- License
- Appendix
This project provides an example how to store the Microsoft Teams calls records data to Azure Kusto.
The solution is built with Python-based Azure Functions, Service Bus and Event Hubs to store the Microsoft Teams call data to ADX (Azure Data Explorer) also known as Kusto.
The following diagram shows how the data gets stored:
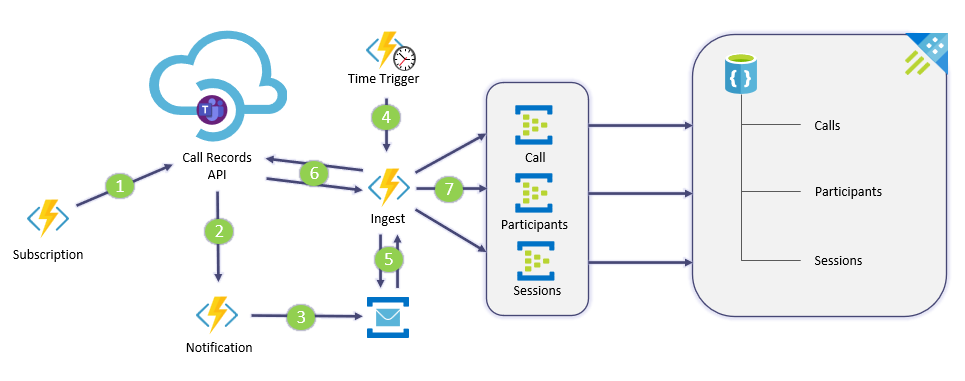
- Azure Function to build and renew the Graph API Subscription
- Azure Function as Webhook to receive new call-id's after a call ends
- Call-id's are written to a Azure Service Bus
- Time Triggered Azure Function('s) to trigger an additional function (Ingest) to process the call-id's
- Ingest Azure Function to fetch new call-id's from the Service Bus
- The function will then query the call records data from Graph API in a batch (20 call-id's)
- Then the call data will be split into 3 segments (Call, Participants, Sessions) and sent to 3 Event Hubs. Data Connection's in ADX will write these segments then to corresponding tables in a database inside the cluster.
The data can then be directly queried based on the call-id's using KQL or Power BI for example. All data is stored in raw JSON format as dynamic fields and require some additional data transformation based on your needs. In Addition, also other sources like ASN information or network details can be added to separate tables to allow even more enhanced queries.
- Python
- PowerShell
- Graph API
- Azure Functions
- Azure Service Bus
- Azure Event Hub
- Azure Data Explorer
To get a copy up and running make sure to meet the requirements and follow the steps below.
❗ Please make sure to first explore 🔭 how this sample project is build and then test the project in a lab or demo environment. This project should help to gain knowledge how to interact with the Microsoft Graph CallRecords API to build your own great solutions 🚀.
The solution require an Office 365 and Azure subscription including the following:
- Demo environment (Office 365 and Azure Subscription)
- Azure Command-Line Interface (CLI)
- Azure Az PowerShell Module
- Visual Studio Code
- Access to Azure AD to create an App Registration
- Access to an Azure subscription to create a new Resource Group and the required components in it
Clone the repo:
git clone https://github.com/tobiheim/teams-call-records-api.gitFirst you need to adjust the configuration file deploy-config.json. This file will include all the details for the PowerShell-based deployment. The PowerShell script will deploy the following components in your Azure subscription:
- App Registration including the required permissions (Note: Will expire after 90 days)
- Resource Group
- Service Bus Namespace with Topic
- Event Hub Namespace with 3 Event Hubs
- Azure Data Explorer Cluster
- Azure Function App
Here's an example:
{
    "tenant": {
        "subscriptionId": "a4d1fd10-XXXX-XXXX-XXXX-XXXXXXXXXXXX",
        "tenantId": "f7bed8uc-XXXX-XXXX-XXXX-XXXXXXXXXXXX"
    },
    "azureGeneral": {
        "Location": "<Azure Location e.g westeurope>",
        "appRegistrationName": "<App Registration Name>",
        "resourceGroup": "<Resource Group Name>"
    },
    "serviceBus": {
        "service_BusNamespace_Name": "<Service Bus Namespace>",
        "serviceBusName": "<Service Bus Topic Name>",
        "serviceBusSubscriptionName": "<Service Bus Subscription Name>",
        "serviceBusAuthenticationRule": "<Service Bus Authentication Rule Name>"
    },
    "eventHubs": {
        "eventHubNamespaceName": "<Event Hub Namespace>"
    },
    "kustoCluster": {
        "kustoClusterName": "<Azure Data Explorer Clustername>"
    },
    "functionApp": {
        "functionAppName": "<Function App Name>"
    }
}
In the Appendix you can find additional details on how to get the tenant- and subscription-id.
Make sure that all selected names are using an allowed syntax for the individual Azure components.
You can find more details here:
Considerations for naming Azure resources
Make sure that the two required PowerShell Modules are already installed.
Next you can run the Azure deployment. The script requires the following necessary parameters:
./deploy.ps1 -AdminUsername <Azure Subscription and Global Admin> -Mfa <$true or $false>
| Parameter | Description |
|---|---|
| AdminUserName | Admin Account that has access to Azure AD to create an App Registration and is also able to access an Azure subscription to create the required components. |
| Mfa | If your Account requires an additional form of authentication you can set Mfa to True. Expect additional pop-ups to appear. |
Do not change the folder structure of the Deployment folder because the script rely on it.
After a successful run of the script you should get the following output:

Next you need to publish the functions to the newly created Azure function app. Open VsCode and then open the folder Azure Functions from the cloned repository.
Make sure that the Azure Function extension is already installed in your VsCode. Either install the Azure Tools or the Azure Functions extension.

Before you can publish the functions you need to get the name of the deployed function app from the Azure portal.

When you now open the Azure extension from your left panel in VsCode you should see the functions under Local Project. Use the Deploy to Function App... option as shown below to publish the functions to Azure.
Note: If the Local Project remain empty then you need to create new local project first.

You should now see a list of all your available function apps. Select the one that the script created for you earlier.

Click Deploy to start the deployment.
You should see the following after the functions are successfully deployed.

Leave VsCode open. You will need it later again.
Now you need to update pre-created values inside the function app configuration based on the deployed functions in the previous step.
Go to the Azure function app in the Azure Portal and navigate to the Functions section.

Open the highlighted HTTP Trigger functions to Get the Function Url.

Store the URL because you will need it in the upcoming steps. Repeat the same step also for the other HTTP Trigger function.
Now you can add the Urls to the function app configuration as shown below.

Please adjust the URL placeholder as shown in the following table:
| Function Name | Function Configuration Value Name |
|---|---|
| tcr_notification URL | API_NOTIFICATION_URL |
| tcr_ingest_webhook URL | INGESTFUNC_URL |

As next step you need to create the required tables inside your Azure Data Explorer cluster. To do so, you can either use the Kusto Application, the VsCode extension or the Kusto Web Explorer. In this example we will use the Web Explorer.
Before you can do this, you need to copy the URI of your Cluster.

Open the Kusto Web Explorer and sign-in. Now you can add your cluster.

Now create the required tables in your cluster. Use the example below:

.create table calls (callid:string, call:dynamic)

.create table participants (callid:string, participant:dynamic)

.create table sessions (callid:string, session:dynamic)
Keep the breaks in between each line and run them one by one. The selected one will be highlighted in light-blue. This applies also to the following steps.
Next enable the ingest timestamp using the following examples:
.alter table calls policy ingestiontime true

.alter table participants policy ingestiontime true

.alter table sessions policy ingestiontime true
As last step in Kusto you need to build the ingest mapping:
.create-or-alter table calls ingestion json mapping "calls"
'['
'    { "column" : "callid", "Properties":{"Path":"$.id"}},'
'    { "column" : "call", "Properties":{"Path":"$"}}'
']'


.create-or-alter table participants ingestion json mapping "participants"
'['
'    { "column" : "callid", "Properties":{"Path":"$.id"}},'
'    { "column" : "participant", "Properties":{"Path":"$.participants"}}'
']'

.create-or-alter table sessions ingestion json mapping "sessions"
'['
'    { "column" : "callid", "Properties":{"Path":"$.id"}},'
'    { "column" : "session", "Properties":{"Path":"$.sessions"}}'
']'Now you can create the data connections for the Kusto cluster based on your three Event Hubs.
Select the created database:

Select Data Connections:

Add a new data connection:

Configure the data connection as shown below:

Repeat the steps in this section for the two additional required data connections:
- participants
- sessions
Before you are able to update the renew time of the subscription, you need to verify that the subscription was created successfully. There are two available options:
- Use the Azure Function Monitor
- Run the following Powershell Example
The PowerShell example requires the app registration information that are stored inside the Azure function configuration.
#region App Registration values
$ClientID = "<App Registration Client Id"
$ClientSecret = "<App Registration Client Secret>"
$TenantId = "<Tenant Id>"

#endregion
#region Get Access Token

$Body = @{
    client_id = $ClientID
    client_secret = $ClientSecret
    grant_type = "client_credentials"
    scope = "https://graph.microsoft.com/.default"
}
$OAuthReq = Invoke-RestMethod -Method Post -Uri https://login.microsoftonline.com/$TenantId/oauth2/v2.0/token -Body $Body
$AccessToken = $OAuthReq.access_token

#endregion
#region Verify Subscription

## Request Header
$Headers= @{'Authorization' = "Bearer $AccessToken"
            'Content-Type'='application/json'
            'Accept'='application/json'
}

## Webhook Subscription URL
$SubscriptionUrl = "https://graph.microsoft.com/v1.0/subscriptions"

## GET Graph API Subscription
$get = Invoke-RestMethod -Uri $SubscriptionUrl -Headers $Headers -Method GET

if (!$get.value) {
    Write-Host('No subscription found for the tenant id: {0}' -f $TenantId)
} else {
    $get.value
}

#endregion
The expected output should look like this:
id                        : XXXXXXXX-XXXX-XXXX-XXXX-XXXXXXXXXXXX
resource                  : communications/callRecords
applicationId             : XXXXXXXX-XXXX-XXXX-XXXX-XXXXXXXXXXXX
changeType                : created
clientState               :
notificationUrl           : https://psfuncapp29-ht3nw.azurewebsites.net/api/...
notificationQueryOptions  :
lifecycleNotificationUrl  :
expirationDateTime        : 2021-08-29T11:04:00.250604Z
creatorId                 : XXXXXXXX-XXXX-XXXX-XXXX-XXXXXXXXXXXX
includeResourceData       :
latestSupportedTlsVersion : v1_2
encryptionCertificate     :
encryptionCertificateId   :
notificationUrlAppId      :
As a final step you need to update the tcr_subscription function time trigger configuration in VSCode. Subscriptions expire after a length of time that varies by resource type. In order to avoid missing new call id's, the app needs to renew its subscriptions in advance of their expiry date. Maximum length of the callRecord subscription can be 4230 minutes (under 3 days). More details can be found here: Maximum length of the subscription
Change the schedule value to "0 0 */4176 * * *" in the function.json as shown below and re-deploy the functions as you did in the step 4. Publish the Azure Function with VSCode.
{
  "scriptFile": "__init__.py",
  "bindings": [
    {
      "name": "mytimer",
      "type": "timerTrigger",
      "direction": "in",
      "schedule": "0 0 */4176 * * *"
    }
  ]
}
Additional details about the NCRONTAB expressions can be found here: Timer trigger for Azure Functions
📞 Run a couple of test calls and check if the data gets stored in the Kusto cluster. Keep in mind that it will take up to 15min. until the Graph API will send the call id to the configured webhook. Furthermore, also consider the additional time (default: 5min.) configured in the Time Trigger function tcr_ingest_trigger when the function should run. (More details can be found in the next section)
🔎 You can verify this by using the following query:

The default configuration of this solution will trigger the data ingest (for 20 calls at a time) every 5 Min. You can simply lower the schedule time inside the tcr_ingest_trigger function in the function.json file as shown below:
{
  "scriptFile": "__init__.py",
  "bindings": [
    {
      "name": "mytimer",
      "type": "timerTrigger",
      "direction": "in",
      "schedule": "0 */1 * * * *"
    }
  ]
}
If you have to handle a large amount of calls in your tenant then you can create additional function apps and only deploy the following function and helper modules in there. This will allow you to trigger the tcr_ingest_webhook function in parallel based on the schedule value defined in the function.json. Make sure to update the function app configuration accordingly in the newly created function apps.
Example additional function app:
constants
|___ constants.py
tcr_ingest_trigger
|___ __ini__.py
|___ function.json
.funcignore
host.json
proxies.json
requirements.txt
This sample project should shed some light on a potential process on how the Microsoft Teams call records data can be collected. Kusto will allow you to query large datasets very effectively in almost no time.
You can easily add additional tables and datasets to combine them in your queries to achieve great results.
Example Query:

For the visualization, Power BI could be leveraged, to provide great looking visuals.
📊 This project currently doesn't included details on how to transform and query the stored data. You can find more details here:
Getting started with Kusto
Visualize data using the Azure Data Explorer connector for Power BI
The solutions uses sample SKUs/ Tier's in all the provided sample Azure ARM Templates. Please make sure to adjust them accordingly based on your requirements and cost estimation.
Example:

You can find more details about the pricing of the used components here:
Azure Pricing Calculator
- Include paging support for truncated responses
- Update and extend batch handling process
- Store app registration in Azure Key Vault
See the open issues for a list of proposed features (and known issues).
Contributions are what make the open source community such an amazing place to be learn, inspire, and create. Any contributions you make are greatly appreciated.
- Fork the Project
- Create your Feature Branch (
git checkout -b feature/AmazingFeature) - Commit your Changes (
git commit -m 'Add some AmazingFeature') - Push to the Branch (
git push origin feature/AmazingFeature) - Open a Pull Request
Distributed under the MIT License. See LICENSE for more information.
To select an Azure location for your resources you can run the following cmdlet using the Azure Az PowerShell Module:
(Get-AzLocation).location
To get the tenant and Subscription Id, you can run the following cmdlet using the Azure Az PowerShell Module:
Get-AzSubscription |Select-Object -Property Id, Tenantid |ft
If you need more details about the used SDKs please visit the links below:
Azure Event Hubs client library for Python
Azure Service Bus client library for Python