Overview of the Oppia Android codebase and architecture
The Oppia Android codebase makes use of Kotlin and XML and can be built using Android Studio. The Oppia app follows a layered architecture that combines parts of MVP (Model-View-Presenter), MVC (Model-View-Controller), and MVVM (Model-View-ViewModel).
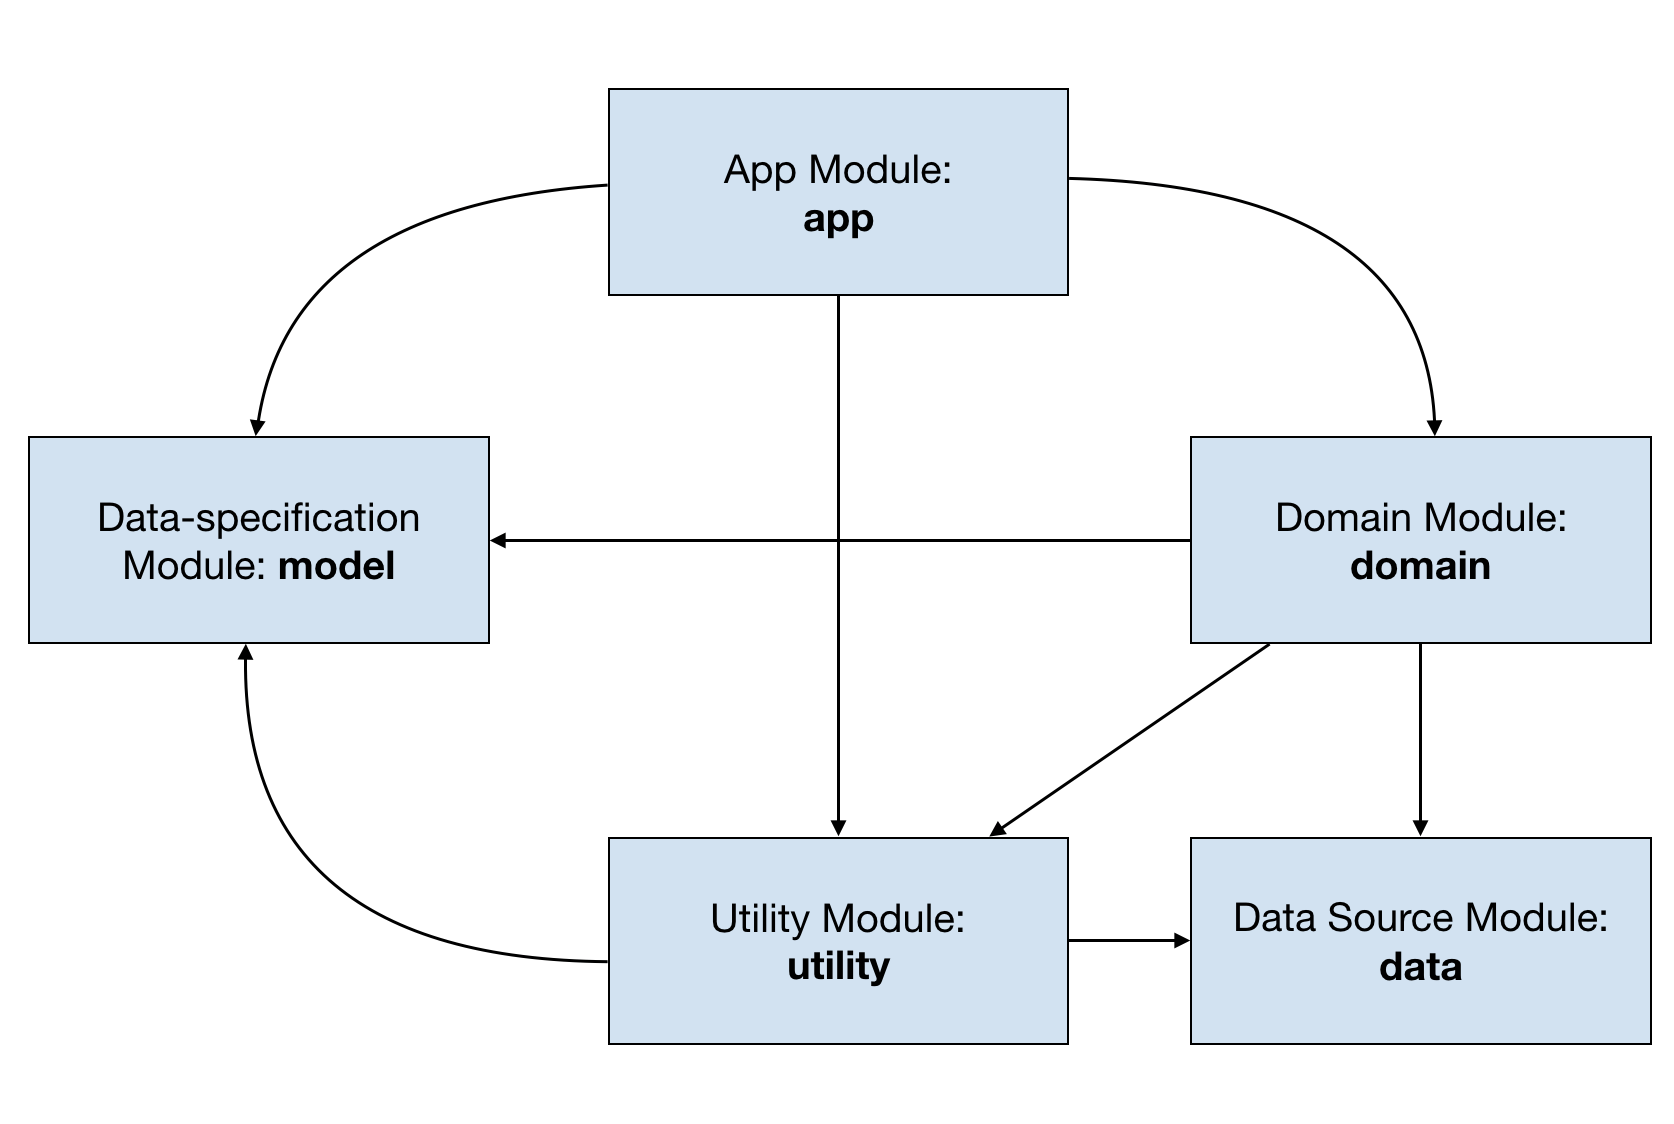
The Oppia project follows a standard Gradle project layout with five modules. Each subdirectory in a module contains files that are specific to a particular feature or purpose.
This module contains all the activities and fragments, as well as the view, view model, and presenter layers. It also contains Robolectric test cases and integration tests using Espresso. Here are the contents of some of its main subdirectories:
- app/activity - Basic Dagger code for activity implementation.
- app/application - Dagger code for the application, with different module declarations.
- app/customview - Custom UI items used by the application.
- app/databinding - Different BindingAdapters which can be used in any layout file.
- app/fragment - Basic Dagger code for fragment implementation.
- app/player - Everything related to the exploration player (e.g. audio, state, etc.).
- app/story - Fragments, activities, view models, adapters, presenters and interfaces related to the Story screen.
- app/testing - All dummy test activities and fragments that are needed to test the Android functionality correctly. These help with writing test cases.
- app/topic - Fragments, activities, view models, adapters, presenters and interfaces related to the Topic screen and its four tabs.
- app/translation - UI utilities for managing languages & locales.
- app/utility - Any code which can be used centrally, e.g. date-time getter-setter, keyboard controller, etc .
- app/view - Basic Dagger code for View implementation.
- app/viewmodel - Basic Dagger code for ViewModel implementation.
In addition to the above-mentioned subdirectories, this module also contains other subdirectories that contain activities, fragments, interfaces and view models for various screens in the app. These subdirectories follow the naming convention app/<screen_name>. For example, the subdirectory app/resumeLesson contains all the activities, fragments, interfaces and ViewModels used by the resume lesson screen.
This module provides data to the application by fetching data from the Oppia backend. This module is unit-tested with a combination of JUnit and Robolectric. Here are the contents of its subdirectories:
- data/backends - APIs and models needed to make a data request to the Oppia backend, and convert that response to appropriate models.
- data/persistence - Provides offline storage persistence support via PersistenceCacheStore
This module contains the application's business logic, including both front-end controller and business service logic. It is a Java/Kotlin library without Android components, and it is unit-tested using robolectric tests. This module generally follows the naming convention <domain/feature or function name>. Some important subdirectories for this module are listed below:
- domain/audio - Business logic for playing audio in the app.
- domain/classify - Classes responsible for classifying user answers to a specific outcome based on Oppia’s interaction rule engine.
- domain/exploration - Controller for loading explorations, managing states and playing explorations.
- domain/locale - Business logic for managing languages & locales.
- domain/oppialogger - Business logic for logging warnings and errors and analytics.
- domain/platformparameter - Business logic for platform parameters.
- domain/profile - Controller for retrieving, adding, updating, and deleting profiles.
- domain/state - Business logic for managing ephemeral states in play sessions.
- domain/testing - Business logic for testing utilities for log uploading functionality.
- domain/topic - Controller for retrieving all aspects of a topic and topic list and the user’s progress.
- domain/workmanager - Business logic for providing implementation of work manager.
Besides the subdirectories mentioned above, this module contains all of the test lesson assets loaded by the developer build of the app. The files for these test lessons can be found in the domain/src/main/assets subdirectory.
This library contains all protos used in the app. It only contains data definitions, so no tests are included.
This is a Java/Kotlin module without Android dependencies. It contains utilities that all other modules may depend on. It also includes JUnit and robolectric test cases. Its subdirectories are as follows:
- utility/accessibility - Utilities corresponding to Android accessibility.
- utility/data - Various classes which help with effectively fetching locally-stored data in the domain layer.
- utility/extensions - Extensions for Android classes (e.g. LiveData).
- utility/gcsresource - Provides the default name of the GCS Resource bucket.
- utility/logging - Oppia Android does not use Log. Instead, it has a custom Logger, a wrapper class for Android Logcat and file logging. All logs in this project should use OppiaLogger instead of Log.
- utility/networking - A utility to get the current connection status of the device.
- utility/parser - Rich-text parsers (e.g. HtmlParser, UrlParser) ensure that the rich-text from the Oppia backend is parsed correctly to display it properly in the Android app.
- utility/profile - A utility to manage the creation and deletion of directories.
- utility/statusbar - A utility to change the colour of the status bar.
- utility/system - A utility that contains system-related utilities.
This module contains helper classes that make testing other modules easier.
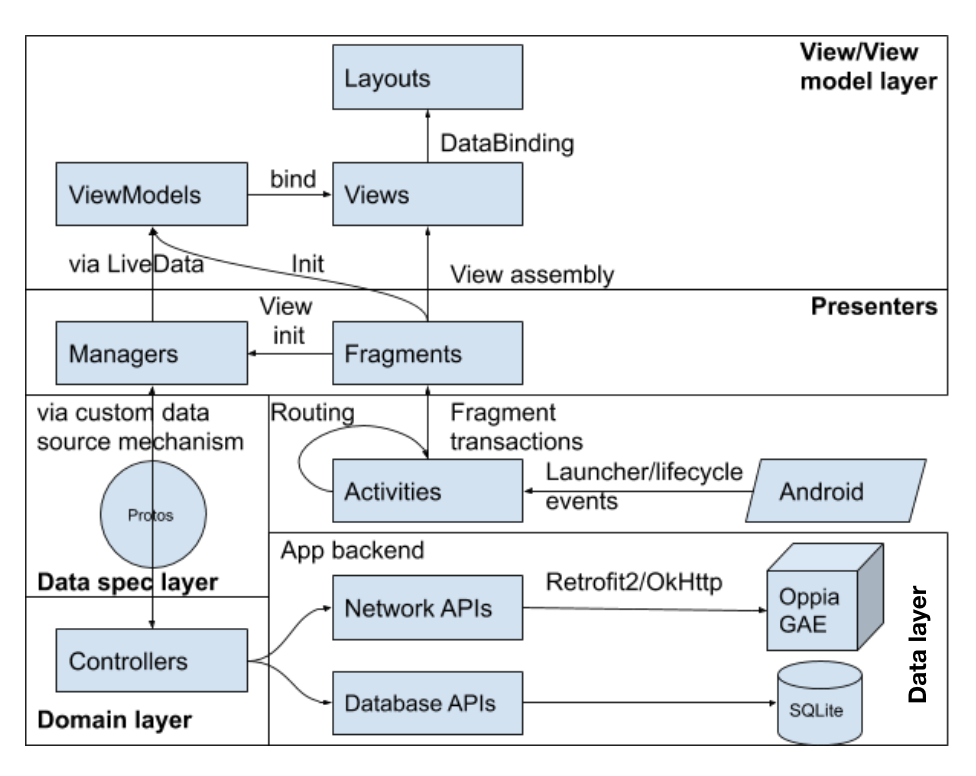
The Oppia app follows a combination of MVP (Model-View-Presenter) and MVVM (Model-View-ViewModel), where different Android components fulfil requirements for each piece:
-
Android Fragments are presenters: they hold the majority of business logic and can optionally have a view but are otherwise responsible for arranging the UI layout and binding view models to Views.
-
Android Views are classic views: they perform no logic and are simply responsible for displaying data from view models (via Android data-binding).
-
View models are Android ViewModels that listen for and expose changes from the model layer.
-
The model layer is defined by a combination of protobuf and Kotlin data objects provided from the controller layer using LiveData. Managers are responsible for maintaining the state in this layer.
-
The controller layer interacts with the database and network. It provides data via a custom data source mechanism.
-
Android Activities should only perform high-level fragment transaction logic and are responsible for initialising Dagger components and performing routing.
Here is an example of how to traverse the codebase. (Note that the examples below are not real tasks/features and should not be implemented.)
Task:
Add a button in Info Tab to open an already existing activity (e.g. SplashActivity).
Walkthrough:
-
Based on the above subdirectory details, we know that app/topic contains all files related to Topic and its tabs.
-
Inside this folder, there is another directory app/topic/info, which should contain information related to the already-existing TopicInfo Tab. In this subdirectory, we see 3 files, TopicInfoFragment, TopicInfoFragmentPresenter and TopicInfoViewModel.
-
Now, let’s first open TopicInfoFragment. This extends InjectableFragment, and we can see that it just calls the TopicInfoFragmentPresenter.
-
Inside TopicInfoFragmentPresenter, we can see that an XML layout inflates using DataBinding. You can see this via this line:
val binding = TopicInfoFragmentBinding.inflate( inflater, container, /* attachToRoot= */ false ) -
From this, we know that the corresponding XML file name is topic_info_fragment.xml.
-
Now, open the topic_info_fragment.xml file and create a button inside it.
-
The button click can be handled by data-binding a function (clickDummyButton) to the XML. That function will be created in the TopicInfoViewModel. We know from the App Architecture section that the ViewModel does not handle the logic, and the presenter is responsible for the logic part.
-
The ViewModel doesn't have access to the presenter directly and instead needs to go through either the fragment or the activity hosting the view via a listener that can be called down into the presenter to perform necessary logic. So we have to get access to the TopicInfoViewModel in TopicInfoFragmentPresenter.
-
So, now that we have access to the ViewModel in the presenter, we will create another function (goToSplashActivity) inside the TopicInfoFragmentPresenter. We can then call this function inside clickDummyButton which was present in TopicInfoViewModel.
Following these steps would lead to completing the entire task with all the code blocks in the correct files.
Task:
Finding code from a string ( e g., story name under lessons tab) that you see in UI when running the app all the way to the UI components, domain controllers and the tests ultimately behind that text appearing.

Walkthrough:
Finding the UI component (story name)
-
The first step is to identify the id of the UI component that is responsible for displaying the text. We can do this by using the layout inspector of the android studio.
-
To do this, run the app on an emulator. Now navigate to the screen that displays the UI component, i.e. the lessons tab.
-
Next, open the layout inspector from the android studio, and click on the UI component displaying the story name. Now all the attributes of this UI component are displayed on the right side of the layout inspector. Here, you can see this UI component's id, i.e. story_name_text_view.

-
Now we have to find the file with a UI component with this id. We can do this by pressing double shift and then typing the id. Doing this, we see the id is the id of a text view present in the file topic_lessons_story_summary.xml.
-
Now that we know that the text view is present in topic_lessons_story_summary.xml, according to the app architecture, we know that the name of this fragment is TopicLessonsFragment. The files responsible for displaying this fragment are TopicLessonsFragment.kt and TopicLessonsFragmentPresenter.kt.
-
Looking at the XML code for story_name_text_view, we can see that StorySummaryViewModel sets the text in the text view using databinding.
Finding the business logic for the UI component, i.e. domain controllers
-
Following the app architecture used by Oppia, StorySummaryViewModel should be initialized in the TopicLessonsFragmentPresenter.
-
Here we can see that the story name is being updated in the viewModel by the TranslationController. Therefore the business logic for getting the story name will be present in the file TranslationController.
Finding the tests
There are two sets of tests:
- Tests to test the UI component
- Tests to test the business logic of the UI component
Since the UI component is present in the TopicLessonsFragment, the UI component tests are present in the file TopicLessonsFragmentTest.
Similarly, since the business logic is present in the file TranslationController, the tests for this controller can be found in the file TranslationControllerTest.
Oppia Android uses Dagger 2 for dependency injection. For an overview of how DI works in general, and specifically how it’s set up in Oppia Android, see these presentation slides.